
Product Manual
Page 2
Contents Introduction 3 Features and Benefits 4 Package Contents 5 Hardware Overview 6 Getting Started 7 Hardware Installation 8 Enabling UPnP 9 Using the Configuration Utility 11 Accessing the DSM-622H/624H in Windows XP/Me 21 Accessing the DSM-622H/624H in Windows 2000 22 Accessing the DSM-622H/624H in Windows 98SE 25 Accessing the DSM-622H/624H in Macintosh OS X 27 Networking Basics 30 Technical Specifications 41 Technical Support 42 Warranty 43 Registration 46 2
Contents Introduction 3 Features and Benefits 4 Package Contents 5 Hardware Overview 6 Getting Started 7 Hardware Installation 8 Enabling UPnP 9 Using the Configuration Utility 11 Accessing the DSM-622H/624H in Windows XP/Me 21 Accessing the DSM-622H/624H in Windows 2000 22 Accessing the DSM-622H/624H in Windows 98SE 25 Accessing the DSM-622H/624H in Macintosh OS X 27 Networking Basics 30 Technical Specifications 41 Technical Support 42 Warranty 43 Registration 46 2
Product Manual
Page 3
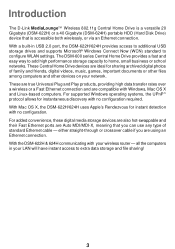
...WLAN settings. Introduction The D-Link MediaLoungeTM Wireless 802.11g Central Home Drive is a versatile 20 Gigabyte (DSM-622H) or a 40 Gigabyte (DSM-624H) portable HDD (Hard Disk Drive) device that you are using an Ethernet connection. With Mac OS X, the DSM-622H/624H uses Apple's Rendezvous for instantaneous ... the DSM-622H/624H provides access to additional USB storage drives and supports Microsoft® Windows Connect Now (WCN) standard to home, small business or school networks. These are true Universal Plug and Play products, providing high data transfer rates over a wireless or ...
...WLAN settings. Introduction The D-Link MediaLoungeTM Wireless 802.11g Central Home Drive is a versatile 20 Gigabyte (DSM-622H) or a 40 Gigabyte (DSM-624H) portable HDD (Hard Disk Drive) device that you are using an Ethernet connection. With Mac OS X, the DSM-622H/624H uses Apple's Rendezvous for instantaneous ... the DSM-622H/624H provides access to additional USB storage drives and supports Microsoft® Windows Connect Now (WCN) standard to home, small business or school networks. These are true Universal Plug and Play products, providing high data transfer rates over a wireless or ...

Product Manual
Page 7
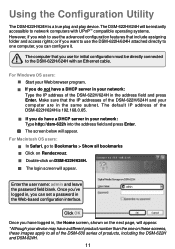
Getting Started Below is a sample network using the DSM-622H/624H. The DSM-622H/624H can be installed for wireless and Ethernet access, as shown above. 7
Getting Started Below is a sample network using the DSM-622H/624H. The DSM-622H/624H can be installed for wireless and Ethernet access, as shown above. 7
Product Manual
Page 11
... use the DSM-622H/624H attached directly to use for initial configuration must be instantly accessible to network computers with an Ethernet cable. or if you do have a DHCP server in , the Home screen, shown on DSM-622H/624H. „ The login screen will appear. The default IP address of the DSM-622H/624H in the same subnet. The DSM-622H/624H...
... use the DSM-622H/624H attached directly to use for initial configuration must be instantly accessible to network computers with an Ethernet cable. or if you do have a DHCP server in , the Home screen, shown on DSM-622H/624H. „ The login screen will appear. The default IP address of the DSM-622H/624H in the same subnet. The DSM-622H/624H...
Product Manual
Page 14
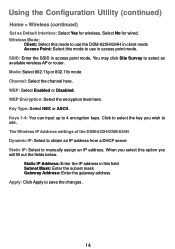
Keys 1-4: You can input up to select an available wireless AP or router. SSID: Enter the SSID in access point mode. Mode: Select 802.11g or 802.11b mode Channel: Select the channel here. Key ...: Select to obtain an IP address from a DHCP server Static IP: Select to use . Using the Configuration Utility (continued) Home > Wireless (continued) Set as Default Interface: Select Yes for wired. Select No for wireless. Wireless Mode: Client: Select this mode to use the DSM-622H/624H in client mode Access Point: Select this mode to manually assign an IP...
Keys 1-4: You can input up to select an available wireless AP or router. SSID: Enter the SSID in access point mode. Mode: Select 802.11g or 802.11b mode Channel: Select the channel here. Key ...: Select to obtain an IP address from a DHCP server Static IP: Select to use . Using the Configuration Utility (continued) Home > Wireless (continued) Set as Default Interface: Select Yes for wired. Select No for wireless. Wireless Mode: Client: Select this mode to use the DSM-622H/624H in client mode Access Point: Select this mode to manually assign an IP...

Product Manual
Page 16
... the network. Read privileges are enabled by default. Click Create and the folder will appear indicating that it is safe to select write privileges for the folder. Share: Click to refresh the contents of this window you plug a USB drive into the USB port of the USB drive. 16...or sharing privileges for the folder. A message will appear in the list below. Share Whole Disk: Click to safely unplug the USB drive from the DSM-622H/624H. Using the Configuration Utility (continued) Advanced > Folder In this page. USB Sharing System Unplug: Click to share all the contents of the...
... the network. Read privileges are enabled by default. Click Create and the folder will appear indicating that it is safe to select write privileges for the folder. Share: Click to refresh the contents of this window you plug a USB drive into the USB port of the USB drive. 16...or sharing privileges for the folder. A message will appear in the list below. Share Whole Disk: Click to safely unplug the USB drive from the DSM-622H/624H. Using the Configuration Utility (continued) Advanced > Folder In this page. USB Sharing System Unplug: Click to share all the contents of the...
Product Manual
Page 18
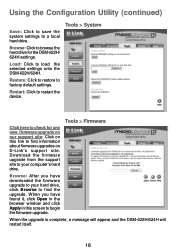
...drive. Using the Configuration Utility (continued) Save: Click to save the system settings to begin the firmware upgrade. When you have found it, click Open in the browser window and click Apply in this link to find the upgrade. Browse: Click to load the selected settings onto the DSM-622H/624H.... Load: Click to browse the hard drive for any new firmware upgrade on our support site: Click on D-Link's support site. Tools > System Tools > ...
...drive. Using the Configuration Utility (continued) Save: Click to save the system settings to begin the firmware upgrade. When you have found it, click Open in the browser window and click Apply in this link to find the upgrade. Browse: Click to load the selected settings onto the DSM-622H/624H.... Load: Click to browse the hard drive for any new firmware upgrade on our support site: Click on D-Link's support site. Tools > System Tools > ...
Product Manual
Page 21
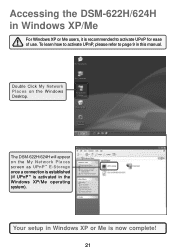
Your setup in the Windows XP/Me operating system). The DSM-622H/624H will appear on the Windows Desktop. To learn how to activate UPnP, please refer to page 9 in Windows XP/Me For Windows XP or Me users, it is now complete! 21 Double Click My Network Places on the My Network Places screen as UPnP™ E-Storage once a connection is established (if UPnP™ is activated in Windows XP or Me is recommended to activate UPnP for ease of use. Accessing the DSM-622H/624H in this manual.
Your setup in the Windows XP/Me operating system). The DSM-622H/624H will appear on the Windows Desktop. To learn how to activate UPnP, please refer to page 9 in Windows XP/Me For Windows XP or Me users, it is now complete! 21 Double Click My Network Places on the My Network Places screen as UPnP™ E-Storage once a connection is established (if UPnP™ is activated in Windows XP or Me is recommended to activate UPnP for ease of use. Accessing the DSM-622H/624H in this manual.
