
Manual
Page 2
... 26 Refreshing Folder Contents 26 Naming the Media Server 27 Stopping the D-Link Media Server 28 Using Windows® Media Connect Software 29 Configuring Windows® Media Connect 29 Connecting the DSM-320RD 33 Video Connections ...33 Audio Connections ...34 Network Connections ...35 Network ...Layout ...36 Using the On-Screen Keyboard 37 The DSM-320RD Setup Wizard 38 Windows Connect Now Configuration 43 DSM-320RD Menu ...48 Menu Basics ...48 Menu Home ...48 Music ...49 Music Quality ...49 Supported Music Formats 49...
... 26 Refreshing Folder Contents 26 Naming the Media Server 27 Stopping the D-Link Media Server 28 Using Windows® Media Connect Software 29 Configuring Windows® Media Connect 29 Connecting the DSM-320RD 33 Video Connections ...33 Audio Connections ...34 Network Connections ...35 Network ...Layout ...36 Using the On-Screen Keyboard 37 The DSM-320RD Setup Wizard 38 Windows Connect Now Configuration 43 DSM-320RD Menu ...48 Menu Basics ...48 Menu Home ...48 Music ...49 Music Quality ...49 Supported Music Formats 49...

Manual
Page 3
... ...61 Supported Video Formats 61 Viewing a Video ...61 Using the Remote Control with Videos 62 Search ...63 DVD ...64 Viewing a DVD ...64 Using the Remote Control with DVDs 64 DVD Player Considerations 66 Memory Card ...67 Viewing a Memory Card 67 Supported File Types ...68 Online Media ...69 AOL®... Rhapsody™ Subscribers 79 For Users New to Rhapsody 80 Configuring Rhapsody™ for use with the DSM-320RD 86 Setup ...88 Network ...88 Wireless ...89 System ...91 DVD ...92 General ...93 Audio/Video 93 Additional Settings 94 Music Presets 94 Memory Card 95 Adjust Video 95...
... ...61 Supported Video Formats 61 Viewing a Video ...61 Using the Remote Control with Videos 62 Search ...63 DVD ...64 Viewing a DVD ...64 Using the Remote Control with DVDs 64 DVD Player Considerations 66 Memory Card ...67 Viewing a Memory Card 67 Supported File Types ...68 Online Media ...69 AOL®... Rhapsody™ Subscribers 79 For Users New to Rhapsody 80 Configuring Rhapsody™ for use with the DSM-320RD 86 Setup ...88 Network ...88 Wireless ...89 System ...91 DVD ...92 General ...93 Audio/Video 93 Additional Settings 94 Music Presets 94 Memory Card 95 Adjust Video 95...

Manual
Page 8
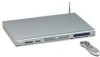
... throughput for transfer speeds of up to 54Mbps on your PC. The DSM-320RD supports the majority of audio, video, and image file formats and streams them directly from Windows XP and transfer the wireless settings to access media content stored on a.... The DSM-320RD features a Progressive Scan DVD player that makes it to communicate with DVD and Card Reader. Introduction D-Link® introduces the latest addition to its multimedia family of products: the D-Link® MediaLoungeTM DSM-320RD Wireless Media Player with other UPnP AV media devices. The DSM-320RD integrates home...
... throughput for transfer speeds of up to 54Mbps on your PC. The DSM-320RD supports the majority of audio, video, and image file formats and streams them directly from Windows XP and transfer the wireless settings to access media content stored on a.... The DSM-320RD features a Progressive Scan DVD player that makes it to communicate with DVD and Card Reader. Introduction D-Link® introduces the latest addition to its multimedia family of products: the D-Link® MediaLoungeTM DSM-320RD Wireless Media Player with other UPnP AV media devices. The DSM-320RD integrates home...
Manual
Page 10
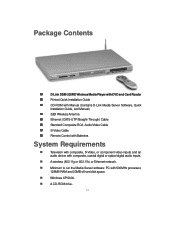
Package Contents „ D-Link DSM-320RD Wireless Media Player with DVD and Card Reader „ Printed Quick Installation Guide „ CD-ROM with Manual (Contains D-Link Media Server Software, Quick Installation Guide, and Manual) „ 2dBi Wireless Antenna „ Ethernet (CAT5-UTP/Straight-Through) Cable „ Standard Composite RCA Audio/Video ....11b) or Ethernet network. „ Minimum to run the Media Server software: PC with 500MHz processor, 128MB RAM and 20MB of hard disk space. „ Windows XP/2000. „ A CD-ROM drive. 10
Package Contents „ D-Link DSM-320RD Wireless Media Player with DVD and Card Reader „ Printed Quick Installation Guide „ CD-ROM with Manual (Contains D-Link Media Server Software, Quick Installation Guide, and Manual) „ 2dBi Wireless Antenna „ Ethernet (CAT5-UTP/Straight-Through) Cable „ Standard Composite RCA Audio/Video ....11b) or Ethernet network. „ Minimum to run the Media Server software: PC with 500MHz processor, 128MB RAM and 20MB of hard disk space. „ Windows XP/2000. „ A CD-ROM drive. 10

Manual
Page 11
... music, photos, and Videos on TV. „ Progressive Scan DVD player provides superior picture quality. „ Built-in 5-in screensaver. „ Easy setup wizard. 11 Features & Benefits „ Stream media content from a PC or D-Link Central Home Drive to your entertainment center. „ Listen to ... „ Easily connect to your wireless network using 802.11g at up to 54Mbps. 802.11b compatible at 11Mbps. „ Connect using Windows® Media Connect software. „ Support for most popular digital media formats. „ Remote controlled TV interface for quick access to your...
... music, photos, and Videos on TV. „ Progressive Scan DVD player provides superior picture quality. „ Built-in 5-in screensaver. „ Easy setup wizard. 11 Features & Benefits „ Stream media content from a PC or D-Link Central Home Drive to your entertainment center. „ Listen to ... „ Easily connect to your wireless network using 802.11g at up to 54Mbps. 802.11b compatible at 11Mbps. „ Connect using Windows® Media Connect software. „ Support for most popular digital media formats. „ Remote controlled TV interface for quick access to your...

Manual
Page 12
... Compact Flash Reader Eject Button Stop Button Previous Next Button Button Rear Panel Antenna Connector Composite Video Connector Optical Digital Audio Connector Composite Audio Connectors Windows® Connect Now USB Port Reset Button S-Video Connector RJ-45 Ethernet Connector Coaxial Digital Audio Connector Component Video Connectors1 1For European customers, a SCART interface...
... Compact Flash Reader Eject Button Stop Button Previous Next Button Button Rear Panel Antenna Connector Composite Video Connector Optical Digital Audio Connector Composite Audio Connectors Windows® Connect Now USB Port Reset Button S-Video Connector RJ-45 Ethernet Connector Coaxial Digital Audio Connector Component Video Connectors1 1For European customers, a SCART interface...

Manual
Page 25
... PC where music, video, or digital photos are stored. Whenever you close the Media Server configuration window, you must install the D-Link® Media Server software (See Page 17). Simply install the included software on your system tray. DSM-320RD System Tray Icon 25 If you selected the option to the Media Server configuration...
... PC where music, video, or digital photos are stored. Whenever you close the Media Server configuration window, you must install the D-Link® Media Server software (See Page 17). Simply install the included software on your system tray. DSM-320RD System Tray Icon 25 If you selected the option to the Media Server configuration...

Manual
Page 26
... may be a slight delay before the path appears in the window. Refresh all folders: All folders can be refreshed by the DSM-320RD when you refresh the folder contents. Refresh multiple folders: Multiple folders can schedule the D-Link Media Server software to refresh. Scheduler: You can be seen ... the number of shared folders. The Shared Folders tab displays the list of files in your folders. 26 Refreshing Folder Contents The D-Link Media Server software scans the folders you share when you copy additional files into these folders, they will share media content from selected ...
... may be a slight delay before the path appears in the window. Refresh all folders: All folders can be refreshed by the DSM-320RD when you refresh the folder contents. Refresh multiple folders: Multiple folders can schedule the D-Link Media Server software to refresh. Scheduler: You can be seen ... the number of shared folders. The Shared Folders tab displays the list of files in your folders. 26 Refreshing Folder Contents The D-Link Media Server software scans the folders you share when you copy additional files into these folders, they will share media content from selected ...

Manual
Page 29
... are using the D-Link Media Server software. Click Add Select your Media Player from the list. Configuring Windows® Media Connect Launch the Windows® Media Connect software and the window below will appear: The Devices tab is available via Windows Update if you add the DSM-320RD to the list of using Windows XP with Windows Media Connect. Click...
... are using the D-Link Media Server software. Click Add Select your Media Player from the list. Configuring Windows® Media Connect Launch the Windows® Media Connect software and the window below will appear: The Devices tab is available via Windows Update if you add the DSM-320RD to the list of using Windows XP with Windows Media Connect. Click...

Manual
Page 30
Click Add Click Browse Select the folder that you want to share Click OK 30 Using Windows® Media Connect Software (continued) The Sharing tab is where you configure the folders that you want to share with your DSM-320RD.
Click Add Click Browse Select the folder that you want to share Click OK 30 Using Windows® Media Connect Software (continued) The Sharing tab is where you configure the folders that you want to share with your DSM-320RD.

Manual
Page 31
You can also Stop/ Start sharing. Using Windows® Media Connect Software (continued) Click Make this content available to all of the folders that you want the DSM-320RD to automatically start folder sharing when Windows starts The Settings tab allows you 've shared all devices Click OK The Shared Folders will appear in the window. Click Automatically start folder sharing when Windows starts. Repeat the steps until you to access. Click Close 31
You can also Stop/ Start sharing. Using Windows® Media Connect Software (continued) Click Make this content available to all of the folders that you want the DSM-320RD to automatically start folder sharing when Windows starts The Settings tab allows you 've shared all devices Click OK The Shared Folders will appear in the window. Click Automatically start folder sharing when Windows starts. Repeat the steps until you to access. Click Close 31
Manual
Page 32
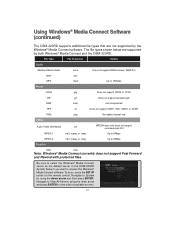
...; Media Connect Software (continued) The DSM-320RD supports additional file types that are supported by both Windows® Media Connect and the DSM-320RD. Be sure to select the Windows® Media Connect server as the default server in the DSM-320RD System Setup if you want to 8Mbps Playlists M3U .m3u Note: Windows® Media Connect currently does...
...; Media Connect Software (continued) The DSM-320RD supports additional file types that are supported by both Windows® Media Connect and the DSM-320RD. Be sure to select the Windows® Media Connect server as the default server in the DSM-320RD System Setup if you want to 8Mbps Playlists M3U .m3u Note: Windows® Media Connect currently does...

Manual
Page 39
If you cannot locate the SSID, select and you 've highlighted the correct SSID, press ENTER on the remote control while the SSID window is highlighted, press ENTER on page 41. Wireless If using a wireless network, press the down arrow buttons on the remote control to ... the up arrow on the remote control to choose Wired. Once the Next button is highlighted, press ENTER on the next screen. 39 The DSM-320RD Setup Wizard (continued) Select Your Network Connection The connection type defaults to the next screen. Once the Next button is highlighted. Press ENTER again...
If you cannot locate the SSID, select and you 've highlighted the correct SSID, press ENTER on the remote control while the SSID window is highlighted, press ENTER on page 41. Wireless If using a wireless network, press the down arrow buttons on the remote control to ... the up arrow on the remote control to choose Wired. Once the Next button is highlighted, press ENTER on the next screen. 39 The DSM-320RD Setup Wizard (continued) Select Your Network Connection The connection type defaults to the next screen. Once the Next button is highlighted. Press ENTER again...
Manual
Page 40
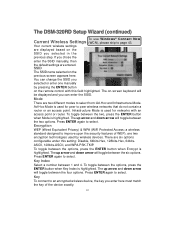
... upon the security features of the device exactly. 40 To toggle between the two, press the ENTER button when Mode is highlighted. The DSM-320RD Setup Wizard (continued) To use Windows® Connect Now Current Wireless Settings (WCN), please skip to select. The up arrow and down arrow will toggle between the six...
... upon the security features of the device exactly. 40 To toggle between the two, press the ENTER button when Mode is highlighted. The DSM-320RD Setup Wizard (continued) To use Windows® Connect Now Current Wireless Settings (WCN), please skip to select. The up arrow and down arrow will toggle between the six...

Manual
Page 43
Click Next to Start > All Programs > Accessories > Communications and click Wireless Network Setup Wizard. Note: WCN is only available on your PC, instead of using the setup wizard, you can use Windows® Connect Now (WCN) to configure the wireless settings on PCs running WindowsXP with Service Pack 2 installed. Your system will display the Setup Wizard Welcome screen. In the menu bar, go to continue. 43 Windows Connect Now Configuration If you already have wireless settings configured on your DSM-320RD.
Click Next to Start > All Programs > Accessories > Communications and click Wireless Network Setup Wizard. Note: WCN is only available on your PC, instead of using the setup wizard, you can use Windows® Connect Now (WCN) to configure the wireless settings on PCs running WindowsXP with Service Pack 2 installed. Your system will display the Setup Wizard Welcome screen. In the menu bar, go to continue. 43 Windows Connect Now Configuration If you already have wireless settings configured on your DSM-320RD.

Manual
Page 44
The wizard provides two methods for setting up a wireless network. Using a USB flash drive is recommended. Windows Connect Now Configuration (continued) Select to add a new device to your wireless network settings and click Next to continue. Select to use a USB flash drive to save your existing wireless network and click Next to continue. 44
The wizard provides two methods for setting up a wireless network. Using a USB flash drive is recommended. Windows Connect Now Configuration (continued) Select to add a new device to your wireless network settings and click Next to continue. Select to use a USB flash drive to save your existing wireless network and click Next to continue. 44

Manual
Page 45
You can choose to the USB flash drive. This may take a few seconds. Next, remove the USB Flash Drive from your PC and insert into a USB port on the back panel of the DSM-320RD labeled "WCN." 45 Windows Connect Now Configuration (continued) Plug your flash drive into the USB port on this drive or select another drive. This screen will appear in the pull down menu. Click Next to save your wireless settings to use this computer. The drive letter will appear when the wireless settings have been saved to the USB flash drive.
You can choose to the USB flash drive. This may take a few seconds. Next, remove the USB Flash Drive from your PC and insert into a USB port on the back panel of the DSM-320RD labeled "WCN." 45 Windows Connect Now Configuration (continued) Plug your flash drive into the USB port on this drive or select another drive. This screen will appear in the pull down menu. Click Next to save your wireless settings to use this computer. The drive letter will appear when the wireless settings have been saved to the USB flash drive.

Manual
Page 46
Windows Connect Now Configuration (continued) The following screen confirms that your PC. Click OK. Next, remove the USB Flash Drive from the DSM-320RD and insert it back into the USB port on your wireless settings have been applied. Click Next to apply your wireless settings. Click OK to continue. The following screen will appear, prompting you to continue. 46
Windows Connect Now Configuration (continued) The following screen confirms that your PC. Click OK. Next, remove the USB Flash Drive from the DSM-320RD and insert it back into the USB port on your wireless settings have been applied. Click Next to apply your wireless settings. Click OK to continue. The following screen will appear, prompting you to continue. 46

Manual
Page 47
Click Finish. 47 The setup wizard will display the devices that have been setup with your wireless network. Windows Connect Now Configuration (continued) Wireless configuration using WCN is now complete.
Click Finish. 47 The setup wizard will display the devices that have been setup with your wireless network. Windows Connect Now Configuration (continued) Wireless configuration using WCN is now complete.

Manual
Page 49
... Microsoft Windows Media player and some music jukebox programs. Also supports WMDRM protected WMA files when using Windows Media Connect. „ WAV WAV was developed by Microsoft and IBM. Uses the file extension .ogg. 49 For CD quality music, rip your MP3s at 128kbps or higher, with Windows applications ... standard audio format for compressing audio and video. File extensions are compatible with a sample rate of your digital music files on the media player depends upon the quality of 44.1kHz. Avoid quality settings below 48kbps as they are supported: „ MP3 (up to 192 kbps)...
... Microsoft Windows Media player and some music jukebox programs. Also supports WMDRM protected WMA files when using Windows Media Connect. „ WAV WAV was developed by Microsoft and IBM. Uses the file extension .ogg. 49 For CD quality music, rip your MP3s at 128kbps or higher, with Windows applications ... standard audio format for compressing audio and video. File extensions are compatible with a sample rate of your digital music files on the media player depends upon the quality of 44.1kHz. Avoid quality settings below 48kbps as they are supported: „ MP3 (up to 192 kbps)...

