

User Guide
Page 4
NAT ...38 ATM...39 Static Routing 40 Dynamic Routing (RIP 41 Remote Access 42 Tools and Utilities 43 Change System Password 43 Save or Load Configuration File 44 Restore Factory Default Settings 44 Time...45 Firmware Upgrade 46 Test...47 Save Settings and Reboot 48 Router Status Information 49 Device Information Display 49 DHCP Clients 50 Log...50 Traffic ...51 ADSL ...51 TECHNICAL SPECIFICATIONS 52 IP ADDRESS SETUP 54 IP CONCEPTS 56 MICROFILTERS AND SPLITTERS 59
NAT ...38 ATM...39 Static Routing 40 Dynamic Routing (RIP 41 Remote Access 42 Tools and Utilities 43 Change System Password 43 Save or Load Configuration File 44 Restore Factory Default Settings 44 Time...45 Firmware Upgrade 46 Test...47 Save Settings and Reboot 48 Router Status Information 49 Device Information Display 49 DHCP Clients 50 Log...50 Traffic ...51 ADSL ...51 TECHNICAL SPECIFICATIONS 52 IP ADDRESS SETUP 54 IP CONCEPTS 56 MICROFILTERS AND SPLITTERS 59
User Guide
Page 26
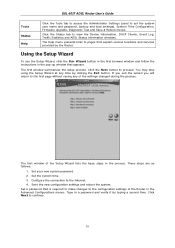
DSL-502T ADSL Router User's Guide Tools Status Help Click the Tools tab to access ... the Router. Click the Status tab to set the system user name and password, backup and load settings), System Time Configuration, Firmware Upgrade, Diagnostic Test and Save & Reboot menus. Click the Next button to the Internet. 4. Set the system time. 3. Set ...the Setup Wizard lists the basic steps in a password and verify it by typing a second time. The Help menu presents links to continue. 16 These steps are as follows: 1. Save the new configuration settings and reboot the system. Configure the ...
DSL-502T ADSL Router User's Guide Tools Status Help Click the Tools tab to access ... the Router. Click the Status tab to set the system user name and password, backup and load settings), System Time Configuration, Firmware Upgrade, Diagnostic Test and Save & Reboot menus. Click the Next button to the Internet. 4. Set the system time. 3. Set ...the Setup Wizard lists the basic steps in a password and verify it by typing a second time. The Help menu presents links to continue. 16 These steps are as follows: 1. Save the new configuration settings and reboot the system. Configure the ...

User Guide
Page 40
...Click the Home tab to pages that have not been presented in the Advanced, Tools and Status directories. The Help menu presents links to access the Setup Wizard, WAN Configuration, LAN IP Configuration, DHCP for troubleshooting. Click the Advanced tab to view the ...Administrator Settings (used to set the system user name and password, backup and load settings), System Time Configuration, Firmware Upgrade, Diagnostic Test and Save & Reboot menus. DSL-502T ADSL Router User's Guide 4 Advanced Router Management This chapter introduces and describes the management features that explain...
...Click the Home tab to pages that have not been presented in the Advanced, Tools and Status directories. The Help menu presents links to access the Setup Wizard, WAN Configuration, LAN IP Configuration, DHCP for troubleshooting. Click the Advanced tab to view the ...Administrator Settings (used to set the system user name and password, backup and load settings), System Time Configuration, Firmware Upgrade, Diagnostic Test and Save & Reboot menus. DSL-502T ADSL Router User's Guide 4 Advanced Router Management This chapter introduces and describes the management features that explain...

User Guide
Page 56
... the file or click on the Browse button to search for the device. DSL-502T ADSL Router User's Guide Firmware Upgrade Note Performing a Firmware Upgrade can sometimes change the configuration settings. Use the Firmware Upgrade menu to back-up the Router's configuration settings before upgrading the firmware. Click the Apply button to the factory default settings, so make sure...
... the file or click on the Browse button to search for the device. DSL-502T ADSL Router User's Guide Firmware Upgrade Note Performing a Firmware Upgrade can sometimes change the configuration settings. Use the Firmware Upgrade menu to back-up the Router's configuration settings before upgrading the firmware. Click the Apply button to the factory default settings, so make sure...

