Manual
Page 2
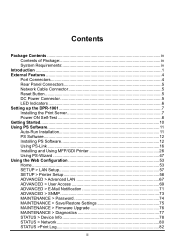
... DPR-1061 7 Installing the Print Server 7 Power ON Self-Test 8 Getting Started...10 Using PS Software 11 Auto-Run Installation 11 PS Software 12 Installing PS Software 12 Using PS-Link 16 Installing and Using MFP/GDI Printer 26 Using PS-Wizard 47 Using the Web Configuration 53 Home ...53 SETUP > LAN Setup 57 SETUP > Printer Setup...
... DPR-1061 7 Installing the Print Server 7 Power ON Self-Test 8 Getting Started...10 Using PS Software 11 Auto-Run Installation 11 PS Software 12 Installing PS Software 12 Using PS-Link 16 Installing and Using MFP/GDI Printer 26 Using PS-Wizard 47 Using the Web Configuration 53 Home ...53 SETUP > LAN Setup 57 SETUP > Printer Setup...
Manual
Page 16
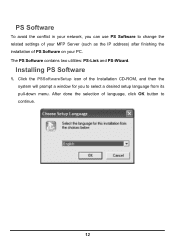
Installing PS Software 1. PS Software To avoid the conflict in your network, you to continue. 12 The PS Software contains two utilities: PS-Link and PS-Wizard. After done the selection of PS Software on your PC. Click the PSSoftwareSetup icon of the Installation CD-ROM, and then the system will prompt a window for you can use PS Software to change the related settings of your MFP Server (such as the IP address) after finishing the installation of language, click OK button to select a desired setup language from its pull-down menu.
Installing PS Software 1. PS Software To avoid the conflict in your network, you to continue. 12 The PS Software contains two utilities: PS-Link and PS-Wizard. After done the selection of PS Software on your PC. Click the PSSoftwareSetup icon of the Installation CD-ROM, and then the system will prompt a window for you can use PS Software to change the related settings of your MFP Server (such as the IP address) after finishing the installation of language, click OK button to select a desired setup language from its pull-down menu.

Manual
Page 21
... List, including MAC and IP addresses, device model name, system status, firmware version and UpTime information. Discover: You may click this field: Setup Wizard, Change IP Address, and Web Setup for you to manually research the current connected MFP Server. Information: This field displays the basic information of the selected MFP Server...
... List, including MAC and IP addresses, device model name, system status, firmware version and UpTime information. Discover: You may click this field: Setup Wizard, Change IP Address, and Web Setup for you to manually research the current connected MFP Server. Information: This field displays the basic information of the selected MFP Server...
Manual
Page 22
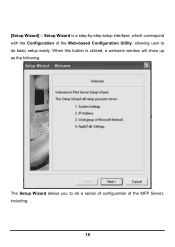
The Setup Wizard allows you to do a series of configuration of the MFP Server, including: 18 [Setup Wizard] - When this button is a step-by-step setup interface, which correspond with the Configuration of the Web-based Configuration Utility, allowing user to do basic setup easily. Setup Wizard is clicked, a welcome window will show up as the following.
The Setup Wizard allows you to do a series of configuration of the MFP Server, including: 18 [Setup Wizard] - When this button is a step-by-step setup interface, which correspond with the Configuration of the Web-based Configuration Utility, allowing user to do basic setup easily. Setup Wizard is clicked, a welcome window will show up as the following.
Manual
Page 28
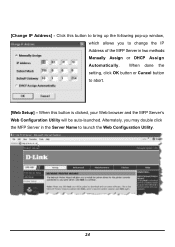
Alternately, you to change the IP Address of the MFP Server in the Server Name to abort. [Web Setup] - [Change IP Address] - Click this button is clicked, your Web browser and the MFP Server's Web Configuration Utility will be auto-launched. When done the setting, click OK button or Cancel button to launch the Web Configuration Utility. 24 When this button to bring up the following pop-up window, which allows you may double click the MFP Server in two methods: Manually Assign or DHCP Assign Automatically.
Alternately, you to change the IP Address of the MFP Server in the Server Name to abort. [Web Setup] - [Change IP Address] - Click this button is clicked, your Web browser and the MFP Server's Web Configuration Utility will be auto-launched. When done the setting, click OK button or Cancel button to launch the Web Configuration Utility. 24 When this button to bring up the following pop-up window, which allows you may double click the MFP Server in two methods: Manually Assign or DHCP Assign Automatically.
Manual
Page 57
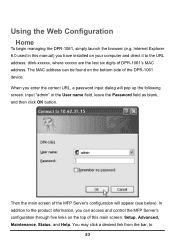
...product information, you can be found on your computer and direct it to 53 Input "admin" in this main screen: Setup, Advanced, Maintenance, Status, and Help. Then the main screen of DPR-1061's MAC address. Internet Explorer 6.0 used in the User name field, leave the Password field as blank, and then ...click OK button. The MAC address can access and control the MFP Server's configuration through five links on the top of the DPR-1061 device. You may click a desired link from the bar, to the URL address: dlink-xxxxxx, where xxxxxx are the last six digits of the MFP...
...product information, you can be found on your computer and direct it to 53 Input "admin" in this main screen: Setup, Advanced, Maintenance, Status, and Help. Then the main screen of DPR-1061's MAC address. Internet Explorer 6.0 used in the User name field, leave the Password field as blank, and then ...click OK button. The MAC address can access and control the MFP Server's configuration through five links on the top of the DPR-1061 device. You may click a desired link from the bar, to the URL address: dlink-xxxxxx, where xxxxxx are the last six digits of the MFP...
Manual
Page 59
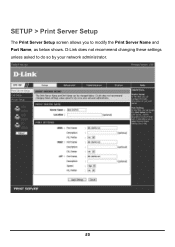
SETUP > Print Server Setup The Print Server Setup screen allows you to do so by your network administrator. 55 D-Link does not recommend changing these settings unless asked to modify the Print Server Name and Port Name, as below shows.
SETUP > Print Server Setup The Print Server Setup screen allows you to do so by your network administrator. 55 D-Link does not recommend changing these settings unless asked to modify the Print Server Name and Port Name, as below shows.

Manual
Page 61
... related information in manual or automatic method. Please note that this section is optional and you to get MFP server up and running. SETUP > LAN Setup The LAN Setup screen allows you configure the local network settings of the settings here to assign IP address in the following boxes, including IP Address, Subnet...
... related information in manual or automatic method. Please note that this section is optional and you to get MFP server up and running. SETUP > LAN Setup The LAN Setup screen allows you configure the local network settings of the settings here to assign IP address in the following boxes, including IP Address, Subnet...
Manual
Page 62
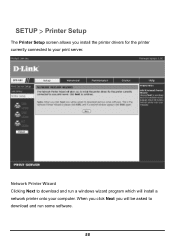
SETUP > Printer Setup The Printer Setup screen allows you will be asked to download and run a windows wizard program which will install a network printer onto your print server. When you click Next you install the printer drivers for the printer currently connected to download and run some software. 58 Network Printer Wizard Clicking Next to your computer.
SETUP > Printer Setup The Printer Setup screen allows you will be asked to download and run a windows wizard program which will install a network printer onto your print server. When you click Next you install the printer drivers for the printer currently connected to download and run some software. 58 Network Printer Wizard Clicking Next to your computer.

Manual
Page 163
The printer that has just been added will show up in the Printer List menu, it is ready for use. When the printer appears listed it might take a few seconds depending on network conditions. Quite the Printer Setup Utility and start printing. 159
The printer that has just been added will show up in the Printer List menu, it is ready for use. When the printer appears listed it might take a few seconds depending on network conditions. Quite the Printer Setup Utility and start printing. 159

Manual
Page 165
... Name field when the printer is found , the Printer Browser will indicate that it is verifying the address. Illustrated examples are basically the same. The setup procedures for the sake of the printer, the name will appear in the Print Using field. Socket) are include below for these three printing protocols...
... Name field when the printer is found , the Printer Browser will indicate that it is verifying the address. Illustrated examples are basically the same. The setup procedures for the sake of the printer, the name will appear in the Print Using field. Socket) are include below for these three printing protocols...

Manual
Page 170
The printer that has just been added will show up in the Printer List menu, it is ready for use. Quite the Printer Setup Utility and start printing. 166 When the printer appears listed it might take a few seconds depending on network conditions.
The printer that has just been added will show up in the Printer List menu, it is ready for use. Quite the Printer Setup Utility and start printing. 166 When the printer appears listed it might take a few seconds depending on network conditions.

Manual
Page 180
The selected printer will prompt you for your computer's default printer. Click Open. (If your printer is not listed, click Generic to access this printer as the default, your computer will become your printer. You may need to choose Page Setup in any applications you have not previously set this setting in the future, you can use a generic printer description.) If you wish to use the Setup button in the Chooser window. Choose Select PPD. Select the appropriate printer description file for a PostScript Printer Description file. If you have open. 176
The selected printer will prompt you for your computer's default printer. Click Open. (If your printer is not listed, click Generic to access this printer as the default, your computer will become your printer. You may need to choose Page Setup in any applications you have not previously set this setting in the future, you can use a generic printer description.) If you wish to use the Setup button in the Chooser window. Choose Select PPD. Select the appropriate printer description file for a PostScript Printer Description file. If you have open. 176