
Product Manual
Page 2
DNS-120 User's Manual Table of Contents Table of Contents Package Contents 3 Introduction 4 Features and Benefits 5 Hardware Overview 6 Getting Started 8 Hardware Installation 9 Mapping a Drive 10 Using the Easy Search Utility 13 Using the Configuration ...Server 23 Admin Password 27 Time Server 28 System Settings 29 Upgrade Firmware 30 Device Information 31 Help Screen 32 Download Scheduling 33 Scheduling Status 36 Networking Basics 37 Troubleshooting 43 Technical Specifications 44 Contacting Technical Support 45 Warranty 46 Registration 50 D-Link...
DNS-120 User's Manual Table of Contents Table of Contents Package Contents 3 Introduction 4 Features and Benefits 5 Hardware Overview 6 Getting Started 8 Hardware Installation 9 Mapping a Drive 10 Using the Easy Search Utility 13 Using the Configuration ...Server 23 Admin Password 27 Time Server 28 System Settings 29 Upgrade Firmware 30 Device Information 31 Help Screen 32 Download Scheduling 33 Scheduling Status 36 Networking Basics 37 Troubleshooting 43 Technical Specifications 44 Contacting Technical Support 45 Warranty 46 Registration 50 D-Link...

Product Manual
Page 3
If any of the above USB Hard Drive(s) An available Ethernet port on the network D-Link Systems, Inc. 3 DNS-120 User's Manual Package Contents Package Contents D-Link DNS-120 Network Storage Adapter CD-ROM with Manual and Software Ethernet (CAT5 UTP/Straight-Through) Cable 5V 2.5A Power Supply Note:... Explorer version 6.0 or Netscape Navigator version 7.0 and above items are missing, please contact your reseller. Minimum System Requirements Computer with the DNS-120 will cause damage and void the warranty for this product.
If any of the above USB Hard Drive(s) An available Ethernet port on the network D-Link Systems, Inc. 3 DNS-120 User's Manual Package Contents Package Contents D-Link DNS-120 Network Storage Adapter CD-ROM with Manual and Software Ethernet (CAT5 UTP/Straight-Through) Cable 5V 2.5A Power Supply Note:... Explorer version 6.0 or Netscape Navigator version 7.0 and above items are missing, please contact your reseller. Minimum System Requirements Computer with the DNS-120 will cause damage and void the warranty for this product.

Product Manual
Page 4
... your files, even when you to reboot the system when adding USB drives to the network, thus eliminating downtime. DNS-120 User's Manual Introduction Introduction The D-Link DNS-120 Network Storage Adapter connects USB drives* to the network, and provides authorized users access to their USB drives. The DNS-120 Network Storage Adapter can be configured using the "Disconnect" button...
... your files, even when you to reboot the system when adding USB drives to the network, thus eliminating downtime. DNS-120 User's Manual Introduction Introduction The D-Link DNS-120 Network Storage Adapter connects USB drives* to the network, and provides authorized users access to their USB drives. The DNS-120 Network Storage Adapter can be configured using the "Disconnect" button...

Product Manual
Page 5
... Server The DNS-120 can schedule the DNS-120 to your files, even when you to reboot the system when adding USB drives to all stored files. D-Link Systems, Inc. 5 Simply connect the DNS-120 to access your network! Web-based Configuration Utility Additional setup options can also prevent any data loss by safely removing the USB drives...
... Server The DNS-120 can schedule the DNS-120 to your files, even when you to reboot the system when adding USB drives to all stored files. D-Link Systems, Inc. 5 Simply connect the DNS-120 to access your network! Web-based Configuration Utility Additional setup options can also prevent any data loss by safely removing the USB drives...

Product Manual
Page 6
Solid green indicates the USB drive is initially connected to the DNS-120. Power LED Solid green indicates a good power source connection. D-Link Systems, Inc. 6 USB LED Blinking green indicates when an USB drive is ready for use. Blinking green indicates activity on the Ethernet network. DNS-120 User's Manual Hardware Overview Front Panel Hardware Overview Ethernet LED Solid green indicates an Ethernet connection.
Solid green indicates the USB drive is initially connected to the DNS-120. Power LED Solid green indicates a good power source connection. D-Link Systems, Inc. 6 USB LED Blinking green indicates when an USB drive is ready for use. Blinking green indicates activity on the Ethernet network. DNS-120 User's Manual Hardware Overview Front Panel Hardware Overview Ethernet LED Solid green indicates an Ethernet connection.
Product Manual
Page 7
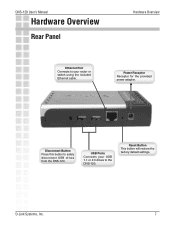
Disconnect Button Press this button to your USB 1.1 or 2.0 drives to the DNS-120. DNS-120 User's Manual Hardware Overview Rear Panel Hardware Overview Ethernet Port Connects to safely disconnect USB drives from the DNS-120. Reset Button This button will restore the factory default settings. Power Receptor Receptor for the provided power adapter. D-Link Systems, Inc. 7 USB Ports Connects your router or switch using the included Ethernet cable.
Disconnect Button Press this button to your USB 1.1 or 2.0 drives to the DNS-120. DNS-120 User's Manual Hardware Overview Rear Panel Hardware Overview Ethernet Port Connects to safely disconnect USB drives from the DNS-120. Reset Button This button will restore the factory default settings. Power Receptor Receptor for the provided power adapter. D-Link Systems, Inc. 7 USB Ports Connects your router or switch using the included Ethernet cable.
Product Manual
Page 9
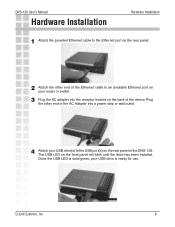
...front panel will blink until the drive has been installed. Plug the other end of the Ethernet cable to the USB port(s) on the rear panel of the device. D-Link Systems, Inc. 9 Once the USB LED is solid green, your USB drive(s) to an available Ethernet port ...on your router or switch. 3 Plug the AC adapter into a power strip or wall outlet. 4 Attach your USB drive is ready for use. The USB LED on the back of the DNS-120...
...front panel will blink until the drive has been installed. Plug the other end of the Ethernet cable to the USB port(s) on the rear panel of the device. D-Link Systems, Inc. 9 Once the USB LED is solid green, your USB drive(s) to an available Ethernet port ...on your router or switch. 3 Plug the AC adapter into a power strip or wall outlet. 4 Attach your USB drive is ready for use. The USB LED on the back of the DNS-120...
Product Manual
Page 10
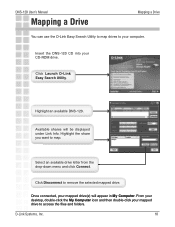
... will appear in My Computer. Once connected, your computer. D-Link Systems, Inc. 10 Click Launch D-Link Easy Search Utility. Highlight an available DNS-120. Highlight the share you want to remove the selected mapped drive. Click Disconnect to map. Insert the DNS-120 CD into your mapped drive to access the files and folders. Select an available...
... will appear in My Computer. Once connected, your computer. D-Link Systems, Inc. 10 Click Launch D-Link Easy Search Utility. Highlight an available DNS-120. Highlight the share you want to remove the selected mapped drive. Click Disconnect to map. Insert the DNS-120 CD into your mapped drive to access the files and folders. Select an available...

Product Manual
Page 11
... the My Computer screen. Please see the following instructions for mapping a USB drive so that you can access the DNS-120's USB drive(s) by mapping the shared folders as drives in the Configuration Utility. Click Finish D-Link Systems, Inc. \\DNS-120\Shared folder 11 DNS-120 User's Manual Mapping a Drive Mapping a Drive (continued) As an alternate method, you entered into the Setup...
... the My Computer screen. Please see the following instructions for mapping a USB drive so that you can access the DNS-120's USB drive(s) by mapping the shared folders as drives in the Configuration Utility. Click Finish D-Link Systems, Inc. \\DNS-120\Shared folder 11 DNS-120 User's Manual Mapping a Drive Mapping a Drive (continued) As an alternate method, you entered into the Setup...
Product Manual
Page 12
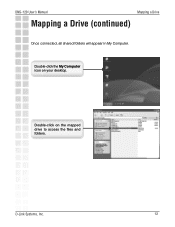
DNS-120 User's Manual Mapping a Drive Mapping a Drive (continued) Once connected, all shared folders will appear in My Computer. D-Link Systems, Inc. 12 Double-click on your desktop. Double-click the My Computer icon on the mapped drive to access the files and folders.
DNS-120 User's Manual Mapping a Drive Mapping a Drive (continued) Once connected, all shared folders will appear in My Computer. D-Link Systems, Inc. 12 Double-click on your desktop. Double-click the My Computer icon on the mapped drive to access the files and folders.
Product Manual
Page 13
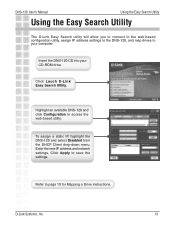
... click Configuration to save the settings. Refer to page 10 for Mapping a Drive instructions. Click Lauch D-Link Easy Search Utility. D-Link Systems, Inc. 13 DNS-120 User's Manual Using the Easy Search Utility Using the Easy Search Utility The D-Link Easy Search utility will allow you to connect to the web-based confi...
... click Configuration to save the settings. Refer to page 10 for Mapping a Drive instructions. Click Lauch D-Link Easy Search Utility. D-Link Systems, Inc. 13 DNS-120 User's Manual Using the Easy Search Utility Using the Easy Search Utility The D-Link Easy Search utility will allow you to connect to the web-based confi...

Product Manual
Page 21
...This "rule" will have read /write permissions, the drive(s) must be displayed in the list similar to the USB drive(s) if formatted with FAT or FAT32. D-Link Systems, Inc. 21 By default, all files and folders on the USB drive(s) that you may only assign Read Only permissions to ... network will be formatted with NTFS. Path: Click Open and select the folder from the USB drive that are connected to create the rule for. Note: Currently, you would like to the DNS-120. DNS-120 User's Manual Advanced > Network Access Using the Configuration Utility User: Select a ...
...This "rule" will have read /write permissions, the drive(s) must be displayed in the list similar to the USB drive(s) if formatted with FAT or FAT32. D-Link Systems, Inc. 21 By default, all files and folders on the USB drive(s) that you may only assign Read Only permissions to ... network will be formatted with NTFS. Path: Click Open and select the folder from the USB drive that are connected to create the rule for. Note: Currently, you would like to the DNS-120. DNS-120 User's Manual Advanced > Network Access Using the Configuration Utility User: Select a ...

Product Manual
Page 22
User2 will be able to access the USB drive(s) until new rules have been created. Example In the example below, permissions are applied, User2 will not be assigned...permissions for the folder "Drivers" on the USB drive named "Storage1". To delete a rule from the list by clicking on the trash can icon to page 20 on creating users). Once the settings are set for the Drivers folder. DNS-120 User's Manual Using the Configuration Utility...to delete the rule. You may edit a rule from the list, click on the icon. Click the trash can icon. D-Link Systems, Inc. 22
User2 will be able to access the USB drive(s) until new rules have been created. Example In the example below, permissions are applied, User2 will not be assigned...permissions for the folder "Drivers" on the USB drive named "Storage1". To delete a rule from the list by clicking on the trash can icon to page 20 on creating users). Once the settings are set for the Drivers folder. DNS-120 User's Manual Using the Configuration Utility...to delete the rule. You may edit a rule from the list, click on the icon. Click the trash can icon. D-Link Systems, Inc. 22

Product Manual
Page 23
DNS-120 User's Manual Using the Configuration Utility Advanced > FTP Server You can use the built-in FTP server to allow users from the Internet or Intranet FTP access to the drive(s) or folder(s) that you want to share. Root: Check the Root box to save your share/permissions. User: Select a user ...from the drop-down menu or check All Accounts. Add: Click Add to select the root level of both USB drives at once. Authority: Select Read Only or Read/Write from the drop-down menu. Path: Click Open and select the folder from the...
DNS-120 User's Manual Using the Configuration Utility Advanced > FTP Server You can use the built-in FTP server to allow users from the Internet or Intranet FTP access to the drive(s) or folder(s) that you want to share. Root: Check the Root box to save your share/permissions. User: Select a user ...from the drop-down menu or check All Accounts. Add: Click Add to select the root level of both USB drives at once. Authority: Select Read Only or Read/Write from the drop-down menu. Path: Click Open and select the folder from the...

Product Manual
Page 25
... web-based configuration by launching the Easy Search Utility or by opening a web browser and entering http://dns-120. Click Advanced and then click FTP Server. Select Read Only or Read/Write. D-Link Systems, Inc. 25 Click Open to select the folder you want to allow FTP access to expand the folder... OK. Select a user from the drop-down menu or check All Accounts. Click the + sign to . Click Add. Check Root to assign access to both USB drives at once.
... web-based configuration by launching the Easy Search Utility or by opening a web browser and entering http://dns-120. Click Advanced and then click FTP Server. Select Read Only or Read/Write. D-Link Systems, Inc. 25 Click Open to select the folder you want to allow FTP access to expand the folder... OK. Select a user from the drop-down menu or check All Accounts. Click the + sign to . Click Add. Check Root to assign access to both USB drives at once.

Product Manual
Page 26
... settings may edit a rule from the list, click on the drive with Read-Only permissions. D-Link Systems, Inc. 26 To delete a rule from the list by clicking on your router to allow an Anonymous user access to the DNS-120. Once the port is forwarded to connect (e.g. If you are ... user manual for more information on port forwarding. Please consult your local network, open a web browser and enter ftp://dns-120 and press enter. DNS-120 User's Manual Advanced > FTP Server (continued) Using the Configuration Utility The rule will be modified on the icon. If you are...
... settings may edit a rule from the list, click on the drive with Read-Only permissions. D-Link Systems, Inc. 26 To delete a rule from the list by clicking on your router to allow an Anonymous user access to the DNS-120. Once the port is forwarded to connect (e.g. If you are ... user manual for more information on port forwarding. Please consult your local network, open a web browser and enter ftp://dns-120 and press enter. DNS-120 User's Manual Advanced > FTP Server (continued) Using the Configuration Utility The rule will be modified on the icon. If you are...
Product Manual
Page 30
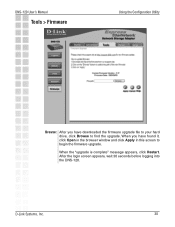
When the "upgrade is complete" message appears, click Restart. D-Link Systems, Inc. 30 DNS-120 User's Manual Tools > Firmware Using the Configuration Utility Browse: After you have downloaded the firmware upgrade file to your hard drive, click Browse to begin the firmware upgrade. When you have found it, click Open in the browser window and click Apply in this screen to find the upgrade. After the login screen appears, wait 30 seconds before logging into the DNS-120.
When the "upgrade is complete" message appears, click Restart. D-Link Systems, Inc. 30 DNS-120 User's Manual Tools > Firmware Using the Configuration Utility Browse: After you have downloaded the firmware upgrade file to your hard drive, click Browse to begin the firmware upgrade. When you have found it, click Open in the browser window and click Apply in this screen to find the upgrade. After the login screen appears, wait 30 seconds before logging into the DNS-120.

Product Manual
Page 34
... to the remote location from an HTTP site) To initiate a local PC's (same network as DNS-120) shared file or shared folder transfer, refer to the following examples of content for a single...transfer) · http://www.abc123.org/Test (transfer from which you wish to the DNS-120 on the network. If the download site employs restricted access, check this button and enter ...appropriate fields provided below this job is a local (drive/ PC to access files for download: · Account - DNS-120 User's Manual Download Scheduling (continued) Using the Configuration...
... to the remote location from an HTTP site) To initiate a local PC's (same network as DNS-120) shared file or shared folder transfer, refer to the following examples of content for a single...transfer) · http://www.abc123.org/Test (transfer from which you wish to the DNS-120 on the network. If the download site employs restricted access, check this button and enter ...appropriate fields provided below this job is a local (drive/ PC to access files for download: · Account - DNS-120 User's Manual Download Scheduling (continued) Using the Configuration...

Product Manual
Page 35
... appear with a graphical representation of the folder path displayed in login method. Recurring Backup: If you click on the USB drive(s). The current date and time according the DNS-120 internal clock will let you wish to specify a single file to transfer, follow the above process to select... is more recent. Note: Incremental Backup is not available for the backup to occur. D-Link Systems, Inc. 35 If you set the source file or folder from any USB drive connected to the DNS-120. To select a folder, click on the folder name, scroll to the bottom of the...
... appear with a graphical representation of the folder path displayed in login method. Recurring Backup: If you click on the USB drive(s). The current date and time according the DNS-120 internal clock will let you wish to specify a single file to transfer, follow the above process to select... is more recent. Note: Incremental Backup is not available for the backup to occur. D-Link Systems, Inc. 35 If you set the source file or folder from any USB drive connected to the DNS-120. To select a folder, click on the folder name, scroll to the bottom of the...

Product Manual
Page 43
...press and hold the reset button for about 5 seconds and then release. D-Link Systems, Inc. 43 How do I reset my DNS-120 to factory defaults? 2. What is formatted with FAT, FAT32, or NTFS*. * A NTFS formatted drive will be readable but cannot be back to the factory default settings? ... USB hard drive, most likely the USB drive is the default IP address of the DNS-120? The DNS-120 does not have a default IP address. After the DNS-120 reboots it will need to use the Easy Search utility to assign an IP address to the DNS-120 (refer to by the DNS-120. DNS-120 ...
...press and hold the reset button for about 5 seconds and then release. D-Link Systems, Inc. 43 How do I reset my DNS-120 to factory defaults? 2. What is formatted with FAT, FAT32, or NTFS*. * A NTFS formatted drive will be readable but cannot be back to the factory default settings? ... USB hard drive, most likely the USB drive is the default IP address of the DNS-120? The DNS-120 does not have a default IP address. After the DNS-120 reboots it will need to use the Easy Search utility to assign an IP address to the DNS-120 (refer to by the DNS-120. DNS-120 ...
