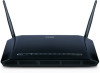

Product Manual
Page 5
Table of Contents Networking Basics 102 Check your IP address 102 Statically Assign an IP address 103 Technical Specifications 104 Contacting Technical Support 105 Warranty 106 Registration 111 D-Link DIR-632 User Manual iv
Table of Contents Networking Basics 102 Check your IP address 102 Statically Assign an IP address 103 Technical Specifications 104 Contacting Technical Support 105 Warranty 106 Registration 111 D-Link DIR-632 User Manual iv
Product Manual
Page 15
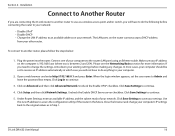
...to do anything to the original values as a wireless access point and/or switch, you need to change your IP address on the router cannot accept a DHCP address from your computers to another router, please follow the steps below: 1. Click Setup and then click Network Settings.... computer. 2. Click Save Settings to access the configuration utility of your settings. Under Router Settings, enter an available IP address and the subnet mask of the router in which case you will have to save your network. Use this new IP address to continue. 5. D-Link DIR-632 User Manual 10
...to do anything to the original values as a wireless access point and/or switch, you need to change your IP address on the router cannot accept a DHCP address from your computers to another router, please follow the steps below: 1. Click Setup and then click Network Settings.... computer. 2. Click Save Settings to access the configuration utility of your settings. Under Router Settings, enter an available IP address and the subnet mask of the router in which case you will have to save your network. Use this new IP address to continue. 5. D-Link DIR-632 User Manual 10
Product Manual
Page 16
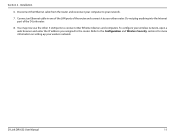
Connect an Ethernet cable in one of the LAN ports of the D-Link router. 8. You may now use the other 3 LAN ports to the Configuration and Wireless Security sections for more information on setting up your other Ethernet ... to the router. Section 2 - Disconnect the Ethernet cable from the router and reconnect your computer to your wireless network, open a web browser and enter the IP address you assigned to your wireless network. D-Link DIR-632 User Manual 11 To configure your network. 7. Installation 6.
Connect an Ethernet cable in one of the LAN ports of the D-Link router. 8. You may now use the other 3 LAN ports to the Configuration and Wireless Security sections for more information on setting up your other Ethernet ... to the router. Section 2 - Disconnect the Ethernet cable from the router and reconnect your computer to your wireless network, open a web browser and enter the IP address you assigned to your wireless network. D-Link DIR-632 User Manual 11 To configure your network. 7. Installation 6.
Product Manual
Page 18
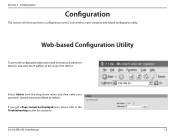
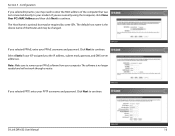
Section 3 - Web-based Configuration Utility To access the configuration utility, open a web-browser such as Internet Explorer and enter the IP address of the router (192.168.0.1). If you how to the Troubleshooting section for assistance. Leave the password blank by default. Configuration Configuration This section will show you get a Page Cannot be Displayed error, please refer to configure your password. D-Link DIR-632 User Manual 13 Select Admin from the drop-down menu and then enter your new D-Link wireless router using the web-based configuration utility.
Section 3 - Web-based Configuration Utility To access the configuration utility, open a web-browser such as Internet Explorer and enter the IP address of the router (192.168.0.1). If you how to the Troubleshooting section for assistance. Leave the password blank by default. Configuration Configuration This section will show you get a Page Cannot be Displayed error, please refer to configure your password. D-Link DIR-632 User Manual 13 Select Admin from the drop-down menu and then enter your new D-Link wireless router using the web-based configuration utility.
Product Manual
Page 21
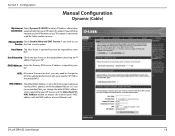
Note: Make sure to continue. If you the IP address, subnet mask, gateway, and DNS server addresses. If you are currently using that was last connected directly to continue. Click Next to your computer. Select Static if your ISP assigned you selected ... Dynamic, you selected PPPoE, enter your PPTP username and password. Click Next to continue. D-Link DIR-632 User Manual 16 The default host name is the device name of the computer that computer, click Clone Your PC's MAC Address and then click Next to remove your PPPoE software from your modem. The Host Name...
Note: Make sure to continue. If you the IP address, subnet mask, gateway, and DNS server addresses. If you are currently using that was last connected directly to continue. Click Next to your computer. Select Static if your ISP assigned you selected ... Dynamic, you selected PPPoE, enter your PPTP username and password. Click Next to continue. D-Link DIR-632 User Manual 16 The default host name is the device name of the computer that computer, click Clone Your PC's MAC Address and then click Next to remove your PPPoE software from your modem. The Host Name...
Product Manual
Page 23
...wish to replace the Internet port's MAC address with your specific ISP. 1500 is set to obtain IP Address information Connection: automatically from your ISP. Advanced DNS Check Enable Advanced DNS Service if you may be required by some ISPs. D-Link DIR-632 User Manual 18 You can use the ...Clone Your PC's MAC Address button to use . Host Name: ...
...wish to replace the Internet port's MAC address with your specific ISP. 1500 is set to obtain IP Address information Connection: automatically from your ISP. Advanced DNS Check Enable Advanced DNS Service if you may be required by some ISPs. D-Link DIR-632 User Manual 18 You can use the ...Clone Your PC's MAC Address button to use . Host Name: ...
Product Manual
Page 24
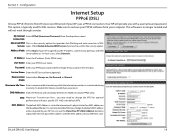
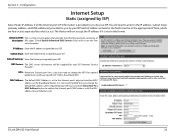
...only). you may need to change the default MAC address unless required by your ISP uses a PPPoE connection. MAC Address: The default MAC Address is maintained during which the Internet connection is set to remove your Ethernet card. D-Link DIR-632 User Manual 19 Your ISP will not work through ... enable Auto-reconnect. Check Enable Advanced DNS Service if you the IP address, subnet mask, gateway, and DNS server addresses. Address Mode: Select Static if your ISP assigned you wish to use the Clone Your PC's MAC Address button to Point Protocol over Ethernet) if your ISP. Mode: ...
...only). you may need to change the default MAC address unless required by your ISP uses a PPPoE connection. MAC Address: The default MAC Address is maintained during which the Internet connection is set to remove your Ethernet card. D-Link DIR-632 User Manual 19 Your ISP will not work through ... enable Auto-reconnect. Check Enable Advanced DNS Service if you the IP address, subnet mask, gateway, and DNS server addresses. Address Mode: Select Static if your ISP assigned you wish to use the Clone Your PC's MAC Address button to Point Protocol over Ethernet) if your ISP. Mode: ...
Product Manual
Page 25
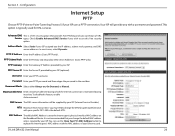
.... To disable this free security option. Your ISP will be supplied by your ISP. This option is maintained during inactivity. PPTP Gateway: Enter the Gateway IP Address provided by your ISP (optional). Section 3 - D-Link DIR-632 User Manual 20 Configuration Internet Setup PPTP Choose PPTP (Point-to the Internet port's physical interface MAC...
.... To disable this free security option. Your ISP will be supplied by your ISP. This option is maintained during inactivity. PPTP Gateway: Enter the Gateway IP Address provided by your ISP (optional). Section 3 - D-Link DIR-632 User Manual 20 Configuration Internet Setup PPTP Choose PPTP (Point-to the Internet port's physical interface MAC...
Product Manual
Page 26
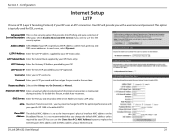
... Unit - Password: Enter your ISP. L2TP IP Address: Enter the L2TP IP address supplied by your Ethernet card. Reconnect Mode: Select either Always-on the Address: Broadband Router. Check Enable Advanced DNS Service if you with the MAC address of Service Description: URL typos. L2TP Subnet ...L2TP Gateway: Enter the Gateway IP Address provided by your L2TP password and then retype the password in the next box. Section 3 - Address Mode: Select Static if your ISP (Static only). Clone MAC The default MAC Address is maintained during inactivity. D-Link DIR-632 User Manual 21
... Unit - Password: Enter your ISP. L2TP IP Address: Enter the L2TP IP address supplied by your Ethernet card. Reconnect Mode: Select either Always-on the Address: Broadband Router. Check Enable Advanced DNS Service if you with the MAC address of Service Description: URL typos. L2TP Subnet ...L2TP Gateway: Enter the Gateway IP Address provided by your L2TP password and then retype the password in the next box. Section 3 - Address Mode: Select Static if your ISP (Static only). Clone MAC The default MAC Address is maintained during inactivity. D-Link DIR-632 User Manual 21
Product Manual
Page 27
... by your ISP. D-Link DIR-632 User Manual 22 Subnet Mask: Enter the Subnet Mask assigned by your ISP (Internet Service Provider.) MTU: Maximum Transmission Unit - You will be in the fields must be supplied by your Ethernet card. IP Address: Enter the IP address assigned by your ISP. MAC Address: The default MAC Address is the default MTU...
... by your ISP. D-Link DIR-632 User Manual 22 Subnet Mask: Enter the Subnet Mask assigned by your ISP (Internet Service Provider.) MTU: Maximum Transmission Unit - You will be in the fields must be supplied by your Ethernet card. IP Address: Enter the IP address assigned by your ISP. MAC Address: The default MAC Address is the default MTU...
Product Manual
Page 31
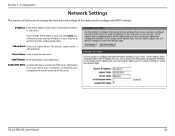
...Mask. If checked, your computers. Configuration Network Settings This section will allow you to get back into the configuration utility. D-Link DIR-632 User Manual 26 The default IP address is 255.255.255.0. Enable DNS Relay: Uncheck the box to transfer the DNS server information from your ISP to your... computers will need to enter the new IP address in your browser to change the IP address, once you click Apply, you change the local network settings of the router. The default subnet mask is 192....
...Mask. If checked, your computers. Configuration Network Settings This section will allow you to get back into the configuration utility. D-Link DIR-632 User Manual 26 The default IP address is 255.255.255.0. Enable DNS Relay: Uncheck the box to transfer the DNS server information from your ISP to your... computers will need to enter the new IP address in your browser to change the IP address, once you click Apply, you change the local network settings of the router. The default subnet mask is 192....
Product Manual
Page 32
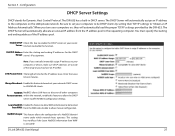
... DHCP Server will automatically load the proper TCP/IP settings provided by setting their TCP/IP settings to LAN/WLAN clients. You must specify the starting and ending IP addresses for the DHCP Range: server's IP assignment. Learn NetBIOS Enable this feature to broadcast your router. D-Link DIR-632 User Manual 27 Be sure to set your computers...
... DHCP Server will automatically load the proper TCP/IP settings provided by setting their TCP/IP settings to LAN/WLAN clients. You must specify the starting and ending IP addresses for the DHCP Range: server's IP assignment. Learn NetBIOS Enable this feature to broadcast your router. D-Link DIR-632 User Manual 27 Be sure to set your computers...
Product Manual
Page 33
Type: Primary/Secondary Enter your Primary (and Secondary) WINS IP address(es). Section 3 - Configuration NetBIOS Mode Select the different type of NetBIOS node: Broadcast only, Point-to-Point, Mixed-mode, and Hybrid. WINS IP Address: D-Link DIR-632 User Manual 28
Type: Primary/Secondary Enter your Primary (and Secondary) WINS IP address(es). Section 3 - Configuration NetBIOS Mode Select the different type of NetBIOS node: Broadcast only, Point-to-Point, Mixed-mode, and Hybrid. WINS IP Address: D-Link DIR-632 User Manual 28
Product Manual
Page 34
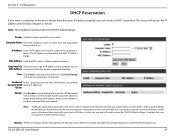
Note: This IP address must be within the DHCP IP Address Range. Computer Name: Enter the computer name or select from the drop-down menu and click Enable: Check this box to always have the same IP address assigned, you want a computer or device to enable the reservation. Configuration DHCP Reservation If you can create a DHCP reservation. The router will assign the IP address only to that computer or device. Section 3 -
Note: This IP address must be within the DHCP IP Address Range. Computer Name: Enter the computer name or select from the drop-down menu and click Enable: Check this box to always have the same IP address assigned, you want a computer or device to enable the reservation. Configuration DHCP Reservation If you can create a DHCP reservation. The router will assign the IP address only to that computer or device. Section 3 -
Product Manual
Page 36
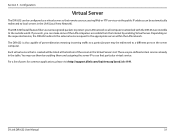
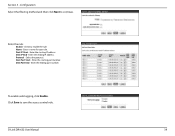
... that remote users accessing Web or FTP services via the public IP address can make some of ports for common applications, please visit http://support.dlink.com/faq/view.asp?prod_id=1191. Configuration Virtual Server The DIR-632 can be configured as a virtual server so that is also capable... of the screen in the table. There are invisible to protect your LAN network so all computers networked with the DIR-632 are pre-defined virtual services already in the Virtual Servers List. D-Link DIR-632 User Manual...
... that remote users accessing Web or FTP services via the public IP address can make some of ports for common applications, please visit http://support.dlink.com/faq/view.asp?prod_id=1191. Configuration Virtual Server The DIR-632 can be configured as a virtual server so that is also capable... of the screen in the table. There are invisible to protect your LAN network so all computers networked with the DIR-632 are pre-defined virtual services already in the Virtual Servers List. D-Link DIR-632 User Manual...
Product Manual
Page 37
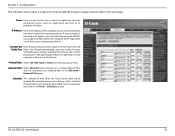
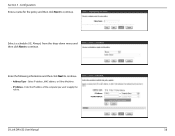
Select an application and click If you to open a range of ports, refer to open a single port. Configuration This will allow you would like to the next page. Section 3 - Name: Enter a name for the rule or select an application from the drop-down menu.
Select an application and click If you to open a range of ports, refer to open a single port. Configuration This will allow you would like to the next page. Section 3 - Name: Enter a name for the rule or select an application from the drop-down menu.
Product Manual
Page 38
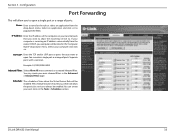
Section 3 - Name: Enter a name for the rule or select an application from the drop-down menu. Select an application and click Configuration Port Forwarding This will allow you to open a single port or a range of ports.
Section 3 - Name: Enter a name for the rule or select an application from the drop-down menu. Select an application and click Configuration Port Forwarding This will allow you to open a single port or a range of ports.
Product Manual
Page 43
Select a schedule (I.E. Select IP address, MAC address, or Other Machines. • IP Address - Enter the IP address of the computer you want to apply the rule to continue. Configuration Enter a name for the policy and then click Next to . Section 3 - D-Link DIR-632 User Manual 38 Enter the following information and then click Next to continue. Always) from the drop-down menu and then click Next to continue. • Address Type -
Select a schedule (I.E. Select IP address, MAC address, or Other Machines. • IP Address - Enter the IP address of the computer you want to apply the rule to continue. Configuration Enter a name for the policy and then click Next to . Section 3 - D-Link DIR-632 User Manual 38 Enter the following information and then click Next to continue. Always) from the drop-down menu and then click Next to continue. • Address Type -
Product Manual
Page 44
Dest IP Start - Protocol - Enter the ending port number. Dest Port Start - Enter a name for your rule. Enter the starting IP address. Click Save to enable the rule. Check to save the access control rule. Enter the starting port number. Enter the ending IP address. To enable web logging, click Enable. Section 3 - Name - Configuration Select the filtering method and then click Next to continue. Dest Port End - Select the protocol. Enter the rule: Enable - Dest IP End - D-Link DIR-632 User Manual 39
Dest IP Start - Protocol - Enter the ending port number. Dest Port Start - Enter a name for your rule. Enter the starting IP address. Click Save to enable the rule. Check to save the access control rule. Enter the starting port number. Enter the ending IP address. To enable web logging, click Enable. Section 3 - Name - Configuration Select the filtering method and then click Next to continue. Dest Port End - Select the protocol. Enter the rule: Enable - Dest IP End - D-Link DIR-632 User Manual 39
Product Manual
Page 46
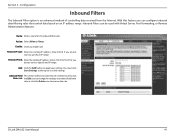
... settings. Inbound Filter This section will list any rules that control data based on an IP address range. Remote IP Start: Enter the starting IP address. Add: Click the Add button to remove the rule. Configuration Inbound Filters The Inbound ...IP range. You must click Save Settings at the top to enable rule. With this feature you can be used with Virtual Server, Port Forwarding, or Remote Administration features. Name: Enter a name for the inbound filter rule. Remote IP End: Enter the ending IP address. Enable: Check to save the settings. Section 3 - D-Link DIR-632...
... settings. Inbound Filter This section will list any rules that control data based on an IP address range. Remote IP Start: Enter the starting IP address. Add: Click the Add button to remove the rule. Configuration Inbound Filters The Inbound ...IP range. You must click Save Settings at the top to enable rule. With this feature you can be used with Virtual Server, Port Forwarding, or Remote Administration features. Name: Enter a name for the inbound filter rule. Remote IP End: Enter the ending IP address. Enable: Check to save the settings. Section 3 - D-Link DIR-632...


