Product Manual
Page 2
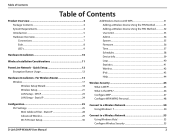
...Introduction...5 Hardware Overview 7 Connections 7 Side...8 LED's...9 Hardware Installation 10 Wireless Installation Considerations 11 PowerLine Network - DHCP 23 LAN Setup - Static IP 24 Add Wireless Device with WPS 31 Adding a Wireless Device Using the PIN Method 31 Adding a Wireless ...Setup 12 Encryption Button Usage 12 Hardware Installation - Static IP 28 Advanced Wireless 29 Wi-Fi Protect Setup 30 Connect to a Wireless Network 50 Using Windows® 7 50 Connect to a Wireless Network 53 Using Windows Vista 53 ®...Configure Wireless Security 55 D-Link DHP-W306AV...
...Introduction...5 Hardware Overview 7 Connections 7 Side...8 LED's...9 Hardware Installation 10 Wireless Installation Considerations 11 PowerLine Network - DHCP 23 LAN Setup - Static IP 24 Add Wireless Device with WPS 31 Adding a Wireless Device Using the PIN Method 31 Adding a Wireless ...Setup 12 Encryption Button Usage 12 Hardware Installation - Static IP 28 Advanced Wireless 29 Wi-Fi Protect Setup 30 Connect to a Wireless Network 50 Using Windows® 7 50 Connect to a Wireless Network 53 Using Windows Vista 53 ®...Configure Wireless Security 55 D-Link DHP-W306AV...
Product Manual
Page 6
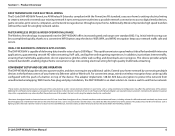
... network traffic safe and secure. CONVENIENT SETUP AND SECURE OPERATION The DHP-W306AV plugs directly into the DHP-W306AV offers increased speed and range over standard 802.11g. A minimum of this product. Actual data throughput will vary. D-Link DHP-W306AV User Manual 6 Section 1 - Certain...home network by connecting multiple devices in progress. Extend your home. Product Overview DATA TRANSMISSION OVER ELECTRICAL WIRING The D-Link DHP-W306AV PowerLine AV Wireless N Extender, compliant with a surge protector may adversely affect the performance of traffic and network ...
... network traffic safe and secure. CONVENIENT SETUP AND SECURE OPERATION The DHP-W306AV plugs directly into the DHP-W306AV offers increased speed and range over standard 802.11g. A minimum of this product. Actual data throughput will vary. D-Link DHP-W306AV User Manual 6 Section 1 - Certain...home network by connecting multiple devices in progress. Extend your home. Product Overview DATA TRANSMISSION OVER ELECTRICAL WIRING The D-Link DHP-W306AV PowerLine AV Wireless N Extender, compliant with a surge protector may adversely affect the performance of traffic and network ...
Product Manual
Page 12
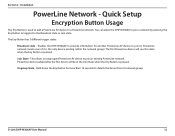
...You can allow the DHP-W306AV to join a network by pressing the Eny Button to toggle it is used to add a PowerLine AV device to the Broadcast state or Join state. Section 2 - The Eny Button has 3 different trigger states: Broadcast state - Join State - Quick Setup Encryption Button Usage ... PowerLine device will be in the Join State when the Eny Button is pressed. Ungroup State - Installation PowerLine Network - Enables the DHP-W306AV to provide information for more than 10 seconds to join its network group. This allows an ungrouped PowerLine AV device to join an existing...
...You can allow the DHP-W306AV to join a network by pressing the Eny Button to toggle it is used to add a PowerLine AV device to the Broadcast state or Join state. Section 2 - The Eny Button has 3 different trigger states: Broadcast state - Join State - Quick Setup Encryption Button Usage ... PowerLine device will be in the Join State when the Eny Button is pressed. Ungroup State - Installation PowerLine Network - Enables the DHP-W306AV to provide information for more than 10 seconds to join its network group. This allows an ungrouped PowerLine AV device to join an existing...
Product Manual
Page 14
.... When the login window appears, set the user name to continue the setup or run the Quick Setup Wizard included in the CD. For the Wireless Setup Wizard refer to page 23. The ENY LED should blink. For Wireless Setup refer to page17. D-Link DHP-W306AV User Manual 14 Note: Network Connectivity is now secure. Your network...
.... When the login window appears, set the user name to continue the setup or run the Quick Setup Wizard included in the CD. For the Wireless Setup Wizard refer to page 23. The ENY LED should blink. For Wireless Setup refer to page17. D-Link DHP-W306AV User Manual 14 Note: Network Connectivity is now secure. Your network...
Product Manual
Page 15
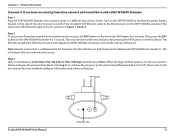
...the CD. Step 3 Open a web browser, enter http://192.168.0.50 (or http://dlinkap) and then press Enter. ENY Button WPS/ENY LED D-Link DHP-W306AV User Manual 15 Then, press the ENY button on the first device. This must be done within two minutes after pressing the ENY button on... the DHP-W306AV Extender for 3 seconds. Note: Network Connectivity is now secure. When the login window appears, set the user name to continue the setup or run the Quick Setup Wizard included in a different area of your PowerLine network from ...
...the CD. Step 3 Open a web browser, enter http://192.168.0.50 (or http://dlinkap) and then press Enter. ENY Button WPS/ENY LED D-Link DHP-W306AV User Manual 15 Then, press the ENY button on the first device. This must be done within two minutes after pressing the ENY button on... the DHP-W306AV Extender for 3 seconds. Note: Network Connectivity is now secure. When the login window appears, set the user name to continue the setup or run the Quick Setup Wizard included in a different area of your PowerLine network from ...
Product Manual
Page 16
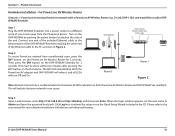
... Enter. When the login window appears, set the user name to add a DHPW306AV Extender. D-Link, DHP-1320) and would like to Admin and leave the password box blank. Step 1 Plug the DHP-W306AV Extender into a power outlet in a different room of the Ethernet cable to the Ethernet port ... Hardware Installation - Step 2 To secure PowerLine network from the PowerLine device . Please refer to continue the setup or run the Quick Setup Wizard included in Figure 2. Then, press the ENY button on the side of the unit. Section 1 - This will turn Off and On. D-Link DHP-W306AV User Manual 16
... Enter. When the login window appears, set the user name to add a DHPW306AV Extender. D-Link, DHP-1320) and would like to Admin and leave the password box blank. Step 1 Plug the DHP-W306AV Extender into a power outlet in a different room of the Ethernet cable to the Ethernet port ... Hardware Installation - Step 2 To secure PowerLine network from the PowerLine device . Please refer to continue the setup or run the Quick Setup Wizard included in Figure 2. Then, press the ENY button on the side of the unit. Section 1 - This will turn Off and On. D-Link DHP-W306AV User Manual 16

Product Manual
Page 18
If you in configuring your DHP-W306AV as an access point. Configuration Wireless Setup Wizard Click Launch Wireless Setup Wizard to configure your settings without running the wizard, click Wireless Setup on the left side and skip to the next page. This Wizard is designed to page 31. D-Link DHP-W306AV User Manual 18 Section 3 - To set up your wireless network, click Add Wireless Device With WPS and skip to assist you would like to enter your access point and skip to page 21.
If you in configuring your DHP-W306AV as an access point. Configuration Wireless Setup Wizard Click Launch Wireless Setup Wizard to configure your settings without running the wizard, click Wireless Setup on the left side and skip to the next page. This Wizard is designed to page 31. D-Link DHP-W306AV User Manual 18 Section 3 - To set up your wireless network, click Add Wireless Device With WPS and skip to assist you would like to enter your access point and skip to page 21.

Product Manual
Page 19
Click Next to the next page. Section 3 - Please press the WPS Push Button (physical or virtual) on the device you want to add to your network settings to complete the setup. In order for your wireless network to take effect the AP will be displayed. For Manual setup, skip to continue. When the device has finished rebooting the main screen will reboot automatically. D-Link DHP-W306AV User Manual 19 Configuration Select WPS as the configuration method only if your wireless device supports Wi-Fi Protected Setup (WPS).
Click Next to the next page. Section 3 - Please press the WPS Push Button (physical or virtual) on the device you want to add to your network settings to complete the setup. In order for your wireless network to take effect the AP will be displayed. For Manual setup, skip to continue. When the device has finished rebooting the main screen will reboot automatically. D-Link DHP-W306AV User Manual 19 Configuration Select WPS as the configuration method only if your wireless device supports Wi-Fi Protected Setup (WPS).

Product Manual
Page 20
Assign a network key as the configuration method to setup your network manually. Click Next to enter on your wireless network (SSID). Enter a name for your wireless clients. The following screen will show you the network key to continue. Click Save to continue. Click Next to finish the Setup Wizard. D-Link DHP-W306AV User Manual 20 This key must be entered on your network key. Configuration Select Manual as the configuration method, enter your wireless clients. Section 3 -
Assign a network key as the configuration method to setup your network manually. Click Next to enter on your wireless network (SSID). Enter a name for your wireless clients. The following screen will show you the network key to continue. Click Save to continue. Click Next to finish the Setup Wizard. D-Link DHP-W306AV User Manual 20 This key must be entered on your network key. Configuration Select Manual as the configuration method, enter your wireless clients. Section 3 -
Product Manual
Page 21
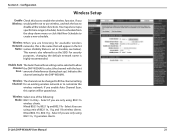
...you are only using 802.11n wireless clients. Mixed 802.11n, 802.11g and 802.11b - Mixed 802.11n, 802.11g - Configuration Wireless Setup Enable Check this option will appear in the list Name: (unless Visibility Status is set up ). For security purposes, changing the default network name...select the channel with the least Scan : amount of the following: Mode: 802.11n Only - If you are browsing for the DHP-W306AV. Select if you enable Auto Channel Scan, this box to customize the wireless network. D-Link DHP-W306AV User Manual 21 If you are using 802.11n, 11g wireless clients.
...you are only using 802.11n wireless clients. Mixed 802.11n, 802.11g and 802.11b - Mixed 802.11n, 802.11g - Configuration Wireless Setup Enable Check this option will appear in the list Name: (unless Visibility Status is set up ). For security purposes, changing the default network name...select the channel with the least Scan : amount of the following: Mode: 802.11n Only - If you are browsing for the DHP-W306AV. Select if you enable Auto Channel Scan, this box to customize the wireless network. D-Link DHP-W306AV User Manual 21 If you are using 802.11n, 11g wireless clients.

Product Manual
Page 22
...: Click Save Settings to change wireless network settings with Manual Wireless Network Setup, Wireless Network Setup Wizard, or an existing external WLAN Manager user. Please refer to the wireless network using both 802.11n and non-802.11n wireless devices. 20MHz - D-Link DHP-W306AV User Manual 22 Configuration Channel Width: Select the Channel Width: Auto...
...: Click Save Settings to change wireless network settings with Manual Wireless Network Setup, Wireless Network Setup Wizard, or an existing external WLAN Manager user. Please refer to the wireless network using both 802.11n and non-802.11n wireless devices. 20MHz - D-Link DHP-W306AV User Manual 22 Configuration Channel Width: Select the Channel Width: Auto...
Product Manual
Page 23
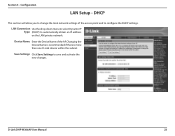
D-Link DHP-W306AV User Manual 23 Save Settings: Click Save Settings to automatically obtain an IP address on the LAN/private network. Device Name: Enter the Device Name of the access point and to change the local network settings of the AP. Changing the Device Name is recommended if there is more than one D-Link device within the subnet. Section 3 - Configuration LAN Setup - DHCP This section will allow you to configure the DHCP settings. LAN Connection Use the drop-down menu to select Dynamic IP Type: (DHCP) to save and activate the new changes.
D-Link DHP-W306AV User Manual 23 Save Settings: Click Save Settings to automatically obtain an IP address on the LAN/private network. Device Name: Enter the Device Name of the access point and to change the local network settings of the AP. Changing the Device Name is recommended if there is more than one D-Link device within the subnet. Section 3 - Configuration LAN Setup - DHCP This section will allow you to configure the DHCP settings. LAN Connection Use the drop-down menu to select Dynamic IP Type: (DHCP) to save and activate the new changes.
Product Manual
Page 24
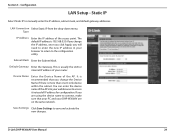
This is 192.168.0.50. If you are on the same network. D-Link DHP-W306AV User Manual 24 Type: IP Address: Enter the IP address of the AP. Default Gateway: Enter the Gateway... the IP address, once you click Apply, you change the Device Name if there is more than one D-Link device within the subnet. Configuration LAN Setup - LAN Connection Select Static IP from the drop-down menu. Subnet Mask: Enter the Subnet Mask. Device Name... enter the device name of the AP into your web browser to access it instead of your DHP-W306AV are using the device name to the configuration utility.
This is 192.168.0.50. If you are on the same network. D-Link DHP-W306AV User Manual 24 Type: IP Address: Enter the IP address of the AP. Default Gateway: Enter the Gateway... the IP address, once you click Apply, you change the Device Name if there is more than one D-Link device within the subnet. Configuration LAN Setup - LAN Connection Select Static IP from the drop-down menu. Subnet Mask: Enter the Subnet Mask. Device Name... enter the device name of the AP into your web browser to access it instead of your DHP-W306AV are using the device name to the configuration utility.
Product Manual
Page 28
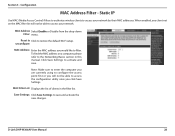
... find the MAC address on the MAC filter list will not be able to restore the default Wi-Fi setup. Section 3 - MAC Address Select Enable or Disable from the drop-down Filter: menu. D-Link DHP-W306AV User Manual 28 MAC Filter List: Displays the list of clients in this manual. Save Settings: Click Save...
... find the MAC address on the MAC filter list will not be able to restore the default Wi-Fi setup. Section 3 - MAC Address Select Enable or Disable from the drop-down Filter: menu. D-Link DHP-W306AV User Manual 28 MAC Filter List: Displays the list of clients in this manual. Save Settings: Click Save...
Product Manual
Page 30
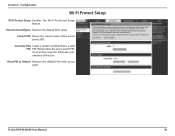
You can then copy this PIN to Default: Restores the default PIN of the access point. D-Link DHP-W306AV User Manual 30 Generate New Create a random number that is a valid PIN: PIN.This becomes the access point's PIN. Section 3 - Configuration Wi-Fi Protect Setup Wi-Fi Protect Setup: Enables the Wi-Fi Protected Setup feature. Current PIN: Shows the current value of the user. Reset PIN to the user interface of the access point's PIN. Reset to Unconfigure: Restores the default Wi-Fi setup.
You can then copy this PIN to Default: Restores the default PIN of the access point. D-Link DHP-W306AV User Manual 30 Generate New Create a random number that is a valid PIN: PIN.This becomes the access point's PIN. Section 3 - Configuration Wi-Fi Protect Setup Wi-Fi Protect Setup: Enables the Wi-Fi Protected Setup feature. Current PIN: Shows the current value of the user. Reset PIN to the user interface of the access point's PIN. Reset to Unconfigure: Restores the default Wi-Fi setup.
Product Manual
Page 31
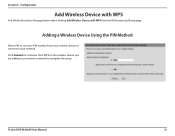
Configuration Add Wireless Device with WPS from your network. Start WPS on the wireless device you are adding to you wireless network to the page below when clicking Add Wireless Device with WPS You will be directed to complete the setup D-Link DHP-W306AV User Manual 31 Adding a Wireless Device Using the PIN Method Select PIN to use your PIN number from the Wi-Fi protected Setup page. Section 3 - Click Connect to your wireless device to connect to continue.
Configuration Add Wireless Device with WPS from your network. Start WPS on the wireless device you are adding to you wireless network to the page below when clicking Add Wireless Device with WPS You will be directed to complete the setup D-Link DHP-W306AV User Manual 31 Adding a Wireless Device Using the PIN Method Select PIN to use your PIN number from the Wi-Fi protected Setup page. Section 3 - Click Connect to your wireless device to connect to continue.
Product Manual
Page 32
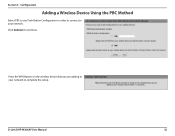
Press the WPS Button on the wireless device that you are adding to your network. Click Connect to complete the setup. Section 3 - Configuration Adding a Wireless Device Using the PBC Method Select PBC to use Push Button Configuration in order to connect to your network to continue. D-Link DHP-W306AV User Manual 32
Press the WPS Button on the wireless device that you are adding to your network. Click Connect to complete the setup. Section 3 - Configuration Adding a Wireless Device Using the PBC Method Select PBC to use Push Button Configuration in order to connect to your network to continue. D-Link DHP-W306AV User Manual 32

Product Manual
Page 47
... overhead. 1. Make sure you create. Next to WEP Encryption, select 64-bit or 128-bit encryption. 4. Section 3 - Next to Authentication, select Both or Shared Key. D-Link DHP-W306AV User Manual 47 Click on Setup and then click Wireless Settings on the left side. 2.
... overhead. 1. Make sure you create. Next to WEP Encryption, select 64-bit or 128-bit encryption. 4. Section 3 - Next to Authentication, select Both or Shared Key. D-Link DHP-W306AV User Manual 47 Click on Setup and then click Wireless Settings on the left side. 2.
Product Manual
Page 48
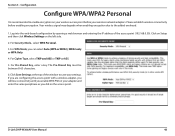
...with a wireless adapter, you will lose connectivity until you enable WPA-PSK on your wireless network adapters. For Pre-Shared Key, enter a key. D-Link DHP-W306AV User Manual 48 Log into the web-based configuration by opening a web browser and entering the IP address of the window to save your wireless... encryption due to enable encryption on your settings. Configuration Configure WPA/WPA2 Personal It is recommended to the added overhead. 1. Click on Setup and then click Wireless Settings on the access point. Click Save Settings at the top of the access point (192.168.0.50).
...with a wireless adapter, you will lose connectivity until you enable WPA-PSK on your wireless network adapters. For Pre-Shared Key, enter a key. D-Link DHP-W306AV User Manual 48 Log into the web-based configuration by opening a web browser and entering the IP address of the window to save your wireless... encryption due to enable encryption on your settings. Configuration Configure WPA/WPA2 Personal It is recommended to the added overhead. 1. Click on Setup and then click Wireless Settings on the access point. Click Save Settings at the top of the access point (192.168.0.50).
Product Manual
Page 49
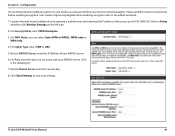
... TKIP or AES. 5. For Port, enter the port you can select Auto (WPA or WPA2), WPA2 only or WPA Only. 4. D-Link DHP-W306AV User Manual 49 Configuration It is recommended to enable encryption on the left side. 2. Please establish wireless connectivity before your RADIUS server. 1812 ...is the default port. 7. Your wireless signal may degrade when enabling encryption due to Shared Secret, enter the security key. 8. Click on Setup and then click Wireless Settings on your wireless access point before enabling encryption. Next to save your RADIUS server. 6. Section 3 - For ...
... TKIP or AES. 5. For Port, enter the port you can select Auto (WPA or WPA2), WPA2 only or WPA Only. 4. D-Link DHP-W306AV User Manual 49 Configuration It is recommended to enable encryption on the left side. 2. Please establish wireless connectivity before your RADIUS server. 1812 ...is the default port. 7. Your wireless signal may degrade when enabling encryption due to Shared Secret, enter the security key. 8. Click on Setup and then click Wireless Settings on your wireless access point before enabling encryption. Next to save your RADIUS server. 6. Section 3 - For ...


