Product Manual
Page 3
...Products vii Protecting Against Electrostatic Discharge ix INTRODUCTION 10 SWITCH DESCRIPTIO N 10 Switch Features 11 Gigabit Ethernet Technology 12 802.1P and QoS 12 FRONT-PANEL COMPONENTS 15 LED Indicators 15 Cable Diagnostic 16 POWER INPUT ON REAR PANEL 18 INSTALLATION 19 Package ...CONNECT TO THE NETWORK 20 Mounting the Switch on a Rack 21 Attaching the Rubber Feet 22 Provide for Adequate Ventilation 22 POWER ON...23 Power Failure 23 CONNECTING THE SWITCH 24 Switch to End Node 25 Switch to Hub or Switch 26 Connecting to Network Backbone or Server...
...Products vii Protecting Against Electrostatic Discharge ix INTRODUCTION 10 SWITCH DESCRIPTIO N 10 Switch Features 11 Gigabit Ethernet Technology 12 802.1P and QoS 12 FRONT-PANEL COMPONENTS 15 LED Indicators 15 Cable Diagnostic 16 POWER INPUT ON REAR PANEL 18 INSTALLATION 19 Package ...CONNECT TO THE NETWORK 20 Mounting the Switch on a Rack 21 Attaching the Rubber Feet 22 Provide for Adequate Ventilation 22 POWER ON...23 Power Failure 23 CONNECTING THE SWITCH 24 Switch to End Node 25 Switch to Hub or Switch 26 Connecting to Network Backbone or Server...

Product Manual
Page 4
... Switch, mounting the Switch in a equipment rack and powering on the Switch. Section 2. A description of the physical installation of data and tells you make better use of your Switch to an end node, hub, another switch or backbone server. Connecting the Switch ...A NOTE indicates important information that describe the system installation and operating instructions with examples. D-Link DGS-1016D/DGS-1024D Unmanaged Gigabit Ethernet Switch Preface The DGS-1016D/DGS-1024D Manual is divided into sections that helps you how to avoid the problem. The technical specifications...
... Switch, mounting the Switch in a equipment rack and powering on the Switch. Section 2. A description of the physical installation of data and tells you make better use of your Switch to an end node, hub, another switch or backbone server. Connecting the Switch ...A NOTE indicates important information that describe the system installation and operating instructions with examples. D-Link DGS-1016D/DGS-1024D Unmanaged Gigabit Ethernet Switch Preface The DGS-1016D/DGS-1024D Manual is divided into sections that helps you how to avoid the problem. The technical specifications...

Product Manual
Page 5
...spill food or liquids on the electrical ratings label. If the system gets wet, see the appropriate section in a wet environment. The power cable, extension cable, or plug is used to indi cate cautions and precautions that are not sure of the type of your system ... components. • Use the product only with a lightning bolt may expose you need to review and follow service markings. D-Link DGS-1016D/DGS-1024D Unmanaged Gigabit Ethernet Switch Safety Instructions Use the following safety guidelines to ensure your own personal safety and to help protect your system. Observe and follow...
...spill food or liquids on the electrical ratings label. If the system gets wet, see the appropriate section in a wet environment. The power cable, extension cable, or plug is used to indi cate cautions and precautions that are not sure of the type of your system ... components. • Use the product only with a lightning bolt may expose you need to review and follow service markings. D-Link DGS-1016D/DGS-1024D Unmanaged Gigabit Ethernet Switch Safety Instructions Use the following safety guidelines to ensure your own personal safety and to help protect your system. Observe and follow...

Product Manual
Page 6
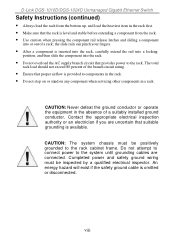
... sure that they cannot be stepped on or tripped over. D-Link DGS-1016D/DGS-1024D Unmanaged Gigabit Ethernet Switch Safety Instructions (continued) • To help avoid damaging your system, be sure the voltage selection Switch (if provided) on the power supply is approved for use in your power company for site modifications. If you must be rated for...
... sure that they cannot be stepped on or tripped over. D-Link DGS-1016D/DGS-1024D Unmanaged Gigabit Ethernet Switch Safety Instructions (continued) • To help avoid damaging your system, be sure the voltage selection Switch (if provided) on the power supply is approved for use in your power company for site modifications. If you must be rated for...
Product Manual
Page 8
... equipment in a rack. Contact the appropriate electrical inspection authority or an electrician if you are connected. Do not attempt to connect power to the system until grounding cables are uncertain that suitable grounding is inserted into the rack, carefully extend the rail into a locking...up, and load the heaviest item in the rack first. • Make sure that the rack is omitted or disconnected. D-Link DGS-1016D/DGS-1024D Unmanaged Gigabit Ethernet Switch Safety Instructions (continued) • Always load the rack from the rack. • Use caution when pressing the component rail ...
... equipment in a rack. Contact the appropriate electrical inspection authority or an electrician if you are connected. Do not attempt to connect power to the system until grounding cables are uncertain that suitable grounding is inserted into the rack, carefully extend the rail into a locking...up, and load the heaviest item in the rack first. • Make sure that the rack is omitted or disconnected. D-Link DGS-1016D/DGS-1024D Unmanaged Gigabit Ethernet Switch Safety Instructions (continued) • Always load the rack from the rack. • Use caution when pressing the component rail ...

Product Manual
Page 10
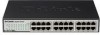
... used to this and all Ethernet devices. SECTION 1 Introduction Switch Description Switch Features Ports Front-Panel Components LED Indicators Power Input on Rear Panel Switch Description The 16-port DGS-1016D and 24-port DGS-1024D Switches provide dedicated 10, 100 or 1000 Mbps Ethernet bandwidth on the Switch and connect the cables. The ports will automatically detect the...
... used to this and all Ethernet devices. SECTION 1 Introduction Switch Description Switch Features Ports Front-Panel Components LED Indicators Power Input on Rear Panel Switch Description The 16-port DGS-1016D and 24-port DGS-1024D Switches provide dedicated 10, 100 or 1000 Mbps Ethernet bandwidth on the Switch and connect the cables. The ports will automatically detect the...
Product Manual
Page 15
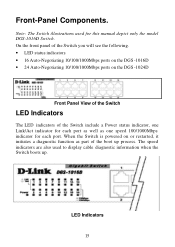
...each port as well as one speed 100/1000Mbps indicator for this manual depict only the model DGS-1016D Switch. LED Indicators 15 When the Switch is powered on the DGS -1024D Front Panel View of the Switch LED Indicators The LED indicators of the boot up . On the front panel of the... Switch you will see the following. • LED status indicators • 16 Auto-Negotiating 10/100/1000Mbps ports on the DGS -1016D • 24 Auto-Negotiating 10/100/1000Mbps ports on or restarted, it initiates a diagnostic function as part of the Switch include a Power status indicator, one Link/Act...
...each port as well as one speed 100/1000Mbps indicator for this manual depict only the model DGS-1016D Switch. LED Indicators 15 When the Switch is powered on the DGS -1024D Front Panel View of the Switch LED Indicators The LED indicators of the boot up . On the front panel of the... Switch you will see the following. • LED status indicators • 16 Auto-Negotiating 10/100/1000Mbps ports on the DGS -1016D • 24 Auto-Negotiating 10/100/1000Mbps ports on or restarted, it initiates a diagnostic function as part of the Switch include a Power status indicator, one Link/Act...
Product Manual
Page 16
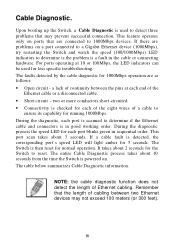
...scanned to detect three problems that the length of Ethernet cabling. This port scan takes about 10 seconds from the time the Switch is powered on. The entire Cable Diagnostic process takes about 3 seconds. For ports operating at each port blinks green in sequential order.... fault in good working order. Cable Diagnostic. This feature operates only on a port connected to a Gigabit Ethernet device (1000Mbps), try restarting the Switch and watch the speed (100/1000Mbps) LED indicators to 1000Mbps devices. If a cable fault is then reset for 5 seconds. The table below ...
...scanned to detect three problems that the length of Ethernet cabling. This port scan takes about 10 seconds from the time the Switch is powered on. The entire Cable Diagnostic process takes about 3 seconds. For ports operating at each port blinks green in sequential order.... fault in good working order. Cable Diagnostic. This feature operates only on a port connected to a Gigabit Ethernet device (1000Mbps), try restarting the Switch and watch the speed (100/1000Mbps) LED indicators to 1000Mbps devices. If a cable fault is then reset for 5 seconds. The table below ...
Product Manual
Page 17
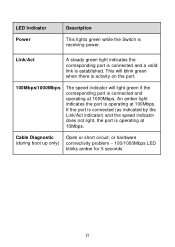
... The speed indicator will light green if the corresponding port is connected and operating at 10Mbps. Link/Act A steady green light indicates the corresponding port is connected and a valid link is operating at 100Mbps. Cable Diagnostic (during boot up only) Open or short circuit, or... seconds 17 If the port is connected (as indicated by the Link/Act indicator) and the speed indicator does not light, the port is receiving power. An amber light indicates the port is established. LED Indicator Power Description This lights green while the Switch is operating at 1000Mbps.
... The speed indicator will light green if the corresponding port is connected and operating at 10Mbps. Link/Act A steady green light indicates the corresponding port is connected and a valid link is operating at 100Mbps. Cable Diagnostic (during boot up only) Open or short circuit, or... seconds 17 If the port is connected (as indicated by the Link/Act indicator) and the speed indicator does not light, the port is receiving power. An amber light indicates the port is established. LED Indicator Power Description This lights green while the Switch is operating at 1000Mbps.

Product Manual
Page 18
Power Input on how to properly connect the Switch to a power source. 18 Please see the Power On section below for instructions on Rear Panel. The power cable connection is located on the rear panel of the Switch Switch power input is a standard three-pronged connector that supports the power cord. The AC power connector is provided by and internal universal power supply (100-240VAC : 12V/3.3A). Rear panel view of the Switch.
Power Input on how to properly connect the Switch to a power source. 18 Please see the Power On section below for instructions on Rear Panel. The power cable connection is located on the rear panel of the Switch Switch power input is a standard three-pronged connector that supports the power cord. The AC power connector is provided by and internal universal power supply (100-240VAC : 12V/3.3A). Rear panel view of the Switch.
Product Manual
Page 19
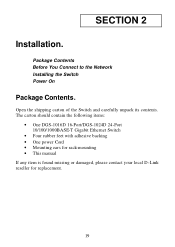
SECTION 2 Installation. The carton should contain the following items: • One DGS-1016D 16-Port/DGS-1024D 24-Port 10/100/1000BASE-T Gigabit Ethernet Switch • Four rubber feet with adhesive backing • One power Cord • Mounting ears for rack-mounting • This manual If any item is found missing or damaged, please contact your local D-Link reseller for replacement. 19 Open the shipping carton of the Switch and carefully unpack its contents. Package Contents Before You Connect to the Network Installing the Switch Power On Package Contents.
SECTION 2 Installation. The carton should contain the following items: • One DGS-1016D 16-Port/DGS-1024D 24-Port 10/100/1000BASE-T Gigabit Ethernet Switch • Four rubber feet with adhesive backing • One power Cord • Mounting ears for rack-mounting • This manual If any item is found missing or damaged, please contact your local D-Link reseller for replacement. 19 Open the shipping carton of the Switch and carefully unpack its contents. Package Contents Before You Connect to the Network Installing the Switch Power On Package Contents.

Product Manual
Page 20
.... Leave at least 10 cm (4 inches) of space at least 3 kg (6.6 lbs) of the Switch. • Visually inspect the power cord and see that it from and adequate ventilation around the Switch. Before You Connect to the bottom of the device. Please follow these guidelines for setting up the... Switch. • Install the Switch on the Switch. • The power outlet should be within 1.82 meters (6 feet) of weight. Do not place heavy objects on a sturdy, level surface that can support at...
.... Leave at least 10 cm (4 inches) of space at least 3 kg (6.6 lbs) of the Switch. • Visually inspect the power cord and see that it from and adequate ventilation around the Switch. Before You Connect to the bottom of the device. Please follow these guidelines for setting up the... Switch. • Install the Switch on the Switch. • The power outlet should be within 1.82 meters (6 feet) of weight. Do not place heavy objects on a sturdy, level surface that can support at...

Product Manual
Page 23
Power On. Power Failure. As a precaution, in the event of the cord into this socket, and the male side of a power failure, unplug the Switch. When power is powered on the Switch, Plug-in . 23 To power on , the LED indicators will blink briefly while the system resets. After the Switch is resumed, plug the Switch back in the female connector of the provided power cord into a suitable power source.
Power On. Power Failure. As a precaution, in the event of the cord into this socket, and the male side of a power failure, unplug the Switch. When power is powered on the Switch, Plug-in . 23 To power on , the LED indicators will blink briefly while the system resets. After the Switch is resumed, plug the Switch back in the female connector of the provided power cord into a suitable power source.
Product Manual
Page 29
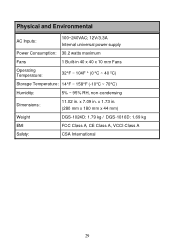
Physical and Environmental AC Inputs: 100~240VAC; 12V/3.3A Internal universal power supply Power Consumption: 30.2 watts maximum Fans 1 Built-in 40 x 40 x 10 mm Fans Operating Temperatu re: 32°F ~ 104F ° (0 °C ~ 40 ºC) Storage Temperature: 14°F ~ 158°F (-10°C ~ 70°C) Humidity: 5% ~ 95% RH, non-condensing Dimensions : 11.02 in . (280 mm x 180 mm x 44 mm) Weight DGS-1024D: 1.79 kg / DGS-1016D: 1.69 kg EMI FCC Class A, CE Class A, VCCI Class A Safety: CSA International 29 x 1.73 in . x 7.09 in.
Physical and Environmental AC Inputs: 100~240VAC; 12V/3.3A Internal universal power supply Power Consumption: 30.2 watts maximum Fans 1 Built-in 40 x 40 x 10 mm Fans Operating Temperatu re: 32°F ~ 104F ° (0 °C ~ 40 ºC) Storage Temperature: 14°F ~ 158°F (-10°C ~ 70°C) Humidity: 5% ~ 95% RH, non-condensing Dimensions : 11.02 in . (280 mm x 180 mm x 44 mm) Weight DGS-1024D: 1.79 kg / DGS-1016D: 1.69 kg EMI FCC Class A, CE Class A, VCCI Class A Safety: CSA International 29 x 1.73 in . x 7.09 in.

Product Manual
Page 33
...equipment. TCP/IP - User Datagram Protocol. A Switch-to-Switch link which allows monitoring and management capabilities by allowing you to the Switch. RMON - Remote Monitoring. Subset of SNMP MIB II, which carries traffic for communication among a wide range of power when connected to transfer files (such as if ...and access a host as if the user were connected directly to run over data transmission if the main port in the link fails. stack - switch - An Internet standard protocol that allows IP to the host. A group of servers in to an application program on ...
...equipment. TCP/IP - User Datagram Protocol. A Switch-to-Switch link which allows monitoring and management capabilities by allowing you to the Switch. RMON - Remote Monitoring. Subset of SNMP MIB II, which carries traffic for communication among a wide range of power when connected to transfer files (such as if ...and access a host as if the user were connected directly to run over data transmission if the main port in the link fails. stack - switch - An Internet standard protocol that allows IP to the host. A group of servers in to an application program on ...
Product Manual
Page 34
...owns the product, or five years after product discontinuance, whichever occurs first (excluding power supplies and fans) • Power Supplies and Fans Three (3) Year • Spare parts and spare kits Ninety (90) days D-Link's sole obligation shall be to repair or replace the defective Hardware during the ...Warranty Period at no charge to the original owner or to D-Link of the defective Hardware....
...owns the product, or five years after product discontinuance, whichever occurs first (excluding power supplies and fans) • Power Supplies and Fans Three (3) Year • Spare parts and spare kits Ninety (90) days D-Link's sole obligation shall be to repair or replace the defective Hardware during the ...Warranty Period at no charge to the original owner or to D-Link of the defective Hardware....

Product Manual
Page 36
...WITHOUT LIMITATION, ANY WARRANTY OF MERCHANTABILITY, FITNESS FOR A PARTICULAR PURPOSE AND NON- What Is Not Covered: This limited warranty provided by D-Link not to power surge, and cosmetic damage; Products that is not packaged and shipped in the documentation for the product, or if the model or serial ...number has been altered, tampered with, defaced or removed; Products sent COD will be rejected by D-Link or become the property of ...
...WITHOUT LIMITATION, ANY WARRANTY OF MERCHANTABILITY, FITNESS FOR A PARTICULAR PURPOSE AND NON- What Is Not Covered: This limited warranty provided by D-Link not to power surge, and cosmetic damage; Products that is not packaged and shipped in the documentation for the product, or if the model or serial ...number has been altered, tampered with, defaced or removed; Products sent COD will be rejected by D-Link or become the property of ...

