
Quick Install Guide
Page 3
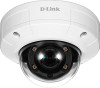
...to conform to use the camera, please see the User Manual on CD-ROM ƒƒ Quick Installation Guide If any of the above items are missing, please contact your warranty. D-Link DCS-4605EV Quick Installation Guide 1 ENGLISH Quick Installation Guide This installation... guide provides basic instructions for installing the DCS-4605EV. For additional information about how to all local codes and prevent voiding ...
...to conform to use the camera, please see the User Manual on CD-ROM ƒƒ Quick Installation Guide If any of the above items are missing, please contact your warranty. D-Link DCS-4605EV Quick Installation Guide 1 ENGLISH Quick Installation Guide This installation... guide provides basic instructions for installing the DCS-4605EV. For additional information about how to all local codes and prevent voiding ...
Quick Install Guide
Page 6
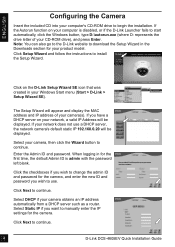
...Next to start automatically, click the Windows button, type D:\autorun.exe (where D: represents the drive letter of your camera(s). Click on the D-Link Setup Wizard SE icon that was created in the Downloads section for your network, a valid IP Address will appear and display the MAC address ...the camera, and enter the new ID and password you want to manually enter the IP settings for the first time, the default Admin ID is disabled, or if the D-Link Launcher fails to continue. 4 D-Link DCS-4605EV Quick Installation Guide ENGLISH Configuring the Camera Insert the included CD into your...
...Next to start automatically, click the Windows button, type D:\autorun.exe (where D: represents the drive letter of your camera(s). Click on the D-Link Setup Wizard SE icon that was created in the Downloads section for your network, a valid IP Address will appear and display the MAC address ...the camera, and enter the new ID and password you want to manually enter the IP settings for the first time, the default Admin ID is disabled, or if the D-Link Launcher fails to continue. 4 D-Link DCS-4605EV Quick Installation Guide ENGLISH Configuring the Camera Insert the included CD into your...

Quick Install Guide
Page 7
...the camera. The Setup Wizard will be asked to set a password for the administrator account. D-Link DCS-4605EV Quick Installation Guide 5 Select the camera and click Link to the user manual included on the D-Link Setup Wizard SE icon that you are done. After entering a password, click Save. Viewing ...Your Camera via Web Browser Click on the CD-ROM or the D-Link website. OR Under Password, enter ...
...the camera. The Setup Wizard will be asked to set a password for the administrator account. D-Link DCS-4605EV Quick Installation Guide 5 Select the camera and click Link to the user manual included on the D-Link Setup Wizard SE icon that you are done. After entering a password, click Save. Viewing ...Your Camera via Web Browser Click on the CD-ROM or the D-Link website. OR Under Password, enter ...
Quick Install Guide
Page 115
... Statements (Only for Class A product) Federal Communication Commission Interference Statement This equipment has been tested and found to comply with the instruction manual, may cause harmful interference to radio communications. D-Link DCS-4605EV Quick Installation Guide 113 Non-modification Statement Any changes or modifications not expressly approved by the party responsible for a Class A digital...
... Statements (Only for Class A product) Federal Communication Commission Interference Statement This equipment has been tested and found to comply with the instruction manual, may cause harmful interference to radio communications. D-Link DCS-4605EV Quick Installation Guide 113 Non-modification Statement Any changes or modifications not expressly approved by the party responsible for a Class A digital...
Quick Install Guide
Page 117
... guidelines are provided to help to a collection point designated by your body (i.e. D-Link DCS-4605EV Quick Installation Guide 115 By recycling the product and its life, some products with a user replaceable battery, please read and follow the instructions in the user manual. • Do not spill food or liquid on the product or packaging...
... guidelines are provided to help to a collection point designated by your body (i.e. D-Link DCS-4605EV Quick Installation Guide 115 By recycling the product and its life, some products with a user replaceable battery, please read and follow the instructions in the user manual. • Do not spill food or liquid on the product or packaging...

User Manual
Page 2
...Link DCS-4605EV User Manual 2 All rights reserved. Preface D-Link reserves the right to revise this document may not be reproduced, in whole or in part, without obligation to make changes in the United States or other company or product names mentioned herein are trademarks or registered trademarks of D-Link... as our services and websites develop and change. Revision 1.00 Manual Revisions Date 06/15/2018 Description DCS-4605EV Revision A1 with firmware version 1.00 Trademarks D-Link and the D-Link logo are trademarks or registered trademarks of such revisions or changes....
...Link DCS-4605EV User Manual 2 All rights reserved. Preface D-Link reserves the right to revise this document may not be reproduced, in whole or in part, without obligation to make changes in the United States or other company or product names mentioned herein are trademarks or registered trademarks of D-Link... as our services and websites develop and change. Revision 1.00 Manual Revisions Date 06/15/2018 Description DCS-4605EV Revision A1 with firmware version 1.00 Trademarks D-Link and the D-Link logo are trademarks or registered trademarks of such revisions or changes....
User Manual
Page 3
... Product Overview 4 Package Contents 4 Introduction 5 System Requirements 5 Features 6 Hardware Overview 7 Installation 9 Mounting the Camera 9 Using the DCS-37-1 Mount (optional 12 Using the DCS-37-2 Mount (optional 14 Using the DCS-37-3 Mount (optional 16 Waterproofing Your Installation 17 Software Installation 20 Configuration 23 Using the Configuration Interface 23 Live Video... Camera Configuration 67 Camera Options 71 Camera Info 71 Time 72 Administration Settings 75 Camera Log 78 Technical Specifications 79 Regulatory Information 83 D-Link DCS-4605EV User Manual 3
... Product Overview 4 Package Contents 4 Introduction 5 System Requirements 5 Features 6 Hardware Overview 7 Installation 9 Mounting the Camera 9 Using the DCS-37-1 Mount (optional 12 Using the DCS-37-2 Mount (optional 14 Using the DCS-37-3 Mount (optional 16 Waterproofing Your Installation 17 Software Installation 20 Configuration 23 Using the Configuration Interface 23 Live Video... Camera Configuration 67 Camera Options 71 Camera Info 71 Time 72 Administration Settings 75 Camera Log 78 Technical Specifications 79 Regulatory Information 83 D-Link DCS-4605EV User Manual 3

User Manual
Page 4
Section 1: Product Overview Product Overview Package Contents DCS-4605EV Vigilance 5 megapixel H.265 Outdoor Dome Camera Cable Waterproofing Connector Mounting Kit CD-ROM with all local codes and prevent voiding your reseller. Safety Notice: Installation and servicing should be done by certified technicians to conform with User Manual and software Quick Installation Guide If any of the above items are missing, please contact your warranty. D-Link DCS-4605EV User Manual 4
Section 1: Product Overview Product Overview Package Contents DCS-4605EV Vigilance 5 megapixel H.265 Outdoor Dome Camera Cable Waterproofing Connector Mounting Kit CD-ROM with all local codes and prevent voiding your reseller. Safety Notice: Installation and servicing should be done by certified technicians to conform with User Manual and software Quick Installation Guide If any of the above items are missing, please contact your warranty. D-Link DCS-4605EV User Manual 4

User Manual
Page 5
...HD resolution video during the day or at night in a variety of locations without the need for supplemental power cabling. The DCS-4605EV also incorporates Power over your video bandwidth. System Requirements • Computer with Microsoft Windows® 10, 8, or 7 &#...for surveillance applications. The combination of its advanced feature set, including granular control over Ethernet (PoE) port D-Link DCS-4605EV User Manual 5 The DCS-4605EV is a professional surveillance and security solution for a dependable and cost-effective 24 hour surveillance solution with different ...
...HD resolution video during the day or at night in a variety of locations without the need for supplemental power cabling. The DCS-4605EV also incorporates Power over your video bandwidth. System Requirements • Computer with Microsoft Windows® 10, 8, or 7 &#...for surveillance applications. The combination of its advanced feature set, including granular control over Ethernet (PoE) port D-Link DCS-4605EV User Manual 5 The DCS-4605EV is a professional surveillance and security solution for a dependable and cost-effective 24 hour surveillance solution with different ...
User Manual
Page 6
.... Remote Monitoring Utility The D-Link D-ViewCam™ application adds enhanced features and functionality for Day and Night Functionality The built-in infrared LEDs enable night time viewing of its standards-based features. Advanced Event Management The DCS-4605EV can also be integrated easily ... allowing you to rest assured that supports 10/100 Ethernet, making the DCS-4605EV easy to provide round-the-clock surveillance. D-Link DCS-4605EV User Manual 6 PoE (Power over Ethernet) for Flexible Installation The DCS-4605EV can be set up to bring out the best performance in CPU, ...
.... Remote Monitoring Utility The D-Link D-ViewCam™ application adds enhanced features and functionality for Day and Night Functionality The built-in infrared LEDs enable night time viewing of its standards-based features. Advanced Event Management The DCS-4605EV can also be integrated easily ... allowing you to rest assured that supports 10/100 Ethernet, making the DCS-4605EV easy to provide round-the-clock surveillance. D-Link DCS-4605EV User Manual 6 PoE (Power over Ethernet) for Flexible Installation The DCS-4605EV can be set up to bring out the best performance in CPU, ...
User Manual
Page 7
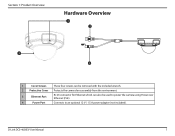
Section 1: Product Overview Hardware Overview 1 3 2 4 1 Cover Screws These four screws can be removed with the included wrench. 2 Protective Cover Protects the camera lens assembly from the environment. 3 Ethernet Port RJ-45 connector for Ethernet which can also be used to power the camera using Power over Ethernet (PoE). 4 Power Port Connects to an optional 12 V / 1.5 A power adapter (not included). D-Link DCS-4605EV User Manual 7
Section 1: Product Overview Hardware Overview 1 3 2 4 1 Cover Screws These four screws can be removed with the included wrench. 2 Protective Cover Protects the camera lens assembly from the environment. 3 Ethernet Port RJ-45 connector for Ethernet which can also be used to power the camera using Power over Ethernet (PoE). 4 Power Port Connects to an optional 12 V / 1.5 A power adapter (not included). D-Link DCS-4605EV User Manual 7
User Manual
Page 8
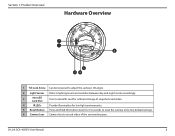
Section 1: Product Overview Hardware Overview 1 2 6 5 34 1 Tilt Lock Screw Can be loosened to adjust the camera's tilt angle. 2 Light Sensor Detects lighting levels and switches between day and night mode accordingly. 3 microSD Card Slot Insert a microSD card for onboard storage of snapshots and video. 4 IR LEDs Provide illumination for low-light environments. 5 Reset Button Press and hold this button down for 10 seconds to reset the camera to factory default settings. 6 Camera Lens Camera lens to record video of the surrounding area. D-Link DCS-4605EV User Manual 8
Section 1: Product Overview Hardware Overview 1 2 6 5 34 1 Tilt Lock Screw Can be loosened to adjust the camera's tilt angle. 2 Light Sensor Detects lighting levels and switches between day and night mode accordingly. 3 microSD Card Slot Insert a microSD card for onboard storage of snapshots and video. 4 IR LEDs Provide illumination for low-light environments. 5 Reset Button Press and hold this button down for 10 seconds to reset the camera to factory default settings. 6 Camera Lens Camera lens to record video of the surrounding area. D-Link DCS-4605EV User Manual 8
User Manual
Page 9
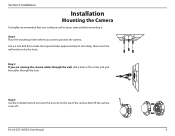
... required holes approximately 25 mm deep, then insert the wall anchors into the holes. Step 2 If you configure and test your camera before mounting it. D-Link DCS-4605EV User Manual 9 Section 2: Installation Installation Mounting the Camera It is highly recommended that you are running the camera cables through the wall, drill a hole in the...
... required holes approximately 25 mm deep, then insert the wall anchors into the holes. Step 2 If you configure and test your camera before mounting it. D-Link DCS-4605EV User Manual 9 Section 2: Installation Installation Mounting the Camera It is highly recommended that you are running the camera cables through the wall, drill a hole in the...
User Manual
Page 10
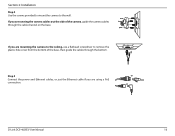
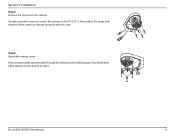
If you are running the camera cables out the side of the base, then guide the cables through the cable channel on the base. D-Link DCS-4605EV User Manual 10 If you are using a PoE connection. Step 5 Connect the power and Ethernet cables, or just the Ethernet cable if you are mounting the camera to the ceiling, use a flathead screwdriver to the wall. Section 2: Installation Step 4 Use the screws provided to mount the camera to remove the plastic hole cover from the bottom of the camera, guide the camera cables through the bottom.
If you are running the camera cables out the side of the base, then guide the cables through the cable channel on the base. D-Link DCS-4605EV User Manual 10 If you are using a PoE connection. Step 5 Connect the power and Ethernet cables, or just the Ethernet cable if you are mounting the camera to the ceiling, use a flathead screwdriver to the wall. Section 2: Installation Step 4 Use the screws provided to mount the camera to remove the plastic hole cover from the bottom of the camera, guide the camera cables through the bottom.
User Manual
Page 11
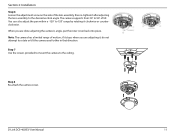
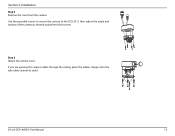
...; to rotate or tilt the camera any further in that direction. Step 7 Use the screws provided to mount the camera to the desired vertical angle. D-Link DCS-4605EV User Manual 11 Section 2: Installation Step 6 Loosen the adjustment screw on the side of the lens assembly, then re-tighten it clockwise or counterclockwise. if it...
...; to rotate or tilt the camera any further in that direction. Step 7 Use the screws provided to mount the camera to the desired vertical angle. D-Link DCS-4605EV User Manual 11 Section 2: Installation Step 6 Loosen the adjustment screw on the side of the lens assembly, then re-tighten it clockwise or counterclockwise. if it...
User Manual
Page 12
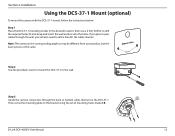
... you plan to pass cables through the back or bottom cable channel on the DCS-37-1. Step 2 Use the provided screws to mount the DCS-37-1 to drill a hole for the cable channel. Step 1 Place the DCS-37-1 mounting sticker in the corresponding graphics may be different from your product, but... deep and insert the wall anchors into the holes. Step 3 Guide the camera connectors through the wall, you will also need to the wall. D-Link DCS-4605EV User Manual 12 Note: The camera in the desired location, then use a 6 mm drill bit to the bracket using the set of mounting holes marked B....
... you plan to pass cables through the back or bottom cable channel on the DCS-37-1. Step 2 Use the provided screws to mount the DCS-37-1 to drill a hole for the cable channel. Step 1 Place the DCS-37-1 mounting sticker in the corresponding graphics may be different from your product, but... deep and insert the wall anchors into the holes. Step 3 Guide the camera connectors through the wall, you will also need to the wall. D-Link DCS-4605EV User Manual 12 Note: The camera in the desired location, then use a 6 mm drill bit to the bracket using the set of mounting holes marked B....
User Manual
Page 13
If you are passing the camera cables through the wall, place the rubber stopper into the bottom cable channel on the mount to the DCS-37-1, then adjust the angle and rotation of the camera as desired using the tilt lock screw. Use the provided screws to mount the camera to seal it. Section 2: Installation Step 4 Remove the cover from the camera. Step 5 Attach the camera cover. D-Link DCS-4605EV User Manual 13
If you are passing the camera cables through the wall, place the rubber stopper into the bottom cable channel on the mount to the DCS-37-1, then adjust the angle and rotation of the camera as desired using the tilt lock screw. Use the provided screws to mount the camera to seal it. Section 2: Installation Step 4 Remove the cover from the camera. Step 5 Attach the camera cover. D-Link DCS-4605EV User Manual 13

User Manual
Page 14
... screws to mount the camera to the wall using the set of mounting holes marked B. Section 2: Installation Using the DCS-37-2 Mount (optional) To mount the camera with the DCS-37-2 mount, follow the instructions below. Step 3 Guide the camera connectors through the ceiling, you plan to drill ...a hole for the cable channel. Step 1 Place the DCS-37-2 mounting sticker in the corresponding graphics may be different from your product, but the procedure is the same. D-Link DCS-4605EV User Manual 14 If you will also need to pass cables through the back or side ...
... screws to mount the camera to the wall using the set of mounting holes marked B. Section 2: Installation Using the DCS-37-2 Mount (optional) To mount the camera with the DCS-37-2 mount, follow the instructions below. Step 3 Guide the camera connectors through the ceiling, you plan to drill ...a hole for the cable channel. Step 1 Place the DCS-37-2 mounting sticker in the corresponding graphics may be different from your product, but the procedure is the same. D-Link DCS-4605EV User Manual 14 If you will also need to pass cables through the back or side ...
User Manual
Page 15
Step 5 Attach the camera cover. Section 2: Installation Step 4 Remove the cover from the camera. Use the provided screws to mount the camera to seal it. If you are passing the camera cables through the ceiling, place the rubber stopper into the side cable channel to the DCS-37-2, then adjust the angle and rotation of the camera as desired using the tilt lock screw. D-Link DCS-4605EV User Manual 15
Step 5 Attach the camera cover. Section 2: Installation Step 4 Remove the cover from the camera. Use the provided screws to mount the camera to seal it. If you are passing the camera cables through the ceiling, place the rubber stopper into the side cable channel to the DCS-37-2, then adjust the angle and rotation of the camera as desired using the tilt lock screw. D-Link DCS-4605EV User Manual 15
User Manual
Page 16
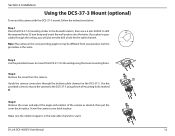
... drill bit to pass cables through the bottom cable channel on the DCS-37-3. Use the provided screws to mount the camera to seal it. D-Link DCS-4605EV User Manual 16 Step 1 Place the DCS-37-3 mounting sticker in the side cable channel to the DCS-37-3 using the inner mounting holes. Screw the camera cover back...
... drill bit to pass cables through the bottom cable channel on the DCS-37-3. Use the provided screws to mount the camera to seal it. D-Link DCS-4605EV User Manual 16 Step 1 Place the DCS-37-3 mounting sticker in the side cable channel to the DCS-37-3 using the inner mounting holes. Screw the camera cover back...


