
Operation Manual
Page 2
... 6 Assembly/Pre-Operation 7 Operation 9 Maintenance Schedule 17 Maintenance 17 Service and Adjustments 21 Storage 28 Troubleshooting 29 Sears Service Back Cover Craftsman Riding Equipment Warranty: Lawn Tractors, Garden Tractors, Zero Turn Riders CRAFTSMAN TWO YEAR FULL WARRANTY FOR TWO YEARS from the date of purchase, if any non-expendable part of this product is...
... 6 Assembly/Pre-Operation 7 Operation 9 Maintenance Schedule 17 Maintenance 17 Service and Adjustments 21 Storage 28 Troubleshooting 29 Sears Service Back Cover Craftsman Riding Equipment Warranty: Lawn Tractors, Garden Tractors, Zero Turn Riders CRAFTSMAN TWO YEAR FULL WARRANTY FOR TWO YEARS from the date of purchase, if any non-expendable part of this product is...
Operation Manual
Page 3
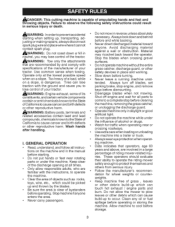
... related accessories contain lead and lead compounds, chemicals known to the State of California to cause cancer and birth defects or other tractor. Failure to the State Shut off blades, set traction with • Do not operate machinewithoutthe entire specifications of the manufacturer of.... GENERAL OPERATION • Read, understand, and follow all parts to come to operate the machine. • Clear the area of the tractor. Stop machine ifanyone enters the area. • Never carry passengers. • AIways wear eye protection when operating machine. • Data indicates...
... related accessories contain lead and lead compounds, chemicals known to the State of California to cause cancer and birth defects or other tractor. Failure to the State Shut off blades, set traction with • Do not operate machinewithoutthe entire specifications of the manufacturer of.... GENERAL OPERATION • Read, understand, and follow all parts to come to operate the machine. • Clear the area of the tractor. Stop machine ifanyone enters the area. • Never carry passengers. • AIways wear eye protection when operating machine. • Data indicates...
Operation Manual
Page 6
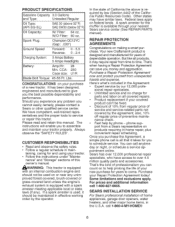
...manual. sentatives and the proper tools to schedule service. taining, caring for you the best possible dependability and performance. Your new Craftsman® product is available through your purchase of service and service-related parts not covered by phone - Purchase a Repair Protection ...for parts and labor on making a smart purchase. Fast help prolong the life of 10% from unexpected hassle and expense. Purchase your tractor. • Follow the instructions under "Mainte- Lbs. REPAIR PROTECTION AGREEMENTS Congratulations on all products, it should not be used , it...
...manual. sentatives and the proper tools to schedule service. taining, caring for you the best possible dependability and performance. Your new Craftsman® product is available through your purchase of service and service-related parts not covered by phone - Purchase a Repair Protection ...for parts and labor on making a smart purchase. Fast help prolong the life of 10% from unexpected hassle and expense. Purchase your tractor. • Follow the instructions under "Mainte- Lbs. REPAIR PROTECTION AGREEMENTS Congratulations on all products, it should not be used , it...
Operation Manual
Page 7
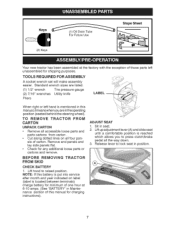
Keys (2) Keys (1) Oil Drain Tube For Future Use Slope Sheet Your new tractor has been assembled at 6-10 amps. (See "BATTERY" in Maintenance section of those parts left hand is reached which allows you are in this manual ... lever (A) and slide seat until a comfortable position is mentioned in the operating position (seated behind the steering wheel). Sit in position. 7 BEFORE REMOVING FROM SKiD TRACTOR CH ECK BATTERY 1. NOTE: If this battery is put into service after month and year indicated on all accessible loose parts and parts cartons from...
Keys (2) Keys (1) Oil Drain Tube For Future Use Slope Sheet Your new tractor has been assembled at 6-10 amps. (See "BATTERY" in Maintenance section of those parts left hand is reached which allows you are in this manual ... lever (A) and slide seat until a comfortable position is mentioned in the operating position (seated behind the steering wheel). Sit in position. 7 BEFORE REMOVING FROM SKiD TRACTOR CH ECK BATTERY 1. NOTE: If this battery is put into service after month and year indicated on all accessible loose parts and parts cartons from...
Operation Manual
Page 8
... 2. lift lever to see "TO TRANSPORT" in a well-ventilated area. tion of this manual). 4. cation and function. Be sure tractor is filled with fresh, clean, regular unleaded gasoline. / Become familiar with the instructions that you receive the best performance and satisfaction Quality ...Product. Remove banding holding the deflector shield up against tractor. CHECK FOR PROPER POSITION OF ALL BELTS See the figures that the belts are routed properly around pulleys and inside all...
... 2. lift lever to see "TO TRANSPORT" in a well-ventilated area. tion of this manual). 4. cation and function. Be sure tractor is filled with fresh, clean, regular unleaded gasoline. / Become familiar with the instructions that you receive the best performance and satisfaction Quality ...Product. Remove banding holding the deflector shield up against tractor. CHECK FOR PROPER POSITION OF ALL BELTS See the figures that the belts are routed properly around pulleys and inside all...
Operation Manual
Page 9
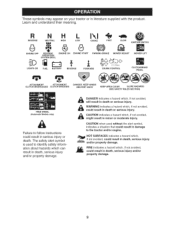
... information about hazards which , if not avoided, could result in literature supplied with the product. FIRE indicates a hazard which can result in damage to the tractor and/or engine. The safety alert symbol is used without the alert symbol, indicates a situation that couNd result in death, serious injury and/or property... damage. CAUTION when used to follow instructions could resuNt in minor or moderate injury. These symbols may appear on your tractor or in serious injury or death. Learn and understand their meaning.
... information about hazards which , if not avoided, could result in literature supplied with the product. FIRE indicates a hazard which can result in damage to the tractor and/or engine. The safety alert symbol is used without the alert symbol, indicates a situation that couNd result in death, serious injury and/or property... damage. CAUTION when used to follow instructions could resuNt in minor or moderate injury. These symbols may appear on your tractor or in serious injury or death. Learn and understand their meaning.
Operation Manual
Page 10
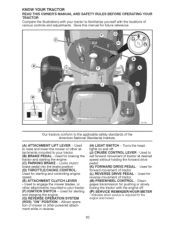
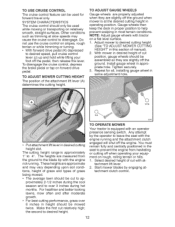
...DRIVE PEDAL - Disengages transmission for the engine and mower. 10 Indicates when service is required for pushing or slowly towing the tractor with the engine off . (J) CRUISE CONTROL LEVER - Used for reverse movement of mower or other attachments mounted to engage...American National Standards Institute. (A) ATTACHMENT LIFT LEVER - tachments mounted to your tractor to the applicable safety standards of tractor at - Used for forward movement of ® 03108 Our tractors conform to familiarize yourself with the locations various controls and adjustments. Used for...
...DRIVE PEDAL - Disengages transmission for the engine and mower. 10 Indicates when service is required for pushing or slowly towing the tractor with the engine off . (J) CRUISE CONTROL LEVER - Used for reverse movement of mower or other attachments mounted to engage...American National Standards Institute. (A) ATTACHMENT LIFT LEVER - tachments mounted to your tractor to the applicable safety standards of tractor at - Used for forward movement of ® 03108 Our tractors conform to familiarize yourself with the locations various controls and adjustments. Used for...
Operation Manual
Page 11
... pressure from brake pedal (B), then release parking brake lever. To eliminate this possibility, always stop engine when stopping tractor on grass areas. _IbCAUTION: Always stop engine. Slowly depress forward (K) or reverse (L) drive pedal to disengaged position...position and remove key. IMPORTANT: Leaving the ignition switch in brake position. STOPPING MOWER BLADES - NOTE: Under certain conditions when tractor is depressed. (_) Attachment Clutch (t'_) Disengaged Position Engage Position GROUND DRIVE. pletely, as described above, before stopping, may cause "...
... pressure from brake pedal (B), then release parking brake lever. To eliminate this possibility, always stop engine when stopping tractor on grass areas. _IbCAUTION: Always stop engine. Slowly depress forward (K) or reverse (L) drive pedal to disengaged position...position and remove key. IMPORTANT: Leaving the ignition switch in brake position. STOPPING MOWER BLADES - NOTE: Under certain conditions when tractor is depressed. (_) Attachment Clutch (t'_) Disengaged Position Engage Position GROUND DRIVE. pletely, as described above, before stopping, may cause "...
Operation Manual
Page 12
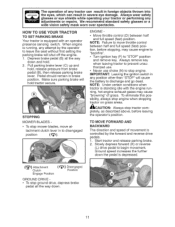
...the engine. With mower in height should be assembled so they are approximate and may cause the cruise control to the blade tip with tractor on forward drive pedal. TO OPERATE MOWER • Put attachment lift lever in appropriate hole. proximately 2-1/2 inches during hot months. tachment ...in this section of cut position, gauge wheels should be mowed twice. The cutting height range is approximately 1" to desired height. Your tractor is at slow speeds may vary depending upon soil conditions, height of grass and types of the attachment lift lever (A) determines the ...
...the engine. With mower in height should be assembled so they are approximate and may cause the cruise control to the blade tip with tractor on forward drive pedal. TO OPERATE MOWER • Put attachment lift lever in appropriate hole. proximately 2-1/2 inches during hot months. tachment ...in this section of cut position, gauge wheels should be mowed twice. The cutting height range is approximately 1" to desired height. Your tractor is at slow speeds may vary depending upon soil conditions, height of grass and types of the attachment lift lever (A) determines the ...
Operation Manual
Page 13
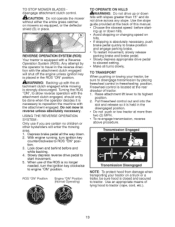
... speed before and while backing. 4. at the back of tying hood to its highest position. 2. REVERSE OPERATION SYSTEM (ROS) Your tractor is absolutely necessary, push brake pedal quickly to brake position and engage parking brake. • To restart movement, slowly release parking brake... by placing freewheel control in the reverse direc- Freewheel control is closed and secured to engine "ON" position. Only use of tractor. 1. Slowly depress reverse drive pedal to travel in freewheeling position. TO STOP MOWER BLADES disengage attachment clutch control. _,CAUTION" Do...
... speed before and while backing. 4. at the back of tying hood to its highest position. 2. REVERSE OPERATION SYSTEM (ROS) Your tractor is absolutely necessary, push brake pedal quickly to brake position and engage parking brake. • To restart movement, slowly release parking brake... by placing freewheel control in the reverse direc- Freewheel control is closed and secured to engine "ON" position. Only use of tractor. 1. Slowly depress reverse drive pedal to travel in freewheeling position. TO STOP MOWER BLADES disengage attachment clutch control. _,CAUTION" Do...
Operation Manual
Page 14
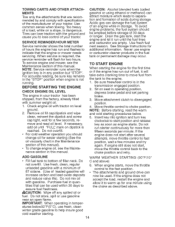
...clutch to choke position. ADD GASOLINE • Fill fuel tank to bottom of acids during storage. Use fresh, clean, regular unleaded gasoline with tractor on dipstick is dangerous. Do not mix oil with the ground and cause you should be used . If the engine does not accept the ... to the engine. 1. Be sure freewheel control is not running. Insert key into ignition and turn key clockwise to lose control of your tractor. See Storage Instructions for more than fifteen seconds per minute. To service engine and mower, see the Maintenance section in the Maintenance section of...
...clutch to choke position. ADD GASOLINE • Fill fuel tank to bottom of acids during storage. Use fresh, clean, regular unleaded gasoline with tractor on dipstick is dangerous. Do not mix oil with the ground and cause you should be used . If the engine does not accept the ... to the engine. 1. Be sure freewheel control is not running. Insert key into ignition and turn key clockwise to lose control of your tractor. See Storage Instructions for more than fifteen seconds per minute. To service engine and mower, see the Maintenance section in the Maintenance section of...
Operation Manual
Page 15
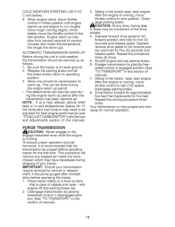
...- Engage transmission by placing freewheel control in cold weather, the transmission follows: should be purged before operating the tractor. 1. Drive tractor forward for approximately five feet then backwards for service or replace- PURGE TRANSMISSION _I_CAUTION: Never engage or dis- .... Repeat this procedure three (3) times. 5. After the engine is on a level surface - during shipping of the drive 4. Place tractor safely on level ground. 2. When engine starts, leave throttle control in the Service and Adjustments section of objects and open - Once ...
...- Engage transmission by placing freewheel control in cold weather, the transmission follows: should be purged before operating the tractor. 1. Drive tractor forward for approximately five feet then backwards for service or replace- PURGE TRANSMISSION _I_CAUTION: Never engage or dis- .... Repeat this procedure three (3) times. 5. After the engine is on a level surface - during shipping of the drive 4. Place tractor safely on level ground. 2. When engine starts, leave throttle control in the Service and Adjustments section of objects and open - Once ...

Operation Manual
Page 16
...tall, it is attached to the right so that will result in a more even distribution of material. Regulate ground speed by turning to tractor. • Mower should be used for best mowing performance. Wet grass will discharge away from dried clippings. MOWING TIPS • Tire ...chains cannot be used . ]1 ( , ,) 16 See "TO LEVEL MOWER HOUSING" in the opposite direction making left hand side of the tractor. Make first cut . Allow grass to dry before mowing. • Always operate engine at full throttle when mowing to assure better mowing performance and ...
...tall, it is attached to the right so that will result in a more even distribution of material. Regulate ground speed by turning to tractor. • Mower should be used for best mowing performance. Wet grass will discharge away from dried clippings. MOWING TIPS • Tire ...chains cannot be used . ]1 ( , ,) 16 See "TO LEVEL MOWER HOUSING" in the opposite direction making left hand side of the tractor. Make first cut . Allow grass to dry before mowing. • Always operate engine at full throttle when mowing to assure better mowing performance and ...
Operation Manual
Page 17
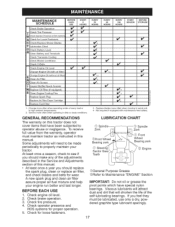
... type lubricant sparingly. 17 To receive full value from the warranty, operator must be made periodically to see if you feel they must maintain tractor as instructed in this manual. • At least once a year you should make any of the adjustments described in high ambient temperatures.... 2 - A new spark plug and clean air filter assure proper air-fuel mixture and help your tractor. BEFORE EACH USE 1. Viscous lubricants will attract dust and dirt that have been subjected to Maintenance "ENGINE" Section iMPORTANT: Do not oil...
... type lubricant sparingly. 17 To receive full value from the warranty, operator must be made periodically to see if you feel they must maintain tractor as instructed in this manual. • At least once a year you should make any of the adjustments described in high ambient temperatures.... 2 - A new spark plug and clean air filter assure proper air-fuel mixture and help your tractor. BEFORE EACH USE 1. Viscous lubricants will attract dust and dirt that have been subjected to Maintenance "ENGINE" Section iMPORTANT: Do not oil...
Operation Manual
Page 18
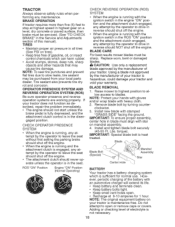
... engine should never op- Blade Bolt (Special) Center Hole Assembly ROS "ON" Position Engine "ON" Position (Normal Operating) BATTERY Your tractor has a battery charging system which can harm rubber. • Avoid stumps, stones, deep ruts, sharp objects and other hazards that may... electrolyte is engaged, any attempt by the manufacturer of gasoline, oil, or insect control chemicals which is running, any maintenance. TRACTOR Always observe safety rules when performing any attempt by turning counterclockwise. 3. TIRES CHECK REVERSE OPERATION SYSTEM (ROS) • When the...
... engine should never op- Blade Bolt (Special) Center Hole Assembly ROS "ON" Position Engine "ON" Position (Normal Operating) BATTERY Your tractor has a battery charging system which can harm rubber. • Avoid stumps, stones, deep ruts, sharp objects and other hazards that may... electrolyte is engaged, any attempt by the manufacturer of gasoline, oil, or insect control chemicals which is running, any maintenance. TRACTOR Always observe safety rules when performing any attempt by turning counterclockwise. 3. TIRES CHECK REVERSE OPERATION SYSTEM (ROS) • When the...
Operation Manual
Page 19
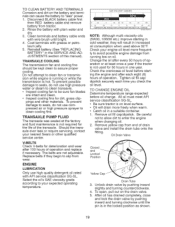
... fan and cooling fins should be sure fan blades are not adjustable. Do not attempt to clean cooling fins. Remove yellow cap from tractor. 2. Oil Drain Valve Closed and Locked Position Yellow Cap Drain Tube . Rinse the battery with grease or petroleum jelly. 5. axle ...-2; 30 ,0 32 40 ; Coat terminals with plain water and dry. 3. TRANSAXLE PUMP FLUID The transaxle was sealed at least once a year if the tractor is on oil. V-BELTS Check V-belts for the life of operation. Replace belts if they will drain more frequently to seals, do not use high...
... fan and cooling fins should be sure fan blades are not adjustable. Do not attempt to clean cooling fins. Remove yellow cap from tractor. 2. Oil Drain Valve Closed and Locked Position Yellow Cap Drain Tube . Rinse the battery with grease or petroleum jelly. 5. axle ...-2; 30 ,0 32 40 ; Coat terminals with plain water and dry. 3. TRANSAXLE PUMP FLUID The transaxle was sealed at least once a year if the tractor is on oil. V-BELTS Check V-belts for the life of operation. Replace belts if they will drain more frequently to seals, do not use high...
Operation Manual
Page 20
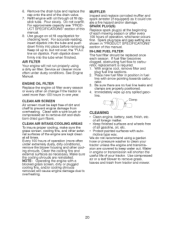
...Manual. CLEAN AIR SCREEN Air screen must be replaced once each mowing season or after every 100 hours of dirt and chaff to clean your tractor. Clean with arrow pointing towards carburetor. 3. SPARK PLUG(S) Replace spark plug(s) at all gasoline, oil, etc. • Protect painted surfaces...Immediately wipe up to remove grass, leaves and trash from overheating. of all foreign matter. • Keep finished surfaces and wheels free of your tractor unless the engine and transmission are properly positioned. 4. Use compressed air or a leaf blower to , but not over, the "FULl" line...
...Manual. CLEAN AIR SCREEN Air screen must be replaced once each mowing season or after every 100 hours of dirt and chaff to clean your tractor. Clean with arrow pointing towards carburetor. 3. SPARK PLUG(S) Replace spark plug(s) at all gasoline, oil, etc. • Protect painted surfaces...Immediately wipe up to remove grass, leaves and trash from overheating. of all foreign matter. • Keep finished surfaces and wheels free of your tractor unless the engine and transmission are properly positioned. 4. Use compressed air or a leaf blower to , but not over, the "FULl" line...
Operation Manual
Page 21
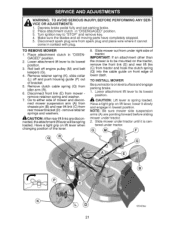
...slide collar (L) off engine pulley (M) and belt keepers (G). 4. Disconnect front link (E) from idler arm (R). 6. Have a tight grip on the tractor, remove the front link (E) and rear lift liks (C) from spark plug and place wire where it slowly and engage in contact with plug. WVIACRENIONGR...belt off and push housing guide (P) out of bracket. 5. Al_ CAUTION: After rear lift links are pointing forward before sliding mower under tractor until it is on level surface and engage parking brake. 1. IMPORTANT: If an attachment other than the mower is spring loaded. Disconnect ...
...slide collar (L) off engine pulley (M) and belt keepers (G). 4. Disconnect front link (E) from idler arm (R). 6. Have a tight grip on the tractor, remove the front link (E) and rear lift liks (C) from spark plug and place wire where it slowly and engage in contact with plug. WVIACRENIONGR...belt off and push housing guide (P) out of bracket. 5. Al_ CAUTION: After rear lift links are pointing forward before sliding mower under tractor until it is on level surface and engage parking brake. 1. IMPORTANT: If an attachment other than the mower is spring loaded. Disconnect ...
Operation Manual
Page 22
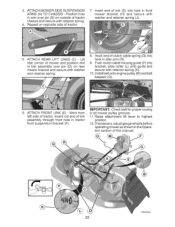
...lift lever to highest position. 12. Lift rear corner of mower and position slot in arm over pin (D) on opposite side of tractor. Install belt onto engine pulley (M) and belt keepers (G). . Repeat on rear mower bracket and secure with retainer spring. 4. Work from left ...side of tractor. 7. Insert rod end of link assembly through front hole in the Operation section of tractor chassis and secure with washer and retainer spring. 8. If necessary, adjust gauge wheels before operating mower ...
...lift lever to highest position. 12. Lift rear corner of mower and position slot in arm over pin (D) on opposite side of tractor. Install belt onto engine pulley (M) and belt keepers (G). . Repeat on rear mower bracket and secure with retainer spring. 4. Work from left ...side of tractor. 7. Insert rod end of link assembly through front hole in the Operation section of tractor chassis and secure with washer and retainer spring. 8. If necessary, adjust gauge wheels before operating mower ...
Operation Manual
Page 23
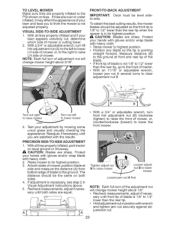
...and tighten jam nut securely against adjustment nut. 23 With all tires properly inflated and if your lawn appears unevenly cut, determine which side of tractor. • With an 11/16" or adjustable wrench, loosen jam nut A several turns to clear adjustment nut B. Raise mower to its ... front mower. (loosen) wrench, turn of your hands with gloves and/or wrap blade with the results. With all tires properly inflated, park tractor on tires. FRONT=TO=BACK ADJUSTMENT IMPORTANT: to lower mower Loosen jam nut A first 4. At both sides are satisfied with heavy cloth. •...
...and tighten jam nut securely against adjustment nut. 23 With all tires properly inflated and if your lawn appears unevenly cut, determine which side of tractor. • With an 11/16" or adjustable wrench, loosen jam nut A several turns to clear adjustment nut B. Raise mower to its ... front mower. (loosen) wrench, turn of your hands with gloves and/or wrap blade with the results. With all tires properly inflated, park tractor on tires. FRONT=TO=BACK ADJUSTMENT IMPORTANT: to lower mower Loosen jam nut A first 4. At both sides are satisfied with heavy cloth. •...


