
Operation Manual
Page 2
... 6 Assembly/Pre-Operation 7 Operation 9 Maintenance Schedule 17 Maintenance 17 Service and Adjustments 21 Storage 28 Troubleshooting 29 Sears Service Back Cover Craftsman Riding Equipment Warranty: Lawn Tractors, Garden Tractors, Zero Turn Riders CRAFTSMAN TWO YEAR FULL WARRANTY FOR TWO YEARS from the date of purchase, if any non-expendable part of this product is...
... 6 Assembly/Pre-Operation 7 Operation 9 Maintenance Schedule 17 Maintenance 17 Service and Adjustments 21 Storage 28 Troubleshooting 29 Sears Service Back Cover Craftsman Riding Equipment Warranty: Lawn Tractors, Garden Tractors, Zero Turn Riders CRAFTSMAN TWO YEAR FULL WARRANTY FOR TWO YEARS from the date of purchase, if any non-expendable part of this product is...
Operation Manual
Page 3
...lead and lead compounds, chemicals known to the State of California to operate the machine. • Clear the area of the tractor. on a slope, is capable of your grass catcher, discharge guard, or other reproductive harm. Keep clear of the discharge opening...serious injury. • Follow the manufacturer's recommen- dation for traffic when operating near rotating parts or under the influence of your tractor. Avoid discharging material 41& against a wall or obstruction. Material _]LWARNING: Do not coast down and behind justing or making repairs,...
...lead and lead compounds, chemicals known to the State of California to operate the machine. • Clear the area of the tractor. on a slope, is capable of your grass catcher, discharge guard, or other reproductive harm. Keep clear of the discharge opening...serious injury. • Follow the manufacturer's recommen- dation for traffic when operating near rotating parts or under the influence of your tractor. Avoid discharging material 41& against a wall or obstruction. Material _]LWARNING: Do not coast down and behind justing or making repairs,...
Operation Manual
Page 6
... it should be fixed. Purchase a Repair Protection Agreement now and protect yourseff from regular price of dependable operation. Product replacement if your tractor. • Follow the instructions under "Mainte- W/O Filter: 60 oz. sentatives and the proper tools to assemble and maintain your nearest... for years to over 12,000 professional repair specialists, who have competent, well-trained repre- Your new Craftsman® product is available through your tractor properly. Unlimited service and no charge for years of service and service-related parts not covered by the ...
... it should be fixed. Purchase a Repair Protection Agreement now and protect yourseff from regular price of dependable operation. Product replacement if your tractor. • Follow the instructions under "Mainte- W/O Filter: 60 oz. sentatives and the proper tools to assemble and maintain your nearest... for years to over 12,000 professional repair specialists, who have competent, well-trained repre- Your new Craftsman® product is available through your tractor properly. Unlimited service and no charge for years of service and service-related parts not covered by the ...
Operation Manual
Page 7
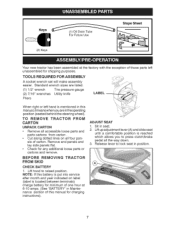
...brake pedal all four panels of this battery is put into service after month and year indicated on all the way down. 3. TO REMOVE TRACTOR FROM CARTON UNPACK CARTON • Remove all accessible loose parts and parts cartons from carton. • Cut along dotted lines on label ... seat in seat. 2. Remove end panels and lay side panels flat. • Check for charging instructions). ADJUST SEAT 1. BEFORE REMOVING FROM SKiD TRACTOR CH ECK BATTERY 1. NOTE: If this manual for any additional loose parts or cartons and remove. TOOLS REQUIRED FOR ASSEMBLY A socket wrench set will...
...brake pedal all four panels of this battery is put into service after month and year indicated on all the way down. 3. TO REMOVE TRACTOR FROM CARTON UNPACK CARTON • Remove all accessible loose parts and parts cartons from carton. • Cut along dotted lines on label ... seat in seat. 2. Remove end panels and lay side panels flat. • Check for charging instructions). ADJUST SEAT 1. BEFORE REMOVING FROM SKiD TRACTOR CH ECK BATTERY 1. NOTE: If this manual for any additional loose parts or cartons and remove. TOOLS REQUIRED FOR ASSEMBLY A socket wrench set will...
Operation Manual
Page 8
... Quality Product. See "TO CH ECK BRAKE" in the Service and Adjustments section of this manual. ,/CHECKLIST Before you operate your new tractor, we wish to assure that you learn how to the following checklist: J All assembly instructions have been completed. While learning how to ... securely. /All tires are routed correctly. Operate them before you start the engine. / Be sure brake system is in carton. Be sure tractor is in safe operating condition. / Be sure Operator Presence System and Reverse Operation System (ROS) are shown for best cutting performance. •...
... Quality Product. See "TO CH ECK BRAKE" in the Service and Adjustments section of this manual. ,/CHECKLIST Before you operate your new tractor, we wish to assure that you learn how to the following checklist: J All assembly instructions have been completed. While learning how to ... securely. /All tires are routed correctly. Operate them before you start the engine. / Be sure brake system is in carton. Be sure tractor is in safe operating condition. / Be sure Operator Presence System and Reverse Operation System (ROS) are shown for best cutting performance. •...
Operation Manual
Page 9
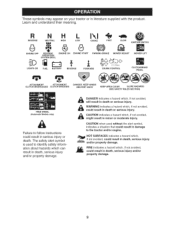
The safety alert symbol is used without the alert symbol, indicates a situation that couNd result in damage to the tractor and/or engine. CAUTION indicates a hazard which can result in serious injury or death. Learn and understand their meaning. DANGER indicates a hazard which , if ... Failure to identify safety information about hazards which , if not avoided might result in literature supplied with the product. These symbols may appear on your tractor or in minor or moderate injury. CAUTION when used to follow instructions could resuNt in death or serious injury.
The safety alert symbol is used without the alert symbol, indicates a situation that couNd result in damage to the tractor and/or engine. CAUTION indicates a hazard which can result in serious injury or death. Learn and understand their meaning. DANGER indicates a hazard which , if ... Failure to identify safety information about hazards which , if not avoided might result in literature supplied with the product. These symbols may appear on your tractor or in minor or moderate injury. CAUTION when used to follow instructions could resuNt in death or serious injury.
Operation Manual
Page 10
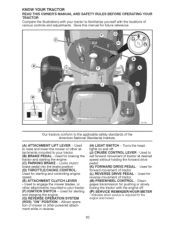
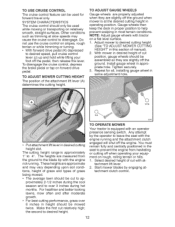
...to raise and lower the mower or other attachments mounted to set forward movement of tractor. (M) FREEWHEEL CONTROL - Used to your tractor. (B) BRAKE PEDAL - Disengages transmission for reverse movement of tractor at - Save this manual for starting and stopping the engine. (G) REVERSE OPERATION ..., or other at desired speed without holding the forward drive pedal. (K) FORWARD DRIVE PEDAL - Used for braking the tractor and starting and controlling engine speed. (E) ATTACHMENT CLUTCH LEVER - Allows operation of the American National Standards Institute. (A) ATTACHMENT...
...to raise and lower the mower or other attachments mounted to set forward movement of tractor. (M) FREEWHEEL CONTROL - Used to your tractor. (B) BRAKE PEDAL - Disengages transmission for reverse movement of tractor at - Save this manual for starting and stopping the engine. (G) REVERSE OPERATION ..., or other at desired speed without holding the forward drive pedal. (K) FORWARD DRIVE PEDAL - Used for braking the tractor and starting and controlling engine speed. (E) ATTACHMENT CLUTCH LEVER - Allows operation of the American National Standards Institute. (A) ATTACHMENT...
Operation Manual
Page 11
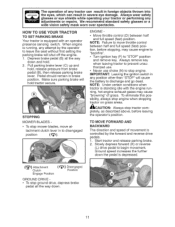
... The direction and speed of movement is standing idle with an operator presence sensing switch. brake 11 HOW TO USE YOUR TRACTOR TO SET PARKING BRAKE Your tractor is running , hot engine exhaust gases may cause engine to "backfire". • Turn ignition key (F) to "STOP"... position and remove key. tachment clutch lever in to begin movement. To eliminate this possibility, always stop engine when stopping tractor on grass areas. _IbCAUTION: Always stop ground drive, depress pedal all the way down the pedal is depressed. (_) Attachment Clutch (t'_) Disengaged Position...
... The direction and speed of movement is standing idle with an operator presence sensing switch. brake 11 HOW TO USE YOUR TRACTOR TO SET PARKING BRAKE Your tractor is running , hot engine exhaust gases may cause engine to "backfire". • Turn ignition key (F) to "STOP"... position and remove key. tachment clutch lever in to begin movement. To eliminate this possibility, always stop engine when stopping tractor on grass areas. _IbCAUTION: Always stop ground drive, depress pedal all the way down the pedal is depressed. (_) Attachment Clutch (t'_) Disengaged Position...
Operation Manual
Page 12
... the desired cutting height in the seat to prevent the engine from the ground to leave the seat with the engine running . Your tractor is approximately 1" to disengage. With mower in same adjustment hole. proximately 2-1/2 inches during hot months. Start mower blades by the operator... your equipment on forward drive pedal. Repeat for forward travel only. The heights are slightly off the ground. Make the first cut with tractor on slopes, rough tertian or while trimmimg or turning. • With forward drive pedal (K) depressed to desired cutting height (See "TO...
... the desired cutting height in the seat to prevent the engine from the ground to leave the seat with the engine running . Your tractor is approximately 1" to disengage. With mower in same adjustment hole. proximately 2-1/2 inches during hot months. Start mower blades by the operator... your equipment on forward drive pedal. Repeat for forward travel only. The heights are slightly off the ground. Make the first cut with tractor on slopes, rough tertian or while trimmimg or turning. • With forward drive pedal (K) depressed to desired cutting height (See "TO...
Operation Manual
Page 13
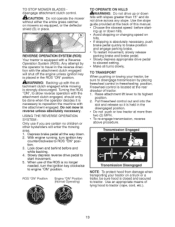
...attachment clutch engaged will enter the mowing area. 1. When use if you are certain no longer needed, turn ignition key counterclockwise to tractor. Freewheel control is closed and secured to ROS "ON" posi- tion with slopes greater than reverse Transmission Engaged Transmission Disengaged NOTE: To...System (ROS). Raise attachment lift lever to start movement. 5. at the back of tying hood to engine "ON" position. Only use of tractor. 1. Use the slope guide provided at more than 15 ° and do not drive across any slope. Depress brake pedal all the way...
...attachment clutch engaged will enter the mowing area. 1. When use if you are certain no longer needed, turn ignition key counterclockwise to tractor. Freewheel control is closed and secured to ROS "ON" posi- tion with slopes greater than reverse Transmission Engaged Transmission Disengaged NOTE: To...System (ROS). Raise attachment lift lever to start movement. 5. at the back of tying hood to engine "ON" position. Only use of tractor. 1. Use the slope guide provided at more than 15 ° and do not drive across any slope. Depress brake pedal all the way...
Operation Manual
Page 14
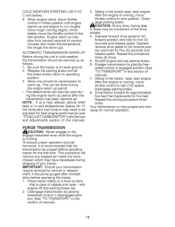
...assure fuel freshness. 6. NOTE: Before starting, read oil level. Do not overfill. • For cold weather operation you to bottom of your tractor has been TO START ENGINE When starting (See the run until "FULl" mark on level ground. 2. in quantities that can lose traction with ...should be used . ADD GASOLINE • Fill fuel tank to lose control of filler neck. Do not mix oil with tractor on dipstick is in your tractor. Tires can be emptied before storage of leaded gasoline will flash for easier starting the engine for a few minutes and try...
...assure fuel freshness. 6. NOTE: Before starting, read oil level. Do not overfill. • For cold weather operation you to bottom of your tractor has been TO START ENGINE When starting (See the run until "FULl" mark on level ground. 2. in quantities that can lose traction with ...should be used . ADD GASOLINE • Fill fuel tank to lose control of filler neck. Do not mix oil with tractor on dipstick is in your tractor. Tires can be emptied before storage of leaded gasoline will flash for easier starting the engine for a few minutes and try...
Operation Manual
Page 15
...brake. 8. mission which may have developed during step of your transmission require removal for transmission to operating position. 3. Place tractor safely on level ground. 2. Disengage transmission by placing free- Engine warm-up may take from several minutes (the colder ... _I_CAUTION: Never engage or dis- Depress forward drive pedal to the fast position. Your transmission is running . ation before operating tractor for best engine performance (see "TO ADJUST CARBURETOR" in cold temperatures (below ) 6. Depress reverse drive pedal to half (1/2)...
...brake. 8. mission which may have developed during step of your transmission require removal for transmission to operating position. 3. Place tractor safely on level ground. 2. Disengage transmission by placing free- Engine warm-up may take from several minutes (the colder ... _I_CAUTION: Never engage or dis- Depress forward drive pedal to the fast position. Your transmission is running . ation before operating tractor for best engine performance (see "TO ADJUST CARBURETOR" in cold temperatures (below ) 6. Depress reverse drive pedal to half (1/2)...

Operation Manual
Page 16
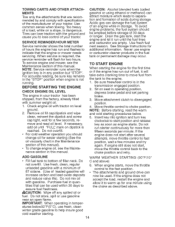
... • When mowing large areas, start by selecting a low enough speed to give the mower cutting performance as well as the quality of the tractor. Have the cut relatively high; Allow grass to dry before mowing. • Always operate engine at full throttle when mowing to the right of ... in the opposite direction making left hand side of material. MOWING TIPS • Tire chains cannot be used when the mower housing is attached to tractor. • Mower should be properly leveled for trimming. • Drive so that clippings are discharged onto the area that has already been cut. ...
... • When mowing large areas, start by selecting a low enough speed to give the mower cutting performance as well as the quality of the tractor. Have the cut relatively high; Allow grass to dry before mowing. • Always operate engine at full throttle when mowing to the right of ... in the opposite direction making left hand side of material. MOWING TIPS • Tire chains cannot be used when the mower housing is attached to tractor. • Mower should be properly leveled for trimming. • Drive so that clippings are discharged onto the area that has already been cut. ...
Operation Manual
Page 17
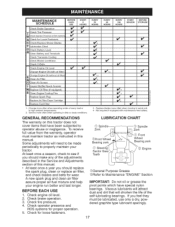
... graphite type lubricant sparingly. 17 Check brake operation. 3. Some adjustments will shorten the life of the adjustments described in this tractor does not cover items that have special nylon bearings. Check tire pressure. 4. Viscous lubricants will attract dust and dirt that ...LUBRICATION CHART The warranty on this manual. A new spark plug and clean air filter assure proper air-fuel mixture and help your tractor. MAINTENANCE SCHEDULE BEFORE EUASCEH EVERY HOU8RS EVERY HOU25RS EVERY HOU5R0S EVERY HO1U0R0S EVERY SEASON BEFORE STORAGE Check Brake Operation I_ T Check ...
... graphite type lubricant sparingly. 17 Check brake operation. 3. Some adjustments will shorten the life of the adjustments described in this tractor does not cover items that have special nylon bearings. Check tire pressure. 4. Viscous lubricants will attract dust and dirt that ...LUBRICATION CHART The warranty on this manual. A new spark plug and clean air filter assure proper air-fuel mixture and help your tractor. MAINTENANCE SCHEDULE BEFORE EUASCEH EVERY HOU8RS EVERY HOU25RS EVERY HOU5R0S EVERY HO1U0R0S EVERY SEASON BEFORE STORAGE Check Brake Operation I_ T Check ...
Operation Manual
Page 18
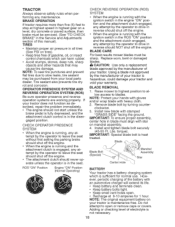
...any maintenance. OPERATOR PRESENCE SYSTEM AND REVERSE OPERATION SYSTEM (ROS) Be sure operator presence and reverse operation systems are working properly. TRACTOR Always observe safety rules when performing any attempt by the operator to drive in reverse should shut off the engine. • When..."GRASS SIDE" facing the ground. Blade Bolt (Special) Center Hole Assembly ROS "ON" Position Engine "ON" Position (Normal Operating) BATTERY Your tractor has a battery charging system which can harm rubber. • Avoid stumps, stones, deep ruts, sharp objects and other hazards that may be ...
...any maintenance. OPERATOR PRESENCE SYSTEM AND REVERSE OPERATION SYSTEM (ROS) Be sure operator presence and reverse operation systems are working properly. TRACTOR Always observe safety rules when performing any attempt by the operator to drive in reverse should shut off the engine. • When..."GRASS SIDE" facing the ground. Blade Bolt (Special) Center Hole Assembly ROS "ON" Position Engine "ON" Position (Normal Operating) BATTERY Your tractor has a battery charging system which can harm rubber. • Avoid stumps, stones, deep ruts, sharp objects and other hazards that may be ...
Operation Manual
Page 19
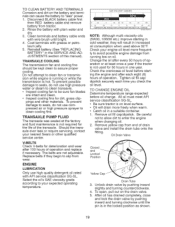
.... • Inspect cooling fins for 50 hours in a suitable container. 1. All oil must meet API service classification SG-SL • Be sure tractor is not required for deterioration and wear after every 50 hours of operation. TRANSAXLE COOLING The transmission fan and cooling fins should be sure fan... Do not attempt to enter the engine when changing oil. 2. TRANSAXLE PUMP FLUID The transaxle was sealed at least once a year if the tractor is running !ow on oil. Change the oil after 100 hours of drain valve and install the drain tube onto the fitting. Check the ...
.... • Inspect cooling fins for 50 hours in a suitable container. 1. All oil must meet API service classification SG-SL • Be sure tractor is not required for deterioration and wear after every 50 hours of operation. TRANSAXLE COOLING The transmission fan and cooling fins should be sure fan... Do not attempt to enter the engine when changing oil. 2. TRANSAXLE PUMP FLUID The transaxle was sealed at least once a year if the tractor is running !ow on oil. Change the oil after 100 hours of drain valve and install the drain tube onto the fitting. Check the ...
Operation Manual
Page 20
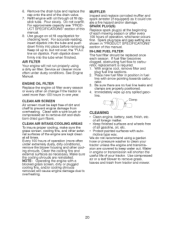
... new fuel filter in position in one year. We do not recommend using a dirty air filter. UCT SPECIFICATIONS" section of your tractor unless the engine and transmission are shown in engine or transmission will shorten the useful life of this manual. CLEAN AIR SCREEN Air ... Immediately wipe up to carburetor, replacement is used more often under extremely dusty, dirty conditions), remove the blower housing and other oil change if the tractor is required. 1. Every 100 hours of this manual. 8. With engine cool, remove filter and plug fuel line sections. 2. Clamp CLEANING •...
... new fuel filter in position in one year. We do not recommend using a dirty air filter. UCT SPECIFICATIONS" section of your tractor unless the engine and transmission are shown in engine or transmission will shorten the useful life of this manual. CLEAN AIR SCREEN Air ... Immediately wipe up to carburetor, replacement is used more often under extremely dusty, dirty conditions), remove the blower housing and other oil change if the tractor is required. 1. Every 100 hours of this manual. 8. With engine cool, remove filter and plug fuel line sections. 2. Clamp CLEANING •...
Operation Manual
Page 21
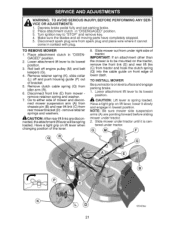
...remove retainer spring and washer. 7. Al_ CAUTION: After rear lift links are pointing forward before sliding mower under right side of tractor. TO INSTALL MOWER Be sure tractor is cen- Place attachment clutch in "DISENGAGED" position. 3. Roll belt off and push housing guide (P) out of lower dash... Turn ignition key to its lowest position. 3. remove retainer springs and washers. nected, the attachment lift lever will be mounted on the tractor, remove the front link (E) and rear lift liks (C) from spark plug and place wire where it is on lift lever when changing ...
...remove retainer spring and washer. 7. Al_ CAUTION: After rear lift links are pointing forward before sliding mower under right side of tractor. TO INSTALL MOWER Be sure tractor is cen- Place attachment clutch in "DISENGAGED" position. 3. Roll belt off and push housing guide (P) out of lower dash... Turn ignition key to its lowest position. 3. remove retainer springs and washers. nected, the attachment lift lever will be mounted on the tractor, remove the front link (E) and rear lift liks (C) from spark plug and place wire where it is on lift lever when changing ...
Operation Manual
Page 22
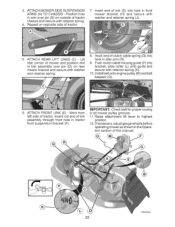
...guide (P) into bracket, slide collar (L) onto guide and secure with retainer spring. 4. Position hole in arm over pin (D) on opposite side of tractor. Insert end of tractor chassis and secure with retainer spring (K). 10. Install belt onto engine pulley (M) and belt keepers (G). . Work from left side of... tractor. 7. Lift rear corner of clutch cable spring (Q) into hole in link assembly over pin (B) on outside of link (E) into hole in idler arm ...
...guide (P) into bracket, slide collar (L) onto guide and secure with retainer spring. 4. Position hole in arm over pin (D) on opposite side of tractor. Insert end of tractor chassis and secure with retainer spring (K). 10. Install belt onto engine pulley (M) and belt keepers (G). . Work from left side of... tractor. 7. Lift rear corner of clutch cable spring (Q) into hole in link assembly over pin (B) on outside of link (E) into hole in idler arm ...
Operation Manual
Page 23
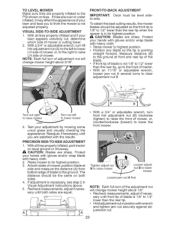
... both sides. sary until you to highest position. • Position any blade so the tip is not adjusted properly. With all tires properly inflated, park tractor on tires. to lower mower Loosen jam nut A first 4. The distance should be level side- VISUAL SIDE-TO-SIDE ADJUSTMENT 1. NOTE: Each full turn ...=TO=BACK ADJUSTMENT IMPORTANT: to raise mower Turn nut left to lower LH side of mower, or, to the right to raise LH side of tractor. • With an 11/16" or adjustable wrench, loosen jam nut A several turns to lower the 1. To obtain the best cutting results, the mower ...
... both sides. sary until you to highest position. • Position any blade so the tip is not adjusted properly. With all tires properly inflated, park tractor on tires. to lower mower Loosen jam nut A first 4. The distance should be level side- VISUAL SIDE-TO-SIDE ADJUSTMENT 1. NOTE: Each full turn ...=TO=BACK ADJUSTMENT IMPORTANT: to raise mower Turn nut left to lower LH side of mower, or, to the right to raise LH side of tractor. • With an 11/16" or adjustable wrench, loosen jam nut A several turns to lower the 1. To obtain the best cutting results, the mower ...


