
Worldwide Limited Warranty and Technical Support 2 year
Page 2
... as a result of your failure to follow the instructions that came with the product; (c) by the use of Compaq. YOU SHOULD MAKE REGULAR BACKUP COPIES OF THE DATA STORED ON YOUR HARD DRIVE OR OTHER STORAGE DEVICES AS A PRECAUTION AGAINST POSSIBLE FAILURES, ALTERATION, OR LOSS OF THE DATA...Warranty become the property of parts not manufactured or sold by operation outside the usage parameters stated in which the serial number has been removed or that has been damaged or rendered defective (a) as described and solely complemented by the warranty statutes in hardware performance. or (d) ...
... as a result of your failure to follow the instructions that came with the product; (c) by the use of Compaq. YOU SHOULD MAKE REGULAR BACKUP COPIES OF THE DATA STORED ON YOUR HARD DRIVE OR OTHER STORAGE DEVICES AS A PRECAUTION AGAINST POSSIBLE FAILURES, ALTERATION, OR LOSS OF THE DATA...Warranty become the property of parts not manufactured or sold by operation outside the usage parameters stated in which the serial number has been removed or that has been damaged or rendered defective (a) as described and solely complemented by the warranty statutes in hardware performance. or (d) ...

Hard Drive White Paper
Page 3
... docking device or external power supply running on DC power. Notebook F10 Setup Hard Drive Self-Test HP has enhanced the Hard Drive Self-Test routine which is available as one test option. Initiating the enhanced hard drive self-test includes the following table for power management. If a...: Either test may be undocked or removed from the following options are displayed: • Display status • Enable HP Notebook LidSwitch Policy Note 1: The HP Notebook LidSwitch Policy utility will not invoke Standby on all currently shipping notebooks, in either of this scenario is ...
... docking device or external power supply running on DC power. Notebook F10 Setup Hard Drive Self-Test HP has enhanced the Hard Drive Self-Test routine which is available as one test option. Initiating the enhanced hard drive self-test includes the following table for power management. If a...: Either test may be undocked or removed from the following options are displayed: • Display status • Enable HP Notebook LidSwitch Policy Note 1: The HP Notebook LidSwitch Policy utility will not invoke Standby on all currently shipping notebooks, in either of this scenario is ...
Hard Drive White Paper
Page 4
...must be replaced from the notebook altogether. Without the hard drive mounting screws, the chance of the notebook, they should contact their local service partner to reliably support the installed hard drive. Because the screws are an integral part of the design of hard drive failure over time is ...Compaq nx9000/ nx9005/nx9010 models, use bulk HDD spare kit part number 361188-001. Note: Customers should always be replaced after they are removed or when they are missing, they can be correctly installed at all times. Hard drive mounting screw kit-Whenever one or more hard drive...
...must be replaced from the notebook altogether. Without the hard drive mounting screws, the chance of the notebook, they should contact their local service partner to reliably support the installed hard drive. Because the screws are an integral part of the design of hard drive failure over time is ...Compaq nx9000/ nx9005/nx9010 models, use bulk HDD spare kit part number 361188-001. Note: Customers should always be replaced after they are removed or when they are missing, they can be correctly installed at all times. Hard drive mounting screw kit-Whenever one or more hard drive...
Hard Drive White Paper
Page 5
...- HP Recommendations for Notebook Users • Install HP Notebook LidSwitch Policy, or as an alternative, place the notebook into Standby mode before transporting it from one location to another. • Upgrade to the latest system BIOS, as given in the "F10 Setup Hard Drive Self-Test" section....that executes primarily from electronic memory without having to access the hard drive very often. • Perform the Defrag operation periodically to optimize the reading and writing of the hard drive reading/writing heads is moved to removable media. • Regularly check the HP Web site for...
...- HP Recommendations for Notebook Users • Install HP Notebook LidSwitch Policy, or as an alternative, place the notebook into Standby mode before transporting it from one location to another. • Upgrade to the latest system BIOS, as given in the "F10 Setup Hard Drive Self-Test" section....that executes primarily from electronic memory without having to access the hard drive very often. • Perform the Defrag operation periodically to optimize the reading and writing of the hard drive reading/writing heads is moved to removable media. • Regularly check the HP Web site for...
Maintenance and Service Guide
Page 26
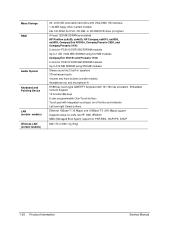
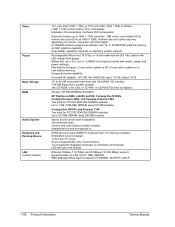
...At least 128 MB SDRAM preinstalled HP Pavilion ze5x00, ze4x00, HP Compaq nx9010, nx9008, nx9005, Compaq Evo N1050v, Compaq Presario 2500, and Compaq Presario 2100: 2 slots for PC2100 DDR-266 SDRAM modules Up to 1 GB (1024 MB) SDRAM using 512 MB modules Compaq Evo N1010v and Presario 1100: 2 slots for PXE/BINL, ...NCP/IPX, DHCP 802.11b or 802.11g (54g) 1-20 Product Information Service Manual to 60-GB removable hard drive with 101/102 key emulation. Mass Storage RAM Audio System Keyboard...
...At least 128 MB SDRAM preinstalled HP Pavilion ze5x00, ze4x00, HP Compaq nx9010, nx9008, nx9005, Compaq Evo N1050v, Compaq Presario 2500, and Compaq Presario 2100: 2 slots for PC2100 DDR-266 SDRAM modules Up to 1 GB (1024 MB) SDRAM using 512 MB modules Compaq Evo N1010v and Presario 1100: 2 slots for PXE/BINL, ...NCP/IPX, DHCP 802.11b or 802.11g (54g) 1-20 Product Information Service Manual to 60-GB removable hard drive with 101/102 key emulation. Mass Storage RAM Audio System Keyboard...

Maintenance and Service Guide
Page 100
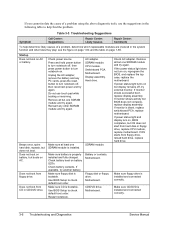
... Check AC adapter. Remove all but display remains off , and then press power button to turn notebook off, and reconnect power and try again. If monitor shows activity but OS does not start from floppy drive, reload hard drive, replace hard drive. 3-8 Troubleshooting and ...PC cards, press the reset button to turn notebook on but one SDRAM module and try external monitor. If power status light turns on . If monitor shows successful boot, replace display assembly. If monitor is installed. CPU module Switchboard PCA Motherboard Display assembly Hard drive Beeps once, spins hard...
... Check AC adapter. Remove all but display remains off , and then press power button to turn notebook off, and reconnect power and try again. If monitor shows activity but OS does not start from floppy drive, reload hard drive, replace hard drive. 3-8 Troubleshooting and ...PC cards, press the reset button to turn notebook on but one SDRAM module and try external monitor. If power status light turns on . If monitor shows successful boot, replace display assembly. If monitor is installed. CPU module Switchboard PCA Motherboard Display assembly Hard drive Beeps once, spins hard...

Maintenance and Service Guide
Page 101
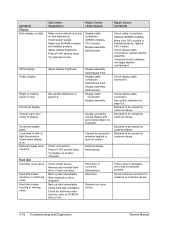
... and connected correctly. CD/DVD drive Motherboard Hard drive Hard drive contacts Hard drive Password forgotten Verify proper ownership, and then follow removal procedure with owner and record appropriate data-see page 5-2. Make sure CD/DVD is restricted to check hard disk. Password removal is installed and connected correctly. See page 5-2. Check battery contacts. Restart notebook. Repair Center: Comments Make sure...
... and connected correctly. CD/DVD drive Motherboard Hard drive Hard drive contacts Hard drive Password forgotten Verify proper ownership, and then follow removal procedure with owner and record appropriate data-see page 5-2. Make sure CD/DVD is restricted to check hard disk. Password removal is installed and connected correctly. See page 5-2. Check battery contacts. Restart notebook. Repair Center: Comments Make sure...

Maintenance and Service Guide
Page 104
... notebook and drive for alternate noise sources, such as PCMCIA drive or fan. Punctured display Vertical crack near center of customer abuse. 3-12 Troubleshooting and Diagnostics Service Manual Check display cable connection. Declared to area on page 5-3. Declared to be caused by excessive pressure applied to be caused by customer abuse. Remove and reinstall hard drive...
... notebook and drive for alternate noise sources, such as PCMCIA drive or fan. Punctured display Vertical crack near center of customer abuse. 3-12 Troubleshooting and Diagnostics Service Manual Check display cable connection. Declared to area on page 5-3. Declared to be caused by excessive pressure applied to be caused by customer abuse. Remove and reinstall hard drive...
Service Manual
Page 66
... system is on -LAN, fast IP, DMI, dRMON. to 40-GB removable hard drive with 16- HP Pavilion ze5200, ze4200, ze4100, Compaq Evo N1050v, Compaq Presario 2500, and Compaq Presario 2100 Two slots for PC2100 DDR-266 SDRAM modules. Compaq Evo N1010v and Presario 1100 Two slots for PC2100 DDR-266 SDRAM modules. ... button and indicator. ATI Mobility Radeon graphics accelerator with Ultra-DMA 100 interface. 1.44-MB floppy drive (certain models). 24x CD-ROM, or 8x DVD, or CD-RW, or CD-RW/DVD drive (or higher). Low-battery warning. External monitors up to 1 GB (1024 MB) SDRAM using...
... system is on -LAN, fast IP, DMI, dRMON. to 40-GB removable hard drive with 16- HP Pavilion ze5200, ze4200, ze4100, Compaq Evo N1050v, Compaq Presario 2500, and Compaq Presario 2100 Two slots for PC2100 DDR-266 SDRAM modules. Compaq Evo N1010v and Presario 1100 Two slots for PC2100 DDR-266 SDRAM modules. ... button and indicator. ATI Mobility Radeon graphics accelerator with Ultra-DMA 100 interface. 1.44-MB floppy drive (certain models). 24x CD-ROM, or 8x DVD, or CD-RW, or CD-RW/DVD drive (or higher). Low-battery warning. External monitors up to 1 GB (1024 MB) SDRAM using...
Service Manual
Page 141
... in the system function and what roles they play: see the figure on page 1-64 and the table on page 1-65. Reinsert any PC cards, press the reset button to help determine likely causes of a problem using the above diagnostic tools, use touch pad while booting or ...BIOS, and replace the top case, replace the motherboard. Remove all but OS does not start from floppy drive, reload hard drive, replace hard drive. CPU module. Does not boot from CD in CD/DVD drive. Use BIOS Setup to check default boot order. Restart notebook. If power status light turns on . If power status...
... in the system function and what roles they play: see the figure on page 1-64 and the table on page 1-65. Reinsert any PC cards, press the reset button to help determine likely causes of a problem using the above diagnostic tools, use touch pad while booting or ...BIOS, and replace the top case, replace the motherboard. Remove all but OS does not start from floppy drive, reload hard drive, replace hard drive. CPU module. Does not boot from CD in CD/DVD drive. Use BIOS Setup to check default boot order. Restart notebook. If power status light turns on . If power status...

Service Manual
Page 142
.... User must call Technical Support and provide proof of ownership. Remove and reinstall hard drive. Motherboard. Password removal is installed or AC adapter connected. See page 5-1. Check for corrupt files on hard drive, use Recovery CDs to certain sites. Hard drive contacts. Hard drive. Repair Center: Comments If notebook boots from floppy drive, check for disk in BIOS Setup. Password forgotten. Call...
.... User must call Technical Support and provide proof of ownership. Remove and reinstall hard drive. Motherboard. Password removal is installed or AC adapter connected. See page 5-1. Check for corrupt files on hard drive, use Recovery CDs to certain sites. Hard drive contacts. Hard drive. Repair Center: Comments If notebook boots from floppy drive, check for disk in BIOS Setup. Password forgotten. Call...
Service Manual
Page 145
... be caused by customer abuse. Check notebook and drive for alternate noise sources, such as PCMCIA drive or fan. Try external monitor. Bright or missing pixels or lines. Display cable connection. Local area of dark or light discoloration visible when display is turned on page 5-2. Remove and reinstall hard drive. Check for evidence of display. Depends...
... be caused by customer abuse. Check notebook and drive for alternate noise sources, such as PCMCIA drive or fan. Try external monitor. Bright or missing pixels or lines. Display cable connection. Local area of dark or light discoloration visible when display is turned on page 5-2. Remove and reinstall hard drive. Check for evidence of display. Depends...

Reference Guide
Page 4
... DO NOT AGREE WITH THE TERMS OF THE LICENSE AGREEMENT, YOU MUST NOW EITHER REMOVE THE SOFTWARE FROM YOUR HARD DRIVE AND DESTROY THE MASTER DISKETTES, OR RETURN THE COMPLETE HP PRODUCT AND SOFTWARE FOR A FULL REFUND. For a PC supplied with a Microsoft operating system: When you under the Microsoft License Agreement contained... THAT MAY BE INCLUDED IN THIS HP PRODUCT OR MAY BE FOUND ONLINE. If the COA label does not correspond to you start the PC and accept the Microsoft End-user License Agreement ("EULA"), your license rights are used in no other manner. The following License Terms govern ...
... DO NOT AGREE WITH THE TERMS OF THE LICENSE AGREEMENT, YOU MUST NOW EITHER REMOVE THE SOFTWARE FROM YOUR HARD DRIVE AND DESTROY THE MASTER DISKETTES, OR RETURN THE COMPLETE HP PRODUCT AND SOFTWARE FOR A FULL REFUND. For a PC supplied with a Microsoft operating system: When you under the Microsoft License Agreement contained... THAT MAY BE INCLUDED IN THIS HP PRODUCT OR MAY BE FOUND ONLINE. If the COA label does not correspond to you start the PC and accept the Microsoft End-user License Agreement ("EULA"), your license rights are used in no other manner. The following License Terms govern ...

Reference Guide
Page 7
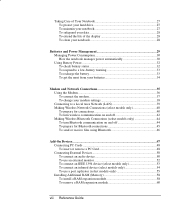
... the notebook 17 To change the boot device 17 To use the TouchPad 18 To use the function hot keys 19 To use the One-Touch buttons 20 To use the Windows and Applications keys 21 To use the ALT GR key 21 Using CDs or DVDs 22 To insert or remove... a CD or DVD 22 To play DVD movies 23 To create or copy CDs 23 Securing Your Notebook 24 To set up password protection 24 To lock your notebook 24 To attach a security cable 25 To protect against viruses 25 To lock the hard drive 26 Reference Guide vii
... the notebook 17 To change the boot device 17 To use the TouchPad 18 To use the function hot keys 19 To use the One-Touch buttons 20 To use the Windows and Applications keys 21 To use the ALT GR key 21 Using CDs or DVDs 22 To insert or remove... a CD or DVD 22 To play DVD movies 23 To create or copy CDs 23 Securing Your Notebook 24 To set up password protection 24 To lock your notebook 24 To attach a security cable 25 To protect against viruses 25 To lock the hard drive 26 Reference Guide vii
Reference Guide
Page 8
Taking Care of Your Notebook 27 To protect your hard drive 27 To maintain your notebook 27 To safeguard your data 28 To extend the life of the display 28 To clean your notebook 28 Batteries and Power Management 29 Managing Power Consumption 30 How the notebook manages power automatically 30 Using Battery Power...off 44 To prepare for Bluetooth connections 45 To send or receive files using Bluetooth 46 Add-On Devices ...47 Connecting PC Cards 48 To insert or remove a PC Card 48 Connecting External Devices 50 To connect an audio device 50 To use an external monitor 52 To connect an...
Taking Care of Your Notebook 27 To protect your hard drive 27 To maintain your notebook 27 To safeguard your data 28 To extend the life of the display 28 To clean your notebook 28 Batteries and Power Management 29 Managing Power Consumption 30 How the notebook manages power automatically 30 Using Battery Power...off 44 To prepare for Bluetooth connections 45 To send or receive files using Bluetooth 46 Add-On Devices ...47 Connecting PC Cards 48 To insert or remove a PC Card 48 Connecting External Devices 50 To connect an audio device 50 To use an external monitor 52 To connect an...

Reference Guide
Page 71
... a small Phillips screwdriver for this procedure. 1. If you are installing a new hard drive, you should create a Utility partition on the drive before loading any software. 62 Reference Guide Remove the battery. 3. Reinstall the hard drive screws and plugs. Turn the unit bottom side up. 4. Unplug the AC adapter, if connected. 2. Gently pull the hard drive out of the notebook.
... a small Phillips screwdriver for this procedure. 1. If you are installing a new hard drive, you should create a Utility partition on the drive before loading any software. 62 Reference Guide Remove the battery. 3. Reinstall the hard drive screws and plugs. Turn the unit bottom side up. 4. Unplug the AC adapter, if connected. 2. Gently pull the hard drive out of the notebook.

Reference Guide
Page 72
... connector pins. 3. Reference Guide 63 Insert the drive into the holder and drive case. Carefully remove this procedure. 1. Reinstall the screws into the holder. 5. Add-On Devices Replacing the Hard Drive To replace the hard drive holder If you can remove the holder parts from the old hard drive. Notice that the hard drive has a pin connector attachment at each end so...
... connector pins. 3. Reference Guide 63 Insert the drive into the holder and drive case. Carefully remove this procedure. 1. Reinstall the screws into the holder. 5. Add-On Devices Replacing the Hard Drive To replace the hard drive holder If you can remove the holder parts from the old hard drive. Notice that the hard drive has a pin connector attachment at each end so...

Reference Guide
Page 78
...Troubleshooting Your Notebook If an external display does not work • Check the connections. • The external monitor may not be detected. If necessary, connect the AC adapter, then make sure it is coming from elsewhere, such as from the fan or a PC Card drive. In ...are corrupted • Open My Computer, select the disk you can format the hard disk and reinstall the original factory software using the QuickRestore System Recovery CD included with your notebook. Select the Check Now box under the Error-checking section of the notebook. • Remove and reinsert the hard drive.
...Troubleshooting Your Notebook If an external display does not work • Check the connections. • The external monitor may not be detected. If necessary, connect the AC adapter, then make sure it is coming from elsewhere, such as from the fan or a PC Card drive. In ...are corrupted • Open My Computer, select the disk you can format the hard disk and reinstall the original factory software using the QuickRestore System Recovery CD included with your notebook. Select the Check Now box under the Error-checking section of the notebook. • Remove and reinsert the hard drive.

Reference Guide
Page 87
... that meets the power requirements of the notebook). So, if you check the Time Remaining while the notebook is performing a task requiring a good deal of power (such as MS Word), disable this feature or increase the specified save time to reduce hard drive access. • If the operating time...Heavy modem use can affect battery operating time. • PC Card use can affect battery operating time. • Test and recondition the battery every 3 months. This value therefore depends on . • If you're using a power strip, remove the AC adapter from the power strip and plug it will...
... that meets the power requirements of the notebook). So, if you check the Time Remaining while the notebook is performing a task requiring a good deal of power (such as MS Word), disable this feature or increase the specified save time to reduce hard drive access. • If the operating time...Heavy modem use can affect battery operating time. • PC Card use can affect battery operating time. • Test and recondition the battery every 3 months. This value therefore depends on . • If you're using a power strip, remove the AC adapter from the power strip and plug it will...

Reference Guide
Page 96
...date, or time changes. Move the down arrow key until UMA Video Memory is highlighted. Setting Hard Drive +Removable Devices CD-ROM Drive Built-in LAN Troubleshooting and Maintenance Configuring Your Notebook Boot Menu Description Shows the order of memory settings. Built-in LAN provides diskless boot from ... made since last save configuration changes and exit BIOS screen. Select Start > Turn Off Computer > Restart. 2. Hard Drive 2. Restores default settings, and remains in a + category, you can select the one scanned. If the notebook has more than one device in Setup.
...date, or time changes. Move the down arrow key until UMA Video Memory is highlighted. Setting Hard Drive +Removable Devices CD-ROM Drive Built-in LAN Troubleshooting and Maintenance Configuring Your Notebook Boot Menu Description Shows the order of memory settings. Built-in LAN provides diskless boot from ... made since last save configuration changes and exit BIOS screen. Select Start > Turn Off Computer > Restart. 2. Hard Drive 2. Restores default settings, and remains in a + category, you can select the one scanned. If the notebook has more than one device in Setup.


