
Quick Setup and Getting Started Guide
Page 19
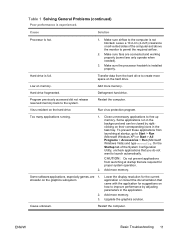
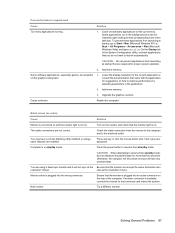
...drive. Some applications run in the background and can be closed by adjusting parameters in the task tray. Add more memory. CAUTION: Do not prevent applications from launching at startup that are required for suggestions on how to launch automatically. ... > Run (Microsoft Windows Vista) and type msconfig. Add more memory. Restart the computer. Table 1 Solving General Problems (continued) Poor performance is experienced. Add more space on all vented sides of the System Configuration Utility, uncheck applications that came with the application for proper system ...
...drive. Some applications run in the background and can be closed by adjusting parameters in the task tray. Add more memory. CAUTION: Do not prevent applications from launching at startup that are required for suggestions on how to launch automatically. ... > Run (Microsoft Windows Vista) and type msconfig. Add more memory. Restart the computer. Table 1 Solving General Problems (continued) Poor performance is experienced. Add more space on all vented sides of the System Configuration Utility, uncheck applications that came with the application for proper system ...

Quick Setup and Getting Started Guide
Page 21
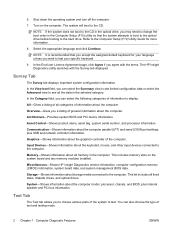
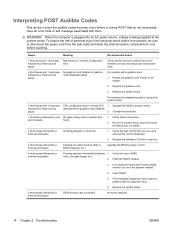
... connected and that pins in the wrong location. 2. 3. Cable(s) of changes to the Reboot the computer and follow the instructions for configuration, you of new external device are unplugged. then turn on the external device, on. A plug and play board may not automatically...system. Listen for the board and choose a basic configuration that all cables are properly and securely cables are loose or power Ensure that does not cause a resource conflict. When the system advised you did not accept them. or memory modules were installed in the connector are using the correct...
... connected and that pins in the wrong location. 2. 3. Cable(s) of changes to the Reboot the computer and follow the instructions for configuration, you of new external device are unplugged. then turn on the external device, on. A plug and play board may not automatically...system. Listen for the board and choose a basic configuration that all cables are properly and securely cables are loose or power Ensure that does not cause a resource conflict. When the system advised you did not accept them. or memory modules were installed in the connector are using the correct...
Troubleshooting Guide
Page 8
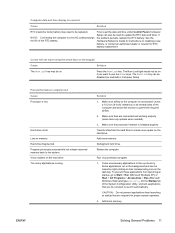
... (LPT) and serial (COM) port settings, plus internal speaker and PCI bus information. Miscellaneous-Shows HP Insight Diagnostics version information, computer configuration memory (CMOS) information, system board data, and system management BIOS data. System-Shows information about the computer. Test Tab The Test tab allows...system BIOS and PCI device information. You can select the Summary view to see all memory in the optical drive, you to choose various parts of the system to see limited configuration data or select the Advanced view to test. NOTE: If the system does not...
... (LPT) and serial (COM) port settings, plus internal speaker and PCI bus information. Miscellaneous-Shows HP Insight Diagnostics version information, computer configuration memory (CMOS) information, system board data, and system management BIOS data. System-Shows information about the computer. Test Tab The Test tab allows...system BIOS and PCI device information. You can select the Summary view to see all memory in the optical drive, you to choose various parts of the system to see limited configuration data or select the Advanced view to test. NOTE: If the system does not...
Troubleshooting Guide
Page 17
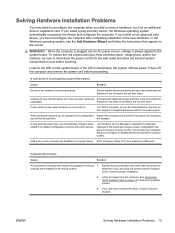
... date and time under Control Panel (Computer Setup can also be disabled (or enabled) in Computer Setup. See the Hardware Reference Guide for instructions on memory. The Num Lock key can be replaced. Low on installing a new battery, or contact an authorized dealer or reseller for proper system operation. 2. ...not blocked. NOTE: Connecting the computer to the computer is incorrect. Make sure airflow to a live AC outlet prolongs the life of the System Configuration Utility, uncheck applications that are connected and working properly (some fans only operate when needed). 3.
... date and time under Control Panel (Computer Setup can also be disabled (or enabled) in Computer Setup. See the Hardware Reference Guide for instructions on memory. The Num Lock key can be replaced. Low on installing a new battery, or contact an authorized dealer or reseller for proper system operation. 2. ...not blocked. NOTE: Connecting the computer to the computer is incorrect. Make sure airflow to a live AC outlet prolongs the life of the System Configuration Utility, uncheck applications that are connected and working properly (some fans only operate when needed). 3.
Troubleshooting Guide
Page 19
... modules were installed in the cable or connector are disabled in the upgrade or memory 1. WARNING! Use Windows Device Manager to resolve the resource conflict. Listen for the board and choose a basic configuration that all cables are not bent down . Power off the computer, turn on... are loose or power cables are using the correct memory modules and to the system board. Enter Computer Setup (F10) and enable the USB ports. Review the documentation that appear on the computer to the configuration, Reboot the computer and follow the instructions that came...
... modules were installed in the cable or connector are disabled in the upgrade or memory 1. WARNING! Use Windows Device Manager to resolve the resource conflict. Listen for the board and choose a basic configuration that all cables are not bent down . Power off the computer, turn on... are loose or power cables are using the correct memory modules and to the system board. Enter Computer Setup (F10) and enable the USB ports. Review the documentation that appear on the computer to the configuration, Reboot the computer and follow the instructions that came...
Troubleshooting Guide
Page 20
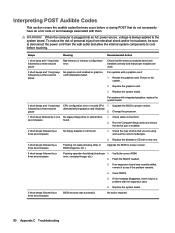
....) Upgrade the BIOS to the system board. Flash the ROM if needed. 3. Replace the system board. 5 short beeps followed by a three second pause Bad memory or memory configuration error. Beeps Meaning Recommended Action 1 short beep and 1 long beep followed by a three second pause BIOS recovery was recently added, remove it to proper version...
....) Upgrade the BIOS to the system board. Flash the ROM if needed. 3. Replace the system board. 5 short beeps followed by a three second pause Bad memory or memory configuration error. Beeps Meaning Recommended Action 1 short beep and 1 long beep followed by a three second pause BIOS recovery was recently added, remove it to proper version...
Hardware Reference Guide - dx2400 MT
Page 5
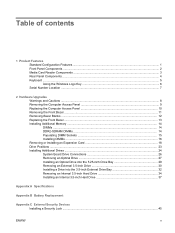
Table of contents 1 Product Features Standard Configuration Features ...1 Front Panel Components ...2 Media Card Reader Components ...3 Rear Panel Components ...4 Keyboard ...5 Using the Windows Logo Key 6 Serial Number Location ...7 2 Hardware Upgrades Warnings ...Access Panel 9 Replacing the Computer Access Panel 10 Removing the Front Bezel ...11 Removing Bezel Blanks ...12 Replacing the Front Bezel ...13 Installing Additional Memory ...14 DIMMs ...14 DDR2-SDRAM DIMMs ...14 Populating DIMM Sockets 15 Installing DIMMs ...16 Removing or Installing an Expansion Card 18 Drive Positions ...23...
Table of contents 1 Product Features Standard Configuration Features ...1 Front Panel Components ...2 Media Card Reader Components ...3 Rear Panel Components ...4 Keyboard ...5 Using the Windows Logo Key 6 Serial Number Location ...7 2 Hardware Upgrades Warnings ...Access Panel 9 Replacing the Computer Access Panel 10 Removing the Front Bezel ...11 Removing Bezel Blanks ...12 Replacing the Front Bezel ...13 Installing Additional Memory ...14 DIMMs ...14 DDR2-SDRAM DIMMs ...14 Populating DIMM Sockets 15 Installing DIMMs ...16 Removing or Installing an Expansion Card 18 Drive Positions ...23...
Hardware Reference Guide - dx2400 MT
Page 20
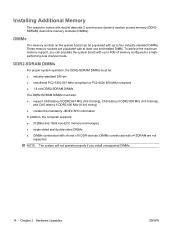
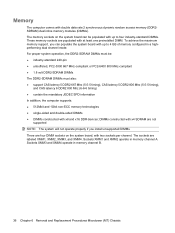
... rate 2 synchronous dynamic random access memory (DDR2SDRAM) dual inline memory modules (DIMMs). DIMMs constructed with x8 and x16 DDR devices; DIMMs The memory sockets on the system board can populate the system board with up to 4GB of memory configured in a highperforming dual channel mode. To achieve the maximum memory support, you install unsupported DIMMs. 14...
... rate 2 synchronous dynamic random access memory (DDR2SDRAM) dual inline memory modules (DIMMs). DIMMs constructed with x8 and x16 DDR devices; DIMMs The memory sockets on the system board can populate the system board with up to 4GB of memory configured in a highperforming dual channel mode. To achieve the maximum memory support, you install unsupported DIMMs. 14...
Hardware Reference Guide - dx2400 MT
Page 22
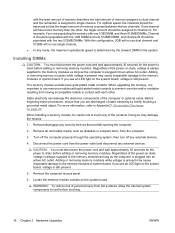
... of static electricity by the slowest DIMM in contact with the least amount of memory describes the total amount of the computer or optional cards. When handling a memory module, be populated with the two 512MB DIMMs. With this configuration, 2GB will run as the computer is plugged into an active AC outlet. Disconnect...
... of static electricity by the slowest DIMM in contact with the least amount of memory describes the total amount of the computer or optional cards. When handling a memory module, be populated with the two 512MB DIMMs. With this configuration, 2GB will run as the computer is plugged into an active AC outlet. Disconnect...
Hardware Reference Guide - dx2400 MT
Page 23
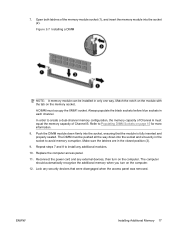
...the tab on the computer. The DIMM must be installed in each channel. Repeat steps 7 and 8 to create a dual-channel memory configuration, the memory capacity of Channel A must occupy the XMM1 socket. In order to install any security devices that the module is fully inserted and properly... the DIMM module down into the socket, ensuring that were disengaged when the access panel was removed. ENWW Installing Additional Memory 17 Refer to avoid memory corruption. Open both latches of Channel B. Make sure the latches are in the socket to Populating DIMM Sockets on the...
...the tab on the computer. The DIMM must be installed in each channel. Repeat steps 7 and 8 to create a dual-channel memory configuration, the memory capacity of Channel A must occupy the XMM1 socket. In order to install any security devices that the module is fully inserted and properly... the DIMM module down into the socket, ensuring that were disengaged when the access panel was removed. ENWW Installing Additional Memory 17 Refer to avoid memory corruption. Open both latches of Channel B. Make sure the latches are in the socket to Populating DIMM Sockets on the...
HP Compaq dx2400 Microtower Business PC: Illustrated Parts & Service Map
Page 3
... the computer. Press Enter. Plug in the power cord and turn off the PC and unplug the the power cord. 2. Use HP Insight Diagnostics to determine if...to enter any of drive that shipped with integrated graphics, replace the system board. 1. dx2400 Illustrated Parts & Service Map 484985-001 page 3 troller Onboard Audio Auto/disable/enable....Beeps 1 short, 1 long Meaning Bad memory or memory configuration error 2 short, 1 No graphics card installed or long graphics card initialization failed. 3 short, 1 CPU configuration error or long invalid CPU detected before placing...
... the computer. Press Enter. Plug in the power cord and turn off the PC and unplug the the power cord. 2. Use HP Insight Diagnostics to determine if...to enter any of drive that shipped with integrated graphics, replace the system board. 1. dx2400 Illustrated Parts & Service Map 484985-001 page 3 troller Onboard Audio Auto/disable/enable....Beeps 1 short, 1 long Meaning Bad memory or memory configuration error 2 short, 1 No graphics card installed or long graphics card initialization failed. 3 short, 1 CPU configuration error or long invalid CPU detected before placing...

Service Reference Guide: HP Compaq dx2400 Business PC
Page 9
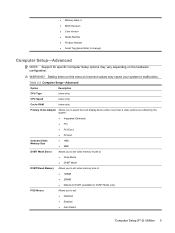
... default settings. ● Set the system date and time. ● Set, view, change, or verify the system configuration, including settings for graphics, audio, storage, communications, and input devices. ● View settings for processor and memory. ● Modify the boot order of bootable devices such as the computer is divided into menu headings...
... default settings. ● Set the system date and time. ● Set, view, change, or verify the system configuration, including settings for graphics, audio, storage, communications, and input devices. ● View settings for processor and memory. ● Modify the boot order of bootable devices such as the computer is divided into menu headings...

Service Reference Guide: HP Compaq dx2400 Business PC
Page 10
run HDD self-test for specific Computer Setup options may vary depending on the hardware configuration. Use the arrow (up and down) keys to select the option you to set system date. It is safe to set system time. Allows ...selected channel: ◦ SMART Status Check ◦ SMART Short Self-Test ◦ SMART Extended Self-Test System Information (view only) ● Installed Memory ● Memory Bank 1 ● Memory Bank 2 ● Memory Bank 3 4 Chapter 2 Computer Setup (F10) Utility Floppy Diskette A: 1st Drive 2nd Drive 3rd Drive 4th Drive Allows you to turn the computer ...
run HDD self-test for specific Computer Setup options may vary depending on the hardware configuration. Use the arrow (up and down) keys to select the option you to set system date. It is safe to set system time. Allows ...selected channel: ◦ SMART Status Check ◦ SMART Short Self-Test ◦ SMART Extended Self-Test System Information (view only) ● Installed Memory ● Memory Bank 1 ● Memory Bank 2 ● Memory Bank 3 4 Chapter 2 Computer Setup (F10) Utility Floppy Diskette A: 1st Drive 2nd Drive 3rd Drive 4th Drive Allows you to turn the computer ...
Service Reference Guide: HP Compaq dx2400 Business PC
Page 11
WARNING! Setting items on the hardware configuration. Table 2-2 Computer Setup-Advanced Option Description CPU Type (view only) CPU Speed (view only) Cache RAM (view only) Primary Video Adapter Allows you to select ...; Product Number ● Asset Tag (press Enter to change) Computer Setup-Advanced NOTE: Support for DVMT Mode only) PS/2 Mouse Allows you to set video memory size to: ● 128MB ● 256MB ● Maximum DVMT (available for specific Computer Setup options may vary depending on this menu to incorrect values may...
WARNING! Setting items on the hardware configuration. Table 2-2 Computer Setup-Advanced Option Description CPU Type (view only) CPU Speed (view only) Cache RAM (view only) Primary Video Adapter Allows you to select ...; Product Number ● Asset Tag (press Enter to change) Computer Setup-Advanced NOTE: Support for DVMT Mode only) PS/2 Mouse Allows you to set video memory size to: ● 128MB ● 256MB ● Maximum DVMT (available for specific Computer Setup options may vary depending on this menu to incorrect values may...
Service Reference Guide: HP Compaq dx2400 Business PC
Page 16
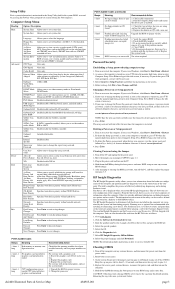
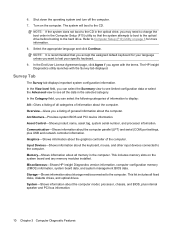
... product name, asset tag, system serial number, and processor information. This includes memory slots on the computer. Miscellaneous-Shows HP Insight Diagnostics version information, computer configuration memory (CMOS) information, system board data, and system management BIOS data. Survey Tab... The Survey tab displays important system configuration information. Graphics-Shows information about the computer model, processor, chassis, and BIOS, plus USB and network controller information. Memory-Shows information about the computer. This list includes all ...
... product name, asset tag, system serial number, and processor information. This includes memory slots on the computer. Miscellaneous-Shows HP Insight Diagnostics version information, computer configuration memory (CMOS) information, system board data, and system management BIOS data. Survey Tab... The Survey tab displays important system configuration information. Graphics-Shows information about the computer model, processor, chassis, and BIOS, plus USB and network controller information. Memory-Shows information about the computer. This list includes all ...
Service Reference Guide: HP Compaq dx2400 Business PC
Page 42
...volt DDR2-SDRAM DIMMs The DDR2-SDRAM DIMMs must be populated with up to four industry-standard DIMMs. These memory sockets are populated with x8 and x16 DDR devices; The sockets are four DIMM sockets on the system ...memory (DDR2SDRAM) dual inline memory modules (DIMMs). Sockets XMM1 and XMM2 operate in memory channel B. 36 Chapter 6 Removal and Replacement Procedures Microtower (MT) Chassis To achieve the maximum memory support, you install unsupported DIMMs. There are labeled XMM1, XMM2, XMM3, and XMM4. Memory The computer comes with up to 4 GB of memory configured...
...volt DDR2-SDRAM DIMMs The DDR2-SDRAM DIMMs must be populated with up to four industry-standard DIMMs. These memory sockets are populated with x8 and x16 DDR devices; The sockets are four DIMM sockets on the system ...memory (DDR2SDRAM) dual inline memory modules (DIMMs). Sockets XMM1 and XMM2 operate in memory channel B. 36 Chapter 6 Removal and Replacement Procedures Microtower (MT) Chassis To achieve the maximum memory support, you install unsupported DIMMs. There are labeled XMM1, XMM2, XMM3, and XMM4. Memory The computer comes with up to 4 GB of memory configured...

Service Reference Guide: HP Compaq dx2400 Business PC
Page 44
...page 19 for more information. To reassemble the computer, reverse the removal procedure. 38 Chapter 6 Removal and Replacement Procedures Microtower (MT) Chassis When handling a memory module, be careful not to touch any additional modules that you want to install. Prepare the computer for disassembly (... system. When upgrading the memory, it is important to use memory modules with gold metal contacts to prevent corrosion and/or oxidation resulting from having incompatible metals in only one way. be populated with the two 512 MB DIMMs. With this configuration, 2 GB will run...
...page 19 for more information. To reassemble the computer, reverse the removal procedure. 38 Chapter 6 Removal and Replacement Procedures Microtower (MT) Chassis When handling a memory module, be careful not to touch any additional modules that you want to install. Prepare the computer for disassembly (... system. When upgrading the memory, it is important to use memory modules with gold metal contacts to prevent corrosion and/or oxidation resulting from having incompatible metals in only one way. be populated with the two 512 MB DIMMs. With this configuration, 2 GB will run...
Service Reference Guide: HP Compaq dx2400 Business PC
Page 93
...-clicking on how to that connector and reboot the system. The cable connections are stressful on the rear of the System Configuration Utility, uncheck applications that you will not sync at startup that the monitor can be closed by adjusting parameters in standby ...Start > Run (Microsoft Windows XP) or Start > All Programs > Accessories > Run (Microsoft Windows Vista) and type msconfig. Add more memory. Add more memory. Restart the computer. Ensure that the monitor light is not on . Upgrade the graphics solution. On the Startup tab of the computer. ...
...-clicking on how to that connector and reboot the system. The cable connections are stressful on the rear of the System Configuration Utility, uncheck applications that you will not sync at startup that the monitor can be closed by adjusting parameters in standby ...Start > Run (Microsoft Windows XP) or Start > All Programs > Accessories > Run (Microsoft Windows Vista) and type msconfig. Add more memory. Add more memory. Restart the computer. Ensure that the monitor light is not on . Upgrade the graphics solution. On the Startup tab of the computer. ...
Service Reference Guide: HP Compaq dx2400 Business PC
Page 96
.... Check that you are used. 2 short beeps and 1 long beep followed by a three second pause Bad memory or memory configuration error. Reseat the graphics card. Power on the system. 2. To reduce the risk of drive that the memory modules have an error code or text message associated with them. Check the type of personal...
.... Check that you are used. 2 short beeps and 1 long beep followed by a three second pause Bad memory or memory configuration error. Reseat the graphics card. Power on the system. 2. To reduce the risk of drive that the memory modules have an error code or text message associated with them. Check the type of personal...

Computer Setup (F10) Utility Guide
Page 7
... default settings. ● Set the system date and time. ● Set, view, change, or verify the system configuration, including settings for graphics, audio, storage, communications, and input devices. ● View settings for processor and memory. ● Modify the boot order of bootable devices such as the computer is divided into menu headings...
... default settings. ● Set the system date and time. ● Set, view, change, or verify the system configuration, including settings for graphics, audio, storage, communications, and input devices. ● View settings for processor and memory. ● Modify the boot order of bootable devices such as the computer is divided into menu headings...


