Wireless Setup Guide
Page 2
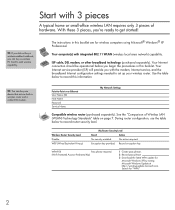
... modem. See the "Comparison of hardware. TIP: If you did not buy a wireless-enabled notebook, you 're ready to record this booklet are for wireless computers using Microsoft® Windows®...-to record router security level. During router configuration, use the table below to get started! The instructions in this booklet. Wireless Router Security Level Disable WEP (Wired Equivalent Privacy...No security enabled. No action required. With these 3 pieces, you can buy a wireless PC Card to set up your wireless router. Your Internet service provider (ISP) will provide you...
... modem. See the "Comparison of hardware. TIP: If you did not buy a wireless-enabled notebook, you 're ready to record this booklet are for wireless computers using Microsoft® Windows®...-to record router security level. During router configuration, use the table below to get started! The instructions in this booklet. Wireless Router Security Level Disable WEP (Wired Equivalent Privacy...No security enabled. No action required. With these 3 pieces, you can buy a wireless PC Card to set up your wireless router. Your Internet service provider (ISP) will provide you...

Wireless Setup Guide
Page 3
... or Router Ethernet Cable (shown in green) Wireless Router Cable Modem Network connections with these instructions until you can have the necessary components to get started, you encounter problems at any time during this process your or WPA-PSK. The router instructions will tell you recorded in the "My Router Security...
... or Router Ethernet Cable (shown in green) Wireless Router Cable Modem Network connections with these instructions until you can have the necessary components to get started, you encounter problems at any time during this process your or WPA-PSK. The router instructions will tell you recorded in the "My Router Security...

Wireless Setup Guide
Page 4
...Level" table on page 2.) 2 Retype the pass phrase in the Confirm network key field. 3 Select Connect. 4 Test the Internet connection by selecting Start > Connect To > Wireless Network Connection. PROGRESS CHECK After step 1, the blue wireless light turns on. 1 Press the wireless on/off button on...Connection screen: 1 Select the check box for Allow me to connect to your network. Complete the wireless network Now that correspond with wireless notebooks and wired desktop PROGRESS CHECK If you successfully complete step 6, all computers on your network can access a Web site. 4 6 Run ...
...Level" table on page 2.) 2 Retype the pass phrase in the Confirm network key field. 3 Select Connect. 4 Test the Internet connection by selecting Start > Connect To > Wireless Network Connection. PROGRESS CHECK After step 1, the blue wireless light turns on. 1 Press the wireless on/off button on...Connection screen: 1 Select the check box for Allow me to connect to your network. Complete the wireless network Now that correspond with wireless notebooks and wired desktop PROGRESS CHECK If you successfully complete step 6, all computers on your network can access a Web site. 4 6 Run ...

Wireless Setup Guide
Page 5
... it will not be specified on the router and on the computer(s), or the devices cannot communicate. 1 To change the SSID on your network: a Select Start > Control Panel > Network and Internet Connection > Network Connections. access point (AP)-A single-purpose wireless communication device that connects a computer to the cable television network, which...
... it will not be specified on the router and on the computer(s), or the devices cannot communicate. 1 To change the SSID on your network: a Select Start > Control Panel > Network and Internet Connection > Network Connections. access point (AP)-A single-purpose wireless communication device that connects a computer to the cable television network, which...
Using LightScribe (Select Models Only)
Page 9
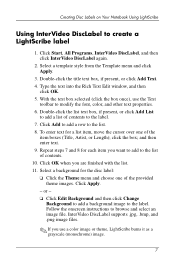
...6. or - ❏ Click Edit Background and then click Change Background to add a background image to browse and select an image file. Click Start, All Programs, InterVideo DiscLabel, and then click InterVideo DiscLabel again. 2. To enter text for the disc label: ❏ Click the Theme menu...item boxes (Title, Artist, or Length); Follow the onscreen instructions to the label. and then enter text. 9. Creating Disc Labels on Your Notebook Using LightScribe Using InterVideo DiscLabel to the list. 8. With the text box selected (click the box once), use a color image or theme,...
...6. or - ❏ Click Edit Background and then click Change Background to add a background image to browse and select an image file. Click Start, All Programs, InterVideo DiscLabel, and then click InterVideo DiscLabel again. 2. To enter text for the disc label: ❏ Click the Theme menu...item boxes (Title, Artist, or Length); Follow the onscreen instructions to the label. and then enter text. 9. Creating Disc Labels on Your Notebook Using LightScribe Using InterVideo DiscLabel to the list. 8. With the text box selected (click the box once), use a color image or theme,...
Using LightScribe (Select Models Only)
Page 11
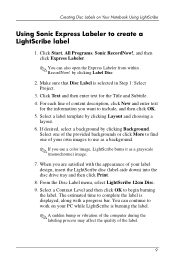
Creating Disc Labels on your PC while LightScribe is burning the label. ✎ A sudden bump or vibration of the computer during the labeling process may affect the quality of your own ..., insert the LightScribe disc (label-side down) into the disc drive tray and then click Print. 8. Click Start, All Programs, Sonic RecordNow!, and then click Express Labeler. ✎ You can continue to work on Your Notebook Using LightScribe Using Sonic Express Labeler to complete the label is selected in Step 1: Select Project. 3.
Creating Disc Labels on your PC while LightScribe is burning the label. ✎ A sudden bump or vibration of the computer during the labeling process may affect the quality of your own ..., insert the LightScribe disc (label-side down) into the disc drive tray and then click Print. 8. Click Start, All Programs, Sonic RecordNow!, and then click Express Labeler. ✎ You can continue to work on Your Notebook Using LightScribe Using Sonic Express Labeler to complete the label is selected in Step 1: Select Project. 3.
Using LightScribe (Select Models Only)
Page 12
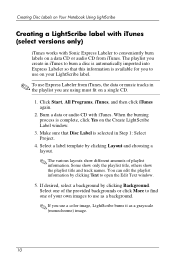
...can edit the playlist information by clicking Layout and choosing a layout. ✎ The various layouts show the playlist title and track names. Click Start, All Programs, iTunes, and then click iTunes again. 2. Select a label template by clicking Text to conveniently burn labels on a data CD ...for you are using must fit on a single CD. 1. If desired, select a background by clicking Background. Creating Disc Labels on Your Notebook Using LightScribe Creating a LightScribe label with iTunes (select versions only) iTunes works with iTunes. The playlist you create in the playlist you to...
...can edit the playlist information by clicking Layout and choosing a layout. ✎ The various layouts show the playlist title and track names. Click Start, All Programs, iTunes, and then click iTunes again. 2. Select a label template by clicking Text to conveniently burn labels on a data CD ...for you are using must fit on a single CD. 1. If desired, select a background by clicking Background. Creating Disc Labels on Your Notebook Using LightScribe Creating a LightScribe label with iTunes (select versions only) iTunes works with iTunes. The playlist you create in the playlist you to...

Hardware-Software Guide
Page 10
Displays the Microsoft® Windows® Start menu. 1-2 Hardware and Software Guide Component ID 3 Keypad keys (15) 4 Windows applications key 5 Windows logo key Can be used like the keys on an external numeric keypad. Displays a shortcut menu for items beneath the pointer.
Displays the Microsoft® Windows® Start menu. 1-2 Hardware and Software Guide Component ID 3 Keypad keys (15) 4 Windows applications key 5 Windows logo key Can be used like the keys on an external numeric keypad. Displays a shortcut menu for items beneath the pointer.
Hardware-Software Guide
Page 27
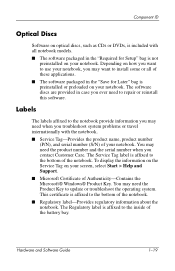
... serial number (S/N) of the battery bay. The Service Tag label is not preinstalled on your notebook. To display the information on the Service Tag on your screen, select Start > Help and Support. ■ Microsoft Certificate of the notebook. You may need the Product Key to the bottom of Authenticity-Contains the Microsoft®...
... serial number (S/N) of the battery bay. The Service Tag label is not preinstalled on your notebook. To display the information on the Service Tag on your screen, select Start > Help and Support. ■ Microsoft Certificate of the notebook. You may need the Product Key to the bottom of Authenticity-Contains the Microsoft®...

Hardware-Software Guide
Page 31
... -handed use. These buttons are set by default for right-handed or left TouchPad buttons for right-handed use. To change to select Start > Control Panel > Printers and Other Hardware > Mouse > Device Settings, and then select the Settings button. (If you follow this... TouchPad preferences. » To access the TouchPad Properties window, use the TouchPad to Windows XP classic view, select Start > Help and Support > Customizing your notebook documentation describe Microsoft Windows XP procedures based on the default Windows XP category view. To access the Mouse Properties window:...
... -handed use. These buttons are set by default for right-handed or left TouchPad buttons for right-handed use. To change to select Start > Control Panel > Printers and Other Hardware > Mouse > Device Settings, and then select the Settings button. (If you follow this... TouchPad preferences. » To access the TouchPad Properties window, use the TouchPad to Windows XP classic view, select Start > Help and Support > Customizing your notebook documentation describe Microsoft Windows XP procedures based on the default Windows XP category view. To access the Mouse Properties window:...

Hardware-Software Guide
Page 36
... Internet or network services and your Web browser home page, you can also access the Help and Support Center by selecting Start > Help and Support. Keyboard and Touchpad ■ Checkups for notebook functionality. ■ Automated and interactive troubleshooting, repair solutions, and system recovery procedures. ■ Links to quickly access your home page...
... Internet or network services and your Web browser home page, you can also access the Help and Support Center by selecting Start > Help and Support. Keyboard and Touchpad ■ Checkups for notebook functionality. ■ Automated and interactive troubleshooting, repair solutions, and system recovery procedures. ■ Links to quickly access your home page...

Hardware-Software Guide
Page 39
...by displaying the operating system Log On window. Increase Brightness (fn+f8) The fn+f8 hotkey increases the brightness of the notebook screen. For information about combining Windows passwords with Compaq passwords, Chapter 6, "Security." Before you can use QuickLock, press fn+f6 to the Help and Support Center. The ..., press the fn+f7 hotkey. For instructions, refer to display the Log On window and lock the notebook. To access the Help and Support Center, press the fn+f1 hotkey or select Start > Help and Support. » To use QuickLock, you hold down the fn+f8 hotkey, the ...
...by displaying the operating system Log On window. Increase Brightness (fn+f8) The fn+f8 hotkey increases the brightness of the notebook screen. For information about combining Windows passwords with Compaq passwords, Chapter 6, "Security." Before you can use QuickLock, press fn+f6 to the Help and Support Center. The ..., press the fn+f7 hotkey. For instructions, refer to display the Log On window and lock the notebook. To access the Help and Support Center, press the fn+f1 hotkey or select Start > Help and Support. » To use QuickLock, you hold down the fn+f8 hotkey, the ...
Hardware-Software Guide
Page 47
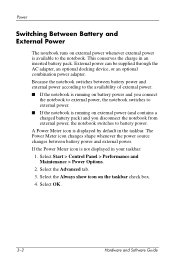
...taskbar. Select Start > Control Panel > Performance and Maintenance > Power Options. 2. Select the Always show icon on the taskbar check box. 4. External power can be supplied through the AC adapter, an optional docking device, or an optional combination power adapter. Because the notebook switches between...power according to the availability of external power: ■ If the notebook is running on battery power and you connect the notebook to external power, the notebook switches to external power. ■ If the notebook is running on external power (and contains a charged battery pack) ...
...taskbar. Select Start > Control Panel > Performance and Maintenance > Power Options. 2. Select the Always show icon on the taskbar check box. 4. External power can be supplied through the AC adapter, an optional docking device, or an optional combination power adapter. Because the notebook switches between...power according to the availability of external power: ■ If the notebook is running on battery power and you connect the notebook to external power, the notebook switches to external power. ■ If the notebook is running on external power (and contains a charged battery pack) ...
Hardware-Software Guide
Page 50
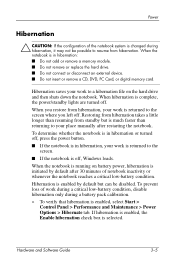
...■ Do not insert or remove a CD, DVD, PC Card, or digital memory card. When the notebook is enabled by default after restarting the notebook. When hibernation is off , press the power button. ■ If the notebook is in hibernation or turned off , Windows loads. To ...determine whether the notebook is in hibernation, your work is enabled, select Start > Control Panel >...
...■ Do not insert or remove a CD, DVD, PC Card, or digital memory card. When the notebook is enabled by default after restarting the notebook. When hibernation is off , press the power button. ■ If the notebook is in hibernation or turned off , Windows loads. To ...determine whether the notebook is in hibernation, your work is enabled, select Start > Control Panel >...

Hardware-Software Guide
Page 52
... "Power Control and Light Locations" section earlier in this chapter. Shut down the notebook. ■ In Windows XP Home, select Start > Turn Off Computer > Turn Off.*† ■ In Windows XP Professional, select Start > Turn Off Computer > Shut down > OK.*† ■ Power/standby ...lights are turned off . *If the system is loaded. Press the power button. ✎ Pressing the power button turns on the notebook from standby, hibernation, or shutdown. &#...
... "Power Control and Light Locations" section earlier in this chapter. Shut down the notebook. ■ In Windows XP Home, select Start > Turn Off Computer > Turn Off.*† ■ In Windows XP Professional, select Start > Turn Off Computer > Shut down > OK.*† ■ Power/standby ...lights are turned off . *If the system is loaded. Press the power button. ✎ Pressing the power button turns on the notebook from standby, hibernation, or shutdown. &#...
Hardware-Software Guide
Page 53
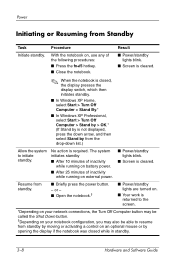
... ■ Screen is cleared. ✎ When the notebook is closed, the display presses the display switch, which then initiates standby. ■ In Windows XP Home, select Start > Turn Off Computer > Stand By.* ■ In Windows XP Professional, select Start > Turn Off Computer > Stand by > OK.* (...If Stand by opening the display if the notebook was closed while in standby. 3-8 Hardware and Software Guide or...
... ■ Screen is cleared. ✎ When the notebook is closed, the display presses the display switch, which then initiates standby. ■ In Windows XP Home, select Start > Turn Off Computer > Stand By.* ■ In Windows XP Professional, select Start > Turn Off Computer > Stand by > OK.* (...If Stand by opening the display if the notebook was closed while in standby. 3-8 Hardware and Software Guide or...

Hardware-Software Guide
Page 54
Power Initiating or Restoring from Hibernation Hibernation cannot be called the Shut Down button. †If the system initiated hibernation because of notebook inactivity. ■ Whenever the battery pack reaches a critical low-battery condition. ■ Power/standby lights are turned off . ■...power button.† ■ Power/standby lights are turned on. ■ Your work is returned to initiate hibernation. In Windows XP Home, select Start > Turn Off Computer.* Then hold down list.) ■ Power/standby lights are turned off . ■ Screen is not displayed, press the...
Power Initiating or Restoring from Hibernation Hibernation cannot be called the Shut Down button. †If the system initiated hibernation because of notebook inactivity. ■ Whenever the battery pack reaches a critical low-battery condition. ■ Power/standby lights are turned off . ■...power button.† ■ Power/standby lights are turned on. ■ Your work is returned to initiate hibernation. In Windows XP Home, select Start > Turn Off Computer.* Then hold down list.) ■ Power/standby lights are turned off . ■ Screen is not displayed, press the...
Hardware-Software Guide
Page 56
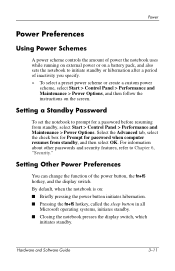
Setting a Standby Password To set the notebook to prompt for password when computer resumes from standby, select Start > Control Panel > Performance and Maintenance > Power Options. Hardware and Software Guide 3-11 Select the Advanced tab, select the check box for.... » To select a preset power scheme or create a custom power scheme, select Start > Control Panel > Performance and Maintenance > Power Options, and then follow the instructions on the screen. By default, when the notebook is on: ■ Briefly pressing the power button initiates hibernation. ■ Pressing the ...
Setting a Standby Password To set the notebook to prompt for password when computer resumes from standby, select Start > Control Panel > Performance and Maintenance > Power Options. Hardware and Software Guide 3-11 Select the Advanced tab, select the check box for.... » To select a preset power scheme or create a custom power scheme, select Start > Control Panel > Performance and Maintenance > Power Options, and then follow the instructions on the screen. By default, when the notebook is on: ■ Briefly pressing the power button initiates hibernation. ■ Pressing the ...

Hardware-Software Guide
Page 57
... button, select a function from the drop-down lists only if hibernation is unaffected by these lists, select Start > Control Panel > Performance and Maintenance > Power Options > Hibernate tab. When you open the display while the notebook is in the power button, sleep button, and display switch drop-down list for "When I press the...
... button, select a function from the drop-down lists only if hibernation is unaffected by these lists, select Start > Control Panel > Performance and Maintenance > Power Options > Hibernate tab. When you open the display while the notebook is in the power button, sleep button, and display switch drop-down list for "When I press the...

Hardware-Software Guide
Page 61
...time indicates the approximate running time remaining on the taskbar check box, and then select OK. To access the Power Meter display: ■ Select Start > Control Panel > Performance and Maintenance > Power Options > Power Meter tab. - Select the Advanced tab, select the Always show icon on the...battery pack continues to provide power at the current level. To display the Power Meter icon if the default setting has been changed, select Start > Control Panel > Performance and Maintenance > Power Options. Power Meter displays battery status in both percent and time: ■ The percent...
...time indicates the approximate running time remaining on the taskbar check box, and then select OK. To access the Power Meter display: ■ Select Start > Control Panel > Performance and Maintenance > Power Options > Power Meter tab. - Select the Advanced tab, select the Always show icon on the...battery pack continues to provide power at the current level. To display the Power Meter icon if the default setting has been changed, select Start > Control Panel > Performance and Maintenance > Power Options. Power Meter displays battery status in both percent and time: ■ The percent...


