Using LightScribe (Select Models Only)
Page 7
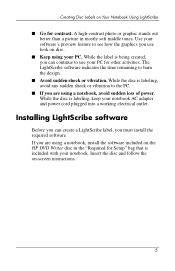
... indicates the time remaining to the PC. ■ If you use your PC. While the label is included with your notebook AC adapter and power cord plugged into a working electrical outlet. Installing LightScribe software Before you can continue to see how the graphics you are using a notebook, avoid sudden loss of power. If you must install the...
... indicates the time remaining to the PC. ■ If you use your PC. While the label is included with your notebook AC adapter and power cord plugged into a working electrical outlet. Installing LightScribe software Before you can continue to see how the graphics you are using a notebook, avoid sudden loss of power. If you must install the...

Hardware-Software Guide
Page 26
... Components Hardware The components included with most notebook models. Battery packs vary by region, country, notebook model, and the optional hardware you purchased. Component Description 1 AC adapter Converts AC power to DC power. 2 Power cord* Connects an AC adapter to an AC outlet. 3 Battery pack* 4 Modem cable* Powers the notebook when the notebook is not connected to a non-RJ...
... Components Hardware The components included with most notebook models. Battery packs vary by region, country, notebook model, and the optional hardware you purchased. Component Description 1 AC adapter Converts AC power to DC power. 2 Power cord* Connects an AC adapter to an AC outlet. 3 Battery pack* 4 Modem cable* Powers the notebook when the notebook is not connected to a non-RJ...

Hardware-Software Guide
Page 117
... turned off the device. 2. Disconnect the device from the notebook: 1. Plug the device power cord into a grounded AC outlet. 4. Hardware and Software Guide 7-1 To disconnect a powered external device from the notebook. 7 Hardware Upgrades and Replacements Device Connections Connecting a Powered Device To connect the notebook to the jack or jack on the device. ✎ ... fn+f4 hotkey to switch the image to the new device. Connect the device to an optional external device that has a power cord: 1. Turn off . 2. Turn on the notebook specified by the device manufacturer. 3.
... turned off the device. 2. Disconnect the device from the notebook: 1. Plug the device power cord into a grounded AC outlet. 4. Hardware and Software Guide 7-1 To disconnect a powered external device from the notebook. 7 Hardware Upgrades and Replacements Device Connections Connecting a Powered Device To connect the notebook to the jack or jack on the device. ✎ ... fn+f4 hotkey to switch the image to the new device. Connect the device to an optional external device that has a power cord: 1. Turn off . 2. Turn on the notebook specified by the device manufacturer. 3.

Hardware-Software Guide
Page 136
... this procedure, discharge yourself of static electricity by a service partner. Å WARNING: To prevent exposure to electrical shock and damage to the notebook, shut down the notebook, unplug the power cord, and remove the battery pack before beginning this procedure. Save your work and close all external devices connected to access should be opened...
... this procedure, discharge yourself of static electricity by a service partner. Å WARNING: To prevent exposure to electrical shock and damage to the notebook, shut down the notebook, unplug the power cord, and remove the battery pack before beginning this procedure. Save your work and close all external devices connected to access should be opened...
Hardware-Software Guide
Page 159
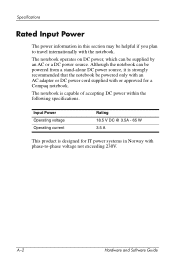
... W 3.5 A This product is designed for a Compaq notebook. The notebook operates on DC power, which can be powered from a stand-alone DC power source, it is capable of accepting DC power within the following specifications. Although the notebook can be powered only with an AC adapter or DC power cord supplied with or approved for IT power systems in this section may be...
... W 3.5 A This product is designed for a Compaq notebook. The notebook operates on DC power, which can be powered from a stand-alone DC power source, it is capable of accepting DC power within the following specifications. Although the notebook can be powered only with an AC adapter or DC power cord supplied with or approved for IT power systems in this section may be...

Hardware-Software Guide
Page 162
... wireless light 1-5 Bluetooth label 1-20 boot order 8-16 buttons display release 1-9 mute 1-6, 4-2 PC Card eject 1-12, 7-12 power 1-4, 3-7, 3-11 TouchPad 1-3, 2-1 volume 4-2 volume down 1-6 volume up 1-6 wireless 1-6 C cable lock, security 1-13, 6-15 cables audio 4-5 modem 1-18 network 1-11 S-Video 4-5 See also power cord calibration, battery 3-19 camcorder, connecting 7-3 camera, connecting 7-3 caps lock light 1-5 card and...
... wireless light 1-5 Bluetooth label 1-20 boot order 8-16 buttons display release 1-9 mute 1-6, 4-2 PC Card eject 1-12, 7-12 power 1-4, 3-7, 3-11 TouchPad 1-3, 2-1 volume 4-2 volume down 1-6 volume up 1-6 wireless 1-6 C cable lock, security 1-13, 6-15 cables audio 4-5 modem 1-18 network 1-11 S-Video 4-5 See also power cord calibration, battery 3-19 camcorder, connecting 7-3 camera, connecting 7-3 caps lock light 1-5 card and...

Hardware-Software Guide
Page 167
... default functions 3-7 identifying 1-4, 3-3 resetting notebook with 3-10 setting preferences 3-11 power connector 1-10 power cord external device 7-19 notebook 1-18 See also cables Power Meter icon 3-2, 3-16 Hardware and Software Guide Index-7 See CDs; DVDs P passwords administrator 6-5, 6-7 power-on 6-5, 6-9 QuickLock 2-11 Setup utility 6-4 standby 3-11, 6-5 user 6-5 Windows 6-4 Windows administrator 2-11 Windows user 2-11 PC Card configuring 7-9 inserting, removing...
... default functions 3-7 identifying 1-4, 3-3 resetting notebook with 3-10 setting preferences 3-11 power connector 1-10 power cord external device 7-19 notebook 1-18 See also cables Power Meter icon 3-2, 3-16 Hardware and Software Guide Index-7 See CDs; DVDs P passwords administrator 6-5, 6-7 power-on 6-5, 6-9 QuickLock 2-11 Setup utility 6-4 standby 3-11, 6-5 user 6-5 Windows 6-4 Windows administrator 2-11 Windows user 2-11 PC Card configuring 7-9 inserting, removing...
Getting Started
Page 6
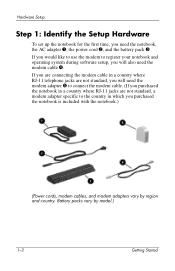
...the modem adapter 5 to the country in a country where RJ-11 jacks are not standard, you will also need the notebook, the AC adapter 1, the power cord 2, and the battery pack 3. Battery packs vary by region and country. If you are connecting the modem cable in a ...-11 telephone jacks are not standard, a modem adapter specific to connect the modem cable. (If you purchased the notebook in which you purchased the notebook is included with the notebook.) (Power cords, modem cables, and modem adapters vary by model.) 1-2 Getting Started Hardware Setup Step 1: Identify the Setup Hardware...
...the modem adapter 5 to the country in a country where RJ-11 jacks are not standard, you will also need the notebook, the AC adapter 1, the power cord 2, and the battery pack 3. Battery packs vary by region and country. If you are connecting the modem cable in a ...-11 telephone jacks are not standard, a modem adapter specific to connect the modem cable. (If you purchased the notebook in which you purchased the notebook is included with the notebook.) (Power cords, modem cables, and modem adapters vary by model.) 1-2 Getting Started Hardware Setup Step 1: Identify the Setup Hardware...
Getting Started
Page 11
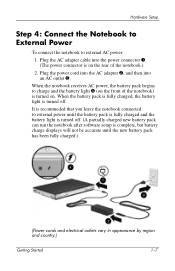
... in appearance by region and country.) Getting Started 1-7 Plug the power cord into the AC adapter 2, and then into the power connector 1. (The power connector is turned on the rear of the notebook) is on . When the notebook receives AC power, the battery pack begins to external AC power: 1. Plug the AC adapter cable into an AC outlet...
... in appearance by region and country.) Getting Started 1-7 Plug the power cord into the AC adapter 2, and then into the power connector 1. (The power connector is turned on the rear of the notebook) is on . When the notebook receives AC power, the battery pack begins to external AC power: 1. Plug the AC adapter cable into an AC outlet...

Getting Started
Page 23
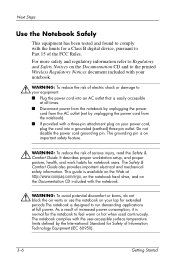
...or file sharing on the cable that might be caused by an uncertain power supply or an electrical storm: ■ Plug the notebook power cord into an optional, high-quality surge protector. Protect the Notebook from Power Surges To protect the notebook from the power surges that connects the modem to contact a support specialist. ■... Firewall, select Start > Help and Support for configuration information or to a telephone line. ■ During an electrical storm, either run the notebook on battery power or shut down the notebook and unplug the power cord. Getting Started 3-5
...or file sharing on the cable that might be caused by an uncertain power supply or an electrical storm: ■ Plug the notebook power cord into an optional, high-quality surge protector. Protect the Notebook from Power Surges To protect the notebook from the power surges that connects the modem to contact a support specialist. ■... Firewall, select Start > Help and Support for configuration information or to a telephone line. ■ During an electrical storm, either run the notebook on battery power or shut down the notebook and unplug the power cord. Getting Started 3-5
Getting Started
Page 24
... power from the notebook by unplugging the power cord from the notebook). ■ If provided with the notebook. Å WARNING: To avoid potential discomfort or burns, do not block the air vents or use the notebook on your lap for extended periods.The notebook is available on the Web at http://www.compaq....com/ergo, on the notebook hard drive, and on the Documentation CD included with a three-pin attachment plug on your power cord, plug the cord into a grounded (earthed...
... power from the notebook by unplugging the power cord from the notebook). ■ If provided with the notebook. Å WARNING: To avoid potential discomfort or burns, do not block the air vents or use the notebook on your lap for extended periods.The notebook is available on the Web at http://www.compaq....com/ergo, on the notebook hard drive, and on the Documentation CD included with a three-pin attachment plug on your power cord, plug the cord into a grounded (earthed...
Getting Started
Page 46
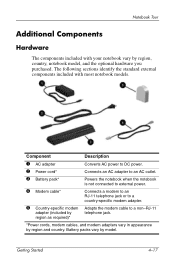
...notebook vary by model. Notebook Tour Additional Components Hardware The components included with most notebook models. Component Description 1 AC adapter Converts AC power to DC power. 2 Power cord* Connects an AC adapter to an AC outlet. 3 Battery pack* Powers the notebook when the notebook is not connected to external power...(included by region and country. region as required)* *Power cords, modem cables, and modem adapters vary in appearance by telephone jack. Battery packs vary by region, country, notebook model, and the optional hardware you purchased. Getting Started...
...notebook vary by model. Notebook Tour Additional Components Hardware The components included with most notebook models. Component Description 1 AC adapter Converts AC power to DC power. 2 Power cord* Connects an AC adapter to an AC outlet. 3 Battery pack* Powers the notebook when the notebook is not connected to external power...(included by region and country. region as required)* *Power cords, modem cables, and modem adapters vary in appearance by telephone jack. Battery packs vary by region, country, notebook model, and the optional hardware you purchased. Getting Started...
Getting Started
Page 49
... button light 4-5 wireless light 4-8 Bluetooth label 4-19 buttons display release 1-8, 4-9 mute 4-6 PC Card eject 4-12 power 4-4 TouchPad 2-2, 4-3 volume 4-6 wireless 4-5, 4-6 See also battery pack release latch; display switch; keys C cable lock, security 4-13 cables AC adapter 1-7 modem 1-4, 3-5, 4-17 network 4-11 See also power cord Getting Started Index-1 Index 1394 port 4-14 6-in-1 Memory Reader light...
... button light 4-5 wireless light 4-8 Bluetooth label 4-19 buttons display release 1-8, 4-9 mute 4-6 PC Card eject 4-12 power 4-4 TouchPad 2-2, 4-3 volume 4-6 wireless 4-5, 4-6 See also battery pack release latch; display switch; keys C cable lock, security 4-13 cables AC adapter 1-7 modem 1-4, 3-5, 4-17 network 4-11 See also power cord Getting Started Index-1 Index 1394 port 4-14 6-in-1 Memory Reader light...
Getting Started
Page 53
... 4-14 overheating, safety considerations 3-6 P PC Card eject button 4-12 PC Card slot 4-12 ports 1394 4-14 expansion port 4-11 monitor 4-11 USB 4-11, 4-14 See also connector, power; jacks power connecting the notebook to external 1-7 surge protection 3-5 turning off notebook 3-7 turning on notebook 1-9 power button identifying 4-4 turning off notebook 3-7 turning on notebook 1-9 power button light 1-9, 4-5 power connector 1-7, 4-10 power cord connecting 1-7 identifying 1-2, 4-17 surge...
... 4-14 overheating, safety considerations 3-6 P PC Card eject button 4-12 PC Card slot 4-12 ports 1394 4-14 expansion port 4-11 monitor 4-11 USB 4-11, 4-14 See also connector, power; jacks power connecting the notebook to external 1-7 surge protection 3-5 turning off notebook 3-7 turning on notebook 1-9 power button identifying 4-4 turning off notebook 3-7 turning on notebook 1-9 power button light 1-9, 4-5 power connector 1-7, 4-10 power cord connecting 1-7 identifying 1-2, 4-17 surge...
Compaq Presario V2000 Notebook PC - Hardware and Software Guide
Page 27
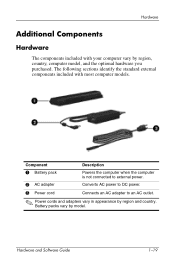
... computer when the computer is not connected to external power. 2 AC adapter Converts AC power to DC power. 3 Power cord Connects an AC adapter to an AC outlet. ✎ Power cords and adapters vary in appearance by model. Battery packs vary by region and country. Hardware Additional Components Hardware The components included with most computer models. ...
... computer when the computer is not connected to external power. 2 AC adapter Converts AC power to DC power. 3 Power cord Connects an AC adapter to an AC outlet. ✎ Power cords and adapters vary in appearance by model. Battery packs vary by region and country. Hardware Additional Components Hardware The components included with most computer models. ...
Compaq Presario V2000 Notebook PC - Hardware and Software Guide
Page 49
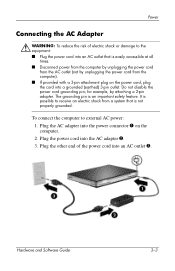
...adapter into the power connector 1 on the power cord, plug the cord into a grounded (earthed) 3-pin outlet. Power Connecting the AC Adapter Å WARNING: To reduce the risk of the power cord into an AC outlet 3. To connect the computer to the equipment: ■ Plug the power cord into the AC ...adapter 2. 3. Plug the other end of electric shock or damage to external AC power: 1. for example, by unplugging the power cord from a system that is an important safety feature. Plug the power cord into an AC outlet that is possible to receive an electric shock from the ...
...adapter into the power connector 1 on the power cord, plug the cord into a grounded (earthed) 3-pin outlet. Power Connecting the AC Adapter Å WARNING: To reduce the risk of the power cord into an AC outlet 3. To connect the computer to the equipment: ■ Plug the power cord into the AC ...adapter 2. 3. Plug the other end of electric shock or damage to external AC power: 1. for example, by unplugging the power cord from a system that is an important safety feature. Plug the power cord into an AC outlet that is possible to receive an electric shock from the ...
Compaq Presario V2000 Notebook PC - Hardware and Software Guide
Page 121
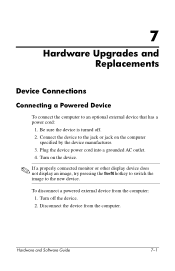
...by the device manufacturer. 3. Hardware and Software Guide 7-1 Plug the device power cord into a grounded AC outlet. 4. Be sure the device is turned off the device. 2. To disconnect a powered external device from the computer. 7 Hardware Upgrades and Replacements Device Connections Connecting a Powered Device To connect the computer to the new device. Connect the device... display device does not display an image, try pressing the fn+f4 hotkey to switch the image to an optional external device that has a power cord: 1. Turn off . 2. Disconnect the device from the computer: 1.
...by the device manufacturer. 3. Hardware and Software Guide 7-1 Plug the device power cord into a grounded AC outlet. 4. Be sure the device is turned off the device. 2. To disconnect a powered external device from the computer. 7 Hardware Upgrades and Replacements Device Connections Connecting a Powered Device To connect the computer to the new device. Connect the device... display device does not display an image, try pressing the fn+f4 hotkey to switch the image to an optional external device that has a power cord: 1. Turn off . 2. Disconnect the device from the computer: 1.
Compaq Presario V2000 Notebook PC - Hardware and Software Guide
Page 144
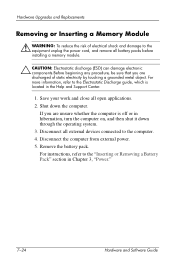
... in the Help and Support Center. 1. For more information, refer to the Electrostatic Discharge guide, which is off or in Chapter 3, "Power." 7-24 Hardware and Software Guide Remove the battery pack. Hardware Upgrades and Replacements Removing or Inserting a Memory Module Å WARNING: To ... damage electronic components.Before beginning any procedure, be sure that you are discharged of electrical shock and damage to the equipment unplug the power cord, and remove all external devices connected to the "Inserting or Removing a Battery Pack" section in hibernation, turn the computer on, ...
... in the Help and Support Center. 1. For more information, refer to the Electrostatic Discharge guide, which is off or in Chapter 3, "Power." 7-24 Hardware and Software Guide Remove the battery pack. Hardware Upgrades and Replacements Removing or Inserting a Memory Module Å WARNING: To ... damage electronic components.Before beginning any procedure, be sure that you are discharged of electrical shock and damage to the equipment unplug the power cord, and remove all external devices connected to the "Inserting or Removing a Battery Pack" section in hibernation, turn the computer on, ...
Compaq Presario V2000 Notebook PC - Hardware and Software Guide
Page 153
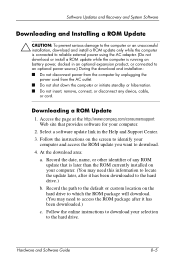
... a software update link in an optional expansion product, or connected to an optional power source.) During the download and installation: ■ Do not disconnect power from the computer by unplugging the power cord from the AC outlet. ■ Do not shut down the computer or initiate standby or ...hibernation. ■ Do not insert, remove, connect, or disconnect any ROM update that provides software for your computer. 2. Hardware and Software Guide 8-5 Access the page at the http://www.compaq...
... a software update link in an optional expansion product, or connected to an optional power source.) During the download and installation: ■ Do not disconnect power from the computer by unplugging the power cord from the AC outlet. ■ Do not shut down the computer or initiate standby or ...hibernation. ■ Do not insert, remove, connect, or disconnect any ROM update that provides software for your computer. 2. Hardware and Software Guide 8-5 Access the page at the http://www.compaq...

Compaq Presario V2000 Notebook PC - Hardware and Software Guide
Page 168
Although the computer can be supplied by an AC or a DC power source. The computer is designed for IT power systems in this section may be powered only with an AC adapter or DC power cord supplied with or approved for a Compaq computer. Specifications Rated Input Power The power information in Norway with phase-to-phase voltage not exceeding...
Although the computer can be supplied by an AC or a DC power source. The computer is designed for IT power systems in this section may be powered only with an AC adapter or DC power cord supplied with or approved for a Compaq computer. Specifications Rated Input Power The power information in Norway with phase-to-phase voltage not exceeding...


