
Maintenance and Service Guide
Page 6
... webcam, panel 40 WLAN module ...48 Memory module ...51 Hard drive ...53 RTC battery ...55 Optical drive ...56 Keyboard ...58 Top cover ...61 Power button board ...65 TouchPad button board ...67 Speakers ...69 USB board ...71 Power connector cable ...73 Display assembly ...75 System board ...84 Optical drive cable ...88 Fan/heat sink assembly ...90 Processor ...96 5 Using Setup Utility (BIOS) and System Diagnostics 99 Starting Setup Utility (BIOS) ...99 Updating the BIOS ...99 Determining the BIOS version ...99 Downloading a BIOS update ...100 Using System Diagnostics ...101 6 Specifications...
... webcam, panel 40 WLAN module ...48 Memory module ...51 Hard drive ...53 RTC battery ...55 Optical drive ...56 Keyboard ...58 Top cover ...61 Power button board ...65 TouchPad button board ...67 Speakers ...69 USB board ...71 Power connector cable ...73 Display assembly ...75 System board ...84 Optical drive cable ...88 Fan/heat sink assembly ...90 Processor ...96 5 Using Setup Utility (BIOS) and System Diagnostics 99 Starting Setup Utility (BIOS) ...99 Updating the BIOS ...99 Determining the BIOS version ...99 Downloading a BIOS update ...100 Using System Diagnostics ...101 6 Specifications...
Maintenance and Service Guide
Page 7
... Restore and recovery ...110 Using Windows Refresh for quick and easy recovery 111 Remove everything and reinstall Windows 111 Recovering using HP Recovery Manager 112 What you need to know 112 Using the HP Recovery partition to recover (select models only 112 Using HP Recovery media to recover 113 Changing the computer boot order 113 Removing the HP Recovery partition 113 8 Power cord set requirements ...115 Requirements for all countries ...115 Requirements for specific countries and regions 116 9 Recycling ...119 Battery ...119 Display...
... Restore and recovery ...110 Using Windows Refresh for quick and easy recovery 111 Remove everything and reinstall Windows 111 Recovering using HP Recovery Manager 112 What you need to know 112 Using the HP Recovery partition to recover (select models only 112 Using HP Recovery media to recover 113 Changing the computer boot order 113 Removing the HP Recovery partition 113 8 Power cord set requirements ...115 Requirements for all countries ...115 Requirements for specific countries and regions 116 9 Recycling ...119 Battery ...119 Display...
Maintenance and Service Guide
Page 12
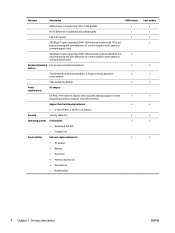
...cable slot Operating system Preinstalled: ● Windows 8 (64-bit) ● FreeDOS 2.0 Serviceability End-user replaceable parts: ● AC adapter ● Battery ● Hard drive ● Memory modules (2) ● Optical drive ● WLAN module AMD models √ √ √ √ Intel models √ √ √ √ 4 Chapter 1 Product description ENWW standard aspect video Keyboard/pointing Full-size textured pocket keyboard devices TouchPad with multi-touch gestures, 2-finger scrolling, and pinchzoom enabled Taps enabled by default Power...
...cable slot Operating system Preinstalled: ● Windows 8 (64-bit) ● FreeDOS 2.0 Serviceability End-user replaceable parts: ● AC adapter ● Battery ● Hard drive ● Memory modules (2) ● Optical drive ● WLAN module AMD models √ √ √ √ Intel models √ √ √ √ 4 Chapter 1 Product description ENWW standard aspect video Keyboard/pointing Full-size textured pocket keyboard devices TouchPad with multi-touch gestures, 2-finger scrolling, and pinchzoom enabled Taps enabled by default Power...

Maintenance and Service Guide
Page 14
... injury, adjust the volume before using headphones, earbuds, or a headset. NOTE: The computer fan starts up automatically to cool internal components. Connects an optional USB device. Left side Component (1) (2) External monitor port Vent (3) RJ-45 (network) jack (4) HDMI port (5) USB 2.0 port (6) Audio-in (microphone) jack (7) Audio-out (headphone) jack (8) Digital Media Slot Description Connects an external VGA monitor or projector. Connects an optional computer headset microphone, stereo array microphone, or monaural microphone. Connects a network cable. Enables airflow...
... injury, adjust the volume before using headphones, earbuds, or a headset. NOTE: The computer fan starts up automatically to cool internal components. Connects an optional USB device. Left side Component (1) (2) External monitor port Vent (3) RJ-45 (network) jack (4) HDMI port (5) USB 2.0 port (6) Audio-in (microphone) jack (7) Audio-out (headphone) jack (8) Digital Media Slot Description Connects an external VGA monitor or projector. Connects an optional computer headset microphone, stereo array microphone, or monaural microphone. Connects a network cable. Enables airflow...
Maintenance and Service Guide
Page 34
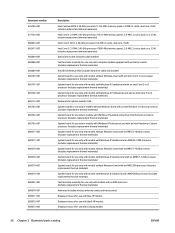
... materials System board for use only with models with Windows 8 Standard and an AMD E300 processor (includes replacement thermal materials Fan/heat sink assembly for use only with models with an AMD processor (includes replacement thermal materials) Antennas (includes wireless antenna cables and transceivers) Display enclosure for use with blue HP models Display enclosure for use with black HP models Display enclosure for use with Compaq models 26 Chapter 3 Illustrated parts catalog ENWW...
... materials System board for use only with models with Windows 8 Standard and an AMD E300 processor (includes replacement thermal materials Fan/heat sink assembly for use only with models with an AMD processor (includes replacement thermal materials) Antennas (includes wireless antenna cables and transceivers) Display enclosure for use with blue HP models Display enclosure for use with black HP models Display enclosure for use with Compaq models 26 Chapter 3 Illustrated parts catalog ENWW...
Maintenance and Service Guide
Page 44
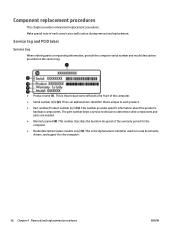
... Chapter 4 Removal and replacement procedures ENWW This is an alphanumeric identifier that is unique to locate documents, drivers, and support for the computer. ● Model description (select models only) (5). This number provides specific information about the product's hardware components. Make special note of each product. ● Part number/Product number (p/n) (3). Service tag and PCID label Service tag When ordering parts or requesting information, provide the computer serial number and model description...
... Chapter 4 Removal and replacement procedures ENWW This is an alphanumeric identifier that is unique to locate documents, drivers, and support for the computer. ● Model description (select models only) (5). This number provides specific information about the product's hardware components. Make special note of each product. ● Part number/Product number (p/n) (3). Service tag and PCID label Service tag When ordering parts or requesting information, provide the computer serial number and model description...

Maintenance and Service Guide
Page 59
... the power cord from the AC outlet and then unplugging the AC adapter from the computer. 4. Spread the retaining tabs (1) on page 48). Remove the battery (see WLAN module on each side of the memory module slot to the computer. 3. Disconnect all external devices connected to release the memory module. (The memory module tilts up the Mylar sheet protecting the memory module compartment. 2. Shut down through the operating...
... the power cord from the AC outlet and then unplugging the AC adapter from the computer. 4. Spread the retaining tabs (1) on page 48). Remove the battery (see WLAN module on each side of the memory module slot to the computer. 3. Disconnect all external devices connected to release the memory module. (The memory module tilts up the Mylar sheet protecting the memory module compartment. 2. Shut down through the operating...

Maintenance and Service Guide
Page 61
... Hibernation, turn the computer on page 39). 5. To remove the hard drive: 1. Disconnect the hard drive cable (1) from the computer. 4. Remove the battery (see WLAN module on page 23. 2. Shut down through the operating system. 2. For more information about the Plastics Kit, see Plastics kit on page 48). ENWW Component replacement procedures 53 Disconnect all external devices connected to the computer. 3. Hard drive NOTE: The hard drive spare part kit...
... Hibernation, turn the computer on page 39). 5. To remove the hard drive: 1. Disconnect the hard drive cable (1) from the computer. 4. Remove the battery (see WLAN module on page 23. 2. Shut down through the operating system. 2. For more information about the Plastics Kit, see Plastics kit on page 48). ENWW Component replacement procedures 53 Disconnect all external devices connected to the computer. 3. Hard drive NOTE: The hard drive spare part kit...

Maintenance and Service Guide
Page 64
... the optical drive cable or cable bracket. Disconnect all external devices connected to the computer. 2. Insert a screwdriver or similar small tool into the hole at the rear of the optical drive, position the optical drive with the rear panel toward you are included in Hibernation, turn the computer on page 53). See Optical drive cable on page 39). 5. Remove the memory module/wireless module compartment cover (see Hard drive on...
... the optical drive cable or cable bracket. Disconnect all external devices connected to the computer. 2. Insert a screwdriver or similar small tool into the hole at the rear of the optical drive, position the optical drive with the rear panel toward you are included in Hibernation, turn the computer on page 53). See Optical drive cable on page 39). 5. Remove the memory module/wireless module compartment cover (see Hard drive on...

Maintenance and Service Guide
Page 66
Keyboard NOTE: The keyboard spare part kit includes a keyboard cable. Spare part number 698694-xx1 Before removing the keyboard, follow these steps: 1. Disconnect all external devices connected to loosen the keyboard. 58 Chapter 4 Removal and replacement procedures ENWW Shut down through the operating system. 2. If you , and then partially open the computer. 3. Remove the memory module/wireless module compartment cover (see Sequential part number listing on its left side with French Canada NOTE: For a detailed list of the...
Keyboard NOTE: The keyboard spare part kit includes a keyboard cable. Spare part number 698694-xx1 Before removing the keyboard, follow these steps: 1. Disconnect all external devices connected to loosen the keyboard. 58 Chapter 4 Removal and replacement procedures ENWW Shut down through the operating system. 2. If you , and then partially open the computer. 3. Remove the memory module/wireless module compartment cover (see Sequential part number listing on its left side with French Canada NOTE: For a detailed list of the...
Maintenance and Service Guide
Page 108
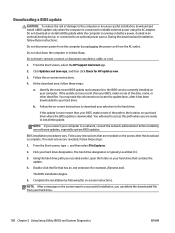
... identifier. From the Start screen, type e, and then select File Explorer. 2. NOTE: After a message on -screen instructions. 4. Do not download or install a BIOS update while the computer is running on your hard drive where the BIOS update is complete. Identify the most recent BIOS update and compare it has been downloaded to your computer to a network, consult the network administrator before installing any device, cable, or cord. 1. Click your BIOS, make a note of...
... identifier. From the Start screen, type e, and then select File Explorer. 2. NOTE: After a message on -screen instructions. 4. Do not download or install a BIOS update while the computer is running on your hard drive where the BIOS update is complete. Identify the most recent BIOS update and compare it has been downloaded to your computer to a network, consult the network administrator before installing any device, cable, or cord. 1. Click your BIOS, make a note of...
Maintenance and Service Guide
Page 116
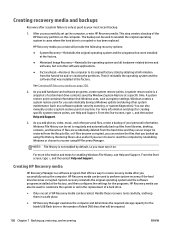
... hard drive and re-creating the partitions. From the Start screen, type h, and then select Help and Support. 3. Creating HP Recovery media HP Recovery Manager is a snapshot of certain hard drive contents saved by deleting all hardware-related drivers and software, but not other software applications. ● Factory Reset-Restores the computer to create recovery media after a system failure is corrupted or has been replaced. Handle these recovery tools carefully, and keep them in a safe place. ● HP Recovery Manager...
... hard drive and re-creating the partitions. From the Start screen, type h, and then select Help and Support. 3. Creating HP Recovery media HP Recovery Manager is a snapshot of certain hard drive contents saved by deleting all hardware-related drivers and software, but not other software applications. ● Factory Reset-Restores the computer to create recovery media after a system failure is corrupted or has been replaced. Handle these recovery tools carefully, and keep them in a safe place. ● HP Recovery Manager...
Maintenance and Service Guide
Page 118
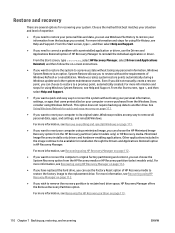
... choose the System Recovery option from the backups you created. Minimized Image Recovery installs only drivers and hardware-enabling applications. For more information, see Recovering using File History, see Recovering using Windows Refresh. From the Start screen, type h, and then select Help and Support. ● If you can choose the HP Minimized Image Recovery option from the HP Recovery partition (select models only) or HP Recovery media. From the Start screen, type recovery, select HP Recovery Manager, select Drivers and Applications Reinstall...
... choose the System Recovery option from the backups you created. Minimized Image Recovery installs only drivers and hardware-enabling applications. For more information, see Recovering using File History, see Recovering using Windows Refresh. From the Start screen, type h, and then select Help and Support. ● If you can choose the HP Minimized Image Recovery option from the HP Recovery partition (select models only) or HP Recovery media. From the Start screen, type recovery, select HP Recovery Manager, select Drivers and Applications Reinstall...
Maintenance and Service Guide
Page 119
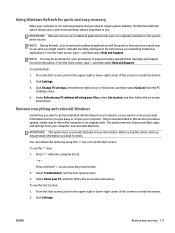
... installed on -screen instructions. See Help and Support for your computer. From the Start screen, type h, and then select Help and Support. Remove everything and reinstall Windows Sometimes you want to remove personal information before you give away or recycle your permission or password when using Refresh. This option removes all personal data, apps, and settings from the PC settings screen. 4. To use the Start screen: 1. ENWW Restore and recovery 111 IMPORTANT: Refresh removes...
... installed on -screen instructions. See Help and Support for your computer. From the Start screen, type h, and then select Help and Support. Remove everything and reinstall Windows Sometimes you want to remove personal information before you give away or recycle your permission or password when using Refresh. This option removes all personal data, apps, and settings from the PC settings screen. 4. To use the Start screen: 1. ENWW Restore and recovery 111 IMPORTANT: Refresh removes...
Maintenance and Service Guide
Page 120
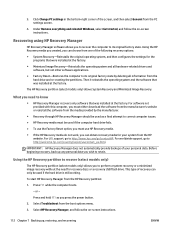
... Recovery partition: 1. Under Remove everything and reinstall Windows, select Get started, and follow the on -screen instructions. Select Troubleshoot from the PC settings screen. 4. Recovering using HP Recovery Manager HP Recovery Manager software allows you to recover the computer to its original factory state by the manufacturer. ● Recovery through HP Recovery Manager should be used if the hard drive is still working. The HP Recovery partition (select models only) allows System Recovery and Minimized Image Recovery. What you press the power button...
... Recovery partition: 1. Under Remove everything and reinstall Windows, select Get started, and follow the on -screen instructions. Select Troubleshoot from the PC settings screen. 4. Recovering using HP Recovery Manager HP Recovery Manager software allows you to recover the computer to its original factory state by the manufacturer. ● Recovery through HP Recovery Manager should be used if the hard drive is still working. The HP Recovery partition (select models only) allows System Recovery and Minimized Image Recovery. What you press the power button...

Maintenance and Service Guide
Page 121
... Recovery Manager, change the boot order: 1. You can change the computer boot order, which is the order of devices listed in HP Recovery Manager, you have an HP Recovery partition or if the hard drive is restarting, and then press f9 for minimized image recovery. Create HP Recovery media before removing the Recovery partition to ensure you can change the selection for startup information. From the Start screen, type recovery, and then select HP Recovery Manager. 2. Insert the HP Recovery USB flash drive you want to free...
... Recovery Manager, change the boot order: 1. You can change the computer boot order, which is the order of devices listed in HP Recovery Manager, you have an HP Recovery partition or if the hard drive is restarting, and then press f9 for minimized image recovery. Create HP Recovery media before removing the Recovery partition to ensure you can change the selection for startup information. From the Start screen, type recovery, and then select HP Recovery Manager. 2. Insert the HP Recovery USB flash drive you want to free...
Maintenance and Service Guide
Page 133
... 13 battery release latch identifying 13 BIOS determining version 99 downloading an update 100 updating 99 boot order changing HP Recovery Manager 113 buttons left TouchPad 9 optical drive eject 5 power 11 right TouchPad 9 TouchPad on/off 9 C cables service considerations 31 caps lock light identifying 10 chipset product description 2 components bottom 13 display 8 front 7 left side 6 right side 5 top 9 computer feet locating 38 spare part number 27 computer major components illustrated 15 computer reset 111 computer specifications...
... 13 battery release latch identifying 13 BIOS determining version 99 downloading an update 100 updating 99 boot order changing HP Recovery Manager 113 buttons left TouchPad 9 optical drive eject 5 power 11 right TouchPad 9 TouchPad on/off 9 C cables service considerations 31 caps lock light identifying 10 chipset product description 2 components bottom 13 display 8 front 7 left side 6 right side 5 top 9 computer feet locating 38 spare part number 27 computer major components illustrated 15 computer reset 111 computer specifications...
Maintenance and Service Guide
Page 134
...113 starting 112 HP Recovery media creating 108 recovery 113 HP Recovery partition 112 recovery 112 removing 113 I integrated webcam light, identifying 8 internal display switch, identifying 8 internal microphone, identifying 8 J jacks audio-in (microphone) 6 audio-out (headphone) 6 network 6 RJ-45 (network) 6 K keyboard illustrated 16 product description 4 removing 58 spare part number 27, 28 keys action 12 esc 12 fn 12 L lights AC adapter 5 caps lock 10 hard drive 7 optical drive 5 power 7, 10 TouchPad 9 webcam 8 wireless 10 M mass storage devices illustrated 22 precautions 32 memory module...
...113 starting 112 HP Recovery media creating 108 recovery 113 HP Recovery partition 112 recovery 112 removing 113 I integrated webcam light, identifying 8 internal display switch, identifying 8 internal microphone, identifying 8 J jacks audio-in (microphone) 6 audio-out (headphone) 6 network 6 RJ-45 (network) 6 K keyboard illustrated 16 product description 4 removing 58 spare part number 27, 28 keys action 12 esc 12 fn 12 L lights AC adapter 5 caps lock 10 hard drive 7 optical drive 5 power 7, 10 TouchPad 9 webcam 8 wireless 10 M mass storage devices illustrated 22 precautions 32 memory module...
Maintenance and Service Guide
Page 135
..., 27 product description audio 3 chipset 2 display panel 2 Ethernet 3 external media cards 3 graphics 2 hard drive 3 keyboard 4 memory module 2 microphone 3 operating system 4 optical drive 3 pointing device 4 ports 3 power requirements 4 processor 1 product name 1 security 4 serviceability 4 video 3 wireless 3 product name 1 R recovery 110, 111 discs 109, 113 HP Recovery Manager 112 media 113 starting 112 supported discs 109 system 112 USB flash drive 113 using HP Recovery media 109 recovery media creating 108 creating using HP Recovery Manager 109 recovery partition 112 removing 113 recycle...
..., 27 product description audio 3 chipset 2 display panel 2 Ethernet 3 external media cards 3 graphics 2 hard drive 3 keyboard 4 memory module 2 microphone 3 operating system 4 optical drive 3 pointing device 4 ports 3 power requirements 4 processor 1 product name 1 security 4 serviceability 4 video 3 wireless 3 product name 1 R recovery 110, 111 discs 109, 113 HP Recovery Manager 112 media 113 starting 112 supported discs 109 system 112 USB flash drive 113 using HP Recovery media 109 recovery media creating 108 creating using HP Recovery Manager 109 recovery partition 112 removing 113 recycle...

Maintenance and Service Guide
Page 136
... light identifying 9 TouchPad on/off button identifying 9 TouchPad zone identifying 9 transporting guidelines 34 U USB board illustrated 16 removing 71 spare part number 27 USB ports identifying 5, 6 V vents identifying 6, 13 video product description 3 W webcam light, identifying 8 webcam, identifying 8 webcam/microphone cable illustrated 21 removing 82 spare part number 27 webcam/microphone module illustrated 20 removing 43, 78 spare part number 26, 28 Windows backup 108 File History 108, 110 Refresh 110, 111 reinstall 110, 111 remove everything and reinstall option 111 reset 111 restoring...
... light identifying 9 TouchPad on/off button identifying 9 TouchPad zone identifying 9 transporting guidelines 34 U USB board illustrated 16 removing 71 spare part number 27 USB ports identifying 5, 6 V vents identifying 6, 13 video product description 3 W webcam light, identifying 8 webcam, identifying 8 webcam/microphone cable illustrated 21 removing 82 spare part number 27 webcam/microphone module illustrated 20 removing 43, 78 spare part number 26, 28 Windows backup 108 File History 108, 110 Refresh 110, 111 reinstall 110, 111 remove everything and reinstall option 111 reset 111 restoring...


