
Drives - Windows Vista
Page 9
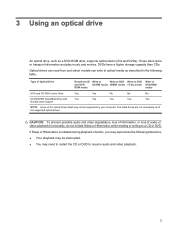
...CD Write to Write to DVD Write to optical media as a DVD-ROM drive, supports optical discs (CDs and DVDs). CAUTION: To prevent possible audio and video degradation, loss of information, or loss of the optical drives listed may not be interrupted. ● You may need to restart the...DVD±RW SuperMulti Drive with Yes Yes Yes Yes Yes Double-Layer support NOTE: Some of audio or video playback functionality, do not initiate Sleep or Hibernation while reading or writing to resume audio and video playback. 3 3 Using an optical drive An optical drive, such as described in the...
...CD Write to Write to DVD Write to optical media as a DVD-ROM drive, supports optical discs (CDs and DVDs). CAUTION: To prevent possible audio and video degradation, loss of information, or loss of the optical drives listed may not be interrupted. ● You may need to restart the...DVD±RW SuperMulti Drive with Yes Yes Yes Yes Yes Double-Layer support NOTE: Some of audio or video playback functionality, do not initiate Sleep or Hibernation while reading or writing to resume audio and video playback. 3 3 Using an optical drive An optical drive, such as described in the...
Notebook Tour - Windows Vista
Page 13
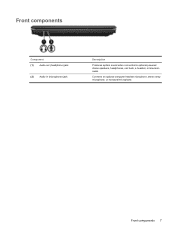
Front components 7 Front components Component (1) Audio-out (headphone) jack (2) Audio-in (microphone) jack Description Produces system sound when connected to optional powered stereo speakers, headphones, ear buds, a headset, or television audio. Connects an optional computer headset microphone, stereo array microphone, or monaural microphone.
Front components 7 Front components Component (1) Audio-out (headphone) jack (2) Audio-in (microphone) jack Description Produces system sound when connected to optional powered stereo speakers, headphones, ear buds, a headset, or television audio. Connects an optional computer headset microphone, stereo array microphone, or monaural microphone.
Notebook Tour - Windows Vista
Page 20
... identifying 2 function keys, identifying 2 H hard drive bay, identifying 10 headphone (audio-out) jack 7 hotkeys mute 4 volume 4 I IEC 60950 compliance iii internal display switch, identifying 6 internal microphone, identifying 6 J jacks audio-in (microphone) 7 audio-out (headphone) 7 RJ-11 (modem) 9 RJ-45 (network) 9 S-...caps lock 5 drive 5 num lock 5 power 5 TouchPad 3 wireless 5 lock, security cable 8 M memory module compartment 10 microphone (audio-in) jack 7 microphone, internal 6 Microsoft Certificate of Authenticity label 13 modem approval label 13 monitor port, external 9 mute hotkey 4 ...
... identifying 2 function keys, identifying 2 H hard drive bay, identifying 10 headphone (audio-out) jack 7 hotkeys mute 4 volume 4 I IEC 60950 compliance iii internal display switch, identifying 6 internal microphone, identifying 6 J jacks audio-in (microphone) 7 audio-out (headphone) 7 RJ-11 (modem) 9 RJ-45 (network) 9 S-...caps lock 5 drive 5 num lock 5 power 5 TouchPad 3 wireless 5 lock, security cable 8 M memory module compartment 10 microphone (audio-in) jack 7 microphone, internal 6 Microsoft Certificate of Authenticity label 13 modem approval label 13 monitor port, external 9 mute hotkey 4 ...
Pointing Devices and Keyboard - Windows Vista
Page 5
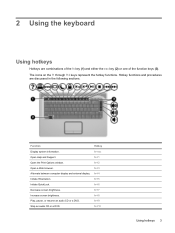
...6 Initiating QuickLock (fn+f6 6 Decreasing screen brightness (fn+f7 6 Increasing screen brightness (fn+f8 6 Playing, pausing or resuming an audio CD or a DVD (fn+f9 6 Stopping an audio CD or a DVD (fn+f10 6 Playing previous track or section of an audio CD or a DVD (fn+f11 6 Playing next track or section of an... audio CD or a DVD (fn+f12 7 Muting speaker sound (fn+home 7 Increasing speaker sound (fn+pg up 7 Decreasing speaker sound (fn+pg dn 7 3 Using the keypads...
...6 Initiating QuickLock (fn+f6 6 Decreasing screen brightness (fn+f7 6 Increasing screen brightness (fn+f8 6 Playing, pausing or resuming an audio CD or a DVD (fn+f9 6 Stopping an audio CD or a DVD (fn+f10 6 Playing previous track or section of an audio CD or a DVD (fn+f11 6 Playing next track or section of an... audio CD or a DVD (fn+f12 7 Muting speaker sound (fn+home 7 Increasing speaker sound (fn+pg up 7 Decreasing speaker sound (fn+pg dn 7 3 Using the keypads...
Pointing Devices and Keyboard - Windows Vista
Page 9
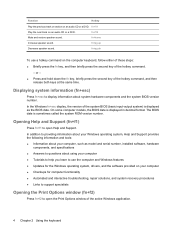
... icons on the f1 through f12 keys represent the hotkey functions. fn+f3 Alternate between computer display and external display. Decrease screen brightness. Stop an audio CD or a DVD. fn+f2 Open a Web browser. fn+esc Open Help and Support. fn+f5 fn+f6 fn+f7 Increase screen brightness.... the Print Options window. 2 Using the keyboard Using hotkeys Hotkeys are discussed in the following sections. Initiate QuickLock. Play, pause, or resume an audio CD or a DVD. fn+f8 fn+f9 fn+f10 Using hotkeys 3 Function Hotkey Display system information. fn+f4 Initiate Hibernation.
... icons on the f1 through f12 keys represent the hotkey functions. fn+f3 Alternate between computer display and external display. Decrease screen brightness. Stop an audio CD or a DVD. fn+f2 Open a Web browser. fn+esc Open Help and Support. fn+f5 fn+f6 fn+f7 Increase screen brightness.... the Print Options window. 2 Using the keyboard Using hotkeys Hotkeys are discussed in the following sections. Initiate QuickLock. Play, pause, or resume an audio CD or a DVD. fn+f8 fn+f9 fn+f10 Using hotkeys 3 Function Hotkey Display system information. fn+f4 Initiate Hibernation.
Pointing Devices and Keyboard - Windows Vista
Page 10
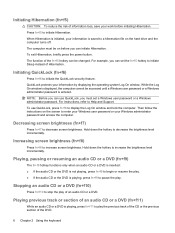
... the Print Options window of the hotkey command, and then release both keys at the same time. fn+f11 Play the next track on an audio CD or a DVD. fn+home Increase speaker sound. or - ● Press and hold down the fn key, briefly press the second key of the active... fn+f12 Mute and restore speaker sound. The BIOS date is displayed in decimal format. Function Hotkey Play the previous track or section on an audio CD or a DVD.
... the Print Options window of the hotkey command, and then release both keys at the same time. fn+f11 Play the next track on an audio CD or a DVD. fn+home Increase speaker sound. or - ● Press and hold down the fn key, briefly press the second key of the active... fn+f12 Mute and restore speaker sound. The BIOS date is displayed in decimal format. Function Hotkey Play the previous track or section on an audio CD or a DVD.
Pointing Devices and Keyboard - Windows Vista
Page 12
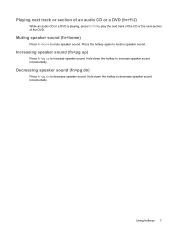
...QuickLock security feature. Playing, pausing or resuming an audio CD or a DVD (fn+f9) The fn+f9 hotkey functions only when an audio CD or a DVD is inserted: ● If the audio CD or the DVD is not playing, press... fn+f9 to begin or resume the play. ● If the audio CD or the DVD is playing, press fn+f11 to increase the brightness level incrementally.... window is displayed, the computer cannot be changed. Playing previous track or section of an audio CD or a DVD (fn+f11) While an audio CD or a DVD is playing, press fn+f9 to stop the play . The function...
...QuickLock security feature. Playing, pausing or resuming an audio CD or a DVD (fn+f9) The fn+f9 hotkey functions only when an audio CD or a DVD is inserted: ● If the audio CD or the DVD is not playing, press... fn+f9 to begin or resume the play. ● If the audio CD or the DVD is playing, press fn+f11 to increase the brightness level incrementally.... window is displayed, the computer cannot be changed. Playing previous track or section of an audio CD or a DVD (fn+f11) While an audio CD or a DVD is playing, press fn+f9 to stop the play . The function...
Pointing Devices and Keyboard - Windows Vista
Page 13
.... Decreasing speaker sound (fn+pg dn) Press fn+pg dn to increase speaker sound. Playing next track or section of an audio CD or a DVD (fn+f12) While an audio CD or a DVD is playing, press fn+f12 to play the next track of the CD or the next section of the...
.... Decreasing speaker sound (fn+pg dn) Press fn+pg dn to increase speaker sound. Playing next track or section of an audio CD or a DVD (fn+f12) While an audio CD or a DVD is playing, press fn+f12 to play the next track of the CD or the next section of the...
Pointing Devices and Keyboard - Windows Vista
Page 17
Index B buttons TouchPad 1 TouchPad on/off 1 D display image, switching 5 screen brightness hotkeys 6 F fn key 3 function keys 3 H Help and Support hotkey 4 Hibernation hotkey 6 hotkeys audio CD or DVD controls 6 decreasing screen brightness 6 decreasing speaker sound 7 description 3 displaying system information 4 increasing screen brightness 6 increasing speaker volume 7 initiating Hibernation 6 initiating QuickLock 6 muting ...
Index B buttons TouchPad 1 TouchPad on/off 1 D display image, switching 5 screen brightness hotkeys 6 F fn key 3 function keys 3 H Help and Support hotkey 4 Hibernation hotkey 6 hotkeys audio CD or DVD controls 6 decreasing screen brightness 6 decreasing speaker sound 7 description 3 displaying system information 4 increasing screen brightness 6 increasing speaker volume 7 initiating Hibernation 6 initiating QuickLock 6 muting ...
Wireless (Select Models Only) - Windows Vista
Page 16
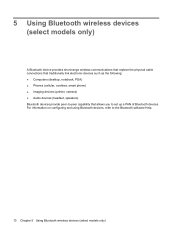
... that replace the physical cable connections that traditionally link electronic devices such as the following: ● Computers (desktop, notebook, PDA) ● Phones (cellular, cordless, smart phone) ● Imaging devices (printer, camera) ● Audio devices (headset, speakers) Bluetooth devices provide peer-to-peer capability that allows you to the Bluetooth software Help. 10...
... that replace the physical cable connections that traditionally link electronic devices such as the following: ● Computers (desktop, notebook, PDA) ● Phones (cellular, cordless, smart phone) ● Imaging devices (printer, camera) ● Audio devices (headset, speakers) Bluetooth devices provide peer-to-peer capability that allows you to the Bluetooth software Help. 10...
Multimedia - Windows Vista
Page 5
Table of contents 1 Using multimedia hardware Using the audio features ...1 Using the audio-in (microphone) jack 2 Using the audio-out (headphone) jack 2 Adjusting the volume ...3 Using the video features ...4 Using the external monitor port 4 Using the S-Video-out jack 5 Using an optical drive ...6 Identifying ...
Table of contents 1 Using multimedia hardware Using the audio features ...1 Using the audio-in (microphone) jack 2 Using the audio-out (headphone) jack 2 Adjusting the volume ...3 Using the video features ...4 Using the external monitor port 4 Using the S-Video-out jack 5 Using an optical drive ...6 Identifying ...
Multimedia - Windows Vista
Page 7
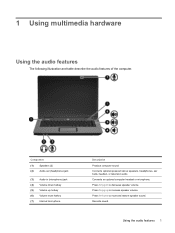
... Produce computer sound. Connects optional powered stereo speakers, headphones, ear buds, headset, or television audio. Connects an optional computer headset or microphone. Records sound. Using the audio features 1 Press fn+home to decrease speaker volume. Component (1) Speakers (2) (2) Audio-out (headphone) jack (3) Audio-in (microphone) jack (4) Volume down hotkey (5) Volume up to increase speaker volume.
... Produce computer sound. Connects optional powered stereo speakers, headphones, ear buds, headset, or television audio. Connects an optional computer headset or microphone. Records sound. Using the audio features 1 Press fn+home to decrease speaker volume. Component (1) Speakers (2) (2) Audio-out (headphone) jack (3) Audio-in (microphone) jack (4) Volume down hotkey (5) Volume up to increase speaker volume.
Multimedia - Windows Vista
Page 8
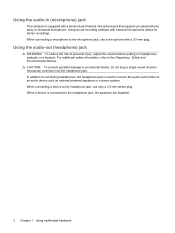
...use only a 3.5-mm stereo plug. When connecting a microphone to the Regulatory, Safety and Environmental Notices. To reduce the risk of an audio device such as external powered speakers or a stereo system. When connecting a device to an external device, do not plug a single sound ...channel (monaural) connector into the headphone jack. Using the audio-out (headphone) jack WARNING! Using the audio-in (microphone) jack The computer is connected to connect the audio-out function of personal injury, adjust the volume before putting on headphones, earbuds, or ...
...use only a 3.5-mm stereo plug. When connecting a microphone to the Regulatory, Safety and Environmental Notices. To reduce the risk of an audio device such as external powered speakers or a stereo system. When connecting a device to an external device, do not plug a single sound ...channel (monaural) connector into the headphone jack. Using the audio-out (headphone) jack WARNING! Using the audio-in (microphone) jack The computer is connected to connect the audio-out function of personal injury, adjust the volume before putting on headphones, earbuds, or ...

Multimedia - Windows Vista
Page 9
... icon in the notification area, follow these steps to mute the volume. - Adjusting the volume You can also be adjusted within some programs. Using the audio features 3 Click OK. ● Program volume control: Volume can adjust the volume using the following controls: ● Computer volume buttons: ◦ To mute or restore...
... icon in the notification area, follow these steps to mute the volume. - Adjusting the volume You can also be adjusted within some programs. Using the audio features 3 Click OK. ● Program volume control: Volume can adjust the volume using the following controls: ● Computer volume buttons: ◦ To mute or restore...
Multimedia - Windows Vista
Page 11
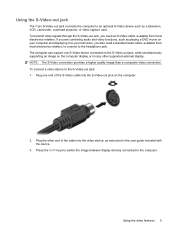
Press the fn+f4 keys to switch the image between display devices connected to the S-Video-out jack: 1. If you are combining audio and video functions, such as instructed in the user guide included with the device. 3. The computer can support one end of the cable... Using the video features 5 To connect a video device to the computer. To transmit video signals through the S-Video-out jack, you need a standard audio cable, available from most electronics retailers, to connect to the headphone jack. Plug one S-Video device connected to an optional S-Video device such as a ...
Press the fn+f4 keys to switch the image between display devices connected to the S-Video-out jack: 1. If you are combining audio and video functions, such as instructed in the user guide included with the device. 3. The computer can support one end of the cable... Using the video features 5 To connect a video device to the computer. To transmit video signals through the S-Video-out jack, you need a standard audio cable, available from most electronics retailers, to connect to the headphone jack. Plug one S-Video device connected to an optional S-Video device such as a ...
Multimedia - Windows Vista
Page 15
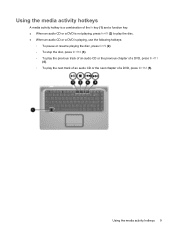
... activity hotkeys A media activity hotkey is a combination of the fn key (1) and a function key. ● When an audio CD or a DVD is not playing, press fn+f9 (2) to play the disc. ● When an audio CD or a DVD is playing, use the following hotkeys: ◦ To pause or resume playing the disc..., press fn+f9 (2). ◦ To stop the disc, press fn+f10 (3). ◦ To play the previous track of an audio CD or the previous chapter of a DVD, press fn+f11 (4). ◦ To play the next track of an...
... activity hotkeys A media activity hotkey is a combination of the fn key (1) and a function key. ● When an audio CD or a DVD is not playing, press fn+f9 (2) to play the disc. ● When an audio CD or a DVD is playing, use the following hotkeys: ◦ To pause or resume playing the disc..., press fn+f9 (2). ◦ To stop the disc, press fn+f10 (3). ◦ To play the previous track of an audio CD or the previous chapter of a DVD, press fn+f11 (4). ◦ To play the next track of an...
Multimedia - Windows Vista
Page 16
... to a disc, observe the following multimedia tasks may be supported: ● Playing digital media, including audio and video CDs, audio and video DVDs, and Internet radio ● Creating or copying data CDs ● Creating, editing, and burning audio CDs ● Creating, editing, and burning a video or movie to a DVD or video CD CAUTION...
... to a disc, observe the following multimedia tasks may be supported: ● Playing digital media, including audio and video CDs, audio and video DVDs, and Internet radio ● Creating or copying data CDs ● Creating, editing, and burning audio CDs ● Creating, editing, and burning a video or movie to a DVD or video CD CAUTION...

Multimedia - Windows Vista
Page 17
... the list of tasks. NOTE: Some programs may be located in subfolders. 2. An AutoPlay dialog box opens. 2. Insert the media disc, such as an audio CD, into the optical drive. For example, if you want to use Windows Media Player to do so. Follow the instructions on -screen instructions. 3. Select... use . Opening preinstalled multimedia software 11 When the installation wizard opens, follow the on the screen. - Restart the computer if prompted to play an audio CD, click Windows Media Player. Select Start > All Programs, and then open . Insert the media disc, such as an...
... the list of tasks. NOTE: Some programs may be located in subfolders. 2. An AutoPlay dialog box opens. 2. Insert the media disc, such as an audio CD, into the optical drive. For example, if you want to use Windows Media Player to do so. Follow the instructions on -screen instructions. 3. Select... use . Opening preinstalled multimedia software 11 When the installation wizard opens, follow the on the screen. - Restart the computer if prompted to play an audio CD, click Windows Media Player. Select Start > All Programs, and then open . Insert the media disc, such as an...
Multimedia - Windows Vista
Page 20
Index A audio features 1 audio-in (microphone) jack 1, 2 audio-out (headphone) jack 1, 2 B buttons volume down 1 volume mute 1, 3 volume up 1 C CD inserting 6 playing 12 protecting 10 removing 7 writing ...changing region setting 13 inserting 6 playing 12 protecting 10 removing 7 writing to 10 DVD region settings 13 E external monitor port 4 I internal microphone, identifying 1 J jacks audio-in (microphone) 1, 2 audio-out (headphone) 1, 2 S-Video-out 5 M media activity hotkeys 9 microphone, internal 1 microphones, supported 2 monitor, connecting 4 multimedia software described 10 using 11 mute...
Index A audio features 1 audio-in (microphone) jack 1, 2 audio-out (headphone) jack 1, 2 B buttons volume down 1 volume mute 1, 3 volume up 1 C CD inserting 6 playing 12 protecting 10 removing 7 writing ...changing region setting 13 inserting 6 playing 12 protecting 10 removing 7 writing to 10 DVD region settings 13 E external monitor port 4 I internal microphone, identifying 1 J jacks audio-in (microphone) 1, 2 audio-out (headphone) 1, 2 S-Video-out 5 M media activity hotkeys 9 microphone, internal 1 microphones, supported 2 monitor, connecting 4 multimedia software described 10 using 11 mute...
Power Management - Windows Vista
Page 9
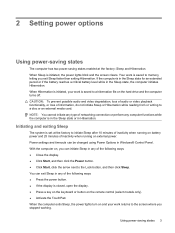
... memory, letting you exit Sleep faster than exiting Hibernation. Your work is set at the factory: Sleep and Hibernation. CAUTION: To prevent possible audio and video degradation, loss of audio or video playback functionality, or loss of the following ways: ● Close the display. ● Click Start, and then click the Power...
... memory, letting you exit Sleep faster than exiting Hibernation. Your work is set at the factory: Sleep and Hibernation. CAUTION: To prevent possible audio and video degradation, loss of audio or video playback functionality, or loss of the following ways: ● Close the display. ● Click Start, and then click the Power...


