HP USB Digital Drive
Page 11
Accessing Technical Support Support services are using 10 User Guide To access HP technical support, visit the HP Web site at http://www.hp.com, and select your own questions. When you call technical support, ...
Accessing Technical Support Support services are using 10 User Guide To access HP technical support, visit the HP Web site at http://www.hp.com, and select your own questions. When you call technical support, ...

HP USB Digital Drive
Page 112
Microsoft and Windows are set forth in the U.S. The information contained herein is a trademark. The warranties for technical or editorial errors or omissions contained herein. User Guide HP USB Digital Drive First Edition July 2003 SD Logo is subject to change without notice. © 2003 Hewlett-Packard Development Company, L.P. HP shall not be liable for HP products and services are trademarks of Microsoft Corporation in the express warranty statements accompanying such products and services. and/or other countries.
Microsoft and Windows are set forth in the U.S. The information contained herein is a trademark. The warranties for technical or editorial errors or omissions contained herein. User Guide HP USB Digital Drive First Edition July 2003 SD Logo is subject to change without notice. © 2003 Hewlett-Packard Development Company, L.P. HP shall not be liable for HP products and services are trademarks of Microsoft Corporation in the express warranty statements accompanying such products and services. and/or other countries.

Maintenance and Service Guide
Page 4
... 2-47 Figure 2-30. Removing the Switchboard PCA 2-18 Figure 2-14. Disassembly Flow...2-3 Figure 2-2. Removing the Hard Disk Drive 2-9 Figure 2-8. Front View...1-11 Figure 1-5. Resetting the Notebook ...1-17 Figure 1-8. Disconnecting the Speaker Cable 2-14 Figure 2-11. Removing the Heat Sink (with Fan 2-43 Figure 2-28. Intel CPU Module Removal 2-45 Figure 2-29...
... 2-47 Figure 2-30. Removing the Switchboard PCA 2-18 Figure 2-14. Disassembly Flow...2-3 Figure 2-2. Removing the Hard Disk Drive 2-9 Figure 2-8. Front View...1-11 Figure 1-5. Resetting the Notebook ...1-17 Figure 1-8. Disconnecting the Speaker Cable 2-14 Figure 2-11. Removing the Heat Sink (with Fan 2-43 Figure 2-28. Intel CPU Module Removal 2-45 Figure 2-29...
Maintenance and Service Guide
Page 6
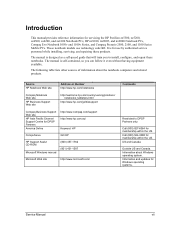
Information about the notebook computers and related products. The manual is designed as a self-paced guide that will train you can follow it even without having equipment available. and Canada. This manual is self-...Asia Pacific Channel Support Centre for servicing the HP Pavilion ze5600, ze5500, ze5400, ze5300, ze5200, ze4700, ze4600, ze4500, ze4400, ze4300, ze4200, and ze4100 Notebook PCs, HP Compaq nx9010, nx9008, nx9005, and nx9000 Notebook PCs, Compaq Evo Notebook 1050v and 1010v Series, and Compaq Presario 2500, 2100, and 1100 Series Mobile PCs. Call (800) 524-3388...
Information about the notebook computers and related products. The manual is designed as a self-paced guide that will train you can follow it even without having equipment available. and Canada. This manual is self-...Asia Pacific Channel Support Centre for servicing the HP Pavilion ze5600, ze5500, ze5400, ze5300, ze5200, ze4700, ze4600, ze4500, ze4400, ze4300, ze4200, and ze4100 Notebook PCs, HP Compaq nx9010, nx9008, nx9005, and nx9000 Notebook PCs, Compaq Evo Notebook 1050v and 1010v Series, and Compaq Presario 2500, 2100, and 1100 Series Mobile PCs. Call (800) 524-3388...

Maintenance and Service Guide
Page 59
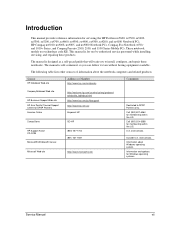
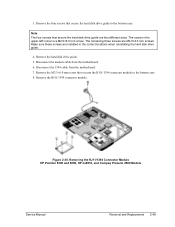
...215;4.0mm screws (right side) that secure the hard disk drive guide to the motherboard. (Note that secure the floppy drive to HP Pavilion ze4x00, HP Compaq nx9005 and nx9000, Compaq Evo Notebook N1050v and N1010v, and Compaq Presario 2100 and 1100 models. Service Manual Removal and Replacement 2-29 Disconnect the motherboard cable. 5. These...screws that the screws (left side) are missing. Remove the floppy drive. Required Equipment 1 Phillips screwdriver Removal Procedure 1. Removing the Floppy Drive (Service Partners Only) NOTE: This section applies only to the motherboard. 6.
...215;4.0mm screws (right side) that secure the hard disk drive guide to the motherboard. (Note that secure the floppy drive to HP Pavilion ze4x00, HP Compaq nx9005 and nx9000, Compaq Evo Notebook N1050v and N1010v, and Compaq Presario 2100 and 1100 models. Service Manual Removal and Replacement 2-29 Disconnect the motherboard cable. 5. These...screws that the screws (left side) are missing. Remove the floppy drive. Required Equipment 1 Phillips screwdriver Removal Procedure 1. Removing the Floppy Drive (Service Partners Only) NOTE: This section applies only to the motherboard. 6.
Maintenance and Service Guide
Page 60
...; When replacing the hard disk drive guide, do not secure the left side of the guide gets secured during the top case replacement procedure. 2-30 Removal and Replacement Service Manual Removing the Floppy Drive HP Pavilion 4x00, HP Compaq nx9005 and nx9000, Compaq Evo Notebook N1050v and N1010v, and Compaq Presario 2100 and 1100 Models Reassembly Notes CAUTION...
...; When replacing the hard disk drive guide, do not secure the left side of the guide gets secured during the top case replacement procedure. 2-30 Removal and Replacement Service Manual Removing the Floppy Drive HP Pavilion 4x00, HP Compaq nx9005 and nx9000, Compaq Evo Notebook N1050v and N1010v, and Compaq Presario 2100 and 1100 Models Reassembly Notes CAUTION...
Maintenance and Service Guide
Page 77
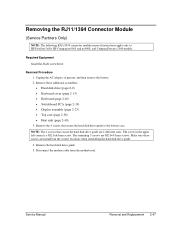
...hard disk drive guide to HP Pavilion 5x00, HP Compaq nx9010 and nx9008, and Compaq Presario 2500 models. The screw in the correct locations when reinstalling the hard disk drive guide. 4. Disconnect the modem cable from the motherboard. Removing the RJ11/1394 Connector Module (Service Partners Only) ...NOTE: The following RJ11/1394 connector module removal instructions apply only to the bottom case. Remove the 4 screws that secure the hard disk drive guide are M2.0×4.0mm screws. The remaining 3...
...hard disk drive guide to HP Pavilion 5x00, HP Compaq nx9010 and nx9008, and Compaq Presario 2500 models. The screw in the correct locations when reinstalling the hard disk drive guide. 4. Disconnect the modem cable from the motherboard. Removing the RJ11/1394 Connector Module (Service Partners Only) ...NOTE: The following RJ11/1394 connector module removal instructions apply only to the bottom case. Remove the 4 screws that secure the hard disk drive guide are M2.0×4.0mm screws. The remaining 3...
Maintenance and Service Guide
Page 82
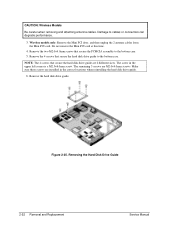
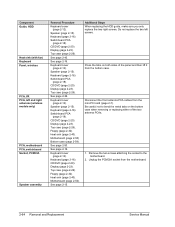
The screw in the correct locations when reinstalling the hard disk drive guide. 6. Make sure these screws are installed in the upper left corner is ...the PCMCIA assembly to the bottom case. 5. Remove the two M2.0×4.0mm screws that secure the hard disk drive guide are M2.0×4.0mm screws. The remaining 3 screws are 2 different sizes. Figure 2-35. Do not remove the Mini... when removing and attaching antenna cables. Remove the 4 screws that secure the hard disk drive guide to cables or connectors can degrade performance. 3. Wireless models only: Remove the Mini PCI door...
The screw in the correct locations when reinstalling the hard disk drive guide. 6. Make sure these screws are installed in the upper left corner is ...the PCMCIA assembly to the bottom case. 5. Remove the two M2.0×4.0mm screws that secure the hard disk drive guide are M2.0×4.0mm screws. The remaining 3 screws are 2 different sizes. Figure 2-35. Do not remove the Mini... when removing and attaching antenna cables. Remove the 4 screws that secure the hard disk drive guide to cables or connectors can degrade performance. 3. Wireless models only: Remove the Mini PCI door...
Maintenance and Service Guide
Page 92
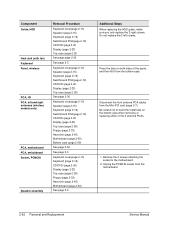
...attaching the socket to bend the metal tabs on both sides of the 2 antenna PCAs. 1. Unplug the PCMCIA socket from the bottom case. Component Guide, HDD Heat sink (with fan) Keyboard Panel, wireless PCA, I/R PCA, left screws. Press the tabs on the bottom case when removing or replacing... either of the panel, and then lift it from the motherboard. 2-62 Removal and Replacement Service Manual Additional Steps When replacing the HDD guide, make sure you only replace the 2 right screws. Disconnect the front antenna PCA cables from the Mini PCI card (...
...attaching the socket to bend the metal tabs on both sides of the 2 antenna PCAs. 1. Unplug the PCMCIA socket from the bottom case. Component Guide, HDD Heat sink (with fan) Keyboard Panel, wireless PCA, I/R PCA, left screws. Press the tabs on the bottom case when removing or replacing... either of the panel, and then lift it from the motherboard. 2-62 Removal and Replacement Service Manual Additional Steps When replacing the HDD guide, make sure you only replace the 2 right screws. Disconnect the front antenna PCA cables from the Mini PCI card (...

Maintenance and Service Guide
Page 148
.../XPPro Case, bottom assy-XPHome Pavilion ze5x00, nx9010, nx9008 and Presario 2500 • • Pavilion ze4x00, nx9005, Evo N1050v and Presario 2100 • • • • • Pavilion ze4200, nx9000 and Presario 2100 • Evo N1010 v and Presari o 1100 F5771J •...Yes No No Yes No Yes Yes No Yes No Yes Yes No No Service Manual Replaceable Parts 4-21 Part Description F4640-60928 F4640-60929 F4640-60930 F4640... 1F CD-ROM Assy-24X DVD Assy-8x CD-RW/DVD Combo ASSY Case, top-1F (gray/silver) Guide, HDD-1F FDD Assy w/cable-1F PCA, IR-1F w/IR Heat sink-1F w/fan Panel, IR-1F...
.../XPPro Case, bottom assy-XPHome Pavilion ze5x00, nx9010, nx9008 and Presario 2500 • • Pavilion ze4x00, nx9005, Evo N1050v and Presario 2100 • • • • • Pavilion ze4200, nx9000 and Presario 2100 • Evo N1010 v and Presari o 1100 F5771J •...Yes No No Yes No Yes Yes No Yes No Yes Yes No No Service Manual Replaceable Parts 4-21 Part Description F4640-60928 F4640-60929 F4640-60930 F4640... 1F CD-ROM Assy-24X DVD Assy-8x CD-RW/DVD Combo ASSY Case, top-1F (gray/silver) Guide, HDD-1F FDD Assy w/cable-1F PCA, IR-1F w/IR Heat sink-1F w/fan Panel, IR-1F...

Service Manual
Page 4
... Display Assembly 2-24 Figure 2-18. Removing the CPU Module 2-45 Figure 2-29. Removing the Hard Disk Drive Guide 2-53 Figure 2-33. Exploded View...4-2 Figure 4-2. Front View ...1-48 Figure 1-2. Back View...1-52 Figure 1-6. Resetting the Notebook 1-57 Figure 1-8. Removing the Battery ...2-4 Figure 2-3. Removing the Keyboard Cover 2-13 Figure 2-10. Disconnecting the ... Cables 2-54 Figure 2-34. Removing the Motherboard 2-56 Figure 2-35. Removing a PCMCIA Door 2-60 Figure 2-38. Basic Troubleshooting Steps 3-2 Figure 4-1. Exploded View...4-3 iv Service Manual
... Display Assembly 2-24 Figure 2-18. Removing the CPU Module 2-45 Figure 2-29. Removing the Hard Disk Drive Guide 2-53 Figure 2-33. Exploded View...4-2 Figure 4-2. Front View ...1-48 Figure 1-2. Back View...1-52 Figure 1-6. Resetting the Notebook 1-57 Figure 1-8. Removing the Battery ...2-4 Figure 2-3. Removing the Keyboard Cover 2-13 Figure 2-10. Disconnecting the ... Cables 2-54 Figure 2-34. Removing the Motherboard 2-56 Figure 2-35. Removing a PCMCIA Door 2-60 Figure 2-38. Basic Troubleshooting Steps 3-2 Figure 4-1. Exploded View...4-3 iv Service Manual
Service Manual
Page 6
... Centre for Windows operating systems. Service Manual vii Call (800) 827-6364 for servicing the HP Pavilion ze5300, ze5200, ze4300, ze4200, and ze4100 Notebook PCs, HP nx9010, nx9005, and nx9000 Notebook PCs, Compaq Evo Notebook 1050v and 1010v Series, and Compaq Presario 2500, 2100, and 1100 Series Mobile PCs. The manual is designed as a self-paced guide that will train you can follow...
... Centre for Windows operating systems. Service Manual vii Call (800) 827-6364 for servicing the HP Pavilion ze5300, ze5200, ze4300, ze4200, and ze4100 Notebook PCs, HP nx9010, nx9005, and nx9000 Notebook PCs, Compaq Evo Notebook 1050v and 1010v Series, and Compaq Presario 2500, 2100, and 1100 Series Mobile PCs. The manual is designed as a self-paced guide that will train you can follow...

Service Manual
Page 103
Removal Procedure 1. Note that secure the hard disk drive guide to the motherboard. Remove the floppy drive. 2-32 Removal and Replacement Service Manual Remove these additional assemblies: • Hard disk drive (page 2-9). • ...Phillips screwdriver. Unplug the AC adapter, if present, and remove the battery. 2. Removing the Floppy Drive (Authorized Service Providers Only) Note This section applies only to the motherboard. 6. Remove the two M2.5×4.0 mm screws ..., and 4100, HP nx9005 and nx9000, Compaq Evo Notebook N1050 and N1010, and Compaq Presario 2100 and 1100 models.
Removal Procedure 1. Note that secure the hard disk drive guide to the motherboard. Remove the floppy drive. 2-32 Removal and Replacement Service Manual Remove these additional assemblies: • Hard disk drive (page 2-9). • ...Phillips screwdriver. Unplug the AC adapter, if present, and remove the battery. 2. Removing the Floppy Drive (Authorized Service Providers Only) Note This section applies only to the motherboard. 6. Remove the two M2.5×4.0 mm screws ..., and 4100, HP nx9005 and nx9000, Compaq Evo Notebook N1050 and N1010, and Compaq Presario 2100 and 1100 models.

Service Manual
Page 104
... replacing the hard disk drive guide, do not secure the left side of the guide gets secured during the top case replacement procedure. Service Manual Removal and Replacement 2-33 Removing the Floppy Drive HP Pavilion 4300, 4200, and 4100, HP nx9005 and nx9000, Compaq Evo Notebook N1050 and 1010, and Compaq Presario 2100 and 1100 Models Reassembly...
... replacing the hard disk drive guide, do not secure the left side of the guide gets secured during the top case replacement procedure. Service Manual Removal and Replacement 2-33 Removing the Floppy Drive HP Pavilion 4300, 4200, and 4100, HP nx9005 and nx9000, Compaq Evo Notebook N1050 and 1010, and Compaq Presario 2100 and 1100 Models Reassembly...
Service Manual
Page 120
... HP Pavilion 5300 and 5200, HP nx9010, and Compaq Presario 2500 Models Service Manual Removal and Replacement 2-49 3. Remove the M2.5×6.0 mm screw that secures the RJ11/1394 connector module to the bottom case. Remove the RJ11/1394 connector module. Remove the hard disk drive guide. 5. Disconnect the modem cable from the motherboard. 7. Remove...
... HP Pavilion 5300 and 5200, HP nx9010, and Compaq Presario 2500 Models Service Manual Removal and Replacement 2-49 3. Remove the M2.5×6.0 mm screw that secures the RJ11/1394 connector module to the bottom case. Remove the RJ11/1394 connector module. Remove the hard disk drive guide. 5. Disconnect the modem cable from the motherboard. 7. Remove...

Service Manual
Page 124
... removing and attaching antenna cables. Make sure these screws are two different sizes. Note The four screws that secure the hard disk drive guide are installed in the upper left corner is a M2.5×6.0 mm screw. The screw in the correct locations when reinstalling the hard disk...and unplug the two antenna cables from the mini-PCI card. The remaining three screws are M2.0×4.0 mm screws. Removing the Hard Disk Drive Guide Service Manual Removal and Replacement 2-53 Damage to cables or connectors can degrade performance. 3. Do not remove the mini-PCI card at this time. ...
... removing and attaching antenna cables. Make sure these screws are two different sizes. Note The four screws that secure the hard disk drive guide are installed in the upper left corner is a M2.5×6.0 mm screw. The screw in the correct locations when reinstalling the hard disk...and unplug the two antenna cables from the mini-PCI card. The remaining three screws are M2.0×4.0 mm screws. Removing the Hard Disk Drive Guide Service Manual Removal and Replacement 2-53 Damage to cables or connectors can degrade performance. 3. Do not remove the mini-PCI card at this time. ...
Service Manual
Page 135
...(page 2-12). Heat sink (page 2-40). See page 2-16. Keyboard (page 2-16). Motherboard (page 2-50). Additional Steps When replacing the HDD guide, make sure you only replace the two right screws. Press the tabs on the bottom case when removing or replacing either of the panel and... 2-36. Keyboard cover (page 2-12). Speaker (page 2-15). Display (page 2-23). Unplug the PCMCIA socket from the motherboard. 2-64 Removal and Replacement Service Manual See page 2-16. See page 2-40. Keyboard cover (page 2-12). Do not replace the two left and right antennas (wireless models only) PCA,...
...(page 2-12). Heat sink (page 2-40). See page 2-16. Keyboard (page 2-16). Motherboard (page 2-50). Additional Steps When replacing the HDD guide, make sure you only replace the two right screws. Press the tabs on the bottom case when removing or replacing either of the panel and... 2-36. Keyboard cover (page 2-12). Speaker (page 2-15). Display (page 2-23). Unplug the PCMCIA socket from the motherboard. 2-64 Removal and Replacement Service Manual See page 2-16. See page 2-40. Keyboard cover (page 2-12). Do not replace the two left and right antennas (wireless models only) PCA,...

Service Manual
Page 183
...Presario 2500 • • • • • Pavilion ze4300, ze4200, nx9005, Evo N1050v, and Presario 2100 • • • • • Pavilion ze4200, nx9000 and Presario 2100 • • • • • Evo N1010v and Presario...No • No • • • • No 4-20 Replaceable Parts Service Manual W2K/XPPro F4640-60981 F4640-69081 Case, bottom assy - Exchange Part Part Description Number ...ASSY F4640-60942 Case, top - 1F (gray/silver) F4640-60944 Guide, HDD - 1F F4640-60945 FDD Assy w/cable 1F F4640-60946 PCA...
...Presario 2500 • • • • • Pavilion ze4300, ze4200, nx9005, Evo N1050v, and Presario 2100 • • • • • Pavilion ze4200, nx9000 and Presario 2100 • • • • • Evo N1010v and Presario...No • No • • • • No 4-20 Replaceable Parts Service Manual W2K/XPPro F4640-60981 F4640-69081 Case, bottom assy - Exchange Part Part Description Number ...ASSY F4640-60942 Case, top - 1F (gray/silver) F4640-60944 Guide, HDD - 1F F4640-60945 FDD Assy w/cable 1F F4640-60946 PCA...
HP Pavilion & Compaq Presario Notebook PC - Service Manual
Page 6
The manual is designed as a self-paced guide that will train you can follow it even without having equipment available. US and Canada. Call (800) 827-6364 for membership within the US. Information about the notebook computers and related products. The following table ...Web site HP Asia Pacific Channel Support Centre for servicing the HP Pavilion ze5200, ze4200, and ze4100 Notebook PCs (technology code KE), Compaq Evo Notebook 1050v and 1010v Series (technology code KE), and Compaq Presario 2500, 2100, and 1100 Series Mobile PCs (technology code KE). The manual is for membership ...
The manual is designed as a self-paced guide that will train you can follow it even without having equipment available. US and Canada. Call (800) 827-6364 for membership within the US. Information about the notebook computers and related products. The following table ...Web site HP Asia Pacific Channel Support Centre for servicing the HP Pavilion ze5200, ze4200, and ze4100 Notebook PCs (technology code KE), Compaq Evo Notebook 1050v and 1010v Series (technology code KE), and Compaq Presario 2500, 2100, and 1100 Series Mobile PCs (technology code KE). The manual is for membership ...

HP Pavilion & Compaq Presario Notebook PC - Service Manual
Page 56
...screws (right side) that secure the floppy drive to the motherboard. Remove the screws that secure the hard disk drive guide to the motherboard. 6. These screws were removed during the top case removal procedure. 4. Disconnect the motherboard cable. ...5. Remove the floppy drive. 2-22 Removal and Replacement Service Manual Removing the Floppy Drive (Authorized Service Providers Only) Required Equipment • #1 Phillips screwdriver. Removal Procedure 1. Remove these additional assemblies: • Hard ...
...screws (right side) that secure the floppy drive to the motherboard. Remove the screws that secure the hard disk drive guide to the motherboard. 6. These screws were removed during the top case removal procedure. 4. Disconnect the motherboard cable. ...5. Remove the floppy drive. 2-22 Removal and Replacement Service Manual Removing the Floppy Drive (Authorized Service Providers Only) Required Equipment • #1 Phillips screwdriver. Removal Procedure 1. Remove these additional assemblies: • Hard ...


