Maintenance and Service Guide
Page 89
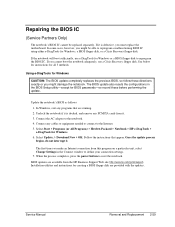
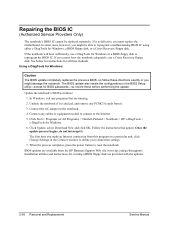
..., press the power button to the notebook. 4. See below for instructions for Windows. 6. Service Manual Removal and Replacement 2-59 If you might be replaced separately. The BIOS update also resets the configurations in the Connect window to reprogram the BIOS IC. Connect the AC adapter to reset the notebook. Repairing the BIOS IC (Service Partners Only) The notebook's BIOS IC cannot be able to the Internet. 5. If the notebook will boot sufficiently, use a Crisis Recovery floppy disk. Using e-DiagTools for BIOS passwords-so record these...
..., press the power button to the notebook. 4. See below for instructions for Windows. 6. Service Manual Removal and Replacement 2-59 If you might be replaced separately. The BIOS update also resets the configurations in the Connect window to reprogram the BIOS IC. Connect the AC adapter to reset the notebook. Repairing the BIOS IC (Service Partners Only) The notebook's BIOS IC cannot be able to the Internet. 5. If the notebook will boot sufficiently, use a Crisis Recovery floppy disk. Using e-DiagTools for BIOS passwords-so record these...
Maintenance and Service Guide
Page 103
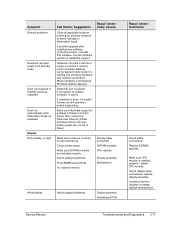
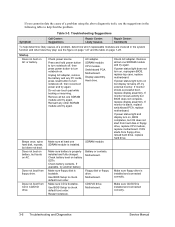
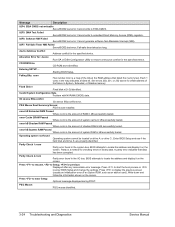
.... If external monitor displays no light Call Center: Suggestions Close all applications before suspending. Check power supply. Press Fn+F5 several times. Replace SDRAM modules. Check display cable connections, replace display assembly. Service Manual Troubleshooting and Diagnostics 3-11 Notebook won't suspend if connection to another computer is enabled in Power in Control Panel. If notebook is installed. Make sure hibernate support is active. Also, make sure Hibernate timeouts (Power Schemes tab) for additional support. Adjust display brightness. Repair Center...
.... If external monitor displays no light Call Center: Suggestions Close all applications before suspending. Check power supply. Press Fn+F5 several times. Replace SDRAM modules. Check display cable connections, replace display assembly. Service Manual Troubleshooting and Diagnostics 3-11 Notebook won't suspend if connection to another computer is enabled in Power in Control Panel. If notebook is installed. Make sure hibernate support is active. Also, make sure Hibernate timeouts (Power Schemes tab) for additional support. Adjust display brightness. Repair Center...
Maintenance and Service Guide
Page 107
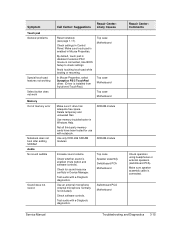
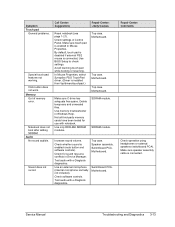
... Causes Reset notebook (see page 1-17). Avoid touching touch pad while booting or resuming. Delete temporary and unneeded files. Use only DDR-266 SDRAM modules. Check software controls. Check settings in Windows Help. Use memory troubleshooter in Control Panel. Make sure speaker assembly cable is connected, Use BIOS Setup to check settings. By default, touch pad is disabled if external PS/2 mouse is connected. SDRAM module SDRAM module Increase sound volume. Check whether sound is enabled in Device Manager. Top case Speaker assembly Switchboard PCA Motherboard Switchboard...
... Causes Reset notebook (see page 1-17). Avoid touching touch pad while booting or resuming. Delete temporary and unneeded files. Use only DDR-266 SDRAM modules. Check software controls. Check settings in Windows Help. Use memory troubleshooter in Control Panel. Make sure speaker assembly cable is connected, Use BIOS Setup to check settings. By default, touch pad is disabled if external PS/2 mouse is connected. SDRAM module SDRAM module Increase sound volume. Check whether sound is enabled in Device Manager. Top case Speaker assembly Switchboard PCA Motherboard Switchboard...
Maintenance and Service Guide
Page 115
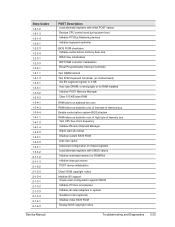
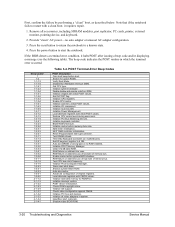
... notice Initialize I20 support Check video configuration against CMOS Initialize PCI bus and devices Initialize all video adapters in system QuietBoot start shut down Shadow system BIOS ROM Auto size cache Advanced configuration of chipset registers Load alternate registers with initial POST values Restore CPU control word during warm boot Initialize PCI Bus Mastering devices Initialize keyboard controller BIOS ROM checksum Initialize cache before system BIOS shadow RAM failure on motherboard) Set ES segment...
... notice Initialize I20 support Check video configuration against CMOS Initialize PCI bus and devices Initialize all video adapters in system QuietBoot start shut down Shadow system BIOS ROM Auto size cache Advanced configuration of chipset registers Load alternate registers with initial POST values Restore CPU control word during warm boot Initialize PCI Bus Mastering devices Initialize keyboard controller BIOS ROM checksum Initialize cache before system BIOS shadow RAM failure on motherboard) Set ES segment...
Maintenance and Service Guide
Page 122
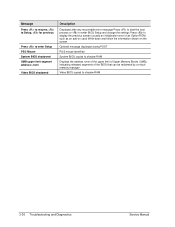
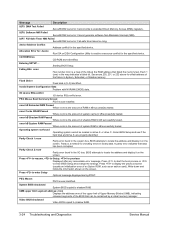
... to start the boot process or to enter BIOS Setup and change the settings Press to display the previous screen (usually an initialization error of an Option ROM, such as an add-on card) Write down and follow the information shown on the screen Optional message displayed during POST PS/2 mouse identified System BIOS copied to shadow RAM Displays the address nnnn of the upper limit of Upper Memory Blocks (UMB), indicating...
... to start the boot process or to enter BIOS Setup and change the settings Press to display the previous screen (usually an initialization error of an Option ROM, such as an add-on card) Write down and follow the information shown on the screen Optional message displayed during POST PS/2 mouse identified System BIOS copied to shadow RAM Displays the address nnnn of the upper limit of Upper Memory Blocks (UMB), indicating...
Service Manual
Page 141
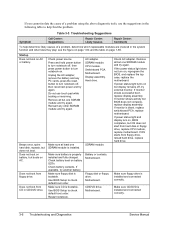
...switchboard PCA, replace motherboard. Use BIOS Setup to check default boot order. SDRAM module. Remove all but one SDRAM module and try again. If monitor shows activity but does not boot. If monitor is bootable. Make sure floppy drive is installed and connected correctly. 3-6 Troubleshooting and Diagnostics Service Manual Remove all but display remains off , then press power button to turn notebook off , try again. AC adapter. Motherboard. Check battery contacts. Use BIOS Setup to check default boot order. Restart notebook. If power status light turns on but...
...switchboard PCA, replace motherboard. Use BIOS Setup to check default boot order. SDRAM module. Remove all but one SDRAM module and try again. If monitor shows activity but does not boot. If monitor is bootable. Make sure floppy drive is installed and connected correctly. 3-6 Troubleshooting and Diagnostics Service Manual Remove all but display remains off , then press power button to turn notebook off , try again. AC adapter. Motherboard. Check battery contacts. Use BIOS Setup to check default boot order. Restart notebook. If power status light turns on but...

Service Manual
Page 145
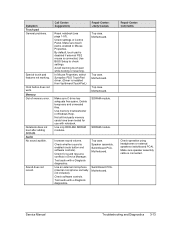
... area of dark or light discoloration visible when display is turned on screen. Hard disk makes clunking or scratching noise. Check connections. Remove and reinstall hard drive. Caused by customer abuse. Declared to area on and warmed up. Symptom Display Dark display, no image, replace motherboard. Adjust display brightness. Adjust display brightness. Display assembly. Vertical crack near center of customer abuse. 3-10 Troubleshooting and Diagnostics Service Manual Check power source. Was notebook or drive dropped? Motherboard. Declared to be...
... area of dark or light discoloration visible when display is turned on screen. Hard disk makes clunking or scratching noise. Check connections. Remove and reinstall hard drive. Caused by customer abuse. Declared to area on and warmed up. Symptom Display Dark display, no image, replace motherboard. Adjust display brightness. Adjust display brightness. Display assembly. Vertical crack near center of customer abuse. 3-10 Troubleshooting and Diagnostics Service Manual Check power source. Was notebook or drive dropped? Motherboard. Declared to be...
Service Manual
Page 148
... sound volume. Service Manual Troubleshooting and Diagnostics 3-13 Audio No sound audible. Check settings in Device Manager. Make sure touch pad is enabled in Windows Help. Top case. Motherboard. Motherboard. Motherboard. Use memory troubleshooter in Mouse Properties. Test audio with e-Diagtools diagnostics. Click button does not work. Sound does not record. Avoid touching touch pad while booting or resuming. Top case. Check software controls. Speaker assembly. SDRAM module. Repair Center: Comments Check operation using headphones or external speakers...
... sound volume. Service Manual Troubleshooting and Diagnostics 3-13 Audio No sound audible. Check settings in Device Manager. Make sure touch pad is enabled in Windows Help. Top case. Motherboard. Motherboard. Motherboard. Use memory troubleshooter in Mouse Properties. Test audio with e-Diagtools diagnostics. Click button does not work. Sound does not record. Avoid touching touch pad while booting or resuming. Top case. Check software controls. Speaker assembly. SDRAM module. Repair Center: Comments Check operation using headphones or external speakers...
Service Manual
Page 154
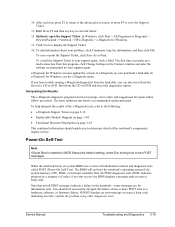
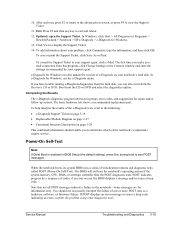
... Print. e-Diagtools for Windows, use the e-Diagtools menu. When the notebook boots, its system BIOS runs a series of one or more POST tests as a hardware, software, or firmware failure. If POST displays an error message or issues a beep code indicating an error, confirm the problem using other diagnostic tools. Service Manual Troubleshooting and Diagnostics 3-19 After each run it from the Recovery CD or DVD. In e-Diagtools for Windows can also run , press...
... Print. e-Diagtools for Windows, use the e-Diagtools menu. When the notebook boots, its system BIOS runs a series of one or more POST tests as a hardware, software, or firmware failure. If POST displays an error message or issues a beep code indicating an error, confirm the problem using other diagnostic tools. Service Manual Troubleshooting and Diagnostics 3-19 After each run it from the Recovery CD or DVD. In e-Diagtools for Windows can also run , press...
Service Manual
Page 155
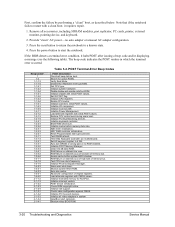
... modules, port replicator, PC cards, printer, external monitor, pointing device, and keyboard. 2. Disable shadow and execute code from ROM. Initialize I/O component. Restore CPU control word during warm boot. RAM failure on motherboard). Initialize caches to initial POST values. Test DRAM refresh. Initialize chipset with a clean boot, it halts POST after issuing a beep code and/or displaying a message (see the following table). Initialize extended memory for option ROMs. Verify Real Mode. Check ROM copyright notice. Remove all video adapters...
... modules, port replicator, PC cards, printer, external monitor, pointing device, and keyboard. 2. Disable shadow and execute code from ROM. Initialize I/O component. Restore CPU control word during warm boot. RAM failure on motherboard). Initialize caches to initial POST values. Test DRAM refresh. Initialize chipset with a clean boot, it halts POST after issuing a beep code and/or displaying a message (see the following table). Initialize extended memory for option ROMs. Verify Real Mode. Check ROM copyright notice. Remove all video adapters...
Service Manual
Page 159
... successfully tested. Video BIOS shadowed Video BIOS copied to locate the address and display it on card). Starting BIOS Setup. PS/2 Mouse Boot Summary Screen: PS/2 mouse installed. Parity Check 1 nnnn Parity error found in the map indicates a failed bit. Parity Check 2 nnnn Parity error found Operating system cannot be reclaimed by a virtual memory manager. Press to enter BIOS Setup and change the settings. nnnn kB Shadow RAM Passed Where nnnn is the amount of an Option ROM, such...
... successfully tested. Video BIOS shadowed Video BIOS copied to locate the address and display it on card). Starting BIOS Setup. PS/2 Mouse Boot Summary Screen: PS/2 mouse installed. Parity Check 1 nnnn Parity error found in the map indicates a failed bit. Parity Check 2 nnnn Parity error found Operating system cannot be reclaimed by a virtual memory manager. Press to enter BIOS Setup and change the settings. nnnn kB Shadow RAM Passed Where nnnn is the amount of an Option ROM, such...
HP Pavilion & Compaq Presario Notebook PC - Service Manual
Page 3
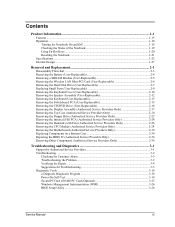
...Features ...1-15 Operation ...1-18 Turning the Notebook On and Off 1-18 Checking the Status of the Notebook 1-19 Using Fn Hot Keys ...1-20 Resetting the Notebook ...1-21 Specifications ...1-22 Internal Design ...1-27 Removal and Replacement 2-1 Disassembly Flowchart ...2-3 Removing the Battery (User-Replaceable 2-4 Removing a SDRAM Module (User-Replaceable 2-5 Removing the Wireless LAN Mini-PCI Card (User-Replaceable 2-6 Removing the Hard Disk Drive (User-Replaceable 2-7 Replacing Small Parts (User-Replaceable 2-9 Removing the Keyboard Cover (User-Replaceable 2-10 Removing the Speaker...
...Features ...1-15 Operation ...1-18 Turning the Notebook On and Off 1-18 Checking the Status of the Notebook 1-19 Using Fn Hot Keys ...1-20 Resetting the Notebook ...1-21 Specifications ...1-22 Internal Design ...1-27 Removal and Replacement 2-1 Disassembly Flowchart ...2-3 Removing the Battery (User-Replaceable 2-4 Removing a SDRAM Module (User-Replaceable 2-5 Removing the Wireless LAN Mini-PCI Card (User-Replaceable 2-6 Removing the Hard Disk Drive (User-Replaceable 2-7 Replacing Small Parts (User-Replaceable 2-9 Removing the Keyboard Cover (User-Replaceable 2-10 Removing the Speaker...
HP Pavilion & Compaq Presario Notebook PC - Service Manual
Page 70
.... See below for instructions for Windows or a BIOS floppy disk to reprogram the BIOS IC. Click Update, select Download New and click OK. Follow the instructions that are running. 2. When the process completes, press the power button to the notebook. 4. BIOS updates are provided with the updates. 2-36 Removal and Replacement Service Manual If you must replace the motherboard. Connect any cables or equipment needed to connect to define your connection settings. 7. Using e-DiagTools for BIOS passwords-so record these...
.... See below for instructions for Windows or a BIOS floppy disk to reprogram the BIOS IC. Click Update, select Download New and click OK. Follow the instructions that are running. 2. When the process completes, press the power button to the notebook. 4. BIOS updates are provided with the updates. 2-36 Removal and Replacement Service Manual If you must replace the motherboard. Connect any cables or equipment needed to connect to define your connection settings. 7. Using e-DiagTools for BIOS passwords-so record these...
HP Pavilion & Compaq Presario Notebook PC - Service Manual
Page 79
... Motherboard. Does not boot on battery, but OS does not start from floppy drive, reload hard drive, replace hard drive. SDRAM module is properly installed and fully charged. Check battery level on , reprogram BIOS, replace top case, replace motherboard. Use BIOS Setup to turn notebook off , then press power button to check default boot order. CD/DVD drive. If power status light does not turn on . If monitor shows successful boot, replace display assembly. If monitor is blank, replace switchboard PCA, replace motherboard. If power status light and display turn on battery LEDs...
... Motherboard. Does not boot on battery, but OS does not start from floppy drive, reload hard drive, replace hard drive. SDRAM module is properly installed and fully charged. Check battery level on , reprogram BIOS, replace top case, replace motherboard. Use BIOS Setup to turn notebook off , then press power button to check default boot order. CD/DVD drive. If power status light does not turn on . If monitor shows successful boot, replace display assembly. If monitor is blank, replace switchboard PCA, replace motherboard. If power status light and display turn on battery LEDs...

HP Pavilion & Compaq Presario Notebook PC - Service Manual
Page 83
... external monitor displays no light. Declared to area on and warmed up. Declared to be caused by customer abuse. If drive case is installed properly, replace CPU module. Adjust display brightness. Display assembly. Adjust display brightness. Vertical crack near center of dark or light discoloration visible when display is turned on screen. Hard disk Hard disk never spins. Hard disk makes buzzing or whining noise. Press Fn+F5 several times. Hard drive. Make sure CPU module is damaged, drive may not operate properly. Check display cable connection...
... external monitor displays no light. Declared to area on and warmed up. Declared to be caused by customer abuse. If drive case is installed properly, replace CPU module. Adjust display brightness. Display assembly. Adjust display brightness. Vertical crack near center of dark or light discoloration visible when display is turned on screen. Hard disk Hard disk never spins. Hard disk makes buzzing or whining noise. Press Fn+F5 several times. Hard drive. Make sure CPU module is damaged, drive may not operate properly. Check display cable connection...
HP Pavilion & Compaq Presario Notebook PC - Service Manual
Page 86
...). Avoid touching touch pad while booting or resuming. Top case. Motherboard. In Mouse Properties, select Synaptics PS/2 TouchPad driver. (Driver is connected, Use BIOS Setup to check settings. Switchboard PCA. Use only DDR-266 SDRAM modules. Test audio with e-Diagtools diagnostics. Service Manual Troubleshooting and Diagnostics 3-13 Top case. Check for use with e-Diagtools diagnostics. Make sure C drive has adequate free space. Check whether sound is enabled (mute button and software controls). Click button does not work. Memory Out of memory error...
...). Avoid touching touch pad while booting or resuming. Top case. Motherboard. In Mouse Properties, select Synaptics PS/2 TouchPad driver. (Driver is connected, Use BIOS Setup to check settings. Switchboard PCA. Use only DDR-266 SDRAM modules. Test audio with e-Diagtools diagnostics. Service Manual Troubleshooting and Diagnostics 3-13 Top case. Check for use with e-Diagtools diagnostics. Make sure C drive has adequate free space. Check whether sound is enabled (mute button and software controls). Click button does not work. Memory Out of memory error...
HP Pavilion & Compaq Presario Notebook PC - Service Manual
Page 92
... a hardware, software, or firmware failure. Boot from the Recovery CD or DVD. You should enable you to determine which of the e-Diagtools tests, refer to your problem, click Comments, type the information, and then click OK. Exit. e-Diagtools for Windows. 13. The basic hardware test shows a recommended replacement part. POST indicates progress by your notebook's hard disk. If POST displays an error message or issues a beep code indicating an error, confirm the problem using...
... a hardware, software, or firmware failure. Boot from the Recovery CD or DVD. You should enable you to determine which of the e-Diagtools tests, refer to your problem, click Comments, type the information, and then click OK. Exit. e-Diagtools for Windows. 13. The basic hardware test shows a recommended replacement part. POST indicates progress by your notebook's hard disk. If POST displays an error message or issues a beep code indicating an error, confirm the problem using...
HP Pavilion & Compaq Presario Notebook PC - Service Manual
Page 93
... a beep code and/or displaying a message (see the following table). Initialize PCI Bus Mastering devices. Reset Programmable Interrupt Controller. Initialize POST Memory Manager. Enable cache before memory Auto size. 8254 timer initialization. 8237 DMA controller initialization. Initialize Phoenix Dispatch Manager. Advanced configuration of memory bus. Initialize extended memory for option ROMs. Verify Real Mode. Initialize all accessories, including SDRAM modules, port replicator, PC cards, printer, external monitor, pointing device, and keyboard. 2. QuietBoot start shut down...
... a beep code and/or displaying a message (see the following table). Initialize PCI Bus Mastering devices. Reset Programmable Interrupt Controller. Initialize POST Memory Manager. Enable cache before memory Auto size. 8254 timer initialization. 8237 DMA controller initialization. Initialize Phoenix Dispatch Manager. Advanced configuration of memory bus. Initialize extended memory for option ROMs. Verify Real Mode. Initialize all accessories, including SDRAM modules, port replicator, PC cards, printer, external monitor, pointing device, and keyboard. 2. QuietBoot start shut down...
HP Pavilion & Compaq Presario Notebook PC - Service Manual
Page 97
... kB successfully tested. CD ROM Drive CD-ROM drive identified. Each 1 (one) in the system bus. PS/2 Mouse Boot Summary Screen: PS/2 mouse installed. Press to start the boot process or to locate the address and display it on the screen. Entering SETUP ... nnnn kB Extended RAM Passed Where nnnn is the amount of shadow RAM in the I /O device IRQ conflict error. BIOS attempts to enter BIOS Setup and change the settings. Starting BIOS Setup. I/O device IRQ conflict I /O bus. Parity...
... kB successfully tested. CD ROM Drive CD-ROM drive identified. Each 1 (one) in the system bus. PS/2 Mouse Boot Summary Screen: PS/2 mouse installed. Press to start the boot process or to locate the address and display it on the screen. Entering SETUP ... nnnn kB Extended RAM Passed Where nnnn is the amount of shadow RAM in the I /O device IRQ conflict error. BIOS attempts to enter BIOS Setup and change the settings. Starting BIOS Setup. I/O device IRQ conflict I /O bus. Parity...

Startup Guide Compaq Notebook Series
Page 75
... Start > Control Panel > Appearance and Themes, Display. • Try adjusting the size of 1024 × 768 or higher, depending on your model. Troubleshooting and Maintenance Troubleshooting Your Notebook • Restart the system: remove the disc from the drive, and select Start > Turn Off Computer > Restart. • If you created the CD on a DVD/CD-RW combo-type drive, try setting Video Display Device to Both in the System Devices menu. • If you must activate the...
... Start > Control Panel > Appearance and Themes, Display. • Try adjusting the size of 1024 × 768 or higher, depending on your model. Troubleshooting and Maintenance Troubleshooting Your Notebook • Restart the system: remove the disc from the drive, and select Start > Turn Off Computer > Restart. • If you created the CD on a DVD/CD-RW combo-type drive, try setting Video Display Device to Both in the System Devices menu. • If you must activate the...


