Wireless Setup Guide
Page 2
... router. Search for Microsoft Windows XP by visiting Microsoft Windows Update at http://windowsupdate.microsoft.com. TIP: You can buy a wireless PC Card to get started! WPA-PSK Pass phrase required. (Wi-Fi Protected Access-Preshared Key) 1 Create pass phrase. 2 Record ...pass phrase 3 Download the latest WPA update for "WPA." 2 Your Internet connection should be operational before you can buy a wireless-enabled notebook, you begin the procedures in this information. Your Internet service provider (ISP) will provide you 're ready to add wireless capability. Use...
... router. Search for Microsoft Windows XP by visiting Microsoft Windows Update at http://windowsupdate.microsoft.com. TIP: You can buy a wireless PC Card to get started! WPA-PSK Pass phrase required. (Wi-Fi Protected Access-Preshared Key) 1 Create pass phrase. 2 Record ...pass phrase 3 Download the latest WPA update for "WPA." 2 Your Internet connection should be operational before you can buy a wireless-enabled notebook, you begin the procedures in this information. Your Internet service provider (ISP) will provide you 're ready to add wireless capability. Use...

Wireless Setup Guide
Page 4
... your Web browser and accessing a Web site. 5 Connect and configure any additional wireless-enabled computers or other devices, including wired devices, that correspond with wireless notebooks and wired desktop PROGRESS CHECK If you successfully complete step 6, all computers on your network can access a Web site. 4 6 Run the Network Setup Wizard on...
... your Web browser and accessing a Web site. 5 Connect and configure any additional wireless-enabled computers or other devices, including wired devices, that correspond with wireless notebooks and wired desktop PROGRESS CHECK If you successfully complete step 6, all computers on your network can access a Web site. 4 6 Run the Network Setup Wizard on...
Reference Guide
Page 1
It also provides information on modem commands, safety, and regulatory information. The last chapter provides additional reference material on battery pack and power management, external device connections, and modem and network connections. b Reference Guide Compaq Notebook Series Document Part Number: 370698-002 April 2005 This guide explains how to set up, operate, maintain, and troubleshoot your notebook.
It also provides information on modem commands, safety, and regulatory information. The last chapter provides additional reference material on battery pack and power management, external device connections, and modem and network connections. b Reference Guide Compaq Notebook Series Document Part Number: 370698-002 April 2005 This guide explains how to set up, operate, maintain, and troubleshoot your notebook.
Reference Guide
Page 2
The information contained herein is subject to change without notice. Reference Guide Compaq Notebook Series Second Edition April 2005 First Edition June 2004 Document Part Number: 370698-002 Microsoft and Windows are set forth in the express warranty statements ...
The information contained herein is subject to change without notice. Reference Guide Compaq Notebook Series Second Edition April 2005 First Edition June 2004 Document Part Number: 370698-002 Microsoft and Windows are set forth in the express warranty statements ...
Reference Guide
Page 3
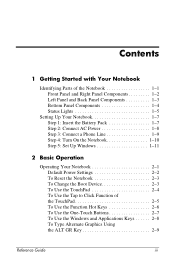
... 1: Insert the Battery Pack 1-7 Step 2: Connect AC Power 1-8 Step 3: Connect a Phone Line 1-9 Step 4: Turn On the Notebook 1-10 Step 5: Set Up Windows 1-11 2 Basic Operation Operating Your Notebook 2-1 Default Power Settings 2-2 To Reset the Notebook 2-3 To Change the Boot Device 2-3 To Use the TouchPad 2-4 To Use the Tap to Click Function of the...
... 1: Insert the Battery Pack 1-7 Step 2: Connect AC Power 1-8 Step 3: Connect a Phone Line 1-9 Step 4: Turn On the Notebook 1-10 Step 5: Set Up Windows 1-11 2 Basic Operation Operating Your Notebook 2-1 Default Power Settings 2-2 To Reset the Notebook 2-3 To Change the Boot Device 2-3 To Use the TouchPad 2-4 To Use the Tap to Click Function of the...
Reference Guide
Page 4
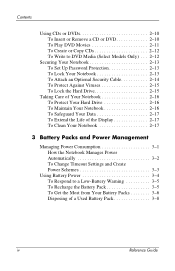
... Create or Copy CDs 2-12 To Write to DVD Media (Select Models Only) . . . 2-12 Securing Your Notebook 2-13 To Set Up Password Protection 2-13 To Lock Your Notebook 2-13 To Attach an Optional Security Cable 2-14 To Protect Against Viruses 2-15 To Lock the Hard Drive 2-15 ... To Safeguard Your Data 2-17 To Extend the Life of the Display 2-17 To Clean Your Notebook 2-17 3 Battery Packs and Power Management Managing Power Consumption 3-1 How the Notebook Manages Power Automatically 3-2 To Change Timeout Settings and Create Power Schemes 3-3 Using Battery Power 3-4 To Respond to a Low-...
... Create or Copy CDs 2-12 To Write to DVD Media (Select Models Only) . . . 2-12 Securing Your Notebook 2-13 To Set Up Password Protection 2-13 To Lock Your Notebook 2-13 To Attach an Optional Security Cable 2-14 To Protect Against Viruses 2-15 To Lock the Hard Drive 2-15 ... To Safeguard Your Data 2-17 To Extend the Life of the Display 2-17 To Clean Your Notebook 2-17 3 Battery Packs and Power Management Managing Power Consumption 3-1 How the Notebook Manages Power Automatically 3-2 To Change Timeout Settings and Create Power Schemes 3-3 Using Battery Power 3-4 To Respond to a Low-...
Reference Guide
Page 5
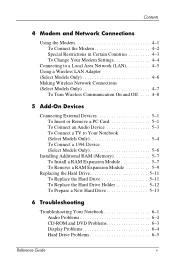
...Turn Wireless Communication On and Off . . . . . 4-8 5 Add-On Devices Connecting External Devices 5-1 To Insert or Remove a PC Card 5-1 To Connect an Audio Device 5-3 To Connect a TV to Your Notebook (Select Models Only 5-4 To Connect a 1394 Device (Select Models Only 5-6 Installing Additional RAM (Memory 5-7 To Install a RAM Expansion ... Drive 5-11 To Replace the Hard Drive Holder 5-12 To Prepare a New Hard Drive 5-13 6 Troubleshooting Troubleshooting Your Notebook 6-1 Audio Problems 6-2 CD-ROM and DVD Problems 6-3 Display Problems 6-4 Hard Drive Problems 6-5 Reference Guide v
...Turn Wireless Communication On and Off . . . . . 4-8 5 Add-On Devices Connecting External Devices 5-1 To Insert or Remove a PC Card 5-1 To Connect an Audio Device 5-3 To Connect a TV to Your Notebook (Select Models Only 5-4 To Connect a 1394 Device (Select Models Only 5-6 Installing Additional RAM (Memory 5-7 To Install a RAM Expansion ... Drive 5-11 To Replace the Hard Drive Holder 5-12 To Prepare a New Hard Drive 5-13 6 Troubleshooting Troubleshooting Your Notebook 6-1 Audio Problems 6-2 CD-ROM and DVD Problems 6-3 Display Problems 6-4 Hard Drive Problems 6-5 Reference Guide v
Reference Guide
Page 6
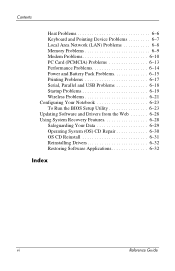
... 6-7 Local Area Network (LAN) Problems 6-8 Memory Problems 6-9 Modem Problems 6-10 PC Card (PCMCIA) Problems 6-13 Performance Problems 6-14 Power and Battery Pack Problems 6-15 Printing Problems 6-17 Serial, Parallel and USB Problems 6-18 Startup Problems 6-19 Wireless Problems 6-21 Configuring Your Notebook 6-23 To Run the BIOS Setup Utility 6-23 Updating Software...
... 6-7 Local Area Network (LAN) Problems 6-8 Memory Problems 6-9 Modem Problems 6-10 PC Card (PCMCIA) Problems 6-13 Performance Problems 6-14 Power and Battery Pack Problems 6-15 Printing Problems 6-17 Serial, Parallel and USB Problems 6-18 Startup Problems 6-19 Wireless Problems 6-21 Configuring Your Notebook 6-23 To Run the BIOS Setup Utility 6-23 Updating Software...

Reference Guide
Page 7
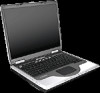
The following tables identify the standard external components included with the notebook may vary by geographical region and the features you selected. Reference Guide 1-1 1 Getting Started with Your Notebook Identifying Parts of the Notebook Components included with most notebook models.
The following tables identify the standard external components included with the notebook may vary by geographical region and the features you selected. Reference Guide 1-1 1 Getting Started with Your Notebook Identifying Parts of the Notebook Components included with most notebook models.

Reference Guide
Page 8
Hard drive 1-2 Reference Guide Getting Started with Your Notebook Front Panel and Right Panel Components 1 Main status lights (left to right): power mode, hard drive activity, and battery 2 TouchPad, scroll pad, Click buttons, and an on-off button 3 Power button: turns the notebook on and off 4 Keyboard status lights 5 One-Touch buttons 6 Notebook open/close latch 7 CD-ROM, DVD, or other drive 8 Battery pack 9 Wireless on-off button and indicator light (select models only) -
Hard drive 1-2 Reference Guide Getting Started with Your Notebook Front Panel and Right Panel Components 1 Main status lights (left to right): power mode, hard drive activity, and battery 2 TouchPad, scroll pad, Click buttons, and an on-off button 3 Power button: turns the notebook on and off 4 Keyboard status lights 5 One-Touch buttons 6 Notebook open/close latch 7 CD-ROM, DVD, or other drive 8 Battery pack 9 Wireless on-off button and indicator light (select models only) -
Reference Guide
Page 9
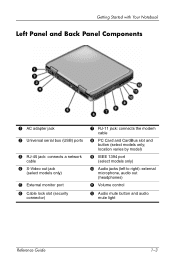
Audio jacks (left to right): external microphone, audio out (headphones) q Volume control w Audio mute button and audio mute light Reference Guide 1-3 location varies by model) 9 IEEE 1394 port (select models only) - Getting Started with Your Notebook Left Panel and Back Panel Components 1 AC adapter jack 2 Universal serial bus (USB) ports 3 RJ-45 jack: connects a network cable 4 S-Video out jack (select models only) 5 External monitor port 6 Cable lock slot (security connector) 7 RJ-11 jack: connects the modem cable 8 PC Card and CardBus slot and button (select models only;
Audio jacks (left to right): external microphone, audio out (headphones) q Volume control w Audio mute button and audio mute light Reference Guide 1-3 location varies by model) 9 IEEE 1394 port (select models only) - Getting Started with Your Notebook Left Panel and Back Panel Components 1 AC adapter jack 2 Universal serial bus (USB) ports 3 RJ-45 jack: connects a network cable 4 S-Video out jack (select models only) 5 External monitor port 6 Cable lock slot (security connector) 7 RJ-11 jack: connects the modem cable 8 PC Card and CardBus slot and button (select models only;

Reference Guide
Page 10
Then contact Customer Care. 1-4 Reference Guide If you install a device and then receive a warning message, remove the device to restore notebook functionality. Getting Started with Your Notebook Bottom Panel Components 1 Hard drive 2 Battery latch 3 RAM (memory) cover 4 Reset button 5 Mini PCI cover (no user parts inside) Ä CAUTION: To prevent an unresponsive system and the display of a warning message, install only a Mini PCI device authorized for use in your notebook by the governmental agency that regulates wireless devicesgin your country.
Then contact Customer Care. 1-4 Reference Guide If you install a device and then receive a warning message, remove the device to restore notebook functionality. Getting Started with Your Notebook Bottom Panel Components 1 Hard drive 2 Battery latch 3 RAM (memory) cover 4 Reset button 5 Mini PCI cover (no user parts inside) Ä CAUTION: To prevent an unresponsive system and the display of a warning message, install only a Mini PCI device authorized for use in your notebook by the governmental agency that regulates wireless devicesgin your country.
Reference Guide
Page 11
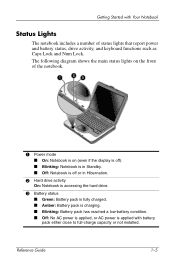
... Lock and Num Lock. Getting Started with Your Notebook Status Lights The notebook includes a number of the notebook. 1 Power mode ■ On: Notebook is on (even if the display is off). ■ Blinking: Notebook is in Standby. ■ Off: Notebook is off or in Hibernation. 2 Hard drive activity On: Notebook is accessing the hard drive. 3 Battery status...
... Lock and Num Lock. Getting Started with Your Notebook Status Lights The notebook includes a number of the notebook. 1 Power mode ■ On: Notebook is on (even if the display is off). ■ Blinking: Notebook is in Standby. ■ Off: Notebook is off or in Hibernation. 2 Hard drive activity On: Notebook is accessing the hard drive. 3 Battery status...
Reference Guide
Page 12
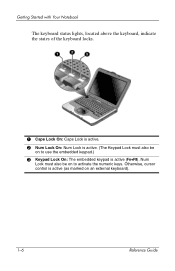
Getting Started with Your Notebook The keyboard status lights, located above the keyboard, indicate the states of the keyboard locks. 1 Caps Lock On: Caps Lock is active. 2 Num Lock On: Num Lock is active. (The Keypad Lock must also be on an external keyboard). 1-6 Reference Guide Num Lock must also be on to use the embedded keypad.) 3 Keypad Lock On: The embedded keypad is active (as marked on to activate the numeric keys. Otherwise, cursor control is active (Fn+F8).
Getting Started with Your Notebook The keyboard status lights, located above the keyboard, indicate the states of the keyboard locks. 1 Caps Lock On: Caps Lock is active. 2 Num Lock On: Num Lock is active. (The Keypad Lock must also be on an external keyboard). 1-6 Reference Guide Num Lock must also be on to use the embedded keypad.) 3 Keypad Lock On: The embedded keypad is active (as marked on to activate the numeric keys. Otherwise, cursor control is active (Fn+F8).
Reference Guide
Page 13
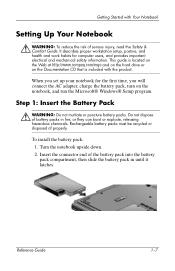
... Å WARNING: Do not mutilate or puncture battery packs. This guide is located on the Web at http://www.compaq.com/ergo and on the hard drive or on the notebook, and run the Microsoft® Windows® Setup program. Do not dispose of the battery pack into the battery ...pack compartment, then slide the battery pack in fire, or they can burst or explode, releasing hazardous chemicals. Turn the notebook upside down. 2. It describes proper workstation setup, posture, and health and work habits for the first time, you will connect the AC adapter, ...
... Å WARNING: Do not mutilate or puncture battery packs. This guide is located on the Web at http://www.compaq.com/ergo and on the hard drive or on the notebook, and run the Microsoft® Windows® Setup program. Do not dispose of the battery pack into the battery ...pack compartment, then slide the battery pack in fire, or they can burst or explode, releasing hazardous chemicals. Turn the notebook upside down. 2. It describes proper workstation setup, posture, and health and work habits for the first time, you will connect the AC adapter, ...

Reference Guide
Page 14
Connect the power cord to the AC adapter. 3. Plug the power cord into the notebook. 2. The notebook battery starts charging. ✎ When unplugging the power cord, unplug it from the outlet before unplugging it from the AC adapter. Plug the AC adapter ...into a wall outlet. While the battery pack is charging, you can continue with your warranty. 1. Getting Started with Your Notebook Step 2: Connect AC Power Ä CAUTION: Use only the AC adapter included with the section "Step 3: Connect a Phone Line." 1-8 Reference Guide Using the wrong AC...
Connect the power cord to the AC adapter. 3. Plug the power cord into the notebook. 2. The notebook battery starts charging. ✎ When unplugging the power cord, unplug it from the outlet before unplugging it from the AC adapter. Plug the AC adapter ...into a wall outlet. While the battery pack is charging, you can continue with your warranty. 1. Getting Started with Your Notebook Step 2: Connect AC Power Ä CAUTION: Use only the AC adapter included with the section "Step 3: Connect a Phone Line." 1-8 Reference Guide Using the wrong AC...

Reference Guide
Page 15
Plug the other end of the telephone cord into a telephone jack. 3. For details about using the modem, see "Using the Modem." Connect the telephone cord (RJ-11) into the RJ-11 modem jack on the notebook. Reference Guide 1-9 Getting Started with Your Notebook Step 3: Connect a Phone Line 1. Make sure the telephone line is an analog line, sometimes called a data line. (Do not use a digital line.) 2.
Plug the other end of the telephone cord into a telephone jack. 3. For details about using the modem, see "Using the Modem." Connect the telephone cord (RJ-11) into the RJ-11 modem jack on the notebook. Reference Guide 1-9 Getting Started with Your Notebook Step 3: Connect a Phone Line 1. Make sure the telephone line is an analog line, sometimes called a data line. (Do not use a digital line.) 2.
Reference Guide
Page 16
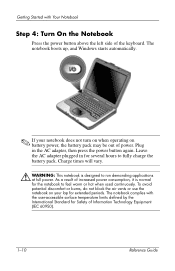
...be out of the keyboard. Plug in for the notebook to feel warm or hot when used continuously. The notebook complies with Your Notebook Step 4: Turn On the Notebook Press the power button above the left side of power. The notebook boots up, and Windows starts automatically. ✎... again. As a result of Information Technology Equipment (IEC 60950). 1-10 Reference Guide Charge times will vary. Å WARNING: This notebook is normal for several hours to run demanding applications at full power. Getting Started with the user-accessible surface temperature limits defined by the...
...be out of the keyboard. Plug in for the notebook to feel warm or hot when used continuously. The notebook complies with Your Notebook Step 4: Turn On the Notebook Press the power button above the left side of power. The notebook boots up, and Windows starts automatically. ✎... again. As a result of Information Technology Equipment (IEC 60950). 1-10 Reference Guide Charge times will vary. Å WARNING: This notebook is normal for several hours to run demanding applications at full power. Getting Started with the user-accessible surface temperature limits defined by the...

Reference Guide
Page 17
... Setup program runs automatically and includes opportunities to enter the Product ID code, locate the code on the bottom of the notebook. 2. Getting Started with Your Notebook Step 5: Set Up Windows Your notebook has the Microsoft Windows operating system preinstalled on the screen. If the program prompts you turn on your country/region...
... Setup program runs automatically and includes opportunities to enter the Product ID code, locate the code on the bottom of the notebook. 2. Getting Started with Your Notebook Step 5: Set Up Windows Your notebook has the Microsoft Windows operating system preinstalled on the screen. If the program prompts you turn on your country/region...

Reference Guide
Page 18
However, alternative methods may be required, depending on power considerations, types of these methods. Reference Guide 2-1 2 Basic Operation Operating Your Notebook You can start and stop your notebook by using the power button. This chapter describes several of active connections, and startup time.
However, alternative methods may be required, depending on power considerations, types of these methods. Reference Guide 2-1 2 Basic Operation Operating Your Notebook You can start and stop your notebook by using the power button. This chapter describes several of active connections, and startup time.


