
Commercial Notebook Batteries: Performance Optimization
Page 4
... all Armada notebooks. If removed, Calibration must be started over . The battery Calibration utility is complete. STEPS TO CALIBRATE UNDER WINDOWS 95 / WINDOWS 98 / WINDOWS NT (Using the Compaq Power Management Suite version 3.x and prior) Attach AC Power Cord and do not remove until Calibration is accurate between the battery and the Operating System. Go to: • Start / Settings / Control Panel / Power Management / Battery Calibration tab (or use the Battery Calibration utility, follow the instructions below for the user...
... all Armada notebooks. If removed, Calibration must be started over . The battery Calibration utility is complete. STEPS TO CALIBRATE UNDER WINDOWS 95 / WINDOWS 98 / WINDOWS NT (Using the Compaq Power Management Suite version 3.x and prior) Attach AC Power Cord and do not remove until Calibration is accurate between the battery and the Operating System. Go to: • Start / Settings / Control Panel / Power Management / Battery Calibration tab (or use the Battery Calibration utility, follow the instructions below for the user...

Operating System Support for Compaq Portable Products
Page 11
... multiple monitors using multiple graphics adapters on which can quickly and safely convert a hard drive from Windows 95 to feature ACPI (Advanced Configuration and Power Interface). Multiple Display Support Allows the user to act as a dial-up to 127 devices off a single port. NA120D/0199 In addition, some commercial notebook users. FAT32 Conversion Utility A graphical utility which notebooks support key Compaq unique and Windows 98 features. 38 Compaq recommends that will install the Windows version of the driver...
... multiple monitors using multiple graphics adapters on which can quickly and safely convert a hard drive from Windows 95 to feature ACPI (Advanced Configuration and Power Interface). Multiple Display Support Allows the user to act as a dial-up to 127 devices off a single port. NA120D/0199 In addition, some commercial notebook users. FAT32 Conversion Utility A graphical utility which notebooks support key Compaq unique and Windows 98 features. 38 Compaq recommends that will install the Windows version of the driver...

Operating System Support for Compaq Portable Products
Page 13
... Windows NT Service Pack. Refer to Service Pack 4 for customers who are supported on Compaq software enhancements provided for Windows NT 4.0. Windows NT 4.0 does not support many new features and support for new hardware technologies over its predecessor, Windows NT 3.51. Once a Service Pack has been installed it is also preinstalled. Operating System Support for Compaq Portable Products 13 Windows NT 4.0 with critical functionality such as power management and PC Card support. Compaq does not support Service Pack 2, Service...
... Windows NT Service Pack. Refer to Service Pack 4 for customers who are supported on Compaq software enhancements provided for Windows NT 4.0. Windows NT 4.0 does not support many new features and support for new hardware technologies over its predecessor, Windows NT 3.51. Once a Service Pack has been installed it is also preinstalled. Operating System Support for Compaq Portable Products 13 Windows NT 4.0 with critical functionality such as power management and PC Card support. Compaq does not support Service Pack 2, Service...

Operating System Support for Compaq Portable Products
Page 19
... install correctly and enable all hardware supported by Microsoft within the native operating system. Support for a small share of the installed user base. However, Compaq does not support new hardware features and functionality that are not directly related to be obtained by the base operating system, software enhancements are provided to 4Mbps). Compaq software enhancements are available as individual SoftPaqs and can be provided for Windows 3.1 on the Armada...
... install correctly and enable all hardware supported by Microsoft within the native operating system. Support for a small share of the installed user base. However, Compaq does not support new hardware features and functionality that are not directly related to be obtained by the base operating system, software enhancements are provided to 4Mbps). Compaq software enhancements are available as individual SoftPaqs and can be provided for Windows 3.1 on the Armada...

Microsoft Windows 2000 Service Pack 2 on Compaq Deskpro, iPAQ and Armada
Page 8
...; Compaq Support Software CD • Compaq Worldwide Web Site and Download Facility Compaq Support Software CD The Compaq Support Software CD (SSCD) includes updated drivers and utilities for Compaq commercial notebook, desktop, and workstation computers. Important You cannot use this issue, go to update Windows Millennium Edition, Windows 2000 Professional, Windows 2000 Server, Windows 2000 Advanced Server, Windows 2000 Datacenter Server, or Windows 2000 with the new worldwide standard of the operating system and the Service Pack...
...; Compaq Support Software CD • Compaq Worldwide Web Site and Download Facility Compaq Support Software CD The Compaq Support Software CD (SSCD) includes updated drivers and utilities for Compaq commercial notebook, desktop, and workstation computers. Important You cannot use this issue, go to update Windows Millennium Edition, Windows 2000 Professional, Windows 2000 Server, Windows 2000 Advanced Server, Windows 2000 Datacenter Server, or Windows 2000 with the new worldwide standard of the operating system and the Service Pack...

Microsoft Windows 2000 Service Pack 2 on Compaq Deskpro, iPAQ and Armada
Page 9
...models Compaq Internal 56K PCI Modem Driver Enables the internal modem device on ArmadaStation I and II Power Management (Notebooks) Allows users to customize power requirements of the computer to maximize battery life and set up hibernation functionality Power Management Enhancements (Notebooks) Increases battery life by managing SMART drive data collection Video Drivers (ATI, Intel, Matrox, NVIDIA) Enables the video hardware Remote Management Enables system administrators to update client ROM and setup over the network Security Management (Notebooks) Allows users to access Compaq...
...models Compaq Internal 56K PCI Modem Driver Enables the internal modem device on ArmadaStation I and II Power Management (Notebooks) Allows users to customize power requirements of the computer to maximize battery life and set up hibernation functionality Power Management Enhancements (Notebooks) Increases battery life by managing SMART drive data collection Video Drivers (ATI, Intel, Matrox, NVIDIA) Enables the video hardware Remote Management Enables system administrators to update client ROM and setup over the network Security Management (Notebooks) Allows users to access Compaq...

Microsoft Windows 2000 Service Pack 2 on Compaq Deskpro, iPAQ and Armada
Page 10
... preinstalled software) Compaq Product Information Compaq Technical Support Telephone Numbers 1-800-888-0220 1-800-888-5858 (U.S.) 1-800-888-5874 1-800-345-1518 (Option 3) 1-800-567-1616 1-800-952-7689 (U.S.) 1-800-349-8498 (Canada) 1-800-345-1518 (U.S.) 1-800-567-1616 (Canada) 1-800-OK-COMPAQ (U.S. Do I need to reinstall the Service Pack if I upgrade to Service Pack 2? Departments and Telephone Numbers for Canada and the United States Department Consumer Direct Compaq DirectPlus Compaq Partner Direct Compaq Reseller Locator Compaq...
... preinstalled software) Compaq Product Information Compaq Technical Support Telephone Numbers 1-800-888-0220 1-800-888-5858 (U.S.) 1-800-888-5874 1-800-345-1518 (Option 3) 1-800-567-1616 1-800-952-7689 (U.S.) 1-800-349-8498 (Canada) 1-800-345-1518 (U.S.) 1-800-567-1616 (Canada) 1-800-OK-COMPAQ (U.S. Do I need to reinstall the Service Pack if I upgrade to Service Pack 2? Departments and Telephone Numbers for Canada and the United States Department Consumer Direct Compaq DirectPlus Compaq Partner Direct Compaq Reseller Locator Compaq...
Wireless Security
Page 26
... the network, since they could "remember" their WEP key. Multiple end stations on an authenticated port - Passwords must configure a symmetric passphrase in use . It should not be cryptologically secure. It is a fundamental problem with 40-128 bit encryption. If WEP is not feasible in public areas or at customer sites). Clearly this is in order to distribute any automated key changes...
... the network, since they could "remember" their WEP key. Multiple end stations on an authenticated port - Passwords must configure a symmetric passphrase in use . It should not be cryptologically secure. It is a fundamental problem with 40-128 bit encryption. If WEP is not feasible in public areas or at customer sites). Clearly this is in order to distribute any automated key changes...
Compaq Armada 110 Series
Page 4
...a Used Battery Pack 4-5 5 Drives Caring for Drives 5-1 Removing and Inserting Storage Media 5-1 Inserting and Removing a Diskette 5-1 Inserting a Disc into the CD or DVD Drive 5-2 Viewing the CD 5-3 Removing a Disc from the CD or DVD Drive . . . . . 5-4 Changing the Startup Sequence 5-4 6 Audio Using Audio Features 6-1 Connecting to the Stereo Line-Out /Headphone Jack 6-2 Connecting to the Stereo Line-In Jack 6-3 Adjusting Volume 6-3 7 External Device Connections Connecting an External Keyboard or Pointing Device . . 7-1 Connecting an External Monitor 7-2 Connecting a Serial Printer...
...a Used Battery Pack 4-5 5 Drives Caring for Drives 5-1 Removing and Inserting Storage Media 5-1 Inserting and Removing a Diskette 5-1 Inserting a Disc into the CD or DVD Drive 5-2 Viewing the CD 5-3 Removing a Disc from the CD or DVD Drive . . . . . 5-4 Changing the Startup Sequence 5-4 6 Audio Using Audio Features 6-1 Connecting to the Stereo Line-Out /Headphone Jack 6-2 Connecting to the Stereo Line-In Jack 6-3 Adjusting Volume 6-3 7 External Device Connections Connecting an External Keyboard or Pointing Device . . 7-1 Connecting an External Monitor 7-2 Connecting a Serial Printer...

Compaq Armada 110 Series
Page 5
...Board 8-3 Upgrading or Adding a Modem or NIC 8-6 Adding and Using PC Cards 8-9 Configuring a PC Card 8-9 Inserting a PC Card 8-10 Removing a PC Card 8-11 Conserving Energy 8-11 Installing Additional Device Drivers 8-12 Adding Wireless Devices 8-12 9 Specifications Regulatory Agency Series Numbers 9-1 Computer Dimensions 9-2 Operating Environment 9-2 Rated Input Power 9-3 Port and COM Port Settings 9-3 Communications Specifications 9-4 10 Computer Utilities Using the PhoenixBIOS Setup Utility 10-1 Power Management 10-1 Enabling Power Savings 10-2 Timeout Settings 10-2 Setting...
...Board 8-3 Upgrading or Adding a Modem or NIC 8-6 Adding and Using PC Cards 8-9 Configuring a PC Card 8-9 Inserting a PC Card 8-10 Removing a PC Card 8-11 Conserving Energy 8-11 Installing Additional Device Drivers 8-12 Adding Wireless Devices 8-12 9 Specifications Regulatory Agency Series Numbers 9-1 Computer Dimensions 9-2 Operating Environment 9-2 Rated Input Power 9-3 Port and COM Port Settings 9-3 Communications Specifications 9-4 10 Computer Utilities Using the PhoenixBIOS Setup Utility 10-1 Power Management 10-1 Enabling Power Savings 10-2 Timeout Settings 10-2 Setting...

Compaq Armada 110 Series
Page 62
... or Bluetooth PC Card. Adding Wireless Devices The computer supports a Compaq wireless device, such as network cards, Global Positioning System (GPS) cards, SCSI cards, audio cards, and multifunction cards, require an additional software device driver to run a particular PC Card. The device driver is provided by the PC Card manufacturer and should be installed according to do so. Computer Upgrades and Add-Ons Installing Additional Device Drivers Device drivers are not turned on using wireless connectivity devices with all of your computer. 8-12 Hardware Guide The...
... or Bluetooth PC Card. Adding Wireless Devices The computer supports a Compaq wireless device, such as network cards, Global Positioning System (GPS) cards, SCSI cards, audio cards, and multifunction cards, require an additional software device driver to run a particular PC Card. The device driver is provided by the PC Card manufacturer and should be installed according to do so. Computer Upgrades and Add-Ons Installing Additional Device Drivers Device drivers are not turned on using wireless connectivity devices with all of your computer. 8-12 Hardware Guide The...

Compaq Armada 110 Series
Page 67
... system. Hardware Guide 10-1 To run PSU, press F10 during system startup. Using the PhoenixBIOS Setup Utility The PhoenixBIOS Setup Utility (PSU) is running on password. You can configure the system BIOS and modify or restore factory default settings, such as date and time, types of disk drives, power management, and password settings. To access power management options, select the power application icon in the operating system's Control Panel. When the main screen displays, use the keyboard and arrow keys to set or remove your computer power consumption...
... system. Hardware Guide 10-1 To run PSU, press F10 during system startup. Using the PhoenixBIOS Setup Utility The PhoenixBIOS Setup Utility (PSU) is running on password. You can configure the system BIOS and modify or restore factory default settings, such as date and time, types of disk drives, power management, and password settings. To access power management options, select the power application icon in the operating system's Control Panel. When the main screen displays, use the keyboard and arrow keys to set or remove your computer power consumption...
Compaq Armada 110 Series
Page 73
... 6-2 hotkeys Quick Reference 3-2 using on external keyboard 3-3 I infrared configuration guidelines 7-5 infrared connection guidelines 7-4 infrared equipment, connecting 7-3 infrared port component location 2-5 enabling 7-5 initial software setup (caution) 1-6 initiating Standby 3-4 input power 9-3 K keyboard connector 2-6 L left side components diskette drive 2-5 infrared port 2-5 PC Card eject button 2-5 PC Card slot 2-5 lights, top component 2-3 M media, removing/inserting 5-1 memory, amount of, in system 8-2 memory expansion board, removing/inserting 8-3 memory expansion compartment cover...
... 6-2 hotkeys Quick Reference 3-2 using on external keyboard 3-3 I infrared configuration guidelines 7-5 infrared connection guidelines 7-4 infrared equipment, connecting 7-3 infrared port component location 2-5 enabling 7-5 initial software setup (caution) 1-6 initiating Standby 3-4 input power 9-3 K keyboard connector 2-6 L left side components diskette drive 2-5 infrared port 2-5 PC Card eject button 2-5 PC Card slot 2-5 lights, top component 2-3 M media, removing/inserting 5-1 memory, amount of, in system 8-2 memory expansion board, removing/inserting 8-3 memory expansion compartment cover...

Compaq Armada 110 and Compaq Evo N110 Maintenance and Service Guide
Page 5
... 5-5 5.5 Mini PCI Communication Board 5-6 5.6 LED Cover 5-8 5.7 Keyboard 5-9 5.8 Optical Drive 5-12 5.9 Display 5-14 5.10 Heat Sink 5-18 5.11 Processor 5-22 5.12 Top Cover 5-24 5.13 Diskette Drive 5-27 5.14 TouchPad 5-29 5.15 Hard Drive 5-32 5.16 Disk Cell Real Time Clock (RTC) Battery 5-34 5.17 Fan 5-36 5.18 System Board 5-39 6 Specifications A Connector Pin Assignments B Power Cord Set Requirements 3-Conductor Power Cord Set B-1 General Requirements B-1 Country-Specific Requirements B-2 Notes B-3 C Screw Listing Index Maintenance and Service Guide v
... 5-5 5.5 Mini PCI Communication Board 5-6 5.6 LED Cover 5-8 5.7 Keyboard 5-9 5.8 Optical Drive 5-12 5.9 Display 5-14 5.10 Heat Sink 5-18 5.11 Processor 5-22 5.12 Top Cover 5-24 5.13 Diskette Drive 5-27 5.14 TouchPad 5-29 5.15 Hard Drive 5-32 5.16 Disk Cell Real Time Clock (RTC) Battery 5-34 5.17 Fan 5-36 5.18 System Board 5-39 6 Specifications A Connector Pin Assignments B Power Cord Set Requirements 3-Conductor Power Cord Set B-1 General Requirements B-1 Country-Specific Requirements B-2 Notes B-3 C Screw Listing Index Maintenance and Service Guide v
Compaq Armada 110 and Compaq Evo N110 Maintenance and Service Guide
Page 144
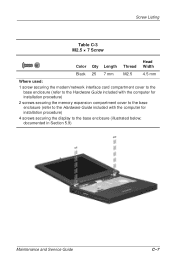
Screw Listing Table C-3 M2.5 × 7 Screw Head Color Qty Length Thread Width Black 25 7 mm M2.5 4.5 mm Where used: 1 screw securing the modem/network interface card compartment cover to the base enclosure (refer to the Hardware Guide included with the computer for installation procedure) 2 screws securing the memory expansion compartment cover to the base enclosure (refer to the Hardware Guide included with the computer for installation procedure) 4 screws securing the display to the base enclosure (illustrated below; documented in Section 5.9) Maintenance and Service Guide C-7
Screw Listing Table C-3 M2.5 × 7 Screw Head Color Qty Length Thread Width Black 25 7 mm M2.5 4.5 mm Where used: 1 screw securing the modem/network interface card compartment cover to the base enclosure (refer to the Hardware Guide included with the computer for installation procedure) 2 screws securing the memory expansion compartment cover to the base enclosure (refer to the Hardware Guide included with the computer for installation procedure) 4 screws securing the display to the base enclosure (illustrated below; documented in Section 5.9) Maintenance and Service Guide C-7
Compaq Armada 110 and Compaq Evo N110 Maintenance and Service Guide
Page 148
...lock key 1-15 light 1-17 CD-ROM drive alignment rail 5-41 illustrated 3-9 illustrated 3-4, 3-6, 3-11 removal 5-12 Index spare part number 3-7, 5-12 specifications 6-8 Certificate of Authenticity label 1-19 computer bottom components 1-19 display components 1-11 features 1-6 feet illustrated 3-8 locations 5-5 keyboard components 1-15 left side components 1-11 models 1-2 rear panel components 1-12 right side components 1-12 specifications 6-1 top components 1-16 connector pin assignments A-1 headphone jack A-1 keyboard connector A-2 microphone jack A-1 modem jack A-2 monitor connector A-5 mouse...
...lock key 1-15 light 1-17 CD-ROM drive alignment rail 5-41 illustrated 3-9 illustrated 3-4, 3-6, 3-11 removal 5-12 Index spare part number 3-7, 5-12 specifications 6-8 Certificate of Authenticity label 1-19 computer bottom components 1-19 display components 1-11 features 1-6 feet illustrated 3-8 locations 5-5 keyboard components 1-15 left side components 1-11 models 1-2 rear panel components 1-12 right side components 1-12 specifications 6-1 top components 1-16 connector pin assignments A-1 headphone jack A-1 keyboard connector A-2 microphone jack A-1 modem jack A-2 monitor connector A-5 mouse...
Compaq Armada 110 Series Maintenance and Service Guide
Page 5
... Computer for Disassembly 5-4 5.4 Computer Feet 5-5 5.5 LED Cover 5-6 5.6 Keyboard 5-7 5.7 Optical Drive 5-10 5.8 Display 5-12 5.9 Heat Sink 5-16 5.10 Processor 5-20 5.11 Top Cover 5-22 5.12 Diskette Drive 5-25 5.13 TouchPad 5-27 5.14 Hard Drive 5-30 5.15 Disk Cell Real Time Clock (RTC) Battery 5-32 5.16 Fan 5-34 5.17 System Board 5-37 6 Specifications A Connector Pin Assignments B Power Cord Set Requirements 3-Conductor Power Cord Set B-1 General Requirements B-1 Country-Specific Requirements B-2 Notes B-3 C Screw Listing Index Maintenance and Service Guide v
... Computer for Disassembly 5-4 5.4 Computer Feet 5-5 5.5 LED Cover 5-6 5.6 Keyboard 5-7 5.7 Optical Drive 5-10 5.8 Display 5-12 5.9 Heat Sink 5-16 5.10 Processor 5-20 5.11 Top Cover 5-22 5.12 Diskette Drive 5-25 5.13 TouchPad 5-27 5.14 Hard Drive 5-30 5.15 Disk Cell Real Time Clock (RTC) Battery 5-32 5.16 Fan 5-34 5.17 System Board 5-37 6 Specifications A Connector Pin Assignments B Power Cord Set Requirements 3-Conductor Power Cord Set B-1 General Requirements B-1 Country-Specific Requirements B-2 Notes B-3 C Screw Listing Index Maintenance and Service Guide v

Compaq Armada 110 Series Maintenance and Service Guide
Page 7
... Key Description Options 1 Brand / Series designator A=Armada 11=110 2 Processor type P=Intel Pentium III C=Intel Celeron 3 Processor speed 800=800 MHz 700=700MHz 4 Display type/size/resolution 4=14.x" 2=12.x" X=XGA (1024 × 768) S=SVGA (800 × 600) 5 Hard drive size 10=10.0 GB 6 Optical drive designator V=8X Max D=24X Max CD-ROM DVD-ROM drive drive 7 Integrated communication M=modem 0 = none C=modem/NIC combination card 8 RAM 64=64 MB 12=128 MB 9 Operating system 8=Windows...
... Key Description Options 1 Brand / Series designator A=Armada 11=110 2 Processor type P=Intel Pentium III C=Intel Celeron 3 Processor speed 800=800 MHz 700=700MHz 4 Display type/size/resolution 4=14.x" 2=12.x" X=XGA (1024 × 768) S=SVGA (800 × 600) 5 Hard drive size 10=10.0 GB 6 Optical drive designator V=8X Max D=24X Max CD-ROM DVD-ROM drive drive 7 Integrated communication M=modem 0 = none C=modem/NIC combination card 8 RAM 64=64 MB 12=128 MB 9 Operating system 8=Windows...

Compaq Armada 110 Series Maintenance and Service Guide
Page 138
documented in Section 5.9) Maintenance and Service Guide C-7 Table C-3 M2.5 × 7 Screw Head Color Qty Length Thread Width Black 25 7 mm M2.5 4.5 mm Where used: 1 screw securing the modem/network interface card compartment cover to the base enclosure (refer to the Hardware Guide included with the computer for installation procedure) 2 screws securing the memory expansion compartment cover to the base enclosure (refer to the Hardware Guide included with the computer for installation procedure) 4 screws securing the display to the base enclosure (illustrated below;
documented in Section 5.9) Maintenance and Service Guide C-7 Table C-3 M2.5 × 7 Screw Head Color Qty Length Thread Width Black 25 7 mm M2.5 4.5 mm Where used: 1 screw securing the modem/network interface card compartment cover to the base enclosure (refer to the Hardware Guide included with the computer for installation procedure) 2 screws securing the memory expansion compartment cover to the base enclosure (refer to the Hardware Guide included with the computer for installation procedure) 4 screws securing the display to the base enclosure (illustrated below;
Compaq Armada 110 Series Maintenance and Service Guide
Page 142
... number 3-5 specifications 6-11 batteyr light 1-15 C Cable Kit components 3-8 spare part number 3-8 cables 4-2 caps lock key 1-13 light 1-15 CD-ROM drive alignment rail 5-39 illustrated 3-7 illustrated 3-4, 3-9 removal 5-10 spare part number 3-5, 5-10 specifications 6-8 Certificate of Authenticity label 1-17 computer bottom components 1-17 display components 1-9 features 1-4 feet illustrated 3-6 locations 5-5 keyboard components 1-13 left side components 1-9 models 1-2 rear panel components 1-10 right side components 1-10 specifications 6-1 top components 1-14 Maintenance and Service Guide...
... number 3-5 specifications 6-11 batteyr light 1-15 C Cable Kit components 3-8 spare part number 3-8 cables 4-2 caps lock key 1-13 light 1-15 CD-ROM drive alignment rail 5-39 illustrated 3-7 illustrated 3-4, 3-9 removal 5-10 spare part number 3-5, 5-10 specifications 6-8 Certificate of Authenticity label 1-17 computer bottom components 1-17 display components 1-9 features 1-4 feet illustrated 3-6 locations 5-5 keyboard components 1-13 left side components 1-9 models 1-2 rear panel components 1-10 right side components 1-10 specifications 6-1 top components 1-14 Maintenance and Service Guide...


