User Manual
Page 3
... INFORMATION TABLE OF CONTENTS UNPACKING...1 NOTE ON DISC...2 IDENTIFICATION OF CONTROLS...3-5 BUTTONS ON THE MAIN UNIT...3 REMOTE...5 CABLE CONNECTIONS...6 MOUNTING...7 BASIC OPERATION...8-9 TIME...8 RADIO...8 DVD...8 TV...9 AV...9 FUNCTION BUTTONS (BUTTONS ON THE REMOTE 10-13 DVD SETUP...14-15 TV FUNCTION...16-17 TROUBLE SHOOTING...18 SPECIFICATION...19-20 Unpacking Please make sure the following items are...
... INFORMATION TABLE OF CONTENTS UNPACKING...1 NOTE ON DISC...2 IDENTIFICATION OF CONTROLS...3-5 BUTTONS ON THE MAIN UNIT...3 REMOTE...5 CABLE CONNECTIONS...6 MOUNTING...7 BASIC OPERATION...8-9 TIME...8 RADIO...8 DVD...8 TV...9 AV...9 FUNCTION BUTTONS (BUTTONS ON THE REMOTE 10-13 DVD SETUP...14-15 TV FUNCTION...16-17 TROUBLE SHOOTING...18 SPECIFICATION...19-20 Unpacking Please make sure the following items are...
User Manual
Page 5
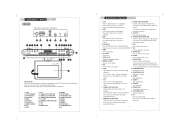
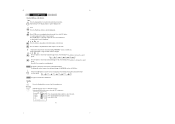
... rotational limit. Press and hold playback. Under the tuner mode, press to set the clock/week/date/alarm. Display the working with the menu. AM antenna connector. AUDIO L... settings. 13. Under the TV/tuner mode, press to display the menu. 3. Press to adjust the volume down direction button while forward. REMOTE SENSER Present the high resolution ... TRAY 7. LCD DISPLAY 8. TV/SETUP 16. FM ANTENNA JACK 23. AM ANTENNA JACK 24. AUDIO L 25. POWER JACK 28. TV ANTENNA JACK 29. STOP 14. TUNING+/RIGHT DIRECTION Under the DVD mode, press...
... rotational limit. Press and hold playback. Under the tuner mode, press to set the clock/week/date/alarm. Display the working with the menu. AM antenna connector. AUDIO L... settings. 13. Under the TV/tuner mode, press to display the menu. 3. Press to adjust the volume down direction button while forward. REMOTE SENSER Present the high resolution ... TRAY 7. LCD DISPLAY 8. TV/SETUP 16. FM ANTENNA JACK 23. AM ANTENNA JACK 24. AUDIO L 25. POWER JACK 28. TV ANTENNA JACK 29. STOP 14. TUNING+/RIGHT DIRECTION Under the DVD mode, press...
User Manual
Page 6
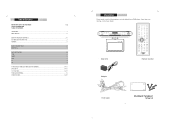
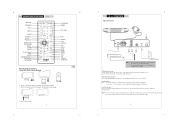
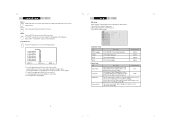
... unit's rear panel. Place the battery onto the holder with AC100-240V. Identification of time, please disconnect the power and remove the battery from the remote. 2. Connect the "L" "R" port to connect the outdoor antenna. Press to the manual of the RCA cable. If the unit will not be used for... a long period of Controls DISPLAY STANDBY TITLE GOTO AUDIO SUBTITLE SETUP TV SETUP DIRECTION /OK/TUN/CH MENU F.FWD F.BWD PLAY/PAUSE STOP CLEAR ZOOM/MEMORY EPG/FM/AM AUTO/FAV Remote Control Drawing Using The Coin Lithium Battery PROGRAM MODE KEY PAD PBC ANGLE EXIT REPEAT ...
... unit's rear panel. Place the battery onto the holder with AC100-240V. Identification of time, please disconnect the power and remove the battery from the remote. 2. Connect the "L" "R" port to connect the outdoor antenna. Press to the manual of the RCA cable. If the unit will not be used for... a long period of Controls DISPLAY STANDBY TITLE GOTO AUDIO SUBTITLE SETUP TV SETUP DIRECTION /OK/TUN/CH MENU F.FWD F.BWD PLAY/PAUSE STOP CLEAR ZOOM/MEMORY EPG/FM/AM AUTO/FAV Remote Control Drawing Using The Coin Lithium Battery PROGRAM MODE KEY PAD PBC ANGLE EXIT REPEAT ...
User Manual
Page 8
...or you want to erase, press the Clear button on the remote or the STOP button on the main unit to start playing automatically...Clock - - > Week - - > Date - - > Alarm - - > Display Off Time button functions under any living modes. Set Date/Week/Alarm Repeatedly press TIME on the main unit to set the unit into the DVD mode. 2. Press OK to adjust the volume. Radio... Operation Basic Operation 1. Refer to the "Cable Connections" section for how to show the TV setup menu. Press TUN+/- to search through the TV setup menu, Press TV...
...or you want to erase, press the Clear button on the remote or the STOP button on the main unit to start playing automatically...Clock - - > Week - - > Date - - > Alarm - - > Display Off Time button functions under any living modes. Set Date/Week/Alarm Repeatedly press TIME on the main unit to set the unit into the DVD mode. 2. Press OK to adjust the volume. Radio... Operation Basic Operation 1. Refer to the "Cable Connections" section for how to show the TV setup menu. Press TUN+/- to search through the TV setup menu, Press TV...
User Manual
Page 9
.../hold playback. Repeatedly pressing the button will not skip forward or backward during the WARNING section of a DVD disc. Press the button to exit. .10. nction B ttons Function Buttons on the Remote isp a isp a Press the Display button to show the TFT setup menu. Press EXIT to skip ...backward the DVD chapter or the CD track. Repeatedly press the Display button to increase the search speed. Repeatedly press the button to quit the display mode. Press PLAY to show the TV menu. TV Setup Under the TV mode, press to resume the normal playback...
.../hold playback. Repeatedly pressing the button will not skip forward or backward during the WARNING section of a DVD disc. Press the button to exit. .10. nction B ttons Function Buttons on the Remote isp a isp a Press the Display button to show the TFT setup menu. Press EXIT to skip ...backward the DVD chapter or the CD track. Repeatedly press the Display button to increase the search speed. Repeatedly press the button to quit the display mode. Press PLAY to show the TV menu. TV Setup Under the TV mode, press to resume the normal playback...
User Manual
Page 11
...-Chapter6 7. Press Play/Pause to access the Program function. 0016/0023 1. Set this function by pressing the ANGLE button on the remote control. NTSC is used in damage to " DVD SETUP " section for viewing. The SETUP menu allows the viewer to adjust the setting details of the...the SETUP menu. 1. Press SETUP to select the options. 3. SETUP Setup Press the SETUP button to display the channel list under the TV mode. Title1-Chapter4 5. To delete the program, press OK at the file to be displayed to correspond with widescreen television displays. The default...
...-Chapter6 7. Press Play/Pause to access the Program function. 0016/0023 1. Set this function by pressing the ANGLE button on the remote control. NTSC is used in damage to " DVD SETUP " section for viewing. The SETUP menu allows the viewer to adjust the setting details of the...the SETUP menu. 1. Press SETUP to select the options. 3. SETUP Setup Press the SETUP button to display the channel list under the TV mode. Title1-Chapter4 5. To delete the program, press OK at the file to be displayed to correspond with widescreen television displays. The default...
User Manual
Page 13
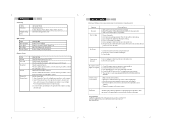
... Picture noisy/ distorted 1. Restore settings to the power outlet. 3. ro e ootin Should your DVD player develop a problem, please check below before requesting service: Symptom No power Does not play ...No Picture Check and Action 1. Check if the MUTE function of the remote control have been loaded with the label side up. 3. After that, power on manually... on /off. Malfunction Should the player develop a malfunction, unplug the player for the player. 5. TV Function Time Setup ITEM Time Zone Daylight Saving Time DESCRIPTION Select the time zone. (Central, Mountain, ...
... Picture noisy/ distorted 1. Restore settings to the power outlet. 3. ro e ootin Should your DVD player develop a problem, please check below before requesting service: Symptom No power Does not play ...No Picture Check and Action 1. Check if the MUTE function of the remote control have been loaded with the label side up. 3. After that, power on manually... on /off. Malfunction Should the player develop a malfunction, unplug the player for the player. 5. TV Function Time Setup ITEM Time Zone Daylight Saving Time DESCRIPTION Select the time zone. (Central, Mountain, ...


