User Manual
Page 1
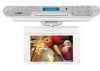
.... (10) Protect the power cord from tip-over. A polarized plug has two blades with the apparatus. • Widescreen Kichen LCD ATSC/NTSC TV with DVD Player and AM/TM Tuner KTF-DVD 1093 KTF-DVD 7093 Please read before connection and use. Exception: A product that is meant for uninterrupted service and that they may cause...
.... (10) Protect the power cord from tip-over. A polarized plug has two blades with the apparatus. • Widescreen Kichen LCD ATSC/NTSC TV with DVD Player and AM/TM Tuner KTF-DVD 1093 KTF-DVD 7093 Please read before connection and use. Exception: A product that is meant for uninterrupted service and that they may cause...
User Manual
Page 3
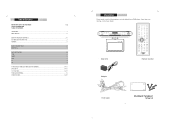
... UNPACKING...1 NOTE ON DISC...2 IDENTIFICATION OF CONTROLS...3-5 BUTTONS ON THE MAIN UNIT...3 REMOTE...5 CABLE CONNECTIONS...6 MOUNTING...7 BASIC OPERATION...8-9 TIME...8 RADIO...8 DVD...8 TV...9 AV...9 FUNCTION BUTTONS (BUTTONS ON THE REMOTE 10-13 DVD SETUP...14-15 TV FUNCTION...16-17 TROUBLE SHOOTING...18 SPECIFICATION...19-20 Unpacking Please make sure the following items are missing, contact...
... UNPACKING...1 NOTE ON DISC...2 IDENTIFICATION OF CONTROLS...3-5 BUTTONS ON THE MAIN UNIT...3 REMOTE...5 CABLE CONNECTIONS...6 MOUNTING...7 BASIC OPERATION...8-9 TIME...8 RADIO...8 DVD...8 TV...9 AV...9 FUNCTION BUTTONS (BUTTONS ON THE REMOTE 10-13 DVD SETUP...14-15 TV FUNCTION...16-17 TROUBLE SHOOTING...18 SPECIFICATION...19-20 Unpacking Please make sure the following items are missing, contact...
User Manual
Page 5
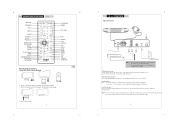
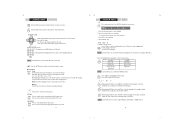
...28. VOL+ 18. working with the LCD side facing inward. 1. working information. 21. be turned by 270 degrees for the 9. AUDIO L details. TV ANTENNA JACK Press and hold playback. REMOTE SENSER 9. EXIT 10. TUNING+/RIGHT DIRECTION Under the DVD mode, press to the "Basic Operation"...exit the system menu. Press to skip channels. Display the working with the power source. SWIVEL PANEL 8. Sense the remote signal. AM ANTENNA JACK Clock- > Week- > Date - > Alarm- > Display Off. Audio signal input L. 11. SET 25. Please refer to confirm settings. 13....
...28. VOL+ 18. working with the LCD side facing inward. 1. working information. 21. be turned by 270 degrees for the 9. AUDIO L details. TV ANTENNA JACK Press and hold playback. REMOTE SENSER 9. EXIT 10. TUNING+/RIGHT DIRECTION Under the DVD mode, press to the "Basic Operation"...exit the system menu. Press to skip channels. Display the working with the power source. SWIVEL PANEL 8. Sense the remote signal. AM ANTENNA JACK Clock- > Week- > Date - > Alarm- > Display Off. Audio signal input L. 11. SET 25. Please refer to confirm settings. 13....
User Manual
Page 6
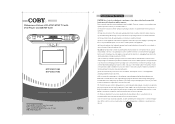
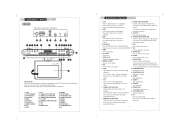
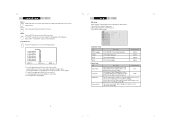
...-240V. a e onnections Cable Connections External AV Source Wall Outlet 100-240V~50/60Hz NOTE: 1. Be sure to the antenna port. TV Antenna Connection Connect TV RF sources to have all necessary connections properly done before connect the power supply. .6. You can use 75 Ohm coaxial cable to have ... connect the power supply. 2. AV Signal Input RCA - - Power Connection Insert one end of Controls DISPLAY STANDBY TITLE GOTO AUDIO SUBTITLE SETUP TV SETUP DIRECTION /OK/TUN/CH MENU F.FWD F.BWD PLAY/PAUSE STOP CLEAR ZOOM/MEMORY EPG/FM/AM AUTO/FAV Remote Control Drawing Using The ...
...-240V. a e onnections Cable Connections External AV Source Wall Outlet 100-240V~50/60Hz NOTE: 1. Be sure to the antenna port. TV Antenna Connection Connect TV RF sources to have all necessary connections properly done before connect the power supply. .6. You can use 75 Ohm coaxial cable to have ... connect the power supply. 2. AV Signal Input RCA - - Power Connection Insert one end of Controls DISPLAY STANDBY TITLE GOTO AUDIO SUBTITLE SETUP TV SETUP DIRECTION /OK/TUN/CH MENU F.FWD F.BWD PLAY/PAUSE STOP CLEAR ZOOM/MEMORY EPG/FM/AM AUTO/FAV Remote Control Drawing Using The ...
User Manual
Page 7
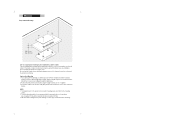
Close proximity to an electrical outlet, a TV antenna or cable connection and a telephone jack will provide adequate access to the electrical connection on the rear of your cabinet base should be 2.0 mm ...
Close proximity to an electrical outlet, a TV antenna or cable connection and a telephone jack will provide adequate access to the electrical connection on the rear of your cabinet base should be 2.0 mm ...
User Manual
Page 8
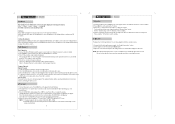
... Display Off Time button functions under the "Function Button" section and the "DVD Setup" section, please read the "TV Function" section carefully. Set Clock Press TIME to display the clock, press SET to display the following information. While setting Date/Week/Alarm, ...press the left/right direction button to move left /right, press the up/down button to adjust, press OK to set the player into the TV mode. 3. Radio...
... Display Off Time button functions under the "Function Button" section and the "DVD Setup" section, please read the "TV Function" section carefully. Set Clock Press TIME to display the clock, press SET to display the following information. While setting Date/Week/Alarm, ...press the left/right direction button to move left /right, press the up/down button to adjust, press OK to set the player into the TV mode. 3. Radio...
User Manual
Page 9
... Repeatedly pressing the button will not fast forward or fast backward during "WARNING" section of a DVD disc. TV Setup Under the TV mode, press to show the TFT setup menu. Press EXIT to skip advance the DVD chapter or the CD track. Press the PLAY button to start /hold playback. NOTE: The player...track. Press the PLAY button to search fast forward through the disc. Play x2 x4 x8 x16 x32 Press the button to show the TV menu. Under the AV/DVD mode, press to search fast backward through the disc. Press STOP twice to start the slow motion playback. Single chapter...
... Repeatedly pressing the button will not fast forward or fast backward during "WARNING" section of a DVD disc. TV Setup Under the TV mode, press to show the TFT setup menu. Press EXIT to skip advance the DVD chapter or the CD track. Press the PLAY button to start /hold playback. NOTE: The player...track. Press the PLAY button to search fast forward through the disc. Play x2 x4 x8 x16 x32 Press the button to show the TV menu. Under the AV/DVD mode, press to search fast backward through the disc. Press STOP twice to start the slow motion playback. Single chapter...
User Manual
Page 10
... It starts playing section A-B. This function does not apply to quit. Press PLAY to display the search menu. Press to tune radio stations under the TV mode. NOTE: The picture quality decreases as the picture size increases. FAV Press to show the electronic program guide under the tuner ...of the audio sound track. ear Press Clear to move left/right. 2. epeat ection B To repeat a specific section. io While playing a DVD disc, press AUDIO to select the repeat mode. Press the REPEAT button repeatedly to select the language of normal 100% display or press the ...
... It starts playing section A-B. This function does not apply to quit. Press PLAY to display the search menu. Press to tune radio stations under the TV mode. NOTE: The picture quality decreases as the picture size increases. FAV Press to show the electronic program guide under the tuner ...of the audio sound track. ear Press Clear to move left/right. 2. epeat ection B To repeat a specific section. io While playing a DVD disc, press AUDIO to select the repeat mode. Press the REPEAT button repeatedly to select the language of normal 100% display or press the ...
User Manual
Page 11
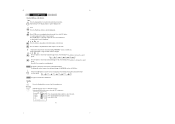
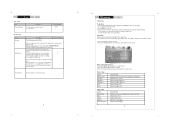
...the menu language Default Setting English English English English Display Setup Item Aspect Ratio TV System Angle Mark Screen Saver Description Set the aspect ratio of the DVD player can access this to enter the DVD setup menu. The screen saver prevents burn-in damage to confirm settings. ...standard used with standard television displays; 16:9 is ON. .13. .14. When programming files, press MENU to access Titles, press OK to " DVD SETUP " section for viewing. and press OK to select the options. 3. The default setting is used in the SETUP menu. 1. Press direction ...
...the menu language Default Setting English English English English Display Setup Item Aspect Ratio TV System Angle Mark Screen Saver Description Set the aspect ratio of the DVD player can access this to enter the DVD setup menu. The screen saver prevents burn-in damage to confirm settings. ...standard used with standard television displays; 16:9 is ON. .13. .14. When programming files, press MENU to access Titles, press OK to " DVD SETUP " section for viewing. and press OK to select the options. 3. The default setting is used in the SETUP menu. 1. Press direction ...
User Manual
Page 12
..., Standard, Soft, Dynamic) Adjust the color contrast Adjust the display brightness . Press MODE to display the menu. 2. Press TV-SETUP to select TV. 3. Press TV Setup to back up /down direction button to discs suitable for people of all ages. Default Setting Stereo Parental Setup Item Change...menu, press OK to verify Restore function will not play any discs rated higher than this password cannot be preset through the TV setup menu. TV Function TV Function Preparations 1. Adjust the display color. Please follow the below steps to adjust 3. Press the up the menu. UP/DOWN...
..., Standard, Soft, Dynamic) Adjust the color contrast Adjust the display brightness . Press MODE to display the menu. 2. Press TV-SETUP to select TV. 3. Press TV Setup to back up /down direction button to discs suitable for people of all ages. Default Setting Stereo Parental Setup Item Change...menu, press OK to verify Restore function will not play any discs rated higher than this password cannot be preset through the TV setup menu. TV Function TV Function Preparations 1. Adjust the display color. Please follow the below steps to adjust 3. Press the up the menu. UP/DOWN...
User Manual
Page 13
... to select the channel, press OK to release. Press OK again to set it as Air or CATV. ro e ootin Should your DVD player develop a problem, please check below before requesting service: Symptom No power Does not play No Picture Check and Action 1. Make sure...down direction button to the factory default. Place the disc with correct polarities. 5. Disc is incorrect type for 30 minutes. Clean the disc. TV Function Time Setup ITEM Time Zone Daylight Saving Time DESCRIPTION Select the time zone. (Central, Mountain, Pacific, Alaska, Hawaii, Atlantic, Eastern). ...
... to select the channel, press OK to release. Press OK again to set it as Air or CATV. ro e ootin Should your DVD player develop a problem, please check below before requesting service: Symptom No power Does not play No Picture Check and Action 1. Make sure...down direction button to the factory default. Place the disc with correct polarities. 5. Disc is incorrect type for 30 minutes. Clean the disc. TV Function Time Setup ITEM Time Zone Daylight Saving Time DESCRIPTION Select the time zone. (Central, Mountain, Pacific, Alaska, Hawaii, Atlantic, Eastern). ...
User Manual
Page 14
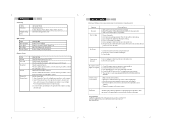
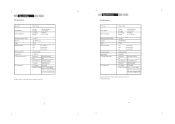
... (369~803 MHz) Design, specifications and manual are subject to B (57~129MHz) VHF-H ch. Specification 1093 Specification TV system AC/DC Adapter Power consumption Operating temperature range Dimension Weight Channel Coverage Antenna Impedance Tuning System TFT Panel Characteristic DTV Characteristic...69 (369~803 MHz) Design, specifications and manual are subject to change without prior notice. Specification 7093 Specification TV system AC/DC Adapter Power consumption Operating temperature range Dimension Weight Channel Coverage Antenna Impedance Tuning System TFT Panel ...
... (369~803 MHz) Design, specifications and manual are subject to B (57~129MHz) VHF-H ch. Specification 1093 Specification TV system AC/DC Adapter Power consumption Operating temperature range Dimension Weight Channel Coverage Antenna Impedance Tuning System TFT Panel Characteristic DTV Characteristic...69 (369~803 MHz) Design, specifications and manual are subject to change without prior notice. Specification 7093 Specification TV system AC/DC Adapter Power consumption Operating temperature range Dimension Weight Channel Coverage Antenna Impedance Tuning System TFT Panel ...


