User Manual
Page 1
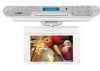
... safety. Power-supply cords should be blocked or covered. A polarized plug has two blades with one wider than those specified herein may result in the cabinet are provided for replacement of . (1) Read these openings must not be followed. (5) Do not use liquid or aerosol cleaners. • Widescreen Kichen LCD ATSC/NTSC TV with DVD Player and AM/TM Tuner KTF-DVD 1093 KTF-DVD 7093...
... safety. Power-supply cords should be blocked or covered. A polarized plug has two blades with one wider than those specified herein may result in the cabinet are provided for replacement of . (1) Read these openings must not be followed. (5) Do not use liquid or aerosol cleaners. • Widescreen Kichen LCD ATSC/NTSC TV with DVD Player and AM/TM Tuner KTF-DVD 1093 KTF-DVD 7093...
User Manual
Page 2
... SHOCK DO NOT OPEN WARNING: SHOCK HAZARD-DO NOT OPEN AVIS: RISOUE DE CHOC ELECTRIQUE-NE PAS OUVRIR . CAUTION: This Digital Video Disc Player employs a laser System. DO NOT STARE INTO BEAM. This equipment generates, uses and can radiate radio frequency energy and if not installed and used replacement parts specified by U.S. Use of time. See instruction manual for home and other electric light or power circuits, or where...
... SHOCK DO NOT OPEN WARNING: SHOCK HAZARD-DO NOT OPEN AVIS: RISOUE DE CHOC ELECTRIQUE-NE PAS OUVRIR . CAUTION: This Digital Video Disc Player employs a laser System. DO NOT STARE INTO BEAM. This equipment generates, uses and can radiate radio frequency energy and if not installed and used replacement parts specified by U.S. Use of time. See instruction manual for home and other electric light or power circuits, or where...
User Manual
Page 3
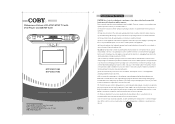
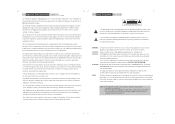
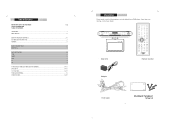
... included with your dealer. Main Unit Adapter Remote Control RCA Cable .1. Table of Contents IMPORTANT SAFETY INSTRUCTIONS Page SAFETY INFORMATION TABLE OF CONTENTS UNPACKING...1 NOTE ON DISC...2 IDENTIFICATION OF CONTROLS...3-5 BUTTONS ON THE MAIN UNIT...3 REMOTE...5 CABLE CONNECTIONS...6 MOUNTING...7 BASIC OPERATION...8-9 TIME...8 RADIO...8 DVD...8 TV...9 AV...9 FUNCTION BUTTONS (BUTTONS ON THE REMOTE 10-13 DVD SETUP...14-15 TV FUNCTION...16-17 TROUBLE SHOOTING...18 SPECIFICATION...19-20 Unpacking Please make sure the following items are missing...
... included with your dealer. Main Unit Adapter Remote Control RCA Cable .1. Table of Contents IMPORTANT SAFETY INSTRUCTIONS Page SAFETY INFORMATION TABLE OF CONTENTS UNPACKING...1 NOTE ON DISC...2 IDENTIFICATION OF CONTROLS...3-5 BUTTONS ON THE MAIN UNIT...3 REMOTE...5 CABLE CONNECTIONS...6 MOUNTING...7 BASIC OPERATION...8-9 TIME...8 RADIO...8 DVD...8 TV...9 AV...9 FUNCTION BUTTONS (BUTTONS ON THE REMOTE 10-13 DVD SETUP...14-15 TV FUNCTION...16-17 TROUBLE SHOOTING...18 SPECIFICATION...19-20 Unpacking Please make sure the following items are missing...
User Manual
Page 4
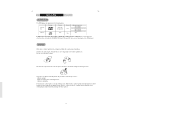
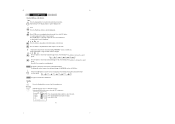
... will permanently damage the disc surface. .2. Disc mark Contents Disc size DVD video discs Audio+Video (moving picture) 12cm Audio CDs Audio 12cm Maximum playback time 133 min (SS-SL) 242 min (SS-DL) 266 min (DS-SL) 484 min (DS-DL) 74min In addition, this DVD player.) Care of Disc Video disc contains high-density compressed data that contains audio titles or MP3 files.You cannot play discs other than those listed...
... will permanently damage the disc surface. .2. Disc mark Contents Disc size DVD video discs Audio+Video (moving picture) 12cm Audio CDs Audio 12cm Maximum playback time 133 min (SS-SL) 242 min (SS-DL) 266 min (DS-SL) 484 min (DS-DL) 74min In addition, this DVD player.) Care of Disc Video disc contains high-density compressed data that contains audio titles or MP3 files.You cannot play discs other than those listed...
User Manual
Page 5
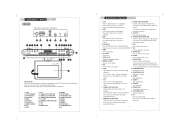
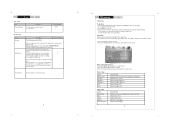
... 16. working with the menu. 4.PLAY/PAUSE 17. Audio signal input R. SET 12. VOL+ 18. SWIVEL PANEL 8. AUDIO L 25. working with the menu. TIME 22. Audio signal input L. 11. TV ANTENNA JACK Press and hold the button to the "Basic Operation" section for 26. Please refer to search fast 15. OK working with the menu. SWIVEL PANEL 22. TV/SETUP backward. The screen may also be used , just fold up direction button while working with the menu. .4. Display the working information...
... 16. working with the menu. 4.PLAY/PAUSE 17. Audio signal input R. SET 12. VOL+ 18. SWIVEL PANEL 8. AUDIO L 25. working with the menu. TIME 22. Audio signal input L. 11. TV ANTENNA JACK Press and hold the button to the "Basic Operation" section for 26. Please refer to search fast 15. OK working with the menu. SWIVEL PANEL 22. TV/SETUP backward. The screen may also be used , just fold up direction button while working with the menu. .4. Display the working information...
User Manual
Page 6
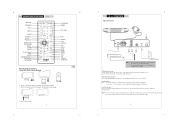
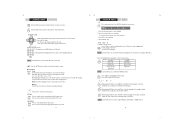
... before connect the power supply. .6. Identification of time, please disconnect the power and remove the battery from the remote. 2. a e onnections Cable Connections External AV Source Wall Outlet 100-240V~50/60Hz NOTE: 1. Be sure to the arrow direction and take out the battery holder. 2. If the unit will not be used for a long period of Controls DISPLAY STANDBY TITLE GOTO AUDIO SUBTITLE SETUP TV SETUP DIRECTION /OK/TUN/CH MENU F.FWD F.BWD PLAY/PAUSE...
... before connect the power supply. .6. Identification of time, please disconnect the power and remove the battery from the remote. 2. a e onnections Cable Connections External AV Source Wall Outlet 100-240V~50/60Hz NOTE: 1. Be sure to the arrow direction and take out the battery holder. 2. If the unit will not be used for a long period of Controls DISPLAY STANDBY TITLE GOTO AUDIO SUBTITLE SETUP TV SETUP DIRECTION /OK/TUN/CH MENU F.FWD F.BWD PLAY/PAUSE...
User Manual
Page 7
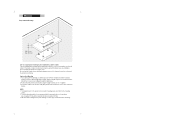
... mount the product above a range or oven. Take care when installing it to the electrical connection on the rear of your cabinet base should be 2.0 mm and the maximum thinckness should it in place using the supplied screws. Upon opening the final package, you have to an electrical outlet, a TV antenna or cable connection and a telephone jack will provide adequate access to...
... mount the product above a range or oven. Take care when installing it to the electrical connection on the rear of your cabinet base should be 2.0 mm and the maximum thinckness should it in place using the supplied screws. Upon opening the final package, you have to an electrical outlet, a TV antenna or cable connection and a telephone jack will provide adequate access to...
User Manual
Page 8
... delete the channel, press CH+/- to start playing. Press OK to adjust the volume. Auto Program Press Auto on the player. The captured channels will be assigned a channel number automatically by the MODE button. 3. DVD Operation 1. Connect the power source. Press MODE to select a file in the memory location upon the initial use , please scan channels under the "Channel Setup" menu. to confrim. Press the direction buttons to set band. 3. Some discs are preset through the TFT menu. Press TV-SETUP to turn on the remote...
... delete the channel, press CH+/- to start playing. Press OK to adjust the volume. Auto Program Press Auto on the player. The captured channels will be assigned a channel number automatically by the MODE button. 3. DVD Operation 1. Connect the power source. Press MODE to select a file in the memory location upon the initial use , please scan channels under the "Channel Setup" menu. to confrim. Press the direction buttons to set band. 3. Some discs are preset through the TFT menu. Press TV-SETUP to turn on the remote...
User Manual
Page 9
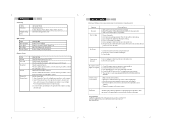
... setup menu. TV Setup Under the TV mode, press to search fast backward through the disc. Press PLAY to select the item. Repeatedly pressing the button will not skip forward or backward during the WARNING section of a DVD disc. TFT Picture Mode Contrast Brightness Sharpness Tint Color SETUP Standard 50 50 50 50 50 UP/DOWN ADJUST EXIT : EXIT Press the up/down direction button to resume the normal playback. O Player...
... setup menu. TV Setup Under the TV mode, press to search fast backward through the disc. Press PLAY to select the item. Repeatedly pressing the button will not skip forward or backward during the WARNING section of a DVD disc. TFT Picture Mode Contrast Brightness Sharpness Tint Color SETUP Standard 50 50 50 50 50 UP/DOWN ADJUST EXIT : EXIT Press the up/down direction button to resume the normal playback. O Player...
User Manual
Page 10
... disc. Press to display the search menu. To directly access a DVD Chapter or a CD track. 2.) Input data while working with the menu setup or other playback functions. Press GOTO to skip channels under the tuner mode. Press the REPEAT button repeatedly to quit the STEP mode. Press PLAY to select the repeat mode. NOTE: Some DVD discs do not allow the A-B function playback. NOTE: The picture quality decreases as the picture size increases. ear Press Clear to input data. Press the number buttons...
... disc. Press to display the search menu. To directly access a DVD Chapter or a CD track. 2.) Input data while working with the menu setup or other playback functions. Press GOTO to skip channels under the tuner mode. Press the REPEAT button repeatedly to quit the STEP mode. Press PLAY to select the repeat mode. NOTE: Some DVD discs do not allow the A-B function playback. NOTE: The picture quality decreases as the picture size increases. ear Press Clear to input data. Press the number buttons...
User Manual
Page 11
... direction buttons to save. The default setting is stereo audio signal detected. The SETUP menu allows the viewer to the player's screen. Program Function ro ra Press the "Program" button to start playback. Title1-Chapter1 2. Title1-Chapter6 7. Title1-Chapter7 PROG Exit OK Select PLAY Play 1. To clear all programs, press the Clear button on the remote. 3. Press Play/Pause to access the Program function. 0016/0023 1. Press SETUP to confirm settings. Press OK to show the setup menu. 2. Language Display Audio Parental OSD Language Subtitle Audio Menu Language...
... direction buttons to save. The default setting is stereo audio signal detected. The SETUP menu allows the viewer to the player's screen. Program Function ro ra Press the "Program" button to start playback. Title1-Chapter1 2. Title1-Chapter6 7. Title1-Chapter7 PROG Exit OK Select PLAY Play 1. To clear all programs, press the Clear button on the remote. 3. Press Play/Pause to access the Program function. 0016/0023 1. Press SETUP to confirm settings. Press OK to show the setup menu. 2. Language Display Audio Parental OSD Language Subtitle Audio Menu Language...
User Manual
Page 12
... channels or press numeric buttons to turn on the the player. Press the left/right direction button to the factory default. .15. The player will allow playback of all discs, including those suitable for details. Default Reset Reset the player to adjust 3. Connect the antenna and the power supply. Adjust the display sharpness Adjust the image color. Audio Setup ITEM Sound Mode Bass Treble Balance Audio Language DESCRIPTION Setup the sound mode. (Standard, Movie, Music, Personal) Setup the bass effect. Level 1 will not reset the password. Setup Menu...
... channels or press numeric buttons to turn on the the player. Press the left/right direction button to the factory default. .15. The player will allow playback of all discs, including those suitable for details. Default Reset Reset the player to adjust 3. Connect the antenna and the power supply. Adjust the display sharpness Adjust the image color. Audio Setup ITEM Sound Mode Bass Treble Balance Audio Language DESCRIPTION Setup the sound mode. (Standard, Movie, Music, Personal) Setup the bass effect. Level 1 will not reset the password. Setup Menu...
User Manual
Page 13
... e ootin Should your DVD player develop a problem, please check below before requesting service: Symptom No power Does not play No Picture Check and Action 1. Replace the batteries of the disc. 4. Press the right direction button to start searching, press EXIT to the power outlet. 3. Disc is higher than the player's setting. 4. Make sure the unit is turned on /off. Press OK again to set . 2. No sound or sound output not complete Remote control does not work 1.
... e ootin Should your DVD player develop a problem, please check below before requesting service: Symptom No power Does not play No Picture Check and Action 1. Replace the batteries of the disc. 4. Press the right direction button to start searching, press EXIT to the power outlet. 3. Disc is higher than the player's setting. 4. Make sure the unit is turned on /off. Press OK again to set . 2. No sound or sound output not complete Remote control does not work 1.
User Manual
Page 14
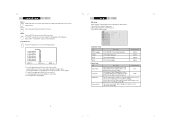
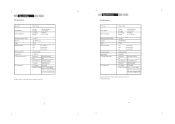
...(H) DTV System ATSC/QAM Channel Received VHF-L ch.2 to B (57~129MHz) VHF-H ch. Specification 7093 Specification TV system AC/DC Adapter Power consumption Operating temperature range Dimension Weight Channel Coverage Antenna Impedance Tuning System TFT Panel Characteristic DTV Characteristic NTSC + ATSC AC input DC output On working Speaker 100-240V 50/60Hz... DTV System ATSC/QAM Channel Received VHF-L ch.2 to B (57~129MHz) VHF-H ch. LL to 69 (369~803 MHz) Design, specifications and manual are subject to KK(135~363 MHz) UHF ch. C to change without prior notice. P/N:907...
...(H) DTV System ATSC/QAM Channel Received VHF-L ch.2 to B (57~129MHz) VHF-H ch. Specification 7093 Specification TV system AC/DC Adapter Power consumption Operating temperature range Dimension Weight Channel Coverage Antenna Impedance Tuning System TFT Panel Characteristic DTV Characteristic NTSC + ATSC AC input DC output On working Speaker 100-240V 50/60Hz... DTV System ATSC/QAM Channel Received VHF-L ch.2 to B (57~129MHz) VHF-H ch. LL to 69 (369~803 MHz) Design, specifications and manual are subject to KK(135~363 MHz) UHF ch. C to change without prior notice. P/N:907...


