User Manual
Page 1
TV-to-Go USB Receiver for ATSC Mobile DTV DTV111 User Manual Please read this manual carefully before operation www.cobyusa.com
TV-to-Go USB Receiver for ATSC Mobile DTV DTV111 User Manual Please read this manual carefully before operation www.cobyusa.com
User Manual
Page 2
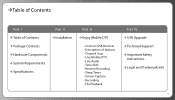
Table of Contents Part I Table of buttons - Connect USB Receiver - Description of Contents Package Contents Hardware Components System Requirements Speci cations Part II Installation Part III Enjoy Mobile DTV - Channel Scan - Screen Capture - File Playback Part IV S/W Upgrade Technical Support Important Safety Instructions Legal and Trademark Info 1 Reserve Recording - Sleep Timer - Time Shift - Recording - Live Audio - Live Mobile DTV -
Table of Contents Part I Table of buttons - Connect USB Receiver - Description of Contents Package Contents Hardware Components System Requirements Speci cations Part II Installation Part III Enjoy Mobile DTV - Channel Scan - Screen Capture - File Playback Part IV S/W Upgrade Technical Support Important Safety Instructions Legal and Trademark Info 1 Reserve Recording - Sleep Timer - Time Shift - Recording - Live Audio - Live Mobile DTV -
User Manual
Page 3
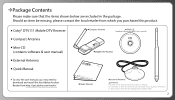
... base of the external antenna contains a magnet. Package Contents Please make sure that may be missing, please contact the local retailer from which you may need to download and install the free Adobe Acrobat Reader from http://get.adobe.com/reader/. Coby® DTV111 Mobile DTV Receiver Compact Antenna Mini-CD (contains software & user manual) External Antenna Quick Manual To view the user manual, you purchased this product.
... base of the external antenna contains a magnet. Package Contents Please make sure that may be missing, please contact the local retailer from which you may need to download and install the free Adobe Acrobat Reader from http://get.adobe.com/reader/. Coby® DTV111 Mobile DTV Receiver Compact Antenna Mini-CD (contains software & user manual) External Antenna Quick Manual To view the user manual, you purchased this product.
User Manual
Page 4
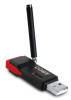
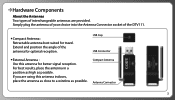
... Connector 3 USB Cap USB Connector External Antenna : Use this antenna indoors, place the antenna as close to a window as possible. For best results, place the antenna in a position as high as possible. Extend and position the angle of the DTV111. Compact Antenna : Retractable antenna best suited for better signal reception. If you are provided. Hardware Components About the...
... Connector 3 USB Cap USB Connector External Antenna : Use this antenna indoors, place the antenna as close to a window as possible. For best results, place the antenna in a position as high as possible. Extend and position the angle of the DTV111. Compact Antenna : Retractable antenna best suited for better signal reception. If you are provided. Hardware Components About the...
User Manual
Page 5
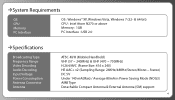
... Windows® XP, Windows Vista, Windows 7 (32- & 64-bit) CPU : Intel Atom N270 or above Memory : 1GB PC Interface : USB 2.0 Speci cations Broadcasting Type Frequency Range Video Decoding Audio Decoding Input Voltage Power ...Consumption Antenna Connector Antenna ATSC-M/H (Mobile/Handheld) VHF (57 ~ 240MHz) & UHF (470 ~ 700MHz) H.264/AVC (Frame Size: 416 x 240) HE AAC+ v2 (Sampling Range: 24KHz/48KHz/Stereo/Mono - Stereo) DC 5V Under 140 mA(Max) / Average 80mA in Power Saving Mode (NOG3) AMB Type Detachable Compact Antenna & External Antenna (5M) support...
... Windows® XP, Windows Vista, Windows 7 (32- & 64-bit) CPU : Intel Atom N270 or above Memory : 1GB PC Interface : USB 2.0 Speci cations Broadcasting Type Frequency Range Video Decoding Audio Decoding Input Voltage Power ...Consumption Antenna Connector Antenna ATSC-M/H (Mobile/Handheld) VHF (57 ~ 240MHz) & UHF (470 ~ 700MHz) H.264/AVC (Frame Size: 416 x 240) HE AAC+ v2 (Sampling Range: 24KHz/48KHz/Stereo/Mono - Stereo) DC 5V Under 140 mA(Max) / Average 80mA in Power Saving Mode (NOG3) AMB Type Detachable Compact Antenna & External Antenna (5M) support...
User Manual
Page 6
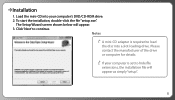
The Setup Wizard screen shown below will appear as simply "setup". 5 Notes 1. A mini-CD adapter is set to hide le extensions, the installation le will appear. 3. Load the mini-CD into a slot-loading drive. Click 'Next' to load the disc into your computer is required to continue. Please contact the manufacturer of the drive or computer for details. 2. To start the installation, double-click the le "setup.exe". If your computer's DVD/CD-ROM drive. 2. Installation 1.
The Setup Wizard screen shown below will appear as simply "setup". 5 Notes 1. A mini-CD adapter is set to hide le extensions, the installation le will appear. 3. Load the mini-CD into a slot-loading drive. Click 'Next' to load the disc into your computer is required to continue. Please contact the manufacturer of the drive or computer for details. 2. To start the installation, double-click the le "setup.exe". If your computer's DVD/CD-ROM drive. 2. Installation 1.
User Manual
Page 7
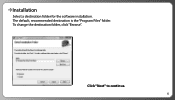
Click "Next" to continue. 6 Installation Select a destination folder for the software installation. The default, recommended destination is the "Program Files" folder. To change the destination folder, click "Browse".
Click "Next" to continue. 6 Installation Select a destination folder for the software installation. The default, recommended destination is the "Program Files" folder. To change the destination folder, click "Browse".

User Manual
Page 10
When this window appears, plug the DTV111 into your system for the Coby DTV111 device. Installation The installer will examine your computer's USB port. 9
When this window appears, plug the DTV111 into your system for the Coby DTV111 device. Installation The installer will examine your computer's USB port. 9
User Manual
Page 11
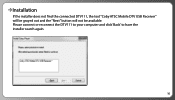
Installation If the installer does not nd the connected DTV111, the text "Coby ATSC Mobile DTV USB Receiver" will be grayed out and the "Next" button will not be available. Please connect or reconnect the DTV111 to your computer and click 'Back' to have the installer search again. 10
Installation If the installer does not nd the connected DTV111, the text "Coby ATSC Mobile DTV USB Receiver" will be grayed out and the "Next" button will not be available. Please connect or reconnect the DTV111 to your computer and click 'Back' to have the installer search again. 10
User Manual
Page 15
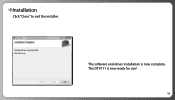
The software and driver installation is now ready for use! 14 Installation Click "Close" to exit the installer. The DTV111 is now complete.
The software and driver installation is now ready for use! 14 Installation Click "Close" to exit the installer. The DTV111 is now complete.
User Manual
Page 22
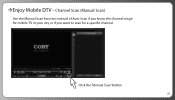
Channel Scan (Manual Scan) Use the Manual Scan function instead of Auto Scan if you know the channel range for mobile TV in your city or if you want to scan for a speci c channel. Click the 'Manual Scan' Button 21 Enjoy Mobile DTV -
Channel Scan (Manual Scan) Use the Manual Scan function instead of Auto Scan if you know the channel range for mobile TV in your city or if you want to scan for a speci c channel. Click the 'Manual Scan' Button 21 Enjoy Mobile DTV -

User Manual
Page 26
Enjoy Mobile DTV - Live Audio To listen to it. This is not available, the Audio Channel List icon will not be selectable. 25 If Live Audio service is an audio-only broadcast that TV stations may use to display the Audio Channel List. 2. What is Live Audio? Double-click an audio channel to listen to Live Audio broadcasts : 1. Click the "Audio Channel List" icon marked below to provide you with news, sports, and weather updates, music, and emergency information.
Enjoy Mobile DTV - Live Audio To listen to it. This is not available, the Audio Channel List icon will not be selectable. 25 If Live Audio service is an audio-only broadcast that TV stations may use to display the Audio Channel List. 2. What is Live Audio? Double-click an audio channel to listen to Live Audio broadcasts : 1. Click the "Audio Channel List" icon marked below to provide you with news, sports, and weather updates, music, and emergency information.
User Manual
Page 27
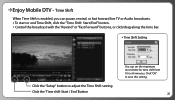
Time Shift When Time Shift is enabled, you can set the maximum record time for time shift from 10 to 60 minutes. To start or end Time Shift, click the "Time Shift: Start/End" button. Click "OK" to adjust the Time Shift setting. Control the broadcast with the "Rewind" or "Fast Forward" buttons, or click/drag along the time bar. Time Shift Setting Click the "Setup" button to save this setting. 26 Click the 'Time shift Start / End' Button You can pause, rewind, or fast forward live TV or Audio broadcasts. Enjoy Mobile DTV -
Time Shift When Time Shift is enabled, you can set the maximum record time for time shift from 10 to 60 minutes. To start or end Time Shift, click the "Time Shift: Start/End" button. Click "OK" to adjust the Time Shift setting. Control the broadcast with the "Rewind" or "Fast Forward" buttons, or click/drag along the time bar. Time Shift Setting Click the "Setup" button to save this setting. 26 Click the 'Time shift Start / End' Button You can pause, rewind, or fast forward live TV or Audio broadcasts. Enjoy Mobile DTV -
User Manual
Page 30
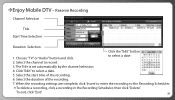
... delete a recording, click a recording in the Recording Scheduler, then click "Delete". Choose "TV" or "Audio" button and click. To exit, click "Exit". 29 Select the start time of the recording. 7. to the Recording Scheduler. Select the duration of the recording. 6. The Title is set automatically by the channel selection. 4. When the recording settings are complete, click 'Insert' to enter the recording to select a date : 2. Reserve Recording Channel Selection Title Start Time...
... delete a recording, click a recording in the Recording Scheduler, then click "Delete". Choose "TV" or "Audio" button and click. To exit, click "Exit". 29 Select the start time of the recording. 7. to the Recording Scheduler. Select the duration of the recording. 6. The Title is set automatically by the channel selection. 4. When the recording settings are complete, click 'Insert' to enter the recording to select a date : 2. Reserve Recording Channel Selection Title Start Time...
User Manual
Page 31
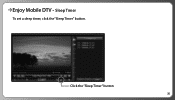
Enjoy Mobile DTV - Sleep Timer To set a sleep timer, click the "Sleep Timer" button. Click the "Sleep Timer" button 30
Enjoy Mobile DTV - Sleep Timer To set a sleep timer, click the "Sleep Timer" button. Click the "Sleep Timer" button 30
User Manual
Page 32
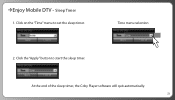
At the end of the sleep timer, the Coby Player software will quit automatically. 31 Click the "Apply" button to set the sleep timer. Time menu selection 2. Click on the "Time" menu to start the sleep timer. Enjoy Mobile DTV - Sleep Timer 1.
At the end of the sleep timer, the Coby Player software will quit automatically. 31 Click the "Apply" button to set the sleep timer. Time menu selection 2. Click on the "Time" menu to start the sleep timer. Enjoy Mobile DTV - Sleep Timer 1.

User Manual
Page 36
Enjoy Mobile DTV - The recording will start once you click "Save". 35 Recording Notes Recordings may only be played with external MP4/media players or devices. Recordings cannot be played within the program (see page 36 for playback instructions).
Enjoy Mobile DTV - The recording will start once you click "Save". 35 Recording Notes Recordings may only be played with external MP4/media players or devices. Recordings cannot be played within the program (see page 36 for playback instructions).
User Manual
Page 39
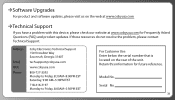
If these resources do not resolve the problem, please contact Technical Support. Serial No. 38 Model No. Software Upgrades For product and software updates, please visit us on the rear of the unit. Retain this device, please check our website at www.cobyusa.com Technical Support If you have a problem with this information for Frequently Asked Questions (FAQ) and product updates. For Customer Use: Enter below the serial number that is located on the web at www.cobyusa.com for future reference.
If these resources do not resolve the problem, please contact Technical Support. Serial No. 38 Model No. Software Upgrades For product and software updates, please visit us on the rear of the unit. Retain this device, please check our website at www.cobyusa.com Technical Support If you have a problem with this information for Frequently Asked Questions (FAQ) and product updates. For Customer Use: Enter below the serial number that is located on the web at www.cobyusa.com for future reference.

User Manual
Page 41
... never be placed in a built-in installation such as opening or removing covers may touch dangerous voltage points or shout-out parts that could result in to your home, consult your product dealer or local power company. If you to the operating instructions 10. Never spill liquid of power supply to this product through openings as this product yourself as a bookcase or rack unless...
... never be placed in a built-in installation such as opening or removing covers may touch dangerous voltage points or shout-out parts that could result in to your home, consult your product dealer or local power company. If you to the operating instructions 10. Never spill liquid of power supply to this product through openings as this product yourself as a bookcase or rack unless...
User Manual
Page 42
... as improper adjustment of any way; Heat: The product should be sure that produce heat. 41 Adjust only those controls that are required, be situated away from the wall outlet and refer servicing to quali ed service personnel under the following the operating instructions. Safety Check: Upon completion of other products (including ampli ers) that your service technician has used replacement parts speci ed...
... as improper adjustment of any way; Heat: The product should be sure that produce heat. 41 Adjust only those controls that are required, be situated away from the wall outlet and refer servicing to quali ed service personnel under the following the operating instructions. Safety Check: Upon completion of other products (including ampli ers) that your service technician has used replacement parts speci ed...


