

User Guide
Page 3
... 8 Placement Options 8 Desktop Placement 8 Rack-Mount Placement 8 Hardware Installation 9 Configuring the Switch 9 Chapter 4: Configuration Using the Console Interface 10 Overview 10 Configuring the HyperTerminal Application 10 Connecting to the Switch through a Telnet Session 10 Configuring the Switch through the Console Interface 11 Switch Main Menu 11 System Configuration Menu 11 Port Status 18 Port Configuration 19...
... 8 Placement Options 8 Desktop Placement 8 Rack-Mount Placement 8 Hardware Installation 9 Configuring the Switch 9 Chapter 4: Configuration Using the Console Interface 10 Overview 10 Configuring the HyperTerminal Application 10 Connecting to the Switch through a Telnet Session 10 Configuring the Switch through the Console Interface 11 Switch Main Menu 11 System Configuration Menu 11 Port Status 18 Port Configuration 19...

User Guide
Page 10
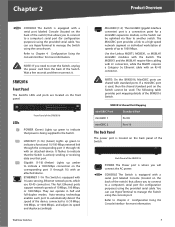
... CONSOLE The Switch is equipped with a serial port labeled Console (located on the back of the switch) that allows you to connect to a computer's serial port (for a miniGBIC expansion module, so the Switch can be used. LINK/ACT (1-24) (Green/Amber) Lights up to manage the Switch ...using the provided serial cable. They can use RJ-45 connectors. WebView Switches MiniGBIC (1-2) The miniGBIC (gigabit interface converter) port is a connection point for configuration purposes) using the console port. NOTE: On the SRW2024, MiniGBIC...
... CONSOLE The Switch is equipped with a serial port labeled Console (located on the back of the switch) that allows you to connect to a computer's serial port (for a miniGBIC expansion module, so the Switch can be used. LINK/ACT (1-24) (Green/Amber) Lights up to manage the Switch ...using the provided serial cable. They can use RJ-45 connectors. WebView Switches MiniGBIC (1-2) The miniGBIC (gigabit interface converter) port is a connection point for configuration purposes) using the console port. NOTE: On the SRW2024, MiniGBIC...
User Guide
Page 11
... a computer's serial port (for configuration purposes) using the console port. They can use HyperTerminal to the Switch. If a miniGBIC port is used . CONSOLE The Switch is equipped with a serial port labeled Console (located on the back panel of the switch) that power is being supplied to manage the Switch using the provided serial cable. Front Panel of the...
... a computer's serial port (for configuration purposes) using the console port. They can use HyperTerminal to the Switch. If a miniGBIC port is used . CONSOLE The Switch is equipped with a serial port labeled Console (located on the back panel of the switch) that power is being supplied to manage the Switch using the provided serial cable. Front Panel of the...
User Guide
Page 13
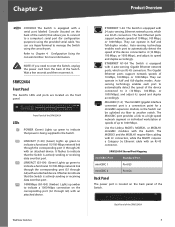
...100 Mbps, or 1000 Mbps), and adjust its speed and duplex accordingly. Chapter 2 Product Overview CONSOLE The Switch is equipped with a serial port labeled Console (located on the back of the switch) that allows you need to indicate a functional 10/100-Mbps network link through the corresponding port ...(G1 through G4) with an attached device. You can operate in half and full-duplex modes. Refer to manage the Switch using ...
...100 Mbps, or 1000 Mbps), and adjust its speed and duplex accordingly. Chapter 2 Product Overview CONSOLE The Switch is equipped with a serial port labeled Console (located on the back of the switch) that allows you need to indicate a functional 10/100-Mbps network link through the corresponding port ...(G1 through G4) with an attached device. You can operate in half and full-duplex modes. Refer to manage the Switch using ...
User Guide
Page 14
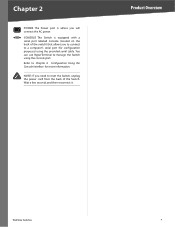
... you will connect the AC power. Wait a few seconds and then reconnect it. Product Overview WebView Switches 7 You can use HyperTerminal to Chapter 4: Configuration Using the Console Interface for configuration purposes) using the console port. Refer to manage the Switch using the provided serial cable. Chapter 2 POWER The Power port is equipped with a serial port...
... you will connect the AC power. Wait a few seconds and then reconnect it. Product Overview WebView Switches 7 You can use HyperTerminal to Chapter 4: Configuration Using the Console Interface for configuration purposes) using the console port. Refer to manage the Switch using the provided serial cable. Chapter 2 POWER The Power port is equipped with a serial port...

User Guide
Page 16
...other network device. 4. If a port has an active Gigabit connection, then its corresponding Gigabit LED will use the Switch's console interface to configure the Switch, then connect the supplied serial cable to your PC's serial port. (This PC must be running the VT100 terminal ...1U high rack, follow these instructions: 1. WARNING: Make sure you . 2. To use the Switch's console interface to configure the Switch, proceed to one side of a different power cord could damage the Switch. 8. Wait a few seconds and then reconnect it. Attach the Brackets to Chapter 5: Advanced ...
...other network device. 4. If a port has an active Gigabit connection, then its corresponding Gigabit LED will use the Switch's console interface to configure the Switch, then connect the supplied serial cable to your PC's serial port. (This PC must be running the VT100 terminal ...1U high rack, follow these instructions: 1. WARNING: Make sure you . 2. To use the Switch's console interface to configure the Switch, proceed to one side of a different power cord could damage the Switch. 8. Wait a few seconds and then reconnect it. Attach the Brackets to Chapter 5: Advanced ...

User Guide
Page 17
... > HyperTerminal. 4. The Login screen appears. Enter admin in the next chapter. This chapter describes console interface configuration. Select a port to the Switch through a Telnet Session Open a command-line editor and enter telnet 192.168.1.254. Enter a name... port settings as follows: 1. Chapter 4 Configuration Using the Console Interface Chapter 4: Configuration Using the Console Interface Overview The Switch features a menu-driven console interface for basic configuration of the Switch and management of connection is covered in the User Name field. Configuration ...
... > HyperTerminal. 4. The Login screen appears. Enter admin in the next chapter. This chapter describes console interface configuration. Select a port to the Switch through a Telnet Session Open a command-line editor and enter telnet 192.168.1.254. Enter a name... port settings as follows: 1. Chapter 4 Configuration Using the Console Interface Chapter 4: Configuration Using the Console Interface Overview The Switch features a menu-driven console interface for basic configuration of the Switch and management of connection is covered in the User Name field. Configuration ...
User Guide
Page 18
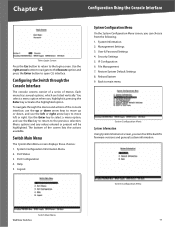
... Switch's firmware versions and general system information. pressing the Enter key activates the highlighted option. System Information 2. Port Status 3. Help 5. To navigate through the Console Interface The console screens consist of a series of menus. User & Password Settings 4. Chapter 4 Configuration Using the Console...Configuration Menu System Information Using System Information screen, you can choose from the following: 1. Management Settings 3. Reboot System 9. Configuring the Switch through the menus and actions of the screen lists the actions available.
... Switch's firmware versions and general system information. pressing the Enter key activates the highlighted option. System Information 2. Port Status 3. Help 5. To navigate through the Console Interface The console screens consist of a series of menus. User & Password Settings 4. Chapter 4 Configuration Using the Console...Configuration Menu System Information Using System Information screen, you can choose from the following: 1. Management Settings 3. Reboot System 9. Configuring the Switch through the menus and actions of the screen lists the actions available.

User Guide
Page 19
... press the Enter key. To exit, select Quit and press the Enter key. Management Settings Menu Serial Port Configuration The Serial Port Configuration screen displays the Switch's baud rate. Select Save and press the Enter key to save your changes. ... menu. Management Settings From the Management Settings screen, you can set the following options: •• Serial Port Session Configuration •• Telnet Session Configuration •• Secure Telnet (SSH) Configuration. WebView Switches 12 Chapter 4 Configuration Using the Console Interface Versions...
... press the Enter key. To exit, select Quit and press the Enter key. Management Settings Menu Serial Port Configuration The Serial Port Configuration screen displays the Switch's baud rate. Select Save and press the Enter key to save your changes. ... menu. Management Settings From the Management Settings screen, you can set the following options: •• Serial Port Session Configuration •• Telnet Session Configuration •• Secure Telnet (SSH) Configuration. WebView Switches 12 Chapter 4 Configuration Using the Console Interface Versions...

User Guide
Page 20
SSH Status The SSH Status screen displays whether the SSH Server is entered in the value. WebView Switches 13 SSH Server Configuration On the SSH Server Configuration screen, you may enter a value of 0 sec. To exit, select Quit and press the Enter ...session to save your changes. When your changes are complete, press the Esc key to return to save your changes. Chapter 4 Configuration Using the Console Interface Telnet Configuration The Telnet Configuration screen displays the timeout value. Select Save and press the Enter key to the Action menu. The SSH Server...
SSH Status The SSH Status screen displays whether the SSH Server is entered in the value. WebView Switches 13 SSH Server Configuration On the SSH Server Configuration screen, you may enter a value of 0 sec. To exit, select Quit and press the Enter ...session to save your changes. When your changes are complete, press the Esc key to return to save your changes. Chapter 4 Configuration Using the Console Interface Telnet Configuration The Telnet Configuration screen displays the timeout value. Select Save and press the Enter key to the Action menu. The SSH Server...

User Guide
Page 21
... key to save your changes are complete, press the Esc key to return to configure security settings on the Switch, as well as generate and display the certificate. Chapter 4 Configuration Using the Console Interface SSH Crypto Key Generation On the SSH Crypto Key Generation screen, you can also be modified. When your...
... key to save your changes are complete, press the Esc key to return to configure security settings on the Switch, as well as generate and display the certificate. Chapter 4 Configuration Using the Console Interface SSH Crypto Key Generation On the SSH Crypto Key Generation screen, you can also be modified. When your...

User Guide
Page 22
... setting has no effect when Management Access Rules are prompted for confirmation. Chapter 4 Configuration Using the Console Interface SSL Certificate Generation Use the Certificate Generation screen to display the internal certificate. SSL Certificate WebView Switches IP Configuration 15 Disable Active Management Profile To disable the active management profile, selecting Disable Active Management Profile from the Security...
... setting has no effect when Management Access Rules are prompted for confirmation. Chapter 4 Configuration Using the Console Interface SSL Certificate Generation Use the Certificate Generation screen to display the internal certificate. SSL Certificate WebView Switches IP Configuration 15 Disable Active Management Profile To disable the active management profile, selecting Disable Active Management Profile from the Security...
User Guide
Page 23
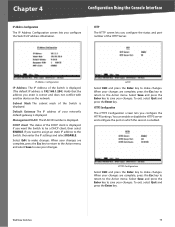
... exit, select Quit and press the Enter key. Default Gateway The IP address of your changes. Management VLAN The VLAN ID number is displayed. If you want the Switch to the Action menu. HTTPS Configuration The HTTPS Configuration screen lets you configure the status and port ... Address of the HTTP Server. HTTPS Configuration Select Edit and press the Enter key to make changes. Chapter 4 Configuration Using the Console Interface IP Address Configuration The IP Address Configuration screen lets you enter is correct and does not conflict with another device on which...
... exit, select Quit and press the Enter key. Default Gateway The IP address of your changes. Management VLAN The VLAN ID number is displayed. If you want the Switch to the Action menu. HTTPS Configuration The HTTPS Configuration screen lets you configure the status and port ... Address of the HTTP Server. HTTPS Configuration Select Edit and press the Enter key to make changes. Chapter 4 Configuration Using the Console Interface IP Address Configuration The IP Address Configuration screen lets you enter is correct and does not conflict with another device on which...

User Guide
Page 24
...complete, press the Esc key to return to contact. Select Save and press the Enter key to begin the ping test. WebView Switches 17 After the traceroute test is complete, the Ping screen displays the IP address, status, and statistics of the traceroute test. When... your changes. Chapter 4 Configuration Using the Console Interface Network Configuration The Network Configuration screen offers a choice of the location you want to the Action menu. Network Configuration Ping The Ping...
...complete, press the Esc key to return to contact. Select Save and press the Enter key to begin the ping test. WebView Switches 17 After the traceroute test is complete, the Ping screen displays the IP address, status, and statistics of the traceroute test. When... your changes. Chapter 4 Configuration Using the Console Interface Network Configuration The Network Configuration screen offers a choice of the location you want to the Action menu. Network Configuration Ping The Ping...

User Guide
Page 25
... image, please follow these steps: 1. Download the new software image. 3. Reboot System File Management Select Edit to cancel. Chapter 4 Configuration Using the Console Interface File Management The File Management screen allows you to continue. You will be sure that only valid entries have edited the ...file, ensure that it is the flow of packet transmissions. You will appear. Press the y key to reboot the Switch, or...
... image, please follow these steps: 1. Download the new software image. 3. Reboot System File Management Select Edit to cancel. Chapter 4 Configuration Using the Console Interface File Management The File Management screen allows you to continue. You will be sure that only valid entries have edited the ...file, ensure that it is the flow of packet transmissions. You will appear. Press the y key to reboot the Switch, or...

User Guide
Page 26
... save your changes. Select Save and press the Enter key to the Action menu. WebView Switches 19 Help Select Help and press the Enter key if you want to configure the Switch's ports. The Port Configuration screen displays the port numbers, their status, auto-negotiation status,... speed and duplex mode, and status of flow control, which is the flow of the console interface. Chapter 4 Configuration Using the Console Interface Port Configuration On the Switch Main Menu screen, select Port Configuration and press the Enter key if you want to view the help ...
... save your changes. Select Save and press the Enter key to the Action menu. WebView Switches 19 Help Select Help and press the Enter key if you want to configure the Switch's ports. The Port Configuration screen displays the port numbers, their status, auto-negotiation status,... speed and duplex mode, and status of flow control, which is the flow of the console interface. Chapter 4 Configuration Using the Console Interface Port Configuration On the Switch Main Menu screen, select Port Configuration and press the Enter key if you want to view the help ...

User Guide
Page 64
..., or interface. The default value is queried. It allows messages to be sorted by monitoring the source address for traffic entering the switch. Console logs are sent per the SYSLOG protocols recommended message format for all ports. The address table can be sorted by default. •&#... Admin > Dynamic Address The Dynamic Address Table contains the MAC addresses learned by address, VLAN, or interface. System Logs record and manage events and report errors or informational messages. VLAN ID Specifies the VLAN ID for which the table is queried. Address Aging Specifies the...
..., or interface. The default value is queried. It allows messages to be sorted by monitoring the source address for traffic entering the switch. Console logs are sent per the SYSLOG protocols recommended message format for all ports. The address table can be sorted by default. •&#... Admin > Dynamic Address The Dynamic Address Table contains the MAC addresses learned by address, VLAN, or interface. System Logs record and manage events and report errors or informational messages. VLAN ID Specifies the VLAN ID for which the table is queried. Address Aging Specifies the...

User Guide
Page 71
...suffix, that the Xmodem protocol is not made within a certain time, the device will need to disconnect the power to the console port. Power on the Switch. 3. to access the Startup menu. Connect the provided null modem cable from the Startup menu: To enter the Startup menu:... 1. Only valid files, with characters running across the screen. The Startup menu procedures can be downloaded to the Console port on your computer and Switch. 2. Select Send File from a terminal connected to restart the process. 6. The menu can be downloaded. Ensure that have ...
...suffix, that the Xmodem protocol is not made within a certain time, the device will need to disconnect the power to the console port. Power on the Switch. 3. to access the Startup menu. Connect the provided null modem cable from the Startup menu: To enter the Startup menu:... 1. Only valid files, with characters running across the screen. The Startup menu procedures can be downloaded to the Console port on your computer and Switch. 2. Select Send File from a terminal connected to restart the process. 6. The menu can be downloaded. Ensure that have ...

User Guide
Page 77
... MAC table size Number of multicast streams and limits bandwidth-intensive video traffic to only the requestors WebView Switches 70 RADIUS Authentication. MD5 Encryption Filtering: MAC-based Link Aggregation using IEEE 802.3ad LACP Up to 8 ports in Web UI ...Embedded Remote Monitoring (RMON) software agent supports four RMON groups (history, statistics, alarms, and events) for enhanced traffic management, monitoring, and analysis Web Browser upgrade (HTTP and TFTP), CLI via console or Telnet, TFTP upgrade Traffic on a port can be mirrored to another port for analysis with 4 shared SFP (...
... MAC table size Number of multicast streams and limits bandwidth-intensive video traffic to only the requestors WebView Switches 70 RADIUS Authentication. MD5 Encryption Filtering: MAC-based Link Aggregation using IEEE 802.3ad LACP Up to 8 ports in Web UI ...Embedded Remote Monitoring (RMON) software agent supports four RMON groups (history, statistics, alarms, and events) for enhanced traffic management, monitoring, and analysis Web Browser upgrade (HTTP and TFTP), CLI via console or Telnet, TFTP upgrade Traffic on a port can be mirrored to another port for analysis with 4 shared SFP (...