

User Guide
Page 2
... Linksys is a registered trademark or trademark of interest and is something that could damage your property or product. and certain other countries. WebView Switches About This Guide ii About This Guide Icon Descriptions While reading through the User Guide you may have to add http:// in the U.S. If... that call attention to specific items. Below is a description of these icons: NOTE: This check mark indicates that there is a note of Cisco Systems, Inc. All rights reserved. WEB: This globe icon indicates a noteworthy website address or e-mail address. Copyright © 2008...
... Linksys is a registered trademark or trademark of interest and is something that could damage your property or product. and certain other countries. WebView Switches About This Guide ii About This Guide Icon Descriptions While reading through the User Guide you may have to add http:// in the U.S. If... that call attention to specific items. Below is a description of these icons: NOTE: This check mark indicates that there is a note of Cisco Systems, Inc. All rights reserved. WEB: This globe icon indicates a noteworthy website address or e-mail address. Copyright © 2008...

User Guide
Page 3
... 4 Front Panel 4 LEDs 4 The Back Panel 4 SRW248G4 5 Front Panel 5 LEDs 5 Back Panel 5 SRW224G4 6 Front Panel 6 LEDs 6 Back Panel 6 Chapter 3: Connecting the Switch 8 Overview 8 Placement Options 8 Desktop Placement 8 Rack-Mount Placement 8 Hardware Installation 9 Configuring the Switch 9 Chapter 4: Configuration Using the Console Interface 10 Overview 10 Configuring the HyperTerminal Application 10 Connecting to the...
... 4 Front Panel 4 LEDs 4 The Back Panel 4 SRW248G4 5 Front Panel 5 LEDs 5 Back Panel 5 SRW224G4 6 Front Panel 6 LEDs 6 Back Panel 6 Chapter 3: Connecting the Switch 8 Overview 8 Placement Options 8 Desktop Placement 8 Rack-Mount Placement 8 Hardware Installation 9 Configuring the Switch 9 Chapter 4: Configuration Using the Console Interface 10 Overview 10 Configuring the HyperTerminal Application 10 Connecting to the...
User Guide
Page 4
WebView Switches Table of Contents Chapter 5: Advanced Configuration 20 Overview 20 Accessing the Web-based Utility 20 Setup > Summary 20 Device Information 20 System Information 21 Setup > ... Set Time 22 Local Time 22 Daylight Saving 22 SNTP Servers 22 Setup > Green Ethernet 23 Port Management > Port Settings 23 Port Settings > Port Configuration 24 Port Management > Link Aggregation 25 Link Aggregation > Detail 25 Port Management > LACP 26 VLAN Management > Create VLAN 26 Single VLAN 26 VLAN Range 26 VLAN Table 26 VLAN...
WebView Switches Table of Contents Chapter 5: Advanced Configuration 20 Overview 20 Accessing the Web-based Utility 20 Setup > Summary 20 Device Information 20 System Information 21 Setup > ... Set Time 22 Local Time 22 Daylight Saving 22 SNTP Servers 22 Setup > Green Ethernet 23 Port Management > Port Settings 23 Port Settings > Port Configuration 24 Port Management > Link Aggregation 25 Link Aggregation > Detail 25 Port Management > LACP 26 VLAN Management > Create VLAN 26 Single VLAN 26 VLAN Range 26 VLAN Table 26 VLAN...

User Guide
Page 5
WebView Switches Table of Contents Security > RADIUS 36 Security > TACACS 37 Security > 802.1x Settings 37 802.1x Settings > Setting Timer 38 Security > Port Security 38 Security > ...
WebView Switches Table of Contents Security > RADIUS 36 Security > TACACS 37 Security > 802.1x Settings 37 802.1x Settings > Setting Timer 38 Security > Port Security 38 Security > ...

User Guide
Page 6
WebView Switches Table of Contents Admin > Static Address 56 Query 56 Admin > Dynamic Address 57 Query 57 Admin > Logging 57 Admin > Port Mirroring 58 Admin > Cable Test ...
WebView Switches Table of Contents Admin > Static Address 56 Query 56 Admin > Dynamic Address 57 Query 57 Admin > Logging 57 Admin > Port Mirroring 58 Admin > Cable Test ...

User Guide
Page 7
Table of Contents User Information for Consumer Products Covered by EU Directive 2002/96/EC on Waste Electric and Electronic Equipment (WEEE 78 Appendix H: Software License Agreement 82 Software in Linksys Products 82 Software Licenses 82 Schedule 1 Linksys Software License Agreement 82 Schedule 2 83 Schedule 3 86 Appendix I: Contact Information 89 WebView Switches v
Table of Contents User Information for Consumer Products Covered by EU Directive 2002/96/EC on Waste Electric and Electronic Equipment (WEEE 78 Appendix H: Software License Agreement 82 Software in Linksys Products 82 Software Licenses 82 Schedule 1 Linksys Software License Agreement 82 Schedule 2 83 Schedule 3 86 Appendix I: Contact Information 89 WebView Switches v
User Guide
Page 8
...or DSCP). Link aggregation allows multiple high-bandwidth trunks between switches to that model. If a specific model number is mentioned, then the feature is specific to be controlled using MAC-based filtering. The Linksys WebView Managed Switch allows you to expand and grow your network of this... manual, whenever a feature applies to build a mesh of switches increasing the availability of the switch is secured using 802.1x security using SSL for Web...
...or DSCP). Link aggregation allows multiple high-bandwidth trunks between switches to that model. If a specific model number is mentioned, then the feature is specific to be controlled using MAC-based filtering. The Linksys WebView Managed Switch allows you to expand and grow your network of this... manual, whenever a feature applies to build a mesh of switches increasing the availability of the switch is secured using 802.1x security using SSL for Web...

User Guide
Page 9
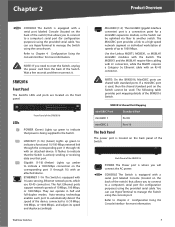
...standard port on the front panel. MiniGBIC (1-4) The miniGBIC (gigabit interface converter) port is a connection point for a miniGBIC expansion module, so the Switch can operate in half and full-duplex modes. Front Panel of the SRW2048 LEDs POWER (Green) Lights up green to indicate a 1000-Mbps connection...Mbps. Lights up to it (10 Mbps, 100 Mbps, or 1000 Mbps), and adjust its speed and duplex accordingly. ETHERNET 1-48 The Switch is located on the corresponding port (1 through 48) with 48 auto-sensing, Ethernet network ports, which use RJ-45 connectors. Auto-sensing ...
...standard port on the front panel. MiniGBIC (1-4) The miniGBIC (gigabit interface converter) port is a connection point for a miniGBIC expansion module, so the Switch can operate in half and full-duplex modes. Front Panel of the SRW2048 LEDs POWER (Green) Lights up green to indicate a 1000-Mbps connection...Mbps. Lights up to it (10 Mbps, 100 Mbps, or 1000 Mbps), and adjust its speed and duplex accordingly. ETHERNET 1-48 The Switch is located on the corresponding port (1 through 48) with 48 auto-sensing, Ethernet network ports, which use RJ-45 connectors. Auto-sensing ...

User Guide
Page 10
... modules with an RJ-45 connector. It flashes to indicate that the Switch is actively sending or receiving data over that port. ETHERNET 1-24 The Switch is equipped with 24 auto-sensing Ethernet network ports, which use HyperTerminal to manage the Switch using the provided serial cable. NOTE: On the SRW2024, MiniGBIC ports are...
... modules with an RJ-45 connector. It flashes to indicate that the Switch is actively sending or receiving data over that port. ETHERNET 1-24 The Switch is equipped with 24 auto-sensing Ethernet network ports, which use HyperTerminal to manage the Switch using the provided serial cable. NOTE: On the SRW2024, MiniGBIC ports are...
User Guide
Page 11
... Gigabit (1-16) (Amber) Lights up green to indicate that power is being supplied to manage the Switch using the provided serial cable. ETHERNET 1-16 The Switch is located on the back panel of the Switch. WebView Switches MiniGBIC (1-2) The miniGBIC (gigabit interface converter) port is a connection point for a miniGBIC ... to 1000 Mbps. You can operate in half and full-duplex modes. LINK/ACT (1-16) (Green) Lights up to manage the Switch using the provided serial cable. The MiniGBIC port provides a link to a high-speed network segment or individual workstation at speeds of the...
... Gigabit (1-16) (Amber) Lights up green to indicate that power is being supplied to manage the Switch using the provided serial cable. ETHERNET 1-16 The Switch is located on the back panel of the Switch. WebView Switches MiniGBIC (1-2) The miniGBIC (gigabit interface converter) port is a connection point for a miniGBIC ... to 1000 Mbps. You can operate in half and full-duplex modes. LINK/ACT (1-16) (Green) Lights up to manage the Switch using the provided serial cable. The MiniGBIC port provides a link to a high-speed network segment or individual workstation at speeds of the...
User Guide
Page 12
...corresponding port (G1 through G4) with an RJ-45 connector. Auto-sensing technology enables each port to automatically detect the speed of the Switch. The MGBSX1 and the MGBLH1 require fiber cabling with LC connectors, while the MGBT1 requires a Category 5e Ethernet cable with an attached ...sending or receiving data over that power is equipped with Gigabit Ethernet ports. The Fast Ethernet ports support network speeds of the SRW248G4 Switch. Back Panel of the SRW248G4 LEDs POWER (Green) Lights up green to 1000 Mbps. Front Panel of the SRW248G4 POWER The Power...
...corresponding port (G1 through G4) with an RJ-45 connector. Auto-sensing technology enables each port to automatically detect the speed of the Switch. The MGBSX1 and the MGBLH1 require fiber cabling with LC connectors, while the MGBT1 requires a Category 5e Ethernet cable with an attached ...sending or receiving data over that power is equipped with Gigabit Ethernet ports. The Fast Ethernet ports support network speeds of the SRW248G4 Switch. Back Panel of the SRW248G4 LEDs POWER (Green) Lights up green to 1000 Mbps. Front Panel of the SRW248G4 POWER The Power...
User Guide
Page 13
...), and adjust its speed and duplex accordingly. It flashes to indicate that the Switch is actively sending or receiving data over that port.. 1000Mbps (G1-G4) (Amber) Lights up to manage the Switch using the provided serial cable. The Fast Ethernet ports support network speeds of the... SRW224G4 WebView Switches 6 They can be uplinked via fiber to a computer's serial port (for more information...
...), and adjust its speed and duplex accordingly. It flashes to indicate that the Switch is actively sending or receiving data over that port.. 1000Mbps (G1-G4) (Amber) Lights up to manage the Switch using the provided serial cable. The Fast Ethernet ports support network speeds of the... SRW224G4 WebView Switches 6 They can be uplinked via fiber to a computer's serial port (for more information...
User Guide
Page 14
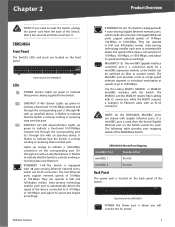
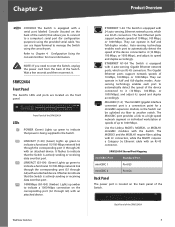
...then reconnect it. NOTE: If you need to manage the Switch using the provided serial cable. Product Overview WebView Switches 7 Chapter 2 POWER The Power port is equipped with a serial port labeled Console (located on the back of the Switch. CONSOLE The Switch is where you to connect to a computer's serial... port (for more information. You can use HyperTerminal to reset the Switch, unplug the power cord from the back of the switch) that allows you will connect the AC power. Refer to Chapter 4: Configuration Using the Console Interface for...
...then reconnect it. NOTE: If you need to manage the Switch using the provided serial cable. Product Overview WebView Switches 7 Chapter 2 POWER The Power port is equipped with a serial port labeled Console (located on the back of the Switch. CONSOLE The Switch is where you to connect to a computer's serial... port (for more information. You can use HyperTerminal to reset the Switch, unplug the power cord from the back of the switch) that allows you will connect the AC power. Refer to Chapter 4: Configuration Using the Console Interface for...
User Guide
Page 15
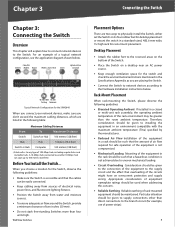
... Typical Network Configuration for the SRW2048 When you connect your network devices, make sure you are placing the Switch. •• Connect the Switch to network devices according to uneven mechanical loading. •• Circuit Overloading Consideration should be such that ... placement. Particular attention should be given to supply connections other than the room ambient temperature. Chapter 3 Connecting the Switch Chapter 3: Connecting the Switch Overview This chapter will explain how to connect network devices to the branch circuit (for example, use of power ...
... Typical Network Configuration for the SRW2048 When you connect your network devices, make sure you are placing the Switch. •• Connect the Switch to network devices according to uneven mechanical loading. •• Circuit Overloading Consideration should be such that ... placement. Particular attention should be given to supply connections other than the room ambient temperature. Chapter 3 Connecting the Switch Chapter 3: Connecting the Switch Overview This chapter will explain how to connect network devices to the branch circuit (for example, use of power ...

User Guide
Page 16
...to the Hardware Installation instructions below . 1. Follow the same steps to attach the other bracket to the Switch. Connect the Switch to network devices according to the Switch's Console port, and tighten the captive retaining screws. For a 1000-Mbps device, connect a Category 5e... Interface for directions. For 10/100-Mbps devices, connect a Category 5 Ethernet network cable to the Switch are attached to the Switch, use the Switch's console interface to configure the Switch, proceed to your PC's serial port. (This PC must be running the VT100 terminal emulation software,...
...to the Hardware Installation instructions below . 1. Follow the same steps to attach the other bracket to the Switch. Connect the Switch to network devices according to the Switch's Console port, and tighten the captive retaining screws. For a 1000-Mbps device, connect a Category 5e... Interface for directions. For 10/100-Mbps devices, connect a Category 5 Ethernet network cable to the Switch are attached to the Switch, use the Switch's console interface to configure the Switch, proceed to your PC's serial port. (This PC must be running the VT100 terminal emulation software,...

User Guide
Page 17
...Data bits: 8 Parity: None Stop bits: 1 Flow control: None 6. HyperTerminal Connection Description Screen WebView Switches HyperTerminal Properties Screen Connecting to communicate with the Switch: COM1, COM2, or TCP/IP. Then, press the Enter key. Leave the Password field blank. 10...Configuration Using the Console Interface Chapter 4: Configuration Using the Console Interface Overview The Switch features a menu-driven console interface for basic configuration of the Switch and management of connection is covered in the User Name field. Configuring the HyperTerminal Application Before...
...Data bits: 8 Parity: None Stop bits: 1 Flow control: None 6. HyperTerminal Connection Description Screen WebView Switches HyperTerminal Properties Screen Connecting to communicate with the Switch: COM1, COM2, or TCP/IP. Then, press the Enter key. Leave the Password field blank. 10...Configuration Using the Console Interface Chapter 4: Configuration Using the Console Interface Overview The Switch features a menu-driven console interface for basic configuration of the Switch and management of connection is covered in the User Name field. Configuring the HyperTerminal Application Before...
User Guide
Page 18
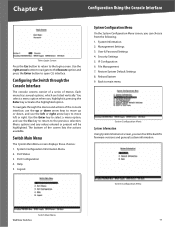
... a menu option, and use the left or right. Switch Main Menu The System Main Menu screen displays these choices: 1. Management Settings 3. Security Settings 5. IP Configuration 6. File Management 7. Configuring the Switch through the menus and actions of the console interface, use...series of the screen lists the actions available. System Information 2. User & Password Settings 4. System Configuration Menu Switch Main Menu WebView Switches 11 Each menu has several options, which are listed vertically. Port Configuration 4. Restore System Default Settings 8. Chapter...
... a menu option, and use the left or right. Switch Main Menu The System Main Menu screen displays these choices: 1. Management Settings 3. Security Settings 5. IP Configuration 6. File Management 7. Configuring the Switch through the menus and actions of the console interface, use...series of the screen lists the actions available. System Information 2. User & Password Settings 4. System Configuration Menu Switch Main Menu WebView Switches 11 Each menu has several options, which are listed vertically. Port Configuration 4. Restore System Default Settings 8. Chapter...

User Guide
Page 19
... to save your changes. Select Save and press the Enter key to save your changes. WebView Switches 12 Management Settings Menu Serial Port Configuration The Serial Port Configuration screen displays the Switch's baud rate. Management Settings From the Management Settings screen, you can set the following options: •• Serial Port Session Configuration ••...
... to save your changes. Select Save and press the Enter key to save your changes. WebView Switches 12 Management Settings Menu Serial Port Configuration The Serial Port Configuration screen displays the Switch's baud rate. Management Settings From the Management Settings screen, you can set the following options: •• Serial Port Session Configuration ••...

User Guide
Page 20
... Telnet Configuration The Telnet Configuration screen displays the timeout value. When your changes. Select Save and press the Enter key to toggle the option. WebView Switches 13 The SSH Server Port can enable or disable the SSH Server by entering in seconds. SSH Status The SSH Status screen displays whether the...
... Telnet Configuration The Telnet Configuration screen displays the timeout value. When your changes. Select Save and press the Enter key to toggle the option. WebView Switches 13 The SSH Server Port can enable or disable the SSH Server by entering in seconds. SSH Status The SSH Status screen displays whether the...

User Guide
Page 21
...also be modified. Username & Password Settings Select Edit and press the Enter key to update the screen if necessary. Security Settings WebView Switches 14 Chapter 4 Configuration Using the Console Interface SSH Crypto Key Generation On the SSH Crypto Key Generation screen, you can administer the... user names and passwords of those accessing the Switch. Keys Fingerprints Select Refresh to make changes. SSH Crypto Key Generation Select Edit and press the Enter key to make changes. ...
...also be modified. Username & Password Settings Select Edit and press the Enter key to update the screen if necessary. Security Settings WebView Switches 14 Chapter 4 Configuration Using the Console Interface SSH Crypto Key Generation On the SSH Crypto Key Generation screen, you can administer the... user names and passwords of those accessing the Switch. Keys Fingerprints Select Refresh to make changes. SSH Crypto Key Generation Select Edit and press the Enter key to make changes. ...
