
User Guide
Page 20
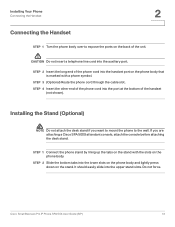
...the other end of the handset (not shown). STEP 2 Slide the bottom tabs into the lower slots on the phone body and lightly press down on the phone body. It should easily slide into the port at the bottom of the phone cord into the upper stand slots. Cisco Small Business Pro IP... Phone SPA 50X User Guide (SIP) 13 STEP 1 Connect the phone stand by lining up the tabs on the stand with a phone symbol. Do not force. Installing Your Phone Connecting the Handset 2 Connecting the Handset STEP 1 Turn the ...
...the other end of the handset (not shown). STEP 2 Slide the bottom tabs into the lower slots on the phone body and lightly press down on the phone body. It should easily slide into the port at the bottom of the phone cord into the upper stand slots. Cisco Small Business Pro IP... Phone SPA 50X User Guide (SIP) 13 STEP 1 Connect the phone stand by lining up the tabs on the stand with a phone symbol. Do not force. Installing Your Phone Connecting the Handset 2 Connecting the Handset STEP 1 Turn the ...
User Guide
Page 26
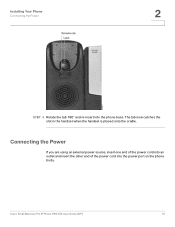
Cisco Small Business Pro IP Phone SPA 50X User Guide (SIP) 19 Installing Your Phone Connecting the Power 2 STEP 3 Rotate the tab 180° and re-insert into the power port on the phone body. Connecting the Power If you are using an external power source, insert one end of the power cord into an outlet and insert the other end of the power cord into the phone base. The tab now catches the slot in the handset when the handset is placed onto the cradle.
Cisco Small Business Pro IP Phone SPA 50X User Guide (SIP) 19 Installing Your Phone Connecting the Power 2 STEP 3 Rotate the tab 180° and re-insert into the power port on the phone body. Connecting the Power If you are using an external power source, insert one end of the power cord into an outlet and insert the other end of the power cord into the phone base. The tab now catches the slot in the handset when the handset is placed onto the cradle.