

User Guide
Page 3
... Phone's Lines and Buttons Phone Components Softkey Buttons Using Keypad Shortcuts Cisco SPA 500S Attendant Console Caring for Your Phone Chapter 2: Installing Your Phone Before You Begin Phone Connections Connecting the Handset Installing the Stand (Optional) Mounting the Phone to the Wall (Optional) Reversing the Handset Retention Tab Connecting the Power Connecting Your...'s IP Address Install the Firmware Contents 1 1 3 4 4 6 8 9 10 11 12 12 13 13 14 18 19 20 20 21 21 22 23 23 24 24 25 Cisco Small Business Pro IP Phone SPA 50X User Guide (SIP) i
... Phone's Lines and Buttons Phone Components Softkey Buttons Using Keypad Shortcuts Cisco SPA 500S Attendant Console Caring for Your Phone Chapter 2: Installing Your Phone Before You Begin Phone Connections Connecting the Handset Installing the Stand (Optional) Mounting the Phone to the Wall (Optional) Reversing the Handset Retention Tab Connecting the Power Connecting Your...'s IP Address Install the Firmware Contents 1 1 3 4 4 6 8 9 10 11 12 12 13 13 14 18 19 20 20 21 21 22 23 23 24 24 25 Cisco Small Business Pro IP Phone SPA 50X User Guide (SIP) i
User Guide
Page 18
...page 12 • Phone Connections, page 12 • Connecting the Handset, page 13 • Installing the Stand (Optional), page 13 • Mounting the Phone to the Wall (Optional), page 14 • Connecting the Power, page 19 • Connecting Your Phone to the Network, page 20 • Connecting a PC...; Connecting Wired and Wireless Headsets (Optional), page 21 • Verifying Phone Startup, page 22 • Upgrading Your Phone's Firmware, page 23 Cisco Small Business Pro IP Phone SPA 50X User Guide (SIP) 11 2 Installing Your Phone This chapter describes how to install your network.
...page 12 • Phone Connections, page 12 • Connecting the Handset, page 13 • Installing the Stand (Optional), page 13 • Mounting the Phone to the Wall (Optional), page 14 • Connecting the Power, page 19 • Connecting Your Phone to the Network, page 20 • Connecting a PC...; Connecting Wired and Wireless Headsets (Optional), page 21 • Verifying Phone Startup, page 22 • Upgrading Your Phone's Firmware, page 23 Cisco Small Business Pro IP Phone SPA 50X User Guide (SIP) 11 2 Installing Your Phone This chapter describes how to install your network.
User Guide
Page 20
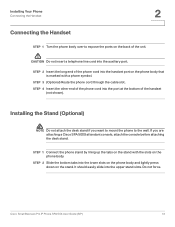
... to mount the phone to expose the ports on the back of the phone cord into the handset port on the phone body that is marked with the slots on the phone body. Cisco Small ... not force. Installing the Stand (Optional) NOTE Do not attach the desk stand if you are attaching a Cisco SPA 500S attendant console, attach the console before attaching the desk stand. STEP 2 Insert the long end of... Your Phone Connecting the Handset 2 Connecting the Handset STEP 1 Turn the phone body over to the wall. It should easily slide into the lower slots on the phone body and lightly press down on the...
... to mount the phone to expose the ports on the back of the phone cord into the handset port on the phone body that is marked with the slots on the phone body. Cisco Small ... not force. Installing the Stand (Optional) NOTE Do not attach the desk stand if you are attaching a Cisco SPA 500S attendant console, attach the console before attaching the desk stand. STEP 2 Insert the long end of... Your Phone Connecting the Handset 2 Connecting the Handset STEP 1 Turn the phone body over to the wall. It should easily slide into the lower slots on the phone body and lightly press down on the...

User Guide
Page 21
Figure 2 MB100 Wall Mount Kit Cisco Small Business Pro IP Phone SPA 50X User Guide (SIP) 14 Installing Your Phone Mounting the Phone to the Wall (Optional) 2 Mounting the Phone to the Wall (Optional) To mount the phone to the wall, you must purchase the MB100 wall mount bracket kit.
Figure 2 MB100 Wall Mount Kit Cisco Small Business Pro IP Phone SPA 50X User Guide (SIP) 14 Installing Your Phone Mounting the Phone to the Wall (Optional) 2 Mounting the Phone to the Wall (Optional) To mount the phone to the wall, you must purchase the MB100 wall mount bracket kit.

User Guide
Page 22
Installing Your Phone Mounting the Phone to lock it in the phone's base. Cisco Small Business Pro IP Phone SPA 50X User Guide (SIP) 15 STEP 3 Push the MB onto the phone's base. Slide the MB upwards to the Wall (Optional) 2 STEP 1 To attach the Mounting Bracket (MB), align the two cleats on the MB with the holes in place. STEP 2 Orient the MB such that the phone's Ethernet and handset ports are accessible after installation.
Installing Your Phone Mounting the Phone to lock it in the phone's base. Cisco Small Business Pro IP Phone SPA 50X User Guide (SIP) 15 STEP 3 Push the MB onto the phone's base. Slide the MB upwards to the Wall (Optional) 2 STEP 1 To attach the Mounting Bracket (MB), align the two cleats on the MB with the holes in place. STEP 2 Orient the MB such that the phone's Ethernet and handset ports are accessible after installation.

User Guide
Page 23
Installing Your Phone Mounting the Phone to the Wall (Optional) STEP 4 (Optional) If a Wi-Fi or PoE dongle is installed, place in the tray. 2 Cisco Small Business Pro IP Phone SPA 50X User Guide (SIP) 16
Installing Your Phone Mounting the Phone to the Wall (Optional) STEP 4 (Optional) If a Wi-Fi or PoE dongle is installed, place in the tray. 2 Cisco Small Business Pro IP Phone SPA 50X User Guide (SIP) 16

User Guide
Page 24
Installing Your Phone Mounting the Phone to the Wall (Optional) Plug in the Ethernet and power cables. 2 Cisco Small Business Pro IP Phone SPA 50X User Guide (SIP) 17
Installing Your Phone Mounting the Phone to the Wall (Optional) Plug in the Ethernet and power cables. 2 Cisco Small Business Pro IP Phone SPA 50X User Guide (SIP) 17

User Guide
Page 25
Cisco Small Business Pro IP Phone SPA 50X User Guide (SIP) 18 STEP 2 Slide the retention tab up until it is placed on the cradle. STEP 1 Push the latch in the wall. 2 Reversing the Handset Retention Tab If you mount the phone to a vertical surface, you must reverse the handset retention tab on the phone body so that the handset does not fall off the phone when it detaches from the phone. Installing Your Phone Mounting the Phone to the Wall (Optional) STEP 5 Hang onto screws mounted in .
Cisco Small Business Pro IP Phone SPA 50X User Guide (SIP) 18 STEP 2 Slide the retention tab up until it is placed on the cradle. STEP 1 Push the latch in the wall. 2 Reversing the Handset Retention Tab If you mount the phone to a vertical surface, you must reverse the handset retention tab on the phone body so that the handset does not fall off the phone when it detaches from the phone. Installing Your Phone Mounting the Phone to the Wall (Optional) STEP 5 Hang onto screws mounted in .