
User Guide
Page 4
... Canada Statement 5 Chapter 1: Getting Started 6 About This Document 6 Overview of the Cisco Small Business Pro IP Phones 8 Caring for Your Phone 9 Understanding Your Phone's Lines and Buttons 10 Phone Components 10 Softkey Buttons 12 Using Keypad Shortcuts 14 Chapter 2: Installing Your Phone 15 Before You Begin 15 Phone Connections 16 Connecting the Handset 17 Installing the Stand (Optional) 17...
... Canada Statement 5 Chapter 1: Getting Started 6 About This Document 6 Overview of the Cisco Small Business Pro IP Phones 8 Caring for Your Phone 9 Understanding Your Phone's Lines and Buttons 10 Phone Components 10 Softkey Buttons 12 Using Keypad Shortcuts 14 Chapter 2: Installing Your Phone 15 Before You Begin 15 Phone Connections 16 Connecting the Handset 17 Installing the Stand (Optional) 17...

User Guide
Page 7
...; About This Document, page 6 • Overview of call control system that you are using. NOTE The Cisco Small Business IP Phone features vary, depending on the type of the Cisco Small Business Pro IP Phones, page 8 • Understanding Your Phone's Lines and Buttons, page 10 About This Document This guide describes the concepts and tasks necessary to use...
...; About This Document, page 6 • Overview of call control system that you are using. NOTE The Cisco Small Business IP Phone features vary, depending on the type of the Cisco Small Business Pro IP Phones, page 8 • Understanding Your Phone's Lines and Buttons, page 10 About This Document This guide describes the concepts and tasks necessary to use...

User Guide
Page 10
... Guide (SPCP) 9 Getting Started Overview of the Cisco Small Business IP Phones 1 The following table shows the Cisco Small Business IP Phones covered in this document and their respective features: Cisco SPA Cisco SPA Cisco SPA Cisco SPA Cisco SPA 501G 502G 504G 508G 509G Screen Paper Labels 128 X 64 monochrome LCD with backlight Lines 8 1 4 8 12 Softkeys 4 fixed (redial, cancel, transfer, and...
... Guide (SPCP) 9 Getting Started Overview of the Cisco Small Business IP Phones 1 The following table shows the Cisco Small Business IP Phones covered in this document and their respective features: Cisco SPA Cisco SPA Cisco SPA Cisco SPA Cisco SPA 501G 502G 504G 508G 509G Screen Paper Labels 128 X 64 monochrome LCD with backlight Lines 8 1 4 8 12 Softkeys 4 fixed (redial, cancel, transfer, and...

User Guide
Page 11
See the "Overview of your phone. Cisco Small Business IP Phone SPA 50X User Guide (SPCP) 10 Other models differ. Getting Started Understanding Your Phone's Lines and Buttons 1 Understanding Your Phone's Lines and Buttons Use the following table. # Phone Feature 1 Handset 2 Message Waiting Indicator Description Pick up to place or answer a call . Phone Components Figure 1 Phone Components The photo above shows the...
See the "Overview of your phone. Cisco Small Business IP Phone SPA 50X User Guide (SPCP) 10 Other models differ. Getting Started Understanding Your Phone's Lines and Buttons 1 Understanding Your Phone's Lines and Buttons Use the following table. # Phone Feature 1 Handset 2 Message Waiting Indicator Description Pick up to place or answer a call . Phone Components Figure 1 Phone Components The photo above shows the...

User Guide
Page 12
... button Conference-While on a call, press to create the conference. Transfer-Transfers a call and dial another number. Red (flashing): Line is an inbound call pickup, or monitoring an extension. Cisco Small Business IP Phone SPA 50X User Guide (SPCP) 11 Cancel-Cancels an action (such as speed dial, call . After the second party answers...
... button Conference-While on a call, press to create the conference. Transfer-Transfers a call and dial another number. Red (flashing): Line is an inbound call pickup, or monitoring an extension. Cisco Small Business IP Phone SPA 50X User Guide (SPCP) 11 Cancel-Cancels an action (such as speed dial, call . After the second party answers...

User Guide
Page 13
...Phone's Lines and Buttons 1 # Phone Feature 9 Hold button 10 Setup button 11 Mute button 12 Volume button 13 Headset button 14 Speaker button 15 Keypad Description Press to place a call forwarding). The button also glows red if the network connection cannot be available on your phone. Cisco Small Business IP Phone... SPA 50X User Guide (SPCP) 12 Press to access a menu to configure features and preferences (such as your directory and speed dials), access your phone, and you to turn the speaker on Cisco.com for more ...
...Phone's Lines and Buttons 1 # Phone Feature 9 Hold button 10 Setup button 11 Mute button 12 Volume button 13 Headset button 14 Speaker button 15 Keypad Description Press to place a call forwarding). The button also glows red if the network connection cannot be available on your phone. Cisco Small Business IP Phone... SPA 50X User Guide (SPCP) 12 Press to access a menu to configure features and preferences (such as your directory and speed dials), access your phone, and you to turn the speaker on Cisco.com for more ...
User Guide
Page 14
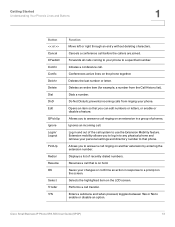
... number or letter. Deletes an entire item (for example, a number from ringing your phone. prevents incoming calls from the Call History list). Displays a list of phones. Cisco Small Business IP Phone SPA 50X User Guide (SPCP) 13 Getting Started Understanding Your Phone's Lines and Buttons 1 Button > Cancel CFwdAll Confrn Conflx Delchr Delete Dial DnD Edit GPickUp Ignore...
... number or letter. Deletes an entire item (for example, a number from ringing your phone. prevents incoming calls from the Call History list). Displays a list of phones. Cisco Small Business IP Phone SPA 50X User Guide (SPCP) 13 Getting Started Understanding Your Phone's Lines and Buttons 1 Button > Cancel CFwdAll Confrn Conflx Delchr Delete Dial DnD Edit GPickUp Ignore...

User Guide
Page 15
Getting Started Understanding Your Phone's Lines and Buttons 1 Using Keypad Shortcuts When using the phone menus, you can use the keypad to enter the number shown next to the menu or sub-menu item on the LCD screen. (Not applicable to the Cisco SPA 501G.) For example, on phone model. Cisco Small Business IP Phone SPA 50X User Guide (SPCP) 14 NOTE Menus and options vary depending on the Cisco SPA 590G, to change your ring settings, press 3 for Settings and then press 2 for Ring Type.
Getting Started Understanding Your Phone's Lines and Buttons 1 Using Keypad Shortcuts When using the phone menus, you can use the keypad to enter the number shown next to the menu or sub-menu item on the LCD screen. (Not applicable to the Cisco SPA 501G.) For example, on phone model. Cisco Small Business IP Phone SPA 50X User Guide (SPCP) 14 NOTE Menus and options vary depending on the Cisco SPA 590G, to change your ring settings, press 3 for Settings and then press 2 for Ring Type.

User Guide
Page 17
It is not for connection with auxiliary devices that are not supported with the SPCP version of the phone. Installing Your Phone Phone Connections 2 NOTE Do not use as a telephone line port. ! Figure 1 Phone Connections Cisco Small Business IP Phone SPA 50X User Guide (SPCP) 16 Phone Connections The following photo shows where you need to connect parts of the telephone firmware. This port is reserved for use the RJ-11 port marked "AUX." CAUTION CAUTION: Do not plug a telephone line cord into the port marked "AUX."
It is not for connection with auxiliary devices that are not supported with the SPCP version of the phone. Installing Your Phone Phone Connections 2 NOTE Do not use as a telephone line port. ! Figure 1 Phone Connections Cisco Small Business IP Phone SPA 50X User Guide (SPCP) 16 Phone Connections The following photo shows where you need to connect parts of the telephone firmware. This port is reserved for use the RJ-11 port marked "AUX." CAUTION CAUTION: Do not plug a telephone line cord into the port marked "AUX."

User Guide
Page 18
... the port at the bottom of the unit. ! STEP 1 Connect the phone stand by lining up the tabs on the phone body. STEP 3 (Optional) Route the phone cord through the cable slot. It should easily slide into the AUX (auxiliary) port. Do not force. Cisco Small Business IP Phone SPA 50X User Guide (SPCP) 17 Installing Your...
... the port at the bottom of the unit. ! STEP 1 Connect the phone stand by lining up the tabs on the phone body. STEP 3 (Optional) Route the phone cord through the cable slot. It should easily slide into the AUX (auxiliary) port. Do not force. Cisco Small Business IP Phone SPA 50X User Guide (SPCP) 17 Installing Your...

User Guide
Page 27
...over their associated soft buttons. At the bottom of the IP phone as shown in the following graphic: Verifying Phone Startup After receiving power and network connectivity, the phone executes a boot-up sequence. After your phone is successfully connected to the network and receives a basic ... display the Cisco logo and then "Initializing Network." During this sequence, phones with screens, the phone displays the standard menu for the phone. Cisco Small Business IP Phone SPA 50X User Guide (SPCP) 26 The date, name and number of the phone display on the top line of the lights...
...over their associated soft buttons. At the bottom of the IP phone as shown in the following graphic: Verifying Phone Startup After receiving power and network connectivity, the phone executes a boot-up sequence. After your phone is successfully connected to the network and receives a basic ... display the Cisco logo and then "Initializing Network." During this sequence, phones with screens, the phone displays the standard menu for the phone. Cisco Small Business IP Phone SPA 50X User Guide (SPCP) 26 The date, name and number of the phone display on the top line of the lights...

User Guide
Page 28
... Communications System (SBCS), according to the administrative settings. Installing Your Phone Upgrading Your Phone's Firmware 2 On models with no screen, such as the Cisco SPA 501G, the lines should hear a dial tone when picking up the handset or pressing the speakerphone button. Cisco Small Business IP Phone SPA 50X User Guide (SPCP) 27 If you should glow...
... Communications System (SBCS), according to the administrative settings. Installing Your Phone Upgrading Your Phone's Firmware 2 On models with no screen, such as the Cisco SPA 501G, the lines should hear a dial tone when picking up the handset or pressing the speakerphone button. Cisco Small Business IP Phone SPA 50X User Guide (SPCP) 27 If you should glow...

User Guide
Page 31
..., speaker, or headset microphone, press the Mute button on the Volume button to increase the volume, or press - Cisco Small Business IP Phone SPA 50X User Guide (SPCP) 30 Press + on the phone. Basic techniques to place or answer a call: • Pick up the handset. • Press the Speaker button. • ... To adjust the ringer volume, press the Volume button when the handset is on the phone and the speaker button is off. Press the Mute button again to the Cisco SPA 502G). to reach an outside line. Placing or Answering a Call NOTE You may have to dial a number or numbers ...
..., speaker, or headset microphone, press the Mute button on the Volume button to increase the volume, or press - Cisco Small Business IP Phone SPA 50X User Guide (SPCP) 30 Press + on the phone. Basic techniques to place or answer a call: • Pick up the handset. • Press the Speaker button. • ... To adjust the ringer volume, press the Volume button when the handset is on the phone and the speaker button is off. Press the Mute button again to the Cisco SPA 502G). to reach an outside line. Placing or Answering a Call NOTE You may have to dial a number or numbers ...

User Guide
Page 32
... Using Hold and Resume To put on hold except the active call . (On the Cisco SPA 502G, press the Resume softkey.) If you . To resume the first call, press the line button for the call . Cisco Small Business IP Phone SPA 50X User Guide (SPCP) 31 See Using the Local Directory, page 38 and Using.... NOTE You also can use this feature on the handset, speakerphone, or headset. • To toggle Mute on a call and another phone in , press the flashing red line button or press the Hold button to indicate that is lit. • To toggle Mute off: Press the lit Mute button. Using Mute...
... Using Hold and Resume To put on hold except the active call . (On the Cisco SPA 502G, press the Resume softkey.) If you . To resume the first call, press the line button for the call . Cisco Small Business IP Phone SPA 50X User Guide (SPCP) 31 See Using the Local Directory, page 38 and Using.... NOTE You also can use this feature on the handset, speakerphone, or headset. • To toggle Mute on a call and another phone in , press the flashing red line button or press the Hold button to indicate that is lit. • To toggle Mute off: Press the lit Mute button. Using Mute...

User Guide
Page 33
...party to which you want to dial the number. The call is placed on hold and a new line is opened to transfer the call, then press Dial or wait a few seconds. Cisco Small Business IP Phone SPA 50X User Guide (SPCP) 32 STEP 2 Enter the number to which you are using the ...speakerphone, press the Speaker button. • If you are transferring the call. Using Basic Phone Functions Ending a Call 3 Ending a Call To end a call...
...party to which you want to dial the number. The call is placed on hold and a new line is opened to transfer the call, then press Dial or wait a few seconds. Cisco Small Business IP Phone SPA 50X User Guide (SPCP) 32 STEP 2 Enter the number to which you are using the ...speakerphone, press the Speaker button. • If you are transferring the call. Using Basic Phone Functions Ending a Call 3 Ending a Call To end a call...

User Guide
Page 34
If you want to transfer the call disconnected. STEP 2 Enter the number to which you misdial, press the line button again to receive a dial tone (not applicable to the Cisco SPA 502G). • To transfer after the call begins to ring. If you 're done, press ok. STEP ... number: STEP 1 Press the Redial softkey and select the desired number. Cisco SPA 501G: To redial the last number, press the Redial button. Cisco SPA 501G: STEP 1 During an active call, press the Transfer button. Cisco Small Business IP Phone SPA 50X User Guide (SPCP) 33 STEP 2 (Optional) Press EditDial ...
If you want to transfer the call disconnected. STEP 2 Enter the number to which you misdial, press the line button again to receive a dial tone (not applicable to the Cisco SPA 502G). • To transfer after the call begins to ring. If you 're done, press ok. STEP ... number: STEP 1 Press the Redial softkey and select the desired number. Cisco SPA 501G: To redial the last number, press the Redial button. Cisco SPA 501G: STEP 1 During an active call, press the Transfer button. Cisco Small Business IP Phone SPA 50X User Guide (SPCP) 33 STEP 2 (Optional) Press EditDial ...

User Guide
Page 36
... not ring. These calls are not logged to the Missed Calls list. Cisco Small Business IP Phone SPA 50X User Guide (SPCP) 35 To deactivate Do Not Disturb: To deactivate Do Not Disturb, press the DnD softkey. For outside line. To activate Do Not Disturb: To activate Do Not Disturb, press more... all calls; The unanswered call is required to access an outside line, be sure to include any access code or area code that Do Not Disturb is turned on for example, your voice mailbox, another IP phone in your phone system. The LCD screen indicates that is handled according to your ...
... not ring. These calls are not logged to the Missed Calls list. Cisco Small Business IP Phone SPA 50X User Guide (SPCP) 35 To deactivate Do Not Disturb: To deactivate Do Not Disturb, press the DnD softkey. For outside line. To activate Do Not Disturb: To activate Do Not Disturb, press more... all calls; The unanswered call is required to access an outside line, be sure to include any access code or area code that Do Not Disturb is turned on for example, your voice mailbox, another IP phone in your phone system. The LCD screen indicates that is handled according to your ...

User Guide
Page 37
... at an extension that is configured on one pickup group is configured on hold, a second line is transferred to your phone. The first call , press more and then press Confrn. STEP 2 Dial the second person's telephone number. Cisco Small Business IP Phone SPA 50X User Guide (SPCP) 36 If only one of the... phone from Another Extension You can pick up a call in the following ways: • Pick up a call that is ...
... at an extension that is configured on one pickup group is configured on hold, a second line is transferred to your phone. The first call , press more and then press Confrn. STEP 2 Dial the second person's telephone number. Cisco Small Business IP Phone SPA 50X User Guide (SPCP) 36 If only one of the... phone from Another Extension You can pick up a call in the following ways: • Pick up a call that is ...

User Guide
Page 38
... 1 Press the Conference button during an active call is placed on hold, a second line is opened, and you hear a dial tone. The first call . All three parties are disconnected. Cisco Small Business IP Phone SPA 50X User Guide (SPCP) 37 Using Basic Phone Functions Placing a Three-Way Conference Call 3 STEP 3 When the second person answers...
... 1 Press the Conference button during an active call is placed on hold, a second line is opened, and you hear a dial tone. The first call . All three parties are disconnected. Cisco Small Business IP Phone SPA 50X User Guide (SPCP) 37 Using Basic Phone Functions Placing a Three-Way Conference Call 3 STEP 3 When the second person answers...

User Guide
Page 42
... your password. b. Creating Speed Dials You can also configure additional speed dials on unused line buttons on your phone. You can configure up to 8 speed dials. Choose Extension Mobility. Cisco Small Business IP Phone SPA 50X User Guide (SPCP) 41 c. STEP 3 Press the Down Arrow key and ...enter your configured speed dial buttons). c. Using Advanced Phone Features Creating Speed Dials 4 To log in to your phone: STEP 1 If you have the ...
... your password. b. Creating Speed Dials You can also configure additional speed dials on unused line buttons on your phone. You can configure up to 8 speed dials. Choose Extension Mobility. Cisco Small Business IP Phone SPA 50X User Guide (SPCP) 41 c. STEP 3 Press the Down Arrow key and ...enter your configured speed dial buttons). c. Using Advanced Phone Features Creating Speed Dials 4 To log in to your phone: STEP 1 If you have the ...

