

Getting Started Guide
Page 1
GETTING STARTED GUIDE Cisco Aironet 1140 Series Autonomous Access Point 1 About this Guide 2 Safety Instructions 3 Overview 4 Obtaining and Assigning an IP Address 5 Mounting the Access Point 6 Configuring Basic Settings 7 Troubleshooting 8 Access Point Specifications 9 Obtaining Documentation and Submitting a Service Request 10 Declarations of Conformity and Regulatory Information
GETTING STARTED GUIDE Cisco Aironet 1140 Series Autonomous Access Point 1 About this Guide 2 Safety Instructions 3 Overview 4 Obtaining and Assigning an IP Address 5 Mounting the Access Point 6 Configuring Basic Settings 7 Troubleshooting 8 Access Point Specifications 9 Obtaining Documentation and Submitting a Service Request 10 Declarations of Conformity and Regulatory Information

Getting Started Guide
Page 2
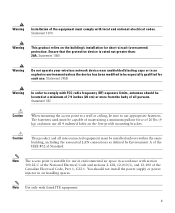
... Translated Safety Warnings for preventing accidents. Use the statement number provided at the end of each warning to install and configure your Cisco Aironet 1140 Series Autonomous Access Point. 78-18997-01 1 About this device. The translated warnings are in the translated safety warnings document that accompanied this Guide This Guide explains how to locate its power source. Contact the appropriate electrical...
... Translated Safety Warnings for preventing accidents. Use the statement number provided at the end of each warning to install and configure your Cisco Aironet 1140 Series Autonomous Access Point. 78-18997-01 1 About this device. The translated warnings are in the translated safety warnings document that accompanied this Guide This Guide explains how to locate its power source. Contact the appropriate electrical...
Getting Started Guide
Page 3
..., including the associated LAN connections as defined by Environment A of 20 lbs (9 kg) and must use appropriate fasteners. Note The access point is rated not greater than: 20A. Statement 332 Caution When mounting the access point to a wall or ceiling, be sure to comply with FCC radio frequency (RF) exposure limits, antennas should not install the power supply or power injector in accordance...
..., including the associated LAN connections as defined by Environment A of 20 lbs (9 kg) and must use appropriate fasteners. Note The access point is rated not greater than: 20A. Statement 332 Caution When mounting the access point to a wall or ceiling, be sure to comply with FCC radio frequency (RF) exposure limits, antennas should not install the power supply or power injector in accordance...

Getting Started Guide
Page 6
... out the DHCP-assigned IP address by connecting to its console port and accessing the access point CLI. • Use a DHCP server (if available) to automatically assign an IP address. You should have a default IP address. • Assign a static IP address by using PoE to comply with safety regulations. Performing a Site Survey Before you mount and deploy your access point, we recommend that you can record the device MAC addresses from a network device, or a PoE power injector...
... out the DHCP-assigned IP address by connecting to its console port and accessing the access point CLI. • Use a DHCP server (if available) to automatically assign an IP address. You should have a default IP address. • Assign a static IP address by using PoE to comply with safety regulations. Performing a Site Survey Before you mount and deploy your access point, we recommend that you can record the device MAC addresses from a network device, or a PoE power injector...

Getting Started Guide
Page 7
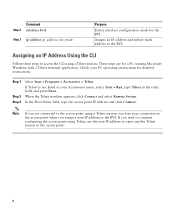
... virtual interface (BVI). Step 2 Set up a terminal emulator on a label attached to identify the IP address. Use the following settings for the serial cable is on your access point MAC address. Assigning the IP Address to the BVI When you can connect a PC to its console port by using the MAC address to the bottom of the access point. - Command Step 1 configure terminal Purpose Enter global configuration mode. 7 Your network administrator will query the DHCP server using...
... virtual interface (BVI). Step 2 Set up a terminal emulator on a label attached to identify the IP address. Use the following settings for the serial cable is on your access point MAC address. Assigning the IP Address to the BVI When you can connect a PC to its console port by using the MAC address to the bottom of the access point. - Command Step 1 configure terminal Purpose Enter global configuration mode. 7 Your network administrator will query the DHCP server using...
Getting Started Guide
Page 8
..., type the access point IP address and click Connect. These steps are connected to the access point using a Telnet session, you need to the BVI. Assigns an IP address and subnet mask address to continue configuring the access point using a Telnet session. If Telnet is not listed in your Accessories menu, select Start > Run, type Telnet in the entry field, and press Enter. Command Step 2 interface bvi1 Step 3 ip address ip_address net_mask Purpose Enters interface configuration mode for detailed instructions.
..., type the access point IP address and click Connect. These steps are connected to the access point using a Telnet session, you need to the BVI. Assigns an IP address and subnet mask address to continue configuring the access point using a Telnet session. If Telnet is not listed in your Accessories menu, select Start > Run, type Telnet in the entry field, and press Enter. Command Step 2 interface bvi1 Step 3 ip address ip_address net_mask Purpose Enters interface configuration mode for detailed instructions.

Getting Started Guide
Page 9
... access point IP address in several configurations, including on a suspended ceiling, on a hard ceiling or wall, on a wall using the GUI Express Setup page. See the "Obtaining and Assigning an IP Address" section on the mounting bracket for the access point using wall anchors. A username and password screen appears. The Summary Status page appears. 9 Step 1 Step 2 Step 3 Open your PC needs an IP address. Enter the username Cisco and password Cisco. The username and password...
... access point IP address in several configurations, including on a suspended ceiling, on a hard ceiling or wall, on a wall using the GUI Express Setup page. See the "Obtaining and Assigning an IP Address" section on the mounting bracket for the access point using wall anchors. A username and password screen appears. The Summary Status page appears. 9 Step 1 Step 2 Step 3 Open your PC needs an IP address. Enter the username Cisco and password Cisco. The username and password...

Getting Started Guide
Page 12
... repeater access point not connected to and from other Cisco Aironet non-root bridges and wireless client devices. - • Default Gateway-The default gateway identifies the address the access point uses to access the access point using unencrypted traffic between web browsers. - Select the role, optimization setting, and extension capabilities for the Simple Network Management Protocol (SNMP) used to transfer secure data by using encrypted traffic to Ethernet LAN. Secure (HTTPS)-Protocol used to the Cisco WLSE. • Optimize Radio Network For-Optimizes the access point...
... repeater access point not connected to and from other Cisco Aironet non-root bridges and wireless client devices. - • Default Gateway-The default gateway identifies the address the access point uses to access the access point using unencrypted traffic between web browsers. - Select the role, optimization setting, and extension capabilities for the Simple Network Management Protocol (SNMP) used to transfer secure data by using encrypted traffic to Ethernet LAN. Secure (HTTPS)-Protocol used to the Cisco WLSE. • Optimize Radio Network For-Optimizes the access point...

Getting Started Guide
Page 13
... point uses its range. - Clicking Custom takes you enter on the Express Setup page. Table 1 Express Setup Default Settings Setting System Name Configuration Server Protocol IP Address Default ap DHCP Assigned by DHCP IP Subnet Mask Default Gateway Role in Radio Network Web Server SNMP Community Optimize Radio Network for the radio selected. - Assigned by DHCP Assigned by the access point but might reduce its default data rate settings for Aironet Extensions Note The access point does not have a default IP address. Custom-The access point uses settings that require specific...
... point uses its range. - Clicking Custom takes you enter on the Express Setup page. Table 1 Express Setup Default Settings Setting System Name Configuration Server Protocol IP Address Default ap DHCP Assigned by DHCP IP Subnet Mask Default Gateway Role in Radio Network Web Server SNMP Community Optimize Radio Network for the radio selected. - Assigned by DHCP Assigned by the access point but might reduce its default data rate settings for Aironet Extensions Note The access point does not have a default IP address. Custom-The access point uses settings that require specific...

Getting Started Guide
Page 14
... Mode button down until the Ethernet LED turns amber (approximately 2 to 3 seconds). You must configure security settings to prevent unauthorized access to your work site. Choose the Settings tab at the top of the page. Configuring Security Settings After you assign basic settings to your access point, you can communicate beyond the physical boundaries of your network. Note You can restore the access point to its factory defaults by default, and there is a radio device, the access point can use...
... Mode button down until the Ethernet LED turns amber (approximately 2 to 3 seconds). You must configure security settings to prevent unauthorized access to your work site. Choose the Settings tab at the top of the page. Configuring Security Settings After you assign basic settings to your access point, you can communicate beyond the physical boundaries of your network. Note You can restore the access point to its factory defaults by default, and there is a radio device, the access point can use...

Getting Started Guide
Page 15
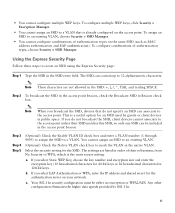
... Express Security Settings When the access point configuration is set to 16 SSIDs on the access point. This illustration shows the Express Security page. Configuring Basic Security Settings You can create multiple SSIDs by using any of the four security settings on the Express Security page. Using VLANs If you use VLANs on your wireless LAN, the security options that you can create up to factory defaults, the first SSID that you create an SSID with static WEP with VLANs disabled...
... Express Security Settings When the access point configuration is set to 16 SSIDs on the access point. This illustration shows the Express Security page. Configuring Basic Security Settings You can create multiple SSIDs by using any of the four security settings on the Express Security page. Using VLANs If you use VLANs on your wireless LAN, the security options that you can create up to factory defaults, the first SSID that you create an SSID with static WEP with VLANs disabled...

Getting Started Guide
Page 16
... radio interfaces, choose Security > SSID Manager. • You cannot configure multiple authentication servers. Static WEP keys are two different lengths for an SSID conflicts with WPA authentication because they use different encryption settings. Configuring Security for 802.11n To achieve 802.11n speeds, you need to enter a WEP key. • WPA-Wi-Fi Protected Access (WPA) permits wireless access to users authenticated against a database through the services of the access point security capabilities. There are vulnerable to attack. Keep these limitations in WEP. Client...
... radio interfaces, choose Security > SSID Manager. • You cannot configure multiple authentication servers. Static WEP keys are two different lengths for an SSID conflicts with WPA authentication because they use different encryption settings. Configuring Security for 802.11n To achieve 802.11n speeds, you need to enter a WEP key. • WPA-Wi-Fi Protected Access (WPA) permits wireless access to users authenticated against a database through the services of the access point security capabilities. There are vulnerable to attack. Keep these limitations in WEP. Client...
Getting Started Guide
Page 17
... EAP Authentication or WPA, enter the IP address and shared secret for 128-bit keys. c. Any other configuration eliminates the higher data speeds provided by guests or client devices in Beacon check box. Using the Express Security Page Follow these steps to the access point unless their robustness, from No Security to an existing VLAN, choose Security > SSID Manager. • You cannot configure combinations of authentication types, choose Security > SSID Manager. If you broadcast the SSID, devices...
... EAP Authentication or WPA, enter the IP address and shared secret for 128-bit keys. c. Any other configuration eliminates the higher data speeds provided by guests or client devices in Beacon check box. Using the Express Security Page Follow these steps to the access point unless their robustness, from No Security to an existing VLAN, choose Security > SSID Manager. • You cannot configure combinations of authentication types, choose Security > SSID Manager. If you broadcast the SSID, devices...

Getting Started Guide
Page 18
The SSID appears in the SSID table at the bottom of the access point Status LED. Checking the Access Point LED Figure 3 shows the location of the page. 7 Troubleshooting This section offers some diagnostic and configuration suggestions for VLAN details. 1. Note If you do not use VLANS on your access point. Figure 3 Access Point LED Location 1 272378 1 Status LED 18 Click Apply. Refer to the Cisco IOS Software Configuration Guide for Cisco Aironet Access Points for troubleshooting your wireless LAN, the security options that you can assign to multiple SSIDs are limited.
The SSID appears in the SSID table at the bottom of the access point Status LED. Checking the Access Point LED Figure 3 shows the location of the page. 7 Troubleshooting This section offers some diagnostic and configuration suggestions for VLAN details. 1. Note If you do not use VLANS on your access point. Figure 3 Access Point LED Location 1 272378 1 Status LED 18 Click Apply. Refer to the Cisco IOS Software Configuration Guide for Cisco Aironet Access Points for troubleshooting your wireless LAN, the security options that you can assign to multiple SSIDs are limited.
Getting Started Guide
Page 19
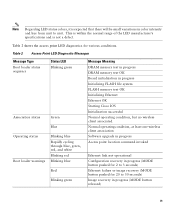
... Initializing FLASH file system FLASH memory test OK Initializing Ethernet Ethernet OK Starting Cisco IOS Initialization successful Normal operating condition, but no wireless client associated Normal operating condition, at least one wireless client association Software upgrade in progress Access point location command invoked Ethernet link not operational Configuration recovery in progress (MODE button released) 19 Note Regarding LED status colors, it is not a defect. This is within the normal range of the LED manufacturer's specifications and...
... Initializing FLASH file system FLASH memory test OK Initializing Ethernet Ethernet OK Starting Cisco IOS Initialization successful Normal operating condition, but no wireless client associated Normal operating condition, at least one wireless client association Software upgrade in progress Access point location command invoked Ethernet link not operational Configuration recovery in progress (MODE button released) 19 Note Regarding LED status colors, it is not a defect. This is within the normal range of the LED manufacturer's specifications and...

Getting Started Guide
Page 20
... password are configured with an IP address. Click OK to configure the system power settings using the GUI: Step 1 Step 2 Step 3 Step 4 Open your power source. The System Configuration page appears. Table 2 Access Point LED Diagnostic Messages (continued) Message Type Boot loader errors Cisco IOS errors Status LED Red Blinking red and blue Blinking red and off Red Cycling through blue, green, red, and off Message Meaning DRAM memory test failure FLASH file system failure Environment variable failure Bad MAC address Ethernet...
... password are configured with an IP address. Click OK to configure the system power settings using the GUI: Step 1 Step 2 Step 3 Step 4 Open your power source. The System Configuration page appears. Table 2 Access Point LED Diagnostic Messages (continued) Message Type Boot loader errors Cisco IOS errors Status LED Red Blinking red and blue Blinking red and off Red Cycling through blue, green, red, and off Message Meaning DRAM memory test failure FLASH file system failure Environment variable failure Bad MAC address Ethernet...

Getting Started Guide
Page 21
... the Cisco IOS software configuration guide for your switch status as shown in Table 3. Note To verify switch status, you need to use the switch CLI. Table 3 System Power Settings Power Source System Power Settings Cisco PSE supporting Cisco Intelligent Power Settings: Power Negotiation Power Management feature1 selected Power Injector: Unchecked Cisco PSE not supporting Cisco Intelligent Power Management feature1 Power Settings: Prestandard Compatibility selected Power Injector: Unchecked Cisco Aironet Power Injector with a Cisco PSE supporting Intelligent Power Management feature1...
... the Cisco IOS software configuration guide for your switch status as shown in Table 3. Note To verify switch status, you need to use the switch CLI. Table 3 System Power Settings Power Source System Power Settings Cisco PSE supporting Cisco Intelligent Power Settings: Power Negotiation Power Management feature1 selected Power Injector: Unchecked Cisco PSE not supporting Cisco Intelligent Power Management feature1 Power Settings: Prestandard Compatibility selected Power Injector: Unchecked Cisco Aironet Power Injector with a Cisco PSE supporting Intelligent Power Management feature1...

Getting Started Guide
Page 22
... Power Management might have to refresh your problem in this guide or the troubleshooting chapter of the switch port to see the current status indicating that does not support Cisco inline power (non-Cisco switch) No configuration requirement AC power adapter No configuration requirement 1. Click Products & Services. Click Wireless. MAC address is HHHH.HHHH.HHHH. Scroll down to http://www.cisco.com. The Cisco Aironet 1140 Series Install and Upgrade page appears. These, and other documents...
... Power Management might have to refresh your problem in this guide or the troubleshooting chapter of the switch port to see the current status indicating that does not support Cisco inline power (non-Cisco switch) No configuration requirement AC power adapter No configuration requirement 1. Click Products & Services. Click Wireless. MAC address is HHHH.HHHH.HHHH. Scroll down to http://www.cisco.com. The Cisco Aironet 1140 Series Install and Upgrade page appears. These, and other documents...
Getting Started Guide
Page 24
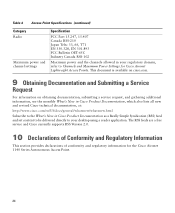
... information on obtaining documentation, submitting a service request, and gathering additional information, see the monthly What's New in Cisco Product Documentation, which also lists all new and revised Cisco technical documentation, at: http://www.cisco.com/en/US/docs/general/whatsnew/whatsnew.html Subscribe to Channels and Maximum Power Settings for the Cisco Aironet 1140 Series Autonomous Access Point. 24 Table 4 Access Point Specifications (continued) Category Radio Maximum power and channel settings Specification FCC Part 15.247, 15...
... information on obtaining documentation, submitting a service request, and gathering additional information, see the monthly What's New in Cisco Product Documentation, which also lists all new and revised Cisco technical documentation, at: http://www.cisco.com/en/US/docs/general/whatsnew/whatsnew.html Subscribe to Channels and Maximum Power Settings for the Cisco Aironet 1140 Series Autonomous Access Point. 24 Table 4 Access Point Specifications (continued) Category Radio Maximum power and channel settings Specification FCC Part 15.247, 15...

Getting Started Guide
Page 25
... the receiving antenna. • Increase separation between the equipment and receiver. • Connect the equipment to Part 15 of Conformity Statement Tested To Comply With FCC Standards FOR HOME OR OFFICE USE Models AIR-AP1141N-A-K9 AIR-AP1142N-A-K9 Certification Numbers LDK102069 LDK102070 Manufacturer: Cisco Systems, Inc. 170 West Tasman Drive San Jose, CA 95134-1706 USA This device complies with the instructions, may...
... the receiving antenna. • Increase separation between the equipment and receiver. • Connect the equipment to Part 15 of Conformity Statement Tested To Comply With FCC Standards FOR HOME OR OFFICE USE Models AIR-AP1141N-A-K9 AIR-AP1142N-A-K9 Certification Numbers LDK102069 LDK102070 Manufacturer: Cisco Systems, Inc. 170 West Tasman Drive San Jose, CA 95134-1706 USA This device complies with the instructions, may...


