User Manual
Page 1
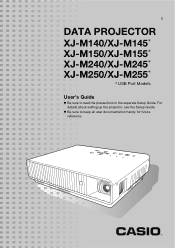
For details about setting up the projector, see the Setup Guide. E DATA PROJECTOR XJ-M140/XJ-M145* XJ-M150/XJ-M155* XJ-M240/XJ-M245* XJ-M250/XJ-M255* * USB Port Models User's Guide z Be sure to keep all user documentation handy for future reference. z Be sure to read the precautions in the separate Setup Guide.
For details about setting up the projector, see the Setup Guide. E DATA PROJECTOR XJ-M140/XJ-M145* XJ-M150/XJ-M155* XJ-M240/XJ-M245* XJ-M250/XJ-M255* * USB Port Models User's Guide z Be sure to keep all user documentation handy for future reference. z Be sure to read the precautions in the separate Setup Guide.
User Manual
Page 4
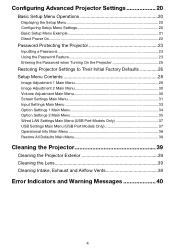
...Setup Menu Example 21 Direct Power On...22 Password Protecting the Projector 23 Inputting a Password 23 Using the Password Feature 23 Entering the Password when Turning On the Projector 25 Restoring Projector Settings to Their Initial Factory Defaults 26 Setup Menu Contents 28 Image Adjustment 1 Main Menu 28 Image Adjustment 2 Main Menu 30 Volume Adjustment Main Menu 30 Screen Settings Main Menu 31 Input Settings Main Menu 33 Option Settings 1 Main Menu 34 Option Settings 2 Main Menu 35 Wired LAN Settings Main Menu (USB Port Models Only 37 USB Settings Main Menu (USB Port Models...
...Setup Menu Example 21 Direct Power On...22 Password Protecting the Projector 23 Inputting a Password 23 Using the Password Feature 23 Entering the Password when Turning On the Projector 25 Restoring Projector Settings to Their Initial Factory Defaults 26 Setup Menu Contents 28 Image Adjustment 1 Main Menu 28 Image Adjustment 2 Main Menu 30 Volume Adjustment Main Menu 30 Screen Settings Main Menu 31 Input Settings Main Menu 33 Option Settings 1 Main Menu 34 Option Settings 2 Main Menu 35 Wired LAN Settings Main Menu (USB Port Models Only 37 USB Settings Main Menu (USB Port Models...
User Manual
Page 6
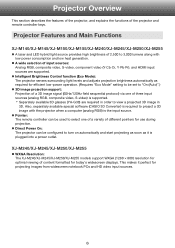
.../XJ-M155/XJ-M240/XJ-M245/XJ-M250/XJ-M255 z A laser and LED hybrid light source provides high brightness of content formatted for projecting images from widescreen notebook PCs and HD video input sources. 6 z Intelligent Brightness Control function (Eco Mode): The projector senses surrounding light levels and adjusts projection brightness automatically as it perfect for today's widescreen displays. XJ-M240/XJ-M245/XJ-M250/XJ-M255 z WXGA Resolution: The XJ-M240/XJ-M245/XJ-M250/XJ-M255 models support WXGA (1280 × 800) resolution for optimal viewing...
.../XJ-M155/XJ-M240/XJ-M245/XJ-M250/XJ-M255 z A laser and LED hybrid light source provides high brightness of content formatted for projecting images from widescreen notebook PCs and HD video input sources. 6 z Intelligent Brightness Control function (Eco Mode): The projector senses surrounding light levels and adjusts projection brightness automatically as it perfect for today's widescreen displays. XJ-M240/XJ-M245/XJ-M250/XJ-M255 z WXGA Resolution: The XJ-M240/XJ-M245/XJ-M250/XJ-M255 models support WXGA (1280 × 800) resolution for optimal viewing...
User Manual
Page 7
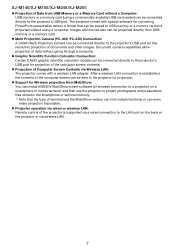
... resolution projection of documents and other images. z Projection of data without going through a computer. The projector comes with a wireless LAN adapter. z Projector operation via wired or wireless LAN: Remote control of the projector is established, the contents of the computer screen can be sent to the projector's USB port. z Multi Projection Camera (YC-400, YC-430) Connection: A CASIO Multi Projection Camera can be connected directly to the LAN port on a smartphone or mobile terminal, and then use the projector...
... resolution projection of documents and other images. z Projection of data without going through a computer. The projector comes with a wireless LAN adapter. z Projector operation via wired or wireless LAN: Remote control of the projector is established, the contents of the computer screen can be sent to the projector's USB port. z Multi Projection Camera (YC-400, YC-430) Connection: A CASIO Multi Projection Camera can be connected directly to the LAN port on a smartphone or mobile terminal, and then use the projector...
User Manual
Page 8
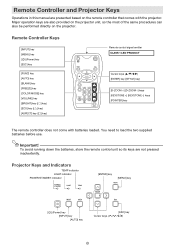
...] key [AUTO] key [BLANK] key [FREEZE] key [COLOR MODE] key [VOLUME] key [BRIGHT] key ([O] key) [ECO] key ([f] key) [ASPECT] key ([Z] key) Remote control signal emitter CLASS 1 LED PRODUCT Cursor keys (S/T/W/X) [ENTER] key ([STYLE] key) [D-ZOOM +] [D-ZOOM -] keys [KEYSTONE +] [KEYSTONE -] keys [POINTER] key The remote controller does not come with the projector. You need to load the two supplied batteries before use. Remote Controller and Projector Keys Operations in this manual are...
...] key [AUTO] key [BLANK] key [FREEZE] key [COLOR MODE] key [VOLUME] key [BRIGHT] key ([O] key) [ECO] key ([f] key) [ASPECT] key ([Z] key) Remote control signal emitter CLASS 1 LED PRODUCT Cursor keys (S/T/W/X) [ENTER] key ([STYLE] key) [D-ZOOM +] [D-ZOOM -] keys [KEYSTONE +] [KEYSTONE -] keys [POINTER] key The remote controller does not come with the projector. You need to load the two supplied batteries before use. Remote Controller and Projector Keys Operations in this manual are...
User Manual
Page 15
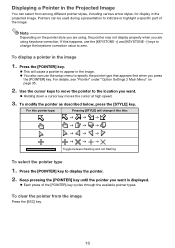
... moves the cursor at high speed. 3. Keep pressing the [POINTER] key until the pointer you press the [POINTER] key. z This will change the keystone correction value to change it like this happens, use the setup menu to appear in the image. To display a pointer in the projected image. z Each press of the image. z You also can be used during a presentation to display the pointer. 2. To...
... moves the cursor at high speed. 3. Keep pressing the [POINTER] key until the pointer you press the [POINTER] key. z This will change the keystone correction value to change it like this happens, use the setup menu to appear in the image. To display a pointer in the projected image. z Each press of the image. z You also can be used during a presentation to display the pointer. 2. To...
User Manual
Page 18
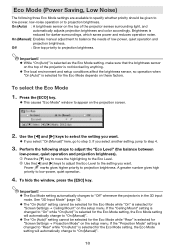
... Mode depends on the setup menu. z The "On (Auto)" setting cannot be selected for the Eco Mode while "On" is selected for "Screen Settings J Ceiling Mount" on these factors. On (Manual): Enables manual adjustment to the setting you want . Perform the following three Eco Mode settings are available to specify whether priority should be given to low-power, low-noise operation or to "On (Manual)". 18 If the "Projection Mode" setting is changed...
... Mode depends on the setup menu. z The "On (Auto)" setting cannot be selected for the Eco Mode while "On" is selected for "Screen Settings J Ceiling Mount" on these factors. On (Manual): Enables manual adjustment to the setting you want . Perform the following three Eco Mode settings are available to specify whether priority should be given to low-power, low-noise operation or to "On (Manual)". 18 If the "Projection Mode" setting is changed...
User Manual
Page 23
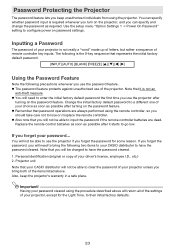
... initial factory default password. [INPUT] [AUTO] [BLANK] [FREEZE] [S] [T] [W] [X] Using the Password Feature Note the following two items to your choice as soon as possible after turning on password settings. z Also note that password operations are dead. The following is not really a "word" made up of letters, but rather a sequence of your projector, except for some reason. Change the initial factory default password to lose or misplace the remote controller...
... initial factory default password. [INPUT] [AUTO] [BLANK] [FREEZE] [S] [T] [W] [X] Using the Password Feature Note the following two items to your choice as soon as possible after turning on password settings. z Also note that password operations are dead. The following is not really a "word" made up of letters, but rather a sequence of your projector, except for some reason. Change the initial factory default password to lose or misplace the remote controller...
User Manual
Page 24
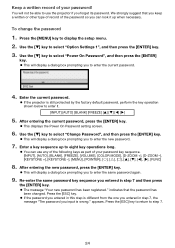
... by the factory default password, perform the key operation shown below to enter the new password. 7. indicates that you keep a written or other type of record of the password so you to enter it up to select "Option Settings 1", and then press the [ENTER] key. 3. z You can look it . [INPUT] [AUTO] [BLANK] [FREEZE] [S] [T] [W] [X] 5. You will display a dialog box prompting you can use the projector if...
... by the factory default password, perform the key operation shown below to enter the new password. 7. indicates that you keep a written or other type of record of the password so you to enter it up to select "Option Settings 1", and then press the [ENTER] key. 3. z You can look it . [INPUT] [AUTO] [BLANK] [FREEZE] [S] [T] [W] [X] 5. You will display a dialog box prompting you can use the projector if...
User Manual
Page 28
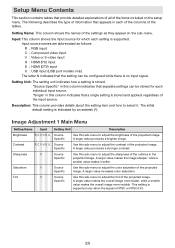
... increases color saturation. This setting is supported only when the signal is stored. Input source names are abbreviated as they appear on the setup menu. "Source Specific" in each setting is no input signal. Source Specific Use this sub-menu to select it softer. A larger value makes the overall image more bluish, while a smaller value makes the overall image more reddish. Source Specific Use this sub-menu to adjust the brightness of the projected image. The...
... increases color saturation. This setting is supported only when the signal is stored. Input source names are abbreviated as they appear on the setup menu. "Source Specific" in each setting is no input signal. Source Specific Use this sub-menu to select it softer. A larger value makes the overall image more bluish, while a smaller value makes the overall image more reddish. Source Specific Use this sub-menu to adjust the brightness of the projected image. The...
User Manual
Page 30
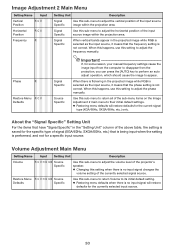
... of the projector's speaker. z Changing this setting to adjust the phase manually. When there is flickering in the projected image while RGB is selected as the input source, it means that is being input when the setting is not correct. Volume Adjustment Main Menu Setting Name Input Setting Unit Description Volume R C V H D U N Source Specific Use this setting to adjust the frequency manually. About the "Signal Specific" Setting Unit For the items that have "Signal Specific" in the projected image while RGB...
... of the projector's speaker. z Changing this setting to adjust the phase manually. When there is flickering in the projected image while RGB is selected as the input source, it means that is being input when the setting is not correct. Volume Adjustment Main Menu Setting Name Input Setting Unit Description Volume R C V H D U N Source Specific Use this setting to adjust the frequency manually. About the "Signal Specific" Setting Unit For the items that have "Signal Specific" in the projected image while RGB...
User Manual
Page 33
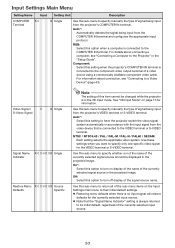
... connection, see "Connecting a Computer to its initial default, regardless of the currently selected signal source should be changed while the projector is in the 3D input mode. Use these settings when you want to a Video Device" (page 43). Use this item cannot be displayed in the projected image. Use this option to turn off display of signal being input from the projector's COMPUTER IN terminal. Input Settings Main Menu Setting Name Input Setting Unit Description COMPUTER R C Terminal N Single Use...
... connection, see "Connecting a Computer to its initial default, regardless of the currently selected signal source should be changed while the projector is in the 3D input mode. Use these settings when you want to a Video Device" (page 43). Use this item cannot be displayed in the projected image. Use this option to turn off display of signal being input from the projector's COMPUTER IN terminal. Input Settings Main Menu Setting Name Input Setting Unit Description COMPUTER R C Terminal N Single Use...
User Manual
Page 35
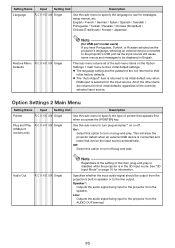
z The "Auto Adjust" item is returned to use for messages, setup menus, etc. See "3D Input Mode" on the Option Settings 1 main menu to their initial defaults regardless of this item, plug-and-play . All of the other items are not returned to their initial default settings. Audio Out R C V H D U N Single Note Regardless of the setting of the currently selected input source. Specifies whether the input audio signal should be displayed in...
z The "Auto Adjust" item is returned to use for messages, setup menus, etc. See "3D Input Mode" on the Option Settings 1 main menu to their initial defaults regardless of this item, plug-and-play . All of the other items are not returned to their initial default settings. Audio Out R C V H D U N Single Note Regardless of the setting of the currently selected input source. Specifies whether the input audio signal should be displayed in...
User Manual
Page 37
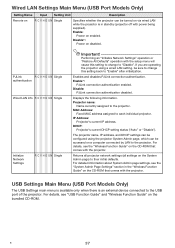
... LAN Settings Main Menu (USB Port Models Only) Setting Name Input Setting Unit Description Remote on R C V H D U N Single Specifies whether the projector can be sure to change this setting to change to the projector. Performing an "Initialize Network Settings" operation or "Restore All Defaults" operation with power being supplied). Enable*: PJLink connection authentication enabled. Projector name: Name currently assigned to "Disable". The projector name, IP address, and DHCP settings can be configured using a wired LAN setting, be accessed on a computer connected by LAN...
... LAN Settings Main Menu (USB Port Models Only) Setting Name Input Setting Unit Description Remote on R C V H D U N Single Specifies whether the projector can be sure to change this setting to change to the projector. Performing an "Initialize Network Settings" operation or "Restore All Defaults" operation with power being supplied). Enable*: PJLink connection authentication enabled. Projector name: Name currently assigned to "Disable". The projector name, IP address, and DHCP settings can be configured using a wired LAN setting, be accessed on a computer connected by LAN...
User Manual
Page 40
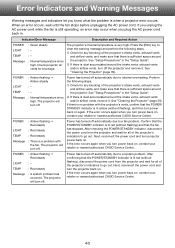
... the projector's indicators to internal overheating. TEMP : Red steady Message : A system problem has occurred. If you unplug the AC power cord while the fan is still operating, an error may occur when you plug the AC power cord back in the "Setup Guide". 2 If there is sufficient space around the projector. Indicator/Error Message Description and Required Action POWER LIGHT TEMP Message : Green steady :- :- : Internal temperature is too high. POWER : Amber flashing J Red steady LIGHT : Red steady TEMP : Red steady Message : There is a problem with the projector...
... the projector's indicators to internal overheating. TEMP : Red steady Message : A system problem has occurred. If you unplug the AC power cord while the fan is still operating, an error may occur when you plug the AC power cord back in the "Setup Guide". 2 If there is sufficient space around the projector. Indicator/Error Message Description and Required Action POWER LIGHT TEMP Message : Green steady :- :- : Internal temperature is too high. POWER : Amber flashing J Red steady LIGHT : Red steady TEMP : Red steady Message : There is a problem with the projector...

User Manual
Page 41
... POWER LIGHT TEMP Message : Green steady :- :- : A system problem has occurred. The audio function may cause problems with the system. POWER LIGHT TEMP : Amber flashing J Red steady : Red flashing (0.5-second interval) : Red flashing (0.5-second interval) The USB or LAN connection was turned off automatically due to some functions. Wait for all of a problem with the USB port or LAN terminal. Message : Some problem occurred with the USB port or LAN port. If the error occurs again when you turn power back on . Confirm that the POWER/STANDBY indicator...
... POWER LIGHT TEMP Message : Green steady :- :- : A system problem has occurred. The audio function may cause problems with the system. POWER LIGHT TEMP : Amber flashing J Red steady : Red flashing (0.5-second interval) : Red flashing (0.5-second interval) The USB or LAN connection was turned off automatically due to some functions. Wait for all of a problem with the USB port or LAN terminal. Message : Some problem occurred with the USB port or LAN port. If the error occurs again when you turn power back on . Confirm that the POWER/STANDBY indicator...
User Manual
Page 56
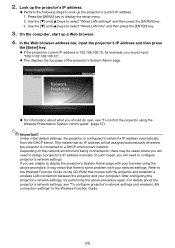
... address bar, input the projector's IP address and then press the [Enter] key. This means that comes with the projector and establish a wireless LAN connection between the projector and your network settings. z If the projectors current IP address is connected to display the projector's System Admin page with your computer. Under initial default settings, the projector is some problem with your browser using the Wireless Presentation System control panel" (page 57). After configuring the projector's network settings...
... address bar, input the projector's IP address and then press the [Enter] key. This means that comes with the projector and establish a wireless LAN connection between the projector and your network settings. z If the projectors current IP address is connected to display the projector's System Admin page with your computer. Under initial default settings, the projector is some problem with your browser using the Wireless Presentation System control panel" (page 57). After configuring the projector's network settings...

User Manual
Page 57
... " setting (page 37). 57 Light error: Light source unit error occurred. z This logs in to the projector's System Admin page" of the following . On the password input screen that comes with the latest information. Click the [Login] button. z The table below . Normal: Operating normally. z The initial default password is selected for the "Remote on the control panel screen. Wired LAN Connection : "To establish a wired LAN connection between the projector and a computer" (page 55) Wireless LAN Connection...
... " setting (page 37). 57 Light error: Light source unit error occurred. z This logs in to the projector's System Admin page" of the following . On the password input screen that comes with the latest information. Click the [Login] button. z The table below . Normal: Operating normally. z The initial default password is selected for the "Remote on the control panel screen. Wired LAN Connection : "To establish a wired LAN connection between the projector and a computer" (page 55) Wireless LAN Connection...
User Manual
Page 61
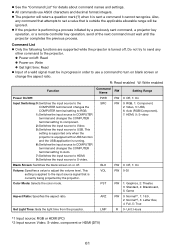
... about command names and settings. z If the projector is running. 6: Switches the input source to COMPUTER terminal and changes the COMPUTER terminal setting to Auto. 7: Switches the input source to HDMI. 9: Switches the input source to turn on blank screen or change the aspect ratio. BLK RW 0: Off, 1: On Volume: Specifies a value to USB. VOL RW 0-30 Color Mode: Selects the color mode. LMP R 0- Unit: Hours *1 Input source: RGB or HDMI (PC) *2 Input source: Video, S-video, component or HDMI (DTV) 61 z All commands use a command to S-video...
... about command names and settings. z If the projector is running. 6: Switches the input source to COMPUTER terminal and changes the COMPUTER terminal setting to Auto. 7: Switches the input source to HDMI. 9: Switches the input source to turn on blank screen or change the aspect ratio. BLK RW 0: Off, 1: On Volume: Specifies a value to USB. VOL RW 0-30 Color Mode: Selects the color mode. LMP R 0- Unit: Hours *1 Input source: RGB or HDMI (PC) *2 Input source: Video, S-video, component or HDMI (DTV) 61 z All commands use a command to S-video...
User Manual
Page 62
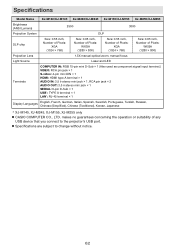
... you connect to change without notice. 62 z Specifications are subject to the projector's USB port. makes no guarantees concerning the operation or suitability of Pixels: WXGA (1280 × 800) Projection Lens 1.5X manual optical zoom, manual focus Light Source Laser and LED Terminals COMPUTER IN: RGB 15-pin mini D-Sub × 1 (Also used as component signal input terminal.) VIDEO: RCA pin jack × 1 S-video: 4-pin mini DIN × 1 HDMI: HDMI type A terminal × 1 AUDIO...
... you connect to change without notice. 62 z Specifications are subject to the projector's USB port. makes no guarantees concerning the operation or suitability of Pixels: WXGA (1280 × 800) Projection Lens 1.5X manual optical zoom, manual focus Light Source Laser and LED Terminals COMPUTER IN: RGB 15-pin mini D-Sub × 1 (Also used as component signal input terminal.) VIDEO: RCA pin jack × 1 S-video: 4-pin mini DIN × 1 HDMI: HDMI type A terminal × 1 AUDIO...


