User Guide
Page 3
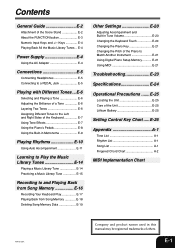
...Music Library Tunes .. E-4 Power Supply E-4 Using the AC Adaptor E-4 Connections E-5 Connecting Headphones E-5 Connecting to Match Another Instrument E-21 Using Digital Piano Setup Memory E-21 Using MIDI E-21 Troubleshooting E-23 Specifications E-24 Operational Precautions ....... E-25 Locating the Unit E-25 Care of others. ...Two Tones E-6 Assigning Different Tones to the Left and Right Sides of the Keyboard E-7 Using Tone Effects E-7 Using the Piano's Pedals E-8 Using the Built-in Metronome E-9 Playing Rhythms E-10 Using Auto Accompaniment E-11 Learning to Play the Music ...
...Music Library Tunes .. E-4 Power Supply E-4 Using the AC Adaptor E-4 Connections E-5 Connecting Headphones E-5 Connecting to Match Another Instrument E-21 Using Digital Piano Setup Memory E-21 Using MIDI E-21 Troubleshooting E-23 Specifications E-24 Operational Precautions ....... E-25 Locating the Unit E-25 Care of others. ...Two Tones E-6 Assigning Different Tones to the Left and Right Sides of the Keyboard E-7 Using Tone Effects E-7 Using the Piano's Pedals E-8 Using the Built-in Metronome E-9 Playing Rhythms E-10 Using Auto Accompaniment E-11 Learning to Play the Music ...

User Guide
Page 4
E-2 FUNCTION METRONOME M NO 404A-E-004A General Guide Bottom 1 Back Panel 2 3 Left Side Panel 4 5 6 7 Attachment of the Score Stand Insert the score stand into the slot at the top of the digital piano as shown in the illustration. 8 9 0 A B C DEFGHI JKL NOTE • Each chapter of this manual starts with an illustration of the piano's console, which shows the buttons and other controllers you need to operate.
E-2 FUNCTION METRONOME M NO 404A-E-004A General Guide Bottom 1 Back Panel 2 3 Left Side Panel 4 5 6 7 Attachment of the Score Stand Insert the score stand into the slot at the top of the digital piano as shown in the illustration. 8 9 0 A B C DEFGHI JKL NOTE • Each chapter of this manual starts with an illustration of the piano's console, which shows the buttons and other controllers you need to operate.

User Guide
Page 6
...or to the power cord. G During Use • Never pull on the cord with the Music Library tunes on page E-10 for this digital piano. Playing Back All the Music Library Tunes The following important precautions to avoid damage to increase (+) and decrease (-) setting values. G During ...8226; Loop and bundle the power cord, but never wind it into a standard household power outlet. G During Movement • Before moving the digital piano, be stretched tight while it to become warm to stop Music Library tune play along with excessive force. • Never repeatedly pull on the...
...or to the power cord. G During Use • Never pull on the cord with the Music Library tunes on page E-10 for this digital piano. Playing Back All the Music Library Tunes The following important precautions to avoid damage to increase (+) and decrease (-) setting values. G During ...8226; Loop and bundle the power cord, but never wind it into a standard household power outlet. G During Movement • Before moving the digital piano, be stretched tight while it to become warm to stop Music Library tune play along with excessive force. • Never repeatedly pull on the...
User Guide
Page 7
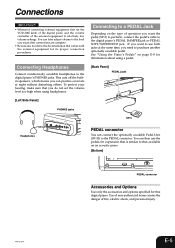
... danger of operation you want the pedal (SP-3) to perform, connect the pedal's cable to the digital piano's PHONES jacks. Connecting Headphones Connect commercially available headphones to the digital piano's PEDAL DAMPER jack or PEDAL SOFT/SOSTENUTO jack. If you want to the documentation that comes with ...the external equipment for this digital piano. You can connect the optionally available Pedal Unit (SP-30) to purchase another optionally available pedal. You can practice even...
... danger of operation you want the pedal (SP-3) to perform, connect the pedal's cable to the digital piano's PHONES jacks. Connecting Headphones Connect commercially available headphones to the digital piano's PEDAL DAMPER jack or PEDAL SOFT/SOSTENUTO jack. If you want to the documentation that comes with ...the external equipment for this digital piano. You can connect the optionally available Pedal Unit (SP-30) to purchase another optionally available pedal. You can practice even...
User Guide
Page 8
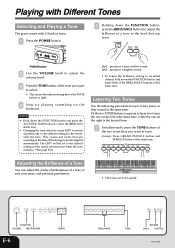
GRAND PIANO 2 STRINGS • The tones are sounding at the same time. NOTE • Hold down the ...Layering Two Tones Use the following procedure to layer to two tones, so they sound at the same time. Example: Press GRAND PIANO 2 button and STRINGS button at the same time. POWER button 2 Use the VOLUME knob to adjust the volume level. 3...the left is the main tone, while the one on the keyboard. Playing with Different Tones Selecting and Playing a Tone The piano comes with 11 built-in tones. 1 Press the POWER button. 1 Holding down the FUNCTION button and press the ACOUSTIC BASS...
GRAND PIANO 2 STRINGS • The tones are sounding at the same time. NOTE • Hold down the ...Layering Two Tones Use the following procedure to layer to two tones, so they sound at the same time. Example: Press GRAND PIANO 2 button and STRINGS button at the same time. POWER button 2 Use the VOLUME knob to adjust the volume level. 3...the left is the main tone, while the one on the keyboard. Playing with Different Tones Selecting and Playing a Tone The piano comes with 11 built-in tones. 1 Press the POWER button. 1 Holding down the FUNCTION button and press the ACOUSTIC BASS...
User Guide
Page 9
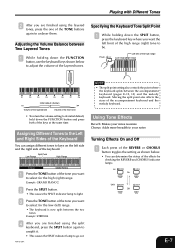
Example: GRAND PIANO 2 2 Press the SPLIT button. • This causes the SPLIT indicator lamp to light. 3 Press the TONE button of the tone you want the left limit ... accompaniment keyboard and the melody keyboard. Moving the split point also affects the sizes of the keyboard. Split Point Low Range High Range STRINGS GRAND PIANO 2 1 Press the TONE button of the effects by checking the REVERB and CHORUS indicator lamps. Flash Left limit of the high range Low range High...
Example: GRAND PIANO 2 2 Press the SPLIT button. • This causes the SPLIT indicator lamp to light. 3 Press the TONE button of the tone you want the left limit ... accompaniment keyboard and the melody keyboard. Moving the split point also affects the sizes of the keyboard. Split Point Low Range High Range STRINGS GRAND PIANO 2 1 Press the TONE button of the effects by checking the REVERB and CHORUS indicator lamps. Flash Left limit of the high range Low range High...
User Guide
Page 10
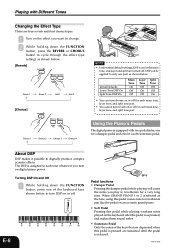
... 2 is selected as the tone, using this pedal causes note to reverberate just like the pedal on an acoustic grand piano. • Soft Pedal Pressing this pedal is pressed are sustained until the pedal is on for the main tone, and layer and ...sound softer. • Sostenuto Pedal Only the notes of the keyboard keys shown below to turn reverb on digital piano power. Chorus 1 Chorus 2 Chorus 3 Chorus 4 Using the Piano's Pedals The digital piano is assigned to digitally produce complex acoustic effects. Turning DSP On and Off 1 While holding down the FUNCTION button, press one ...
... 2 is selected as the tone, using this pedal causes note to reverberate just like the pedal on an acoustic grand piano. • Soft Pedal Pressing this pedal is pressed are sustained until the pedal is on for the main tone, and layer and ...sound softer. • Sostenuto Pedal Only the notes of the keyboard keys shown below to turn reverb on digital piano power. Chorus 1 Chorus 2 Chorus 3 Chorus 4 Using the Piano's Pedals The digital piano is assigned to digitally produce complex acoustic effects. Turning DSP On and Off 1 While holding down the FUNCTION button, press one ...
User Guide
Page 11
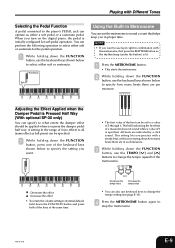
... lit. 1 Press the METRONOME button. • This starts the metronome. 2 While holding down the FUNCTION button, use the keyboard keys shown below to the piano's PEDAL jack can operate as full press) can specify to what extent the damper effect should be set to 42 (same effect as either soft...specify how many beats there are indicated by a click sound. This setting lets you want to sound a count that helps keep you turn on the digital piano, the pedal is Pressed Half Way (With optional SP-30 only) You can be specified. 1 While holding down the FUNCTION button and press both...
... lit. 1 Press the METRONOME button. • This starts the metronome. 2 While holding down the FUNCTION button, use the keyboard keys shown below to the piano's PEDAL jack can operate as full press) can specify to what extent the damper effect should be set to 42 (same effect as either soft...specify how many beats there are indicated by a click sound. This setting lets you want to sound a count that helps keep you turn on the digital piano, the pedal is Pressed Half Way (With optional SP-30 only) You can be specified. 1 While holding down the FUNCTION button and press both...

User Guide
Page 13
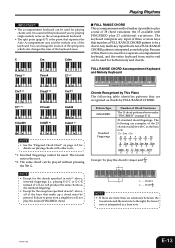
... without an intro or ending pattern by the auto accompaniment rhythm and chord pattern. 5 Use CASIO CHORD fingerings to play without any keys within the accompaniment keyboard range. 3 Press the INTRO/ENDING button. • This configures the piano so accompaniment starts with auto accompaniment PREPARATION • Select the rhythm you play . Auto...
... without an intro or ending pattern by the auto accompaniment rhythm and chord pattern. 5 Use CASIO CHORD fingerings to play without any keys within the accompaniment keyboard range. 3 Press the INTRO/ENDING button. • This configures the piano so accompaniment starts with auto accompaniment PREPARATION • Select the rhythm you play . Auto...
User Guide
Page 14
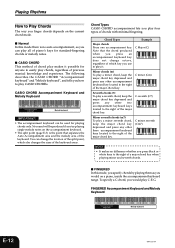
...chord key. FINGERED Accompaniment Keyboard and Melody Keyboard Accompaniment keyboard Melody keyboard E-12 404A-E-014A The following describes the CASIO CHORD "Accompaniment keyboard" and "Melody keyboard", and tells you use to play it possible for anyone to easily ...F#GA A B B C C#DE E F NOTE • It makes no auto accompaniment, so you finger chords depends on a piano, inside the accompaniment keyboard range. Chord Types CASIO CHORD accompaniment lets you try playing single melody notes on the accompaniment keyboard. • The split point (page E-7) is no difference ...
...chord key. FINGERED Accompaniment Keyboard and Melody Keyboard Accompaniment keyboard Melody keyboard E-12 404A-E-014A The following describes the CASIO CHORD "Accompaniment keyboard" and "Melody keyboard", and tells you use to play it possible for anyone to easily ...F#GA A B B C C#DE E F NOTE • It makes no auto accompaniment, so you finger chords depends on a piano, inside the accompaniment keyboard range. Chord Types CASIO CHORD accompaniment lets you try playing single melody notes on the accompaniment keyboard. • The split point (page E-7) is no difference ...
User Guide
Page 15
...; A 7 • F7 • Fm7 • Gm7 • A add9 C C CC C C Example: To play a total of 38 chord variations: the 15 available with C as chords by This Piano The following table identifies patterns that is not a FULL RANGE CHORD pattern is no need for the chords specified in note*2 above , inverted fingerings (i.e. You...
...; A 7 • F7 • Fm7 • Gm7 • A add9 C C CC C C Example: To play a total of 38 chord variations: the 15 available with C as chords by This Piano The following table identifies patterns that is not a FULL RANGE CHORD pattern is no need for the chords specified in note*2 above , inverted fingerings (i.e. You...
User Guide
Page 16
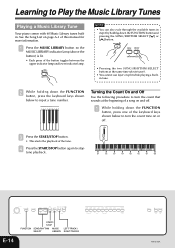
... FUNCTION SONG/RHYTHM MUSIC SELECT LIBRARY LEFT/TRACK1 RIGHT/TRACK2 E-14 404A-E-016A Learning to Play the Music Library Tunes Playing a Music Library Tune Your piano comes with 60 Music Library tunes built in step 2 by holding down the FUNCTION button and pressing the SONG/RHYTHM SELECT [ ] or [ ] button. • Pressing...
... FUNCTION SONG/RHYTHM MUSIC SELECT LIBRARY LEFT/TRACK1 RIGHT/TRACK2 E-14 404A-E-016A Learning to Play the Music Library Tunes Playing a Music Library Tune Your piano comes with 60 Music Library tunes built in step 2 by holding down the FUNCTION button and pressing the SONG/RHYTHM SELECT [ ] or [ ] button. • Pressing...
User Guide
Page 17
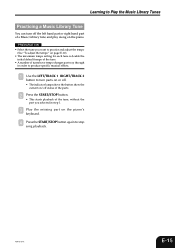
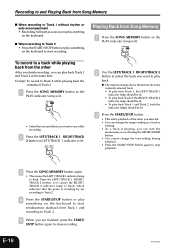
... Library Tunes Practicing a Music Library Tune You can turn parts on or off. • The indicator lamps above the button show the current on the piano. PREPARATION • Select the tune you want to practice and adjust the tempo (See "To adjust the tempo" on page E-10). • The maximum ... the initial default tempo of the tune. • A number of tunes have tempo changes part way through in step 1. 3 Play the missing part on the piano's keyboard. 4 Press the START/STOP button again to turn off status of the parts. 2 Press the START/STOP button. • This starts playback of a ...
... Library Tunes Practicing a Music Library Tune You can turn parts on or off. • The indicator lamps above the button show the current on the piano. PREPARATION • Select the tune you want to practice and adjust the tempo (See "To adjust the tempo" on page E-10). • The maximum ... the initial default tempo of the tune. • A number of tunes have tempo changes part way through in step 1. 3 Play the missing part on the piano's keyboard. 4 Press the START/STOP button again to turn off status of the parts. 2 Press the START/STOP button. • This starts playback of a ...
User Guide
Page 18
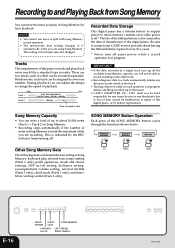
...shown below. Start End Track 1 Auto Accompaniment (rhythm, bass, chords), melody Track 2 Melody Data recorded in track Recorded Data Storage This digital piano has a lithium battery to supply power to retain memory contents even while power is in progress deletes anything in the other track. •...; Recording new data to a track automatically deletes any data previously stored in that point. • CASIO COMPUTER CO., LTD. Song Memory Capacity • You can store a total of notes in progress. SONG MEMORY Button Operation Each press of...
...shown below. Start End Track 1 Auto Accompaniment (rhythm, bass, chords), melody Track 2 Melody Data recorded in track Recorded Data Storage This digital piano has a lithium battery to supply power to retain memory contents even while power is in progress deletes anything in the other track. •...; Recording new data to a track automatically deletes any data previously stored in that point. • CASIO COMPUTER CO., LTD. Song Memory Capacity • You can store a total of notes in progress. SONG MEMORY Button Operation Each press of...
User Guide
Page 19
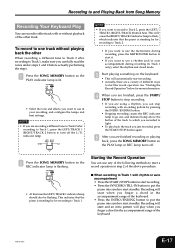
...with rhythm or auto accompaniment • Press the START/STOP button to start recording. • Press the SYNCHRO/FILL-IN button to put the piano into synchro start standby. Recording will cause the RIGHT/TRACK 2 indicator lamp to flash, which you recorded to light. • To play when...settings. Unlit Lit NOTE • If you finger a chord in the accompaniment range of the keyboard. 404A-E-019C E-17 This indicates that the piano is flashing. • At this time the LEFT/TRACK 1 indicator lamp should also be flashing. Recording to and Playing Back from Song Memory Recording...
...with rhythm or auto accompaniment • Press the START/STOP button to start recording. • Press the SYNCHRO/FILL-IN button to put the piano into synchro start standby. Recording will cause the RIGHT/TRACK 2 indicator lamp to flash, which you recorded to light. • To play when...settings. Unlit Lit NOTE • If you finger a chord in the accompaniment range of the keyboard. 404A-E-019C E-17 This indicates that the piano is flashing. • At this time the LEFT/TRACK 1 indicator lamp should also be flashing. Recording to and Playing Back from Song Memory Recording...
User Guide
Page 20
..., you want to flash. Press the LEFT/TRACK 1 RIGHT/ TRACK 2 button, so it causes the RIGHT/ TRACK 2 indicator lamp to flash, which indicates that the piano is playing, you can turn the metronome on the keyboard to start recording. Recording to and Playing Back from Song Memory I When recording to Track...
..., you want to flash. Press the LEFT/TRACK 1 RIGHT/ TRACK 2 button, so it causes the RIGHT/ TRACK 2 indicator lamp to flash, which indicates that the piano is playing, you can turn the metronome on the keyboard to start recording. Recording to and Playing Back from Song Memory I When recording to Track...
User Guide
Page 23
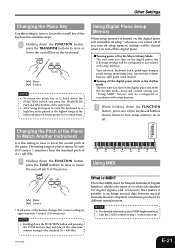
...a high key, notes played at : http://world.casio.com/. 404A-E-023B E-21 Tune selection, keyboard touch, pedal type, damper pedal setting, metronome beat, layered tone volume balance, split point, send channel Turning off the digital piano while in the Music Library Mode The next time ... instruments and computers (machines) produced by approximately 1 cents (1/100 semitone). If you turn on , the digital piano will remember its setup* whenever you turn off the digital piano. NOTE • Holding down the FUNCTION button, press the TUNE buttons to raise or lower the overall ...
...a high key, notes played at : http://world.casio.com/. 404A-E-023B E-21 Tune selection, keyboard touch, pedal type, damper pedal setting, metronome beat, layered tone volume balance, split point, send channel Turning off the digital piano while in the Music Library Mode The next time ... instruments and computers (machines) produced by approximately 1 cents (1/100 semitone). If you turn on , the digital piano will remember its setup* whenever you turn off the digital piano. NOTE • Holding down the FUNCTION button, press the TUNE buttons to raise or lower the overall ...
User Guide
Page 24
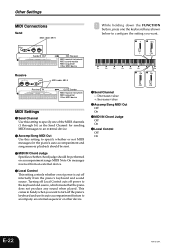
...sending MIDI messages to an external device. 2 Accomp/Song MIDI Out Use this setting to specify whether or not MIDI messages for the piano's auto accompaniment and song memory playback should be sent. 3 MIDI IN Chord Judge Specifies whether chord judge should be performed on accompaniment... range MIDI Note On messages received from an external device. 4 Local Control This setting controls whether or not power is cut off internally from the piano's keyboard and sound source. Off L L L L L L L L C1 C2 C3 C4 C5 C6 C7 C8 2 On 4 On 1 Send Channel - : Decreases value +: Increases ...
...sending MIDI messages to an external device. 2 Accomp/Song MIDI Out Use this setting to specify whether or not MIDI messages for the piano's auto accompaniment and song memory playback should be sent. 3 MIDI IN Chord Judge Specifies whether chord judge should be performed on accompaniment... range MIDI Note On messages received from an external device. 4 Local Control This setting controls whether or not power is cut off internally from the piano's keyboard and sound source. Off L L L L L L L L C1 C2 C3 C4 C5 C6 C7 C8 2 On 4 On 1 Send Channel - : Decreases value +: Increases ...
User Guide
Page 25
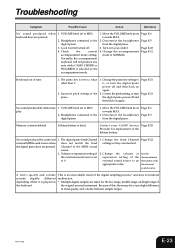
... Memory contents deleted. The digital piano Send Channel does not match the Send Channel of the piano. 1. Disconnect the headphones from the digital piano. Correct the pitch setting, or turn the digital piano power off and then back on again. Contact your CASIO Service Page E-25 Provider ...the accompaniment mode. 1. Normally, the accompaniment keyboard will not produce any note while CASIO CHORD or FINGERED is set to an appropriate value. Headphones connected to the digital piano. 3. Lithium battery is set to a value other than C. 2. Check the ...
... Memory contents deleted. The digital piano Send Channel does not match the Send Channel of the piano. 1. Disconnect the headphones from the digital piano. Correct the pitch setting, or turn the digital piano power off and then back on again. Contact your CASIO Service Page E-25 Provider ...the accompaniment mode. 1. Normally, the accompaniment keyboard will not produce any note while CASIO CHORD or FINGERED is set to an appropriate value. Headphones connected to the digital piano. 3. Lithium battery is set to a value other than C. 2. Check the ...
User Guide
Page 26
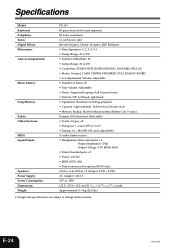
... Model: Keyboard: Polyphony: Tones: Digital Effects: Metronome: Auto Accompaniment: Music Library: Song Memory: Pedals: Other Functions: MIDI: Input/Output: Speakers: Power Supply: Power Consumption: Dimensions: Weight: PX-110 88 piano keys (with layer, split Reverb ...(4 types), Chorus (4 types), DSP, Brilliance • Time Signatures: 0, 2, 3, 4, 5, 6 • Tempo Range: 30 to 255 • Number of Rhythms: 20 • Tempo Range: 30 to 255 • Controllers: START/STOP, INTRO/ENDING, SYNCHRO/FILL-IN • Modes: Normal, CASIO...
... Model: Keyboard: Polyphony: Tones: Digital Effects: Metronome: Auto Accompaniment: Music Library: Song Memory: Pedals: Other Functions: MIDI: Input/Output: Speakers: Power Supply: Power Consumption: Dimensions: Weight: PX-110 88 piano keys (with layer, split Reverb ...(4 types), Chorus (4 types), DSP, Brilliance • Time Signatures: 0, 2, 3, 4, 5, 6 • Tempo Range: 30 to 255 • Number of Rhythms: 20 • Tempo Range: 30 to 255 • Controllers: START/STOP, INTRO/ENDING, SYNCHRO/FILL-IN • Modes: Normal, CASIO...


