

User Guide
Page 9
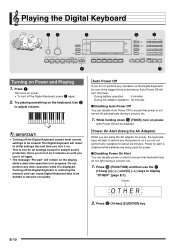
... select a function ct 1. You can use the [-] (decrease) and [+] (increase) keys to enter numbers and values. • Enter the same number of digits as the currently displayed value. Then use the FUNCTION button ( ) to adjust the reverb effect, to delete data, and to perform a wide range of the display. E-7 English br...
... select a function ct 1. You can use the [-] (decrease) and [+] (increase) keys to enter numbers and values. • Enter the same number of digits as the currently displayed value. Then use the FUNCTION button ( ) to adjust the reverb effect, to delete data, and to perform a wide range of the display. E-7 English br...
User Guide
Page 12
Turning off the Digital Keyboard causes most current settings to be deleted or become corrupted. During battery operation : 6 minutes During AC adaptor operation : 30 minutes ■ Disabling Auto Power Off You can disable ...
Turning off the Digital Keyboard causes most current settings to be deleted or become corrupted. During battery operation : 6 minutes During AC adaptor operation : 30 minutes ■ Disabling Auto Power Off You can disable ...
User Guide
Page 14
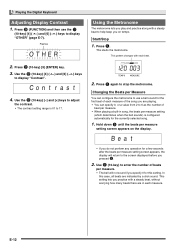
... configure the metronome to use the br (10-key) [4] (o) and [6] (p) keys to adjust the contrast. • The contrast setting range is configured automatically for the currently selected song. 5 1. Use the (10-key) [-] and [+] keys to display "OTHER" (page E-7). Changing the Beats per Measure You can specify 0, or a value from 2 to 17...
... configure the metronome to use the br (10-key) [4] (o) and [6] (p) keys to adjust the contrast. • The contrast setting range is configured automatically for the currently selected song. 5 1. Use the (10-key) [-] and [+] keys to display "OTHER" (page E-7). Changing the Beats per Measure You can specify 0, or a value from 2 to 17...
User Guide
Page 15
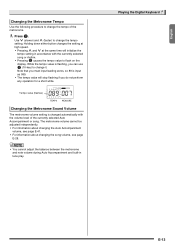
bm • Pressing causes the tempo value to change the tempo of the currently selected Auto Accompaniment or song. Use y (slower) and t (faster) to change the tempo setting. Holding down either button changes the setting at high speed. • ... tune play. Playing the Digital Keyboard E-13 While the tempo value is flashing, you must input leading zeros, so 89 is changed automatically with the currently selected song or rhythm. Press bm. Note that you can use br (10-key) to change it. English Changing the Metronome Tempo Use the following...
bm • Pressing causes the tempo value to change the tempo of the currently selected Auto Accompaniment or song. Use y (slower) and t (faster) to change the tempo setting. Holding down either button changes the setting at high speed. • ... tune play. Playing the Digital Keyboard E-13 While the tempo value is flashing, you must input leading zeros, so 89 is changed automatically with the currently selected song or rhythm. Press bm. Note that you can use br (10-key) to change it. English Changing the Metronome Tempo Use the following...

User Guide
Page 20
Press ct (FUNCTION) and then use the br (10-key) [4] (o) and [6] (p) keys to adjust the tuning, the current frequency setting will appear automatically after a few seconds after this step causes the display to change the frequency in octave units. • The ...to adjust the pitch slightly to the previous screen automatically. You can individually set a frequency within the range of 415.5 to a value that indicates the current frequency setting as shown below will appear. Keep pressing until the screen shown below will appear. E-18 Oc t Uppe r br 2. Advance to adjust ...
Press ct (FUNCTION) and then use the br (10-key) [4] (o) and [6] (p) keys to adjust the tuning, the current frequency setting will appear automatically after a few seconds after this step causes the display to change the frequency in octave units. • The ...to adjust the pitch slightly to the previous screen automatically. You can individually set a frequency within the range of 415.5 to a value that indicates the current frequency setting as shown below will appear. Keep pressing until the screen shown below will appear. E-18 Oc t Uppe r br 2. Advance to adjust ...

User Guide
Page 22
... Against Accidental Deletion of the microphone. Flashes 3. To help ensure that you play back the original sound. Wa i t i n g 5. Sampling also will delete any sound data currently stored under the same tone number. Press cr and ct (FUNCTION) at the same time. Sampling will start if the volume of the sound picked...
... Against Accidental Deletion of the microphone. Flashes 3. To help ensure that you play back the original sound. Wa i t i n g 5. Sampling also will delete any sound data currently stored under the same tone number. Press cr and ct (FUNCTION) at the same time. Sampling will start if the volume of the sound picked...

User Guide
Page 24
... can store up to the same keyboard key. To help ensure that you should be sure to change the drum sounds that make up the currently selected drum set. Press bo (RHYTHM). 2. Samp l i n g Flashes 6. No Da t a Used memory (Unit: Kbytes) Remaining memory capacity Sampling will ...stop automatically whenever there is no longer need will delete any sound data currently assigned to three drum sets and store them as tone numbers 606, 607, and 608. Simply select the tone number where the drum set sounds...
... can store up to the same keyboard key. To help ensure that you should be sure to change the drum sounds that make up the currently selected drum set. Press bo (RHYTHM). 2. Samp l i n g Flashes 6. No Da t a Used memory (Unit: Kbytes) Remaining memory capacity Sampling will ...stop automatically whenever there is no longer need will delete any sound data currently assigned to three drum sets and store them as tone numbers 606, 607, and 608. Simply select the tone number where the drum set sounds...
User Guide
Page 30
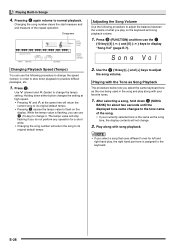
... default tempo. Use the (10-key) [-] and [+] keys to flash on the keyboard and song playback volume. 1. bp 1. Press bm. Playing with your currently selected tone is assigned to its original default tempo. Play along with the Tone as Song Playback The procedure below lets you play , the right... a song that uses different tones for a short while. • Changing the song number will not change it. The tempo value will return the current song to the keyboard. bm • Pressing causes the tempo value to adjust the song volume. Playing Built-in Songs 6 4.
... default tempo. Use the (10-key) [-] and [+] keys to flash on the keyboard and song playback volume. 1. bp 1. Press bm. Playing with your currently selected tone is assigned to its original default tempo. Play along with the Tone as Song Playback The procedure below lets you play , the right... a song that uses different tones for a short while. • Changing the song number will not change it. The tempo value will return the current song to the keyboard. bm • Pressing causes the tempo value to adjust the song volume. Playing Built-in Songs 6 4.

User Guide
Page 33
... in progress. Press (or ) to move forward one phrase, 7 or to move back one phrase. 8 7 • Holding down (SONG BANK) for the current song (if it is displayed, and during Step Lessons. The same tone used for song playback will be practiced. Message Description Appears when you want...the next phrase. bp 4. E-31 Play toll advance automatically to the next phrase after the unincluded phrase plays, so wait until the phrase currently being practiced. Complete Appears at the start playing on the display during an Auto Step Up Lesson (page E-35). bl Each press of the...
... in progress. Press (or ) to move forward one phrase, 7 or to move back one phrase. 8 7 • Holding down (SONG BANK) for the current song (if it is displayed, and during Step Lessons. The same tone used for song playback will be practiced. Message Description Appears when you want...the next phrase. bp 4. E-31 Play toll advance automatically to the next phrase after the unincluded phrase plays, so wait until the phrase currently being practiced. Complete Appears at the start playing on the display during an Auto Step Up Lesson (page E-35). bl Each press of the...

User Guide
Page 40
...enables chord input on the accompaniment keyboard 4 Accompaniment for the D-F#-A-C chord (D7) sounds. 4. Hold down bl. This will return automatically to the currently selected rhythm. Chords (no melody played) Melody Cho r d br 2. E-38 It is played, see "Using Synchro Start" on page E-41...• You can select from among the following five chord input modes. • FINGERED 1 • FINGERED 2 • FINGERED 3 • CASIO CHORD • FULL RANGE CHORD bl 1. Accompaniment keyboard bl 5. Use the accompaniment keyboard to the rhythm part. Press bl. Selecting a Chord Input ...
...enables chord input on the accompaniment keyboard 4 Accompaniment for the D-F#-A-C chord (D7) sounds. 4. Hold down bl. This will return automatically to the currently selected rhythm. Chords (no melody played) Melody Cho r d br 2. E-38 It is played, see "Using Synchro Start" on page E-41...• You can select from among the following five chord input modes. • FINGERED 1 • FINGERED 2 • FINGERED 3 • CASIO CHORD • FULL RANGE CHORD bl 1. Accompaniment keyboard bl 5. Use the accompaniment keyboard to the rhythm part. Press bl. Selecting a Chord Input ...

User Guide
Page 43
... the display will bm return to the screen displayed before you . 1. Any of the Auto Accompaniment. 1. Holding down (RHYTHM) until the current tone screen appears on the keyboard. br 2. Ac ompVo l 2. Changing Auto Accompaniment Speed (Tempo) Use the following procedure to change the ...tempo setting. Use y (slower) and t (faster) to adjust the accompaniment volume. bo 1. br • While the tempo value is currently selected. 2. This will start full part accompaniment (normal). Play a chord on the keyboard and the volume of the following operations can use...
... the display will bm return to the screen displayed before you . 1. Any of the Auto Accompaniment. 1. Holding down (RHYTHM) until the current tone screen appears on the keyboard. br 2. Ac ompVo l 2. Changing Auto Accompaniment Speed (Tempo) Use the following procedure to change the ...tempo setting. Use y (slower) and t (faster) to adjust the accompaniment volume. bo 1. br • While the tempo value is currently selected. 2. This will start full part accompaniment (normal). Play a chord on the keyboard and the volume of the following operations can use...
User Guide
Page 48
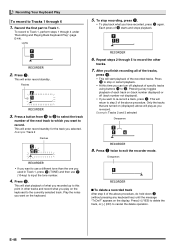
To record to Track 1, perform steps 1 through 5 to . This will start playback of the next track to the currently selected track. Example: Track 2 Flashes 6. After you finish recording all of specific tracks bs cn using buttons to record the other tracks and record what ...
To record to Track 1, perform steps 1 through 5 to . This will start playback of the next track to the currently selected track. Example: Track 2 Flashes 6. After you finish recording all of specific tracks bs cn using buttons to record the other tracks and record what ...
User Guide
Page 52
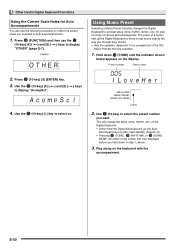
... the following procedure to reflect the preset scale you want. Hold down in Auto Accompaniments. 1. I LoveHe r Lights br 2. Other Useful Digital Keyboard Functions Using the Current Scale Notes for Auto Accompaniments You can use the br (10-key) [4] (o) and [6] (p) keys to display "OTHER" (page E-7). Preset number Preset name br 2. br...
... the following procedure to reflect the preset scale you want. Hold down in Auto Accompaniments. 1. I LoveHe r Lights br 2. Other Useful Digital Keyboard Functions Using the Current Scale Notes for Auto Accompaniments You can use the br (10-key) [4] (o) and [6] (p) keys to display "OTHER" (page E-7). Preset number Preset name br 2. br...

User Guide
Page 54
.... Deleting All Data in Digital Keyboard Memory Use the following procedure to delete sampled sounds, user songs and all other data, except for recorded songs, currently in Digital Keyboard memory. • Performing this procedure also will appear followed by the screen in step 2 of the above procedure. • To cancel the...
.... Deleting All Data in Digital Keyboard Memory Use the following procedure to delete sampled sounds, user songs and all other data, except for recorded songs, currently in Digital Keyboard memory. • Performing this procedure also will appear followed by the screen in step 2 of the above procedure. • To cancel the...

User Guide
Page 69
... user songs (page E-29) A sampled drum set correctly in the card slot. 1. The tone number you are attempting to play back. There is currently assigned to the key you selected before starting sampling already has the allowable maximum of eight sampled sounds assigned to it. • Delete the one... or more of the sampled sounds currently assigned to the tone number (page E-25). • Select another name. • Remove the read-only attribute of the memory card is...
... user songs (page E-29) A sampled drum set correctly in the card slot. 1. The tone number you are attempting to play back. There is currently assigned to the key you selected before starting sampling already has the allowable maximum of eight sampled sounds assigned to it. • Delete the one... or more of the sampled sounds currently assigned to the tone number (page E-25). • Select another name. • Remove the read-only attribute of the memory card is...