User Guide
Page 4
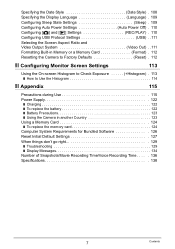
... Shooting Precautions 28 ❚ Auto Focus Restrictions 28 ❚❙ Snapshot Tutorial 29 Using the Control Panel 29 Changing the Image Size Size) . . 30 Using Flash Flash) . . 33 Using Face Detection Face Detection) . . 35 Reducing the Effects of Camera and Subject Movement . . . (Anti Shake) . . 36 Specifying ISO Sensitivity ISO) . . 37 Adjusting White Balance White Balance) . . 37 Correcting Image Brightness EV Shift) . . 39 Using the easy Mode 40 Changing the Control Panel Date/Time Style 42 Shooting with Zoom 42 ❚ Optical Zoom and Digital Zoom Switch...
... Shooting Precautions 28 ❚ Auto Focus Restrictions 28 ❚❙ Snapshot Tutorial 29 Using the Control Panel 29 Changing the Image Size Size) . . 30 Using Flash Flash) . . 33 Using Face Detection Face Detection) . . 35 Reducing the Effects of Camera and Subject Movement . . . (Anti Shake) . . 36 Specifying ISO Sensitivity ISO) . . 37 Adjusting White Balance White Balance) . . 37 Correcting Image Brightness EV Shift) . . 39 Using the easy Mode 40 Changing the Control Panel Date/Time Style 42 Shooting with Zoom 42 ❚ Optical Zoom and Digital Zoom Switch...

User Guide
Page 5
... Camera and Subject Movement . . . . (Anti Shake) . . . 60 ❚ Specifying the Auto Focus Area AF Area) . . . 60 ❚ Using the easy Mode easy Mode) . . . 61 ❚ Assigning Functions to the [4] and [6] Keys L/R Key) . . . 61 ❚ Displaying the On-screen Grid Grid) . . . 61 ❚ Turning Digital Zoom On or Off Digital Zoom) . . . 62 ❚ Turning on Image Review Review) . . . 62 ❚ Using Icon Help Icon Help) . . . 62 ❚ Configuring Power On Default Settings Memory) . . . 63 Image Quality Settings Quality) . . 64 ❚ Specifying Snapshot Size Size...
... Camera and Subject Movement . . . . (Anti Shake) . . . 60 ❚ Specifying the Auto Focus Area AF Area) . . . 60 ❚ Using the easy Mode easy Mode) . . . 61 ❚ Assigning Functions to the [4] and [6] Keys L/R Key) . . . 61 ❚ Displaying the On-screen Grid Grid) . . . 61 ❚ Turning Digital Zoom On or Off Digital Zoom) . . . 62 ❚ Turning on Image Review Review) . . . 62 ❚ Using Icon Help Icon Help) . . . 62 ❚ Configuring Power On Default Settings Memory) . . . 63 Image Quality Settings Quality) . . 64 ❚ Specifying Snapshot Size Size...

User Guide
Page 6
...10074; Viewing User Documentation PDF Files) . . . 99 ❚ User Registration 99 Using an Eye-Fi Wireless SD Memory Card to Transfer Images . (Eye-Fi) . . 99 Files and Folders 101 Memory Card Data 102 ❚❙ Other Settings (Set Up) 104 Selecting a REC Mode Screen Layout R Panel) . 104 Turning off Eye-Fi Card Communication Eye-Fi) . 104 Configuring Camera Sound Settings Sounds) . 105 Configuring a Startup Image Startup) . 105 Specifying the File Name Serial Number Generation Rule . . . . . (File No.) . 106 Configuring World Time Settings World Time) . 106 Time Stamping...
...10074; Viewing User Documentation PDF Files) . . . 99 ❚ User Registration 99 Using an Eye-Fi Wireless SD Memory Card to Transfer Images . (Eye-Fi) . . 99 Files and Folders 101 Memory Card Data 102 ❚❙ Other Settings (Set Up) 104 Selecting a REC Mode Screen Layout R Panel) . 104 Turning off Eye-Fi Card Communication Eye-Fi) . 104 Configuring Camera Sound Settings Sounds) . 105 Configuring a Startup Image Startup) . 105 Specifying the File Name Serial Number Generation Rule . . . . . (File No.) . 106 Configuring World Time Settings World Time) . 106 Time Stamping...
User Guide
Page 7
... 115 Precautions during Use 115 Power Supply 122 ❚ Charging 122 ❚ To replace the battery 122 ❚ Battery Precautions 123 ❚ Using the Camera in another Country 123 Using a Memory Card 124 ❚ To replace the memory card 124 Computer System Requirements for Bundled Software 126 Reset Initial Default Settings 127 When things don't go right 129 ❚ Troubleshooting 129 ❚ Display Messages 134 Number of Snapshots/Movie Recording Time/Voice Recording Time . . . . . 136 Specifications 138 7 Contents
... 115 Precautions during Use 115 Power Supply 122 ❚ Charging 122 ❚ To replace the battery 122 ❚ Battery Precautions 123 ❚ Using the Camera in another Country 123 Using a Memory Card 124 ❚ To replace the memory card 124 Computer System Requirements for Bundled Software 126 Reset Initial Default Settings 127 When things don't go right 129 ❚ Troubleshooting 129 ❚ Display Messages 134 Number of Snapshots/Movie Recording Time/Voice Recording Time . . . . . 136 Specifications 138 7 Contents
User Guide
Page 18
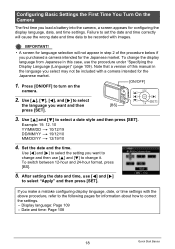
... to change it. Date and time: Page 108 18 Quick Start Basics Failure to set the date and time correctly will not appear in this manual in the language you want to change the display language from Japanese in step 2 of this case, use [4] and [6] to select [SET ] the language you select may not be recorded with images. Use [4] and [6] to select the setting you make a mistake configuring display language, date, or time settings with a camera intended...
... to change it. Date and time: Page 108 18 Quick Start Basics Failure to set the date and time correctly will not appear in this manual in the language you want to change the display language from Japanese in step 2 of this case, use [4] and [6] to select [SET ] the language you select may not be recorded with images. Use [4] and [6] to select the setting you make a mistake configuring display language, date, or time settings with a camera intended...

User Guide
Page 27
IMPORTANT! • Remember that a file (image) delete operation cannot be undone. • Deleting an audio snapshot (page 75) deletes both the snapshot and the audio file. To delete all files. Use [8] and [2] to free up storage and record more images. Deleting Images If memory becomes full, you can delete images you want to enter the PLAY mode and then press [2] ( ). 2. Press [p] (PLAY) to appear. 27 Quick Start Basics This will cause the message "There are no...
IMPORTANT! • Remember that a file (image) delete operation cannot be undone. • Deleting an audio snapshot (page 75) deletes both the snapshot and the audio file. To delete all files. Use [8] and [2] to free up storage and record more images. Deleting Images If memory becomes full, you can delete images you want to enter the PLAY mode and then press [2] ( ). 2. Press [p] (PLAY) to appear. 27 Quick Start Basics This will cause the message "There are no...

User Guide
Page 48
... will cause the monitor screen to play back an audio recording 1. About audio data • Audio files can use [4] and [6] to display the Voice Recording file you want to turn off Playback end [4] [6] [SET] While playback is displayed in place of an image for a Voice Recording file. 2. Press [2] and then press [8] [2] [8] (DISP) [MENU] 48 Recording Movie Images and Audio NOTE • You can be played back on a computer using Windows Media Player or QuickTime...
... will cause the monitor screen to play back an audio recording 1. About audio data • Audio files can use [4] and [6] to display the Voice Recording file you want to turn off Playback end [4] [6] [SET] While playback is displayed in place of an image for a Voice Recording file. 2. Press [2] and then press [8] [2] [8] (DISP) [MENU] 48 Recording Movie Images and Audio NOTE • You can be played back on a computer using Windows Media Player or QuickTime...

User Guide
Page 59
... after a fixed amount of time. „ 10 sec 10-second Self-timer , 2 sec 2-second Self-timer • When shooting under conditions that slow down the shutter speed, you can interrupt an ongoing Self-timer countdown by pressing [SET]. easy Mode - " X3 (Triple Self-timer) Shoots three images: one image 10 seconds after the shutter button is pressed, and the next two images as soon as the camera is shot after shooting the previous image. Continuous Shutter, certain BEST SHOT scene (Voice Recording) •...
... after a fixed amount of time. „ 10 sec 10-second Self-timer , 2 sec 2-second Self-timer • When shooting under conditions that slow down the shutter speed, you can interrupt an ongoing Self-timer countdown by pressing [SET]. easy Mode - " X3 (Triple Self-timer) Shoots three images: one image 10 seconds after the shutter button is pressed, and the next two images as soon as the camera is shot after shooting the previous image. Continuous Shutter, certain BEST SHOT scene (Voice Recording) •...

User Guide
Page 62
... * [MENU] * REC Tab * Review While Review is turned on, a textual description will display a image for certain icons when you press the shutter button to turn digital zoom on , the camera will appear on the display for about one second immediately after you switch between REC functions. Functions Supported by Icon Help • REC Mode, Flash, Metering Mode, White Balance, Self-timer, EV Shift 62 Advanced Settings Using Icon Help (Icon Help) Procedure [r] (REC) * [MENU] * REC Tab * Icon Help While Icon Help is turned on or off , operating the zoom controller zooms the image...
... * [MENU] * REC Tab * Review While Review is turned on, a textual description will display a image for certain icons when you press the shutter button to turn digital zoom on , the camera will appear on the display for about one second immediately after you switch between REC functions. Functions Supported by Icon Help • REC Mode, Flash, Metering Mode, White Balance, Self-timer, EV Shift 62 Advanced Settings Using Icon Help (Icon Help) Procedure [r] (REC) * [MENU] * REC Tab * Icon Help While Icon Help is turned on or off , operating the zoom controller zooms the image...

User Guide
Page 77
... camera. 77 Other Playback Functions (PLAY) NOTE • You can be used to copy a single file. Files are copied to the folder in built-in camera memory to a memory card. This option copies all files from a memory card to built-in memory. Copies a single file on the memory card to camera built-in camera memory. Copying Files (Copy) Procedure [p] (PLAY) * Snapshot Screen * [MENU] * PLAY Tab * Copy Files can copy snapshots, movies, audio snapshots, or Voice Recording files you want to copy. 2Use [8] and [2] to select "Copy" and then press [SET]. Built-in * Card Card...
... camera. 77 Other Playback Functions (PLAY) NOTE • You can be used to copy a single file. Files are copied to the folder in built-in camera memory to a memory card. This option copies all files from a memory card to built-in memory. Copies a single file on the memory card to camera built-in camera memory. Copying Files (Copy) Procedure [p] (PLAY) * Snapshot Screen * [MENU] * PLAY Tab * Copy Files can copy snapshots, movies, audio snapshots, or Voice Recording files you want to copy. 2Use [8] and [2] to select "Copy" and then press [SET]. Built-in * Card Card...
User Guide
Page 99
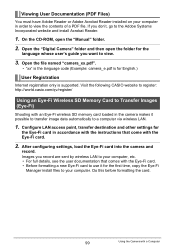
Open the "Digital Camera" folder and then open the "Manual" folder. 2. Open the file named "camera_xx.pdf". • "xx" is the language code (Example: camera_e.pdf is supported. On the CD-ROM, open the folder for the Eye-Fi card in the camera makes it for English.) User Registration Internet registration only is for the first time, copy the Eye-Fi Manager install files to your computer in order to view the contents of a PDF file. Images you record are sent by wireless...
Open the "Digital Camera" folder and then open the "Manual" folder. 2. Open the file named "camera_xx.pdf". • "xx" is the language code (Example: camera_e.pdf is supported. On the CD-ROM, open the folder for the Eye-Fi card in the camera makes it for English.) User Registration Internet registration only is for the first time, copy the Eye-Fi Manager install files to your computer in order to view the contents of a PDF file. Images you record are sent by wireless...

User Guide
Page 109
... screen whenever no camera operation is performed for a preset amount of the following conditions. - During Voice Recording playback or recording - In the PLAY mode - Specifying the Display Language (Language) Procedure [MENU] * Set Up Tab * Language . Press any of time. During a slideshow - Trigger Time Settings: 30 sec, 1 min, 2 min, Off (Sleep is disabled while "Off" is selected.) • Sleep is connected to turn the monitor screen back on , Auto Power Off takes priority. 109 Other Settings (Set...
... screen whenever no camera operation is performed for a preset amount of the following conditions. - During Voice Recording playback or recording - In the PLAY mode - Specifying the Display Language (Language) Procedure [MENU] * Set Up Tab * Language . Press any of time. During a slideshow - Trigger Time Settings: 30 sec, 1 min, 2 min, Off (Sleep is disabled while "Off" is selected.) • Sleep is connected to turn the monitor screen back on , Auto Power Off takes priority. 109 Other Settings (Set...

User Guide
Page 110
... [p] Settings (REC/PLAY) Procedure [MENU] * Set Up Tab * REC/PLAY Power On Power On/Off Disable Camera turns on or off when you press [r] (REC) in the REC mode or [p] (PLAY) in the PLAY mode.) • Auto Power Off is disabled under any of time. Camera turns on whenever [r] (REC) or [p] (PLAY) is pressed. During Voice Recording playback or recording - Configuring Auto Power Settings (Auto Power Off) Procedure [MENU] * Set Up Tab * Auto Power Off Auto Power Off turns off the camera whenever no camera operation is performed for image viewing...
... [p] Settings (REC/PLAY) Procedure [MENU] * Set Up Tab * REC/PLAY Power On Power On/Off Disable Camera turns on or off when you press [r] (REC) in the REC mode or [p] (PLAY) in the PLAY mode.) • Auto Power Off is disabled under any of time. Camera turns on whenever [r] (REC) or [p] (PLAY) is pressed. During Voice Recording playback or recording - Configuring Auto Power Settings (Auto Power Off) Procedure [MENU] * Set Up Tab * Auto Power Off Auto Power Off turns off the camera whenever no camera operation is performed for image viewing...

User Guide
Page 111
... Video system used when exchanging data with a computer, printer, or other video equipment. • Images cannot be displayed correctly on a TV or video equipment that is not NTSC or PAL. • An optionally available AV cable (EMC-4A) is required for normal transfer of images from the camera to a computer. With this setting for video output. 111 Other Settings (Set Up) Use this setting, the computer sees the camera...
... Video system used when exchanging data with a computer, printer, or other video equipment. • Images cannot be displayed correctly on a TV or video equipment that is not NTSC or PAL. • An optionally available AV cable (EMC-4A) is required for normal transfer of images from the camera to a computer. With this setting for video output. 111 Other Settings (Set Up) Use this setting, the computer sees the camera...
User Guide
Page 112
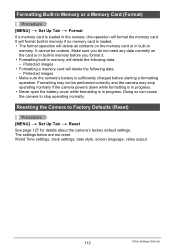
...; Make sure the camera's battery is loaded in the camera, this operation will delete the following data. - World Time settings, clock settings, date style, screen language, video output 112 Other Settings (Set Up) The settings below are not reset. Doing so can cause the camera to Factory Defaults (Reset) Procedure [MENU] * Set Up Tab * Reset See page 127 for details about the camera's factory default settings. Formatting Built-in Memory or a Memory Card (Format) Procedure [MENU] * Set Up Tab * Format If a memory card is sufficiently charged before you do not need...
...; Make sure the camera's battery is loaded in the camera, this operation will delete the following data. - World Time settings, clock settings, date style, screen language, video output 112 Other Settings (Set Up) The settings below are not reset. Doing so can cause the camera to Factory Defaults (Reset) Procedure [MENU] * Set Up Tab * Reset See page 127 for details about the camera's factory default settings. Formatting Built-in Memory or a Memory Card (Format) Procedure [MENU] * Set Up Tab * Format If a memory card is sufficiently charged before you do not need...
User Guide
Page 129
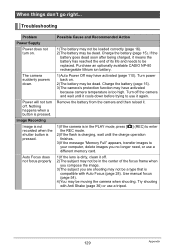
... lens is compatible with Auto Focus (page 28). Power will not turn on . 2)The battery may not be replaced. Nothing happens when a button is pressed. Purchase an optionally available CASIO NP-80 rechargeable lithium ion battery. 1)Auto Power Off may have activated (page 110). Remove the battery from the camera and then reload it cools down . Image Recording Image is not recorded when the shutter button is pressed. Charge the battery (page 15). 3)The camera's protection function...
... lens is compatible with Auto Focus (page 28). Power will not turn on . 2)The battery may not be replaced. Nothing happens when a button is pressed. Purchase an optionally available CASIO NP-80 rechargeable lithium ion battery. 1)Auto Power Off may have activated (page 110). Remove the battery from the camera and then reload it cools down . Image Recording Image is not recorded when the shutter button is pressed. Charge the battery (page 15). 3)The camera's protection function...
User Guide
Page 130
... not indicate malfunction of a movie. A red ? (Flash Off) icon appears on flash (page 33) or use the camera for illumination. 130 Appendix The monitor screen image is out of focus. 1)You may not be attempting to shoot in the monitor screen image. When composing the image, make images appear coarse. There is digital noise in the recorded image. Note that uses ? (Flash Off) is selected, change to appear in the case of the camera. Camera powers...
... not indicate malfunction of a movie. A red ? (Flash Off) icon appears on flash (page 33) or use the camera for illumination. 130 Appendix The monitor screen image is out of focus. 1)You may not be attempting to shoot in the monitor screen image. When composing the image, make images appear coarse. There is digital noise in the recorded image. Note that uses ? (Flash Off) is selected, change to appear in the case of the camera. Camera powers...

User Guide
Page 131
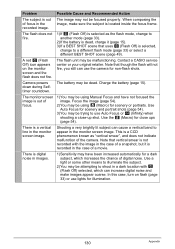
... will cause digital zoom to a zoom factor of images. Change the flash mode setting to the + side (page 39). Problem Possible Cause and Recommended Action A recorded image was not saved. 1)Camera power may be turned on digital zoom (page 62). 2)Date stamping may have removed the memory card from the camera before the save operation is outside focus during movie the focus range. Change the flash mode setting to < (Flash On) for daylight synchro flash (page 33), or adjust EV shift to < (Flash On) for shooting people...
... will cause digital zoom to a zoom factor of images. Change the flash mode setting to the + side (page 39). Problem Possible Cause and Recommended Action A recorded image was not saved. 1)Camera power may be turned on digital zoom (page 62). 2)Date stamping may have removed the memory card from the camera before the save operation is outside focus during movie the focus range. Change the flash mode setting to < (Flash On) for daylight synchro flash (page 33), or adjust EV shift to < (Flash On) for shooting people...

User Guide
Page 132
... Always connect directly to recognize the camera if you are connecting (pages 86, 95). 3)If the camera is not turned on, turn it on the monitor screen when shooting. Change the display language setting (page 109). 1)The USB cable may not be edited (with another camera The date and time setting is off. Select the correct USB communication protocol in the wrong language. This camera cannot display non-DCF images recorded onto a memory card using another digital camera. Position the camera...
... Always connect directly to recognize the camera if you are connecting (pages 86, 95). 3)If the camera is not turned on, turn it on the monitor screen when shooting. Change the display language setting (page 109). 1)The USB cable may not be edited (with another camera The date and time setting is off. Select the correct USB communication protocol in the wrong language. This camera cannot display non-DCF images recorded onto a memory card using another digital camera. Position the camera...

User Guide
Page 134
...). Record Error Image compression could not be performed for some reason during image data storage. Turn off whenever lens performs some other storage device. Folder cannot be created. Battery power is too high. IMPORTANT! • Formatting a memory card deletes all its files. The printer ran out of the printer (page 79). You are trying to record more, delete files you no longer need (page 27). Shoot the image again. 134 Appendix Display Messages ALERT The camera's protection function may...
...). Record Error Image compression could not be performed for some reason during image data storage. Turn off whenever lens performs some other storage device. Folder cannot be created. Battery power is too high. IMPORTANT! • Formatting a memory card deletes all its files. The printer ran out of the printer (page 79). You are trying to record more, delete files you no longer need (page 27). Shoot the image again. 134 Appendix Display Messages ALERT The camera's protection function may...


