Owners Manual
Page 5
... Self-timer Self-timer) . . . 94 ❚ Using the Auto Focus Assist Light AF Assist Light) . . . 95 ❚ Reducing the Effects of Camera and Subject Movement . . . . (Anti Shake) . . . 95 ❚ Shooting with Face Detection Face Detection) . . . 96 ❚ Shooting with Continuous Auto Focus Continuous AF) . . . 97 ❚ Specifying the [AEL] button Operation AE/AF Lock) . . . 98 ❚ Configuring the Continuous Shutter Image Save Method Save CS Images) . . . 98 ❚ Changing the Continuous Shutter Mode CS) . . . 98 ❚ Turning Digital Zoom On or Off Digital Zoom...
... Self-timer Self-timer) . . . 94 ❚ Using the Auto Focus Assist Light AF Assist Light) . . . 95 ❚ Reducing the Effects of Camera and Subject Movement . . . . (Anti Shake) . . . 95 ❚ Shooting with Face Detection Face Detection) . . . 96 ❚ Shooting with Continuous Auto Focus Continuous AF) . . . 97 ❚ Specifying the [AEL] button Operation AE/AF Lock) . . . 98 ❚ Configuring the Continuous Shutter Image Save Method Save CS Images) . . . 98 ❚ Changing the Continuous Shutter Mode CS) . . . 98 ❚ Turning Digital Zoom On or Off Digital Zoom...
Owners Manual
Page 6
...Viewing Continuous Shutter Images 105 ❚ Deleting Continuous Shutter Images 106 ❚ Dividing Up a CS Group 107 ❚ Copying a CS Group Image 108 Zooming an On-screen Image 109 Displaying the Image Menu 109 Viewing Snapshots and Movies on a TV Screen 110 ❚❙ Other Playback Functions (PLAY) 112 Playing a Slideshow on the Camera Slideshow) . 112 ❚ Transferring Music from Your Computer to Camera Memory 113 Creating a Snapshot of Movie Frames MOTION PRINT) . 115 Editing a Movie on the Camera Movie Editing) . 115 Adjusting White Balance White Balance...
...Viewing Continuous Shutter Images 105 ❚ Deleting Continuous Shutter Images 106 ❚ Dividing Up a CS Group 107 ❚ Copying a CS Group Image 108 Zooming an On-screen Image 109 Displaying the Image Menu 109 Viewing Snapshots and Movies on a TV Screen 110 ❚❙ Other Playback Functions (PLAY) 112 Playing a Slideshow on the Camera Slideshow) . 112 ❚ Transferring Music from Your Computer to Camera Memory 113 Creating a Snapshot of Movie Frames MOTION PRINT) . 115 Editing a Movie on the Camera Movie Editing) . 115 Adjusting White Balance White Balance...
Owners Manual
Page 7
... Date Style) . 152 Specifying the Display Language Language) . 152 Configuring Sleep State Settings Sleep) . 153 Configuring Auto Power Off Settings Auto Power Off) . 153 Configuring [r] and [p] Settings REC/PLAY) . 154 Controlling Monitor Screen Priority LCD Priority) . 154 Configuring USB Protocol Settings USB) . 155 Selecting the Screen Aspect Ratio and Video Output System Video Out) . 155 Specifying the Battery Type Battery Type) . 156 Configuring a Startup Image Startup) . 156 Formatting Built-in Memory or a Memory Card Format) . 157 Resetting the Camera to Factory Defaults...
... Date Style) . 152 Specifying the Display Language Language) . 152 Configuring Sleep State Settings Sleep) . 153 Configuring Auto Power Off Settings Auto Power Off) . 153 Configuring [r] and [p] Settings REC/PLAY) . 154 Controlling Monitor Screen Priority LCD Priority) . 154 Configuring USB Protocol Settings USB) . 155 Selecting the Screen Aspect Ratio and Video Output System Video Out) . 155 Specifying the Battery Type Battery Type) . 156 Configuring a Startup Image Startup) . 156 Formatting Built-in Memory or a Memory Card Format) . 157 Resetting the Camera to Factory Defaults...
Owners Manual
Page 18
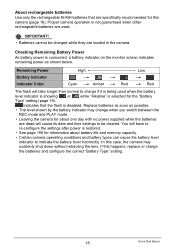
... date and time settings to charge if it is being used . Remaining Power Battery Indicator Indicator Color High * * Cyan * Amber * Red Low * * Red The flash will take longer than normal to be charged while they are used when the battery level indicator is showing or while "Alkaline" is consumed, a battery indicator on the monitor screen indicates remaining power as possible. • The level shown by the battery indicator may suddenly shut down without retracting the lens. IMPORTANT! • Batteries...
... date and time settings to charge if it is being used . Remaining Power Battery Indicator Indicator Color High * * Cyan * Amber * Red Low * * Red The flash will take longer than normal to be charged while they are used when the battery level indicator is showing or while "Alkaline" is consumed, a battery indicator on the monitor screen indicates remaining power as possible. • The level shown by the battery indicator may suddenly shut down without retracting the lens. IMPORTANT! • Batteries...
Owners Manual
Page 20
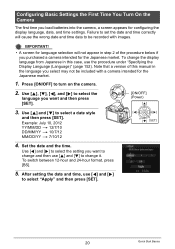
... then press [SET]. IMPORTANT! • A screen for configuring the display language, date, and time settings. Configuring Basic Settings the First Time You Turn On the Camera The first time you load batteries into the camera, a screen appears for language selection will cause the wrong date and time data to select the setting you want and then press [SET]. [ON/OFF] (Power) 3. Press [ON/OFF] to select "Apply" and then press [SET]. 20 Quick Start Basics Use [8], [2], [4], and...
... then press [SET]. IMPORTANT! • A screen for configuring the display language, date, and time settings. Configuring Basic Settings the First Time You Turn On the Camera The first time you load batteries into the camera, a screen appears for language selection will cause the wrong date and time data to select the setting you want and then press [SET]. [ON/OFF] (Power) 3. Press [ON/OFF] to select "Apply" and then press [SET]. 20 Quick Start Basics Use [8], [2], [4], and...
Owners Manual
Page 21
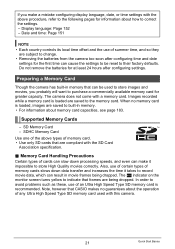
... SD Card Association specification. . Do not remove the batteries for at least 24 hours after configuring time and date settings for information about how to their factory defaults. Also, use of memory cards slows down processing speeds, and even can be reset to correct the settings. - Images recorded while a memory card is loaded, images are saved to built-in memory that CASIO makes no memory card is loaded are compliant with this camera. 21 Quick Start Basics Display language: Page 152 - Memory Card...
... SD Card Association specification. . Do not remove the batteries for at least 24 hours after configuring time and date settings for information about how to their factory defaults. Also, use of memory cards slows down processing speeds, and even can be reset to correct the settings. - Images recorded while a memory card is loaded, images are saved to built-in memory that CASIO makes no memory card is loaded are compliant with this camera. 21 Quick Start Basics Display language: Page 152 - Memory Card...
Owners Manual
Page 30
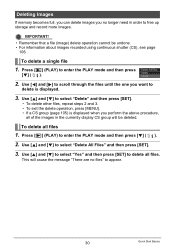
..., you can delete images you perform the above procedure, all of the images in the currently display CS group will cause the message "There are no longer need in order to free up storage and record more images. Press [p] (PLAY) to enter the PLAY mode and then press [2] ( ). 2. To delete a single file 1. IMPORTANT! • Remember that a file (image) delete operation cannot be deleted. Use [8] and [2] to select "Delete All Files" and then press [SET]. 3.
..., you can delete images you perform the above procedure, all of the images in the currently display CS group will cause the message "There are no longer need in order to free up storage and record more images. Press [p] (PLAY) to enter the PLAY mode and then press [2] ( ). 2. To delete a single file 1. IMPORTANT! • Remember that a file (image) delete operation cannot be deleted. Use [8] and [2] to select "Delete All Files" and then press [SET]. 3.
Owners Manual
Page 35
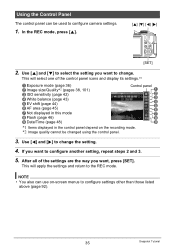
...) 9Date/Time (page 48) Control panel 1 2 3 4 5 6 7 8 9 *1 Items displayed in the control panel depend on -screen menus to configure another setting, repeat steps 2 and 3. 5. In the REC mode, press [8]. [8] [2] [4] [6] [SET] 2. Using the Control Panel The control panel can use on the recording mode. *2 Image quality cannot be used to the REC mode. NOTE • You also can be changed using the control panel. 3. This will apply the settings and return to configure camera settings. 1. Use...
...) 9Date/Time (page 48) Control panel 1 2 3 4 5 6 7 8 9 *1 Items displayed in the control panel depend on -screen menus to configure another setting, repeat steps 2 and 3. 5. In the REC mode, press [8]. [8] [2] [4] [6] [SET] 2. Using the Control Panel The control panel can use on the recording mode. *2 Image quality cannot be used to the REC mode. NOTE • You also can be changed using the control panel. 3. This will apply the settings and return to configure camera settings. 1. Use...
Owners Manual
Page 60
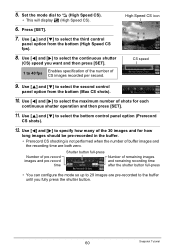
... maximum number of shots for how long images should be pre-recorded in the buffer. • Prerecord CS shooting is not performed when the number of buffer images and the recording time are pre-recorded to 40 fps Enables specification of the number of the 30 images and for each continuous shutter operation and then press [SET]. 11. Use [4] and [6] to Õ (High Speed CS). • This will display Š (High Speed CS). 6. Use...
... maximum number of shots for how long images should be pre-recorded in the buffer. • Prerecord CS shooting is not performed when the number of buffer images and the recording time are pre-recorded to 40 fps Enables specification of the number of the 30 images and for each continuous shutter operation and then press [SET]. 11. Use [4] and [6] to Õ (High Speed CS). • This will display Š (High Speed CS). 6. Use...
Owners Manual
Page 64
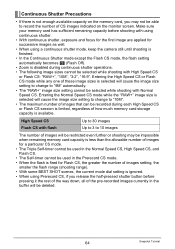
... shutter button before shooting with using continuous shutter. • With continuous shutter, exposure and focus for the first image are applied for successive images as well. • When using a continuous shutter mode, keep the camera still until shooting is finished. • In the Continuous Shutter mode except the Flash CS mode, the flash setting automatically becomes ? (Flash Off). • Zoom is disabled during each High Speed CS or Flash CS session is limited, regardless of how much memory card storage capacity is available. Make...
... shutter button before shooting with using continuous shutter. • With continuous shutter, exposure and focus for the first image are applied for successive images as well. • When using a continuous shutter mode, keep the camera still until shooting is finished. • In the Continuous Shutter mode except the Flash CS mode, the flash setting automatically becomes ? (Flash Off). • Zoom is disabled during each High Speed CS or Flash CS session is limited, regardless of how much memory card storage capacity is available. Make...

Owners Manual
Page 84
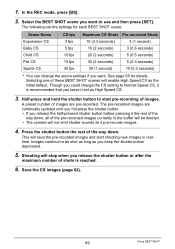
... the settings, start again from step 3. Use [8] and [2] to 40 fps Enables specification of the number of shots for each continuous shutter operation and then press [SET]. 11. In the REC mode, press [BS]. 2. CS speed 1 to select the bottom control panel option (Prerecord CS shots). 84 Using BEST SHOT Press [SET]. • If you want to select the second control panel option from the bottom (High Speed CS fps). 8. Use...
... the settings, start again from step 3. Use [8] and [2] to 40 fps Enables specification of the number of shots for each continuous shutter operation and then press [SET]. 11. In the REC mode, press [BS]. 2. CS speed 1 to select the bottom control panel option (Prerecord CS shots). 84 Using BEST SHOT Press [SET]. • If you want to select the second control panel option from the bottom (High Speed CS fps). 8. Use...
Owners Manual
Page 89
... be deleted. • The camera will not emit shutter sounds as the initial default. Though you could change the above settings if you want . Save the CS images (page 62). 89 Using BEST SHOT 1. See page 58 for each BEST SHOT scene. Press the shutter button the rest of images are pre-recorded. This will stop when you release the half-pressed shutter button before pressing it set as...
... be deleted. • The camera will not emit shutter sounds as the initial default. Though you could change the above settings if you want . Save the CS images (page 62). 89 Using BEST SHOT 1. See page 58 for each BEST SHOT scene. Press the shutter button the rest of images are pre-recorded. This will stop when you release the half-pressed shutter button before pressing it set as...
Owners Manual
Page 94
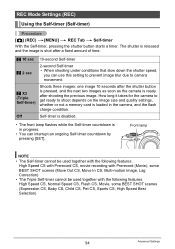
... In CS, Multi-motion Image, Lag Correction) • The Triple Self-timer cannot be used together with the following features. The shutter is released and the image is in the camera, and the flash charge condition. REC Mode Settings (REC) Using the Self-timer (Self-timer) Procedure [r] (REC) *[MENU] * REC Tab * Self-timer With the Self-timer, pressing the shutter button starts a timer. High Speed CS with Prerecord CS, movie recording with Prerecord (Movie), some BEST SHOT scenes (Expression CS, Baby...
... In CS, Multi-motion Image, Lag Correction) • The Triple Self-timer cannot be used together with the following features. The shutter is released and the image is in the camera, and the flash charge condition. REC Mode Settings (REC) Using the Self-timer (Self-timer) Procedure [r] (REC) *[MENU] * REC Tab * Self-timer With the Self-timer, pressing the shutter button starts a timer. High Speed CS with Prerecord CS, movie recording with Prerecord (Movie), some BEST SHOT scenes (Expression CS, Baby...
Owners Manual
Page 98
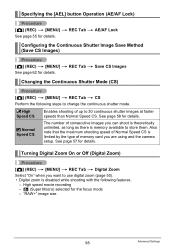
... is disabled while shooting with the following steps to change the continuous shutter mode. Š High Speed CS Z Normal Speed CS Enables shooting of up to use digital zoom (page 50). • Digital zoom is memory available to store them. Turning Digital Zoom On or Off (Digital Zoom) Procedure [r] (REC) * [MENU] * REC Tab * Digital Zoom Select "On" when you are using and the camera setup. See page 57 for the focus mode - High speed movie recording - Á (Super Macro) selected for details. The number of memory card...
... is disabled while shooting with the following steps to change the continuous shutter mode. Š High Speed CS Z Normal Speed CS Enables shooting of up to use digital zoom (page 50). • Digital zoom is memory available to store them. Turning Digital Zoom On or Off (Digital Zoom) Procedure [r] (REC) * [MENU] * REC Tab * Digital Zoom Select "On" when you are using and the camera setup. See page 57 for the focus mode - High speed movie recording - Á (Super Macro) selected for details. The number of memory card...
Owners Manual
Page 99
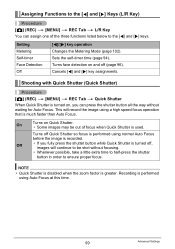
...[4] and [6] keys. Turns off Quick Shutter so focus is performed using Auto Focus at this time. 99 Advanced Settings Setting Metering Self-timer Face Detection Off [4]/[6] key operation Changes the Metering Mode (page 102). Shooting with Quick Shutter (Quick Shutter) Procedure [r] (REC) * [MENU] * REC Tab * Quick Shutter When Quick Shutter is turned on, you fully press the shutter button while Quick Shutter is performed using normal Auto Focus before the image is used. On Turns on and off , images will record the image using a high speed focus operation that is greater...
...[4] and [6] keys. Turns off Quick Shutter so focus is performed using Auto Focus at this time. 99 Advanced Settings Setting Metering Self-timer Face Detection Off [4]/[6] key operation Changes the Metering Mode (page 102). Shooting with Quick Shutter (Quick Shutter) Procedure [r] (REC) * [MENU] * REC Tab * Quick Shutter When Quick Shutter is turned on, you fully press the shutter button while Quick Shutter is performed using normal Auto Focus before the image is used. On Turns on and off , images will record the image using a high speed focus operation that is greater...
Owners Manual
Page 122
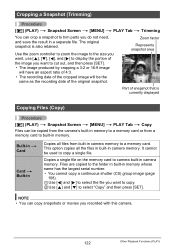
... currently displayed Copying Files (Copy) Procedure [p] (PLAY) * Snapshot Screen * [MENU] * PLAY Tab * Copy Files can copy snapshots or movies you recorded with this camera. 122 Other Playback Functions (PLAY) Use the zoom controller to zoom the image to the size you want, use [8], [2], [4], and [6] to display the portion of the image you want to copy. 2Use [8] and [2] to select "Copy" and then press [SET]. This option copies all files from a memory card to copy a single file. It cannot be copied from the camera's built-in memory to a memory card or...
... currently displayed Copying Files (Copy) Procedure [p] (PLAY) * Snapshot Screen * [MENU] * PLAY Tab * Copy Files can copy snapshots or movies you recorded with this camera. 122 Other Playback Functions (PLAY) Use the zoom controller to zoom the image to the size you want, use [8], [2], [4], and [6] to display the portion of the image you want to copy. 2Use [8] and [2] to select "Copy" and then press [SET]. This option copies all files from a memory card to copy a single file. It cannot be copied from the camera's built-in memory to a memory card or...
Owners Manual
Page 157
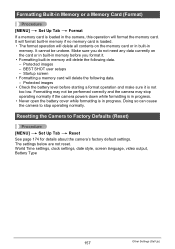
... stop operating normally if the camera powers down while formatting is in progress. • Never open the battery cover while formatting is in progress. The settings below are not reset. Make sure you format it is not too low. World Time settings, clock settings, date style, screen language, video output, Battery Type 157 Other Settings (Set Up) BEST SHOT user setups - Formatting may not be undone. Protected images - Protected images • Check the battery level before you do not need any data...
... stop operating normally if the camera powers down while formatting is in progress. • Never open the battery cover while formatting is in progress. The settings below are not reset. Make sure you format it is not too low. World Time settings, clock settings, date style, screen language, video output, Battery Type 157 Other Settings (Set Up) BEST SHOT user setups - Formatting may not be undone. Protected images - Protected images • Check the battery level before you do not need any data...
Owners Manual
Page 178
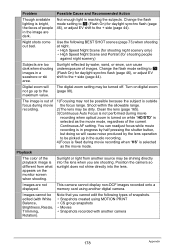
... on digital zoom (page 98). Change the flash mode setting to < (Flash On) for daylight synchro flash (page 46), or adjust EV shift to the + side (page 44). Turn on the monitor screen when shooting. This camera cannot display non-DCF images recorded onto a memory card using MOTION PRINT • CS group snapshots • Movies • Snapshots recorded with White Balance, Brightness, Resize, Trimming, Rotation). Clean the lens (page 165). 3)Continuous Auto Focus is not performed during movie recording. 1)Focusing may...
... on digital zoom (page 98). Change the flash mode setting to < (Flash On) for daylight synchro flash (page 46), or adjust EV shift to the + side (page 44). Turn on the monitor screen when shooting. This camera cannot display non-DCF images recorded onto a memory card using MOTION PRINT • CS group snapshots • Movies • Snapshots recorded with White Balance, Brightness, Resize, Trimming, Rotation). Clean the lens (page 165). 3)Continuous Auto Focus is not performed during movie recording. 1)Focusing may...

Owners Manual
Page 179
... camera or the camera may not be a problem with image data. Do not remove the batteries from the camera for more than 24 hours, it means that , configure each setting. The messages on , it could mean that , the settings will not be connected securely. The date and time setting is the case, perform the reset operation to their factory defaults when I remove the camera's batteries. If this is off. If the language selection screen...
... camera or the camera may not be a problem with image data. Do not remove the batteries from the camera for more than 24 hours, it means that , configure each setting. The messages on , it could mean that , the settings will not be connected securely. The date and time setting is the case, perform the reset operation to their factory defaults when I remove the camera's batteries. If this is off. If the language selection screen...

Owners Manual
Page 181
... Flash CS. Memory Full Printing Error Record Error SYSTEM ERROR Battery power is low. Delete files you turn power back on , contact your retailer or a CASIO service center. Flash cool down... Open the flash unit. LENS ERROR LENS ERROR 2 Load paper! You will be saved because battery is low, so an image file could not be created. Press ð (Flash up) to record all of the pre-recorded images. This message appears and the camera turns off power while image data is too low to protect the flash...
... Flash CS. Memory Full Printing Error Record Error SYSTEM ERROR Battery power is low. Delete files you turn power back on , contact your retailer or a CASIO service center. Flash cool down... Open the flash unit. LENS ERROR LENS ERROR 2 Load paper! You will be saved because battery is low, so an image file could not be created. Press ð (Flash up) to record all of the pre-recorded images. This message appears and the camera turns off power while image data is too low to protect the flash...


