
User Guide
Page 1
E USER'S GUIDE Please keep all information for future reference. CTK6000/WK6500E1B Safety Precautions Before trying to use the keyboard, be sure to read the separate "Safety Precautions".
E USER'S GUIDE Please keep all information for future reference. CTK6000/WK6500E1B Safety Precautions Before trying to use the keyboard, be sure to read the separate "Safety Precautions".

User Guide
Page 2
...FCC Rules, Operation is no guarantee that to Part 15 of the FCC Rules. This equipment generates, uses and can radiate radio frequency energy and, if not installed and used in a particular installation. Responsible party: CASIO AMERICA, INC. PLEASANT AVENUE, DOVER, NEW JERSEY 07801 Telephone number: 973-361-5400 This device ... interference by the party responsible for help. FCC WARNING Changes or modifications not expressly approved by one or more of Conformity Model Number: CTK-6000/WK-6500 Trade Name: CASIO COMPUTER CO., LTD. These limits are designed to operate the equipment.
...FCC Rules, Operation is no guarantee that to Part 15 of the FCC Rules. This equipment generates, uses and can radiate radio frequency energy and, if not installed and used in a particular installation. Responsible party: CASIO AMERICA, INC. PLEASANT AVENUE, DOVER, NEW JERSEY 07801 Telephone number: 973-361-5400 This device ... interference by the party responsible for help. FCC WARNING Changes or modifications not expressly approved by one or more of Conformity Model Number: CTK-6000/WK-6500 Trade Name: CASIO COMPUTER CO., LTD. These limits are designed to operate the equipment.

User Guide
Page 3
...this manual may be sure to power the unit, be registered trademarks of this product. • Before using this manual, either in part or its entirety, is prohibited under 3 years. • Use only a CASIO AD-A12150LW adaptor. • The AC adaptor is not a toy. • Be sure to ...WHATSOEVER (INCLUDING, WITHOUT LIMITATION, DAMAGES FOR LOSS OF PROFITS, BUSINESS INTERRUPTION, LOSS OF INFORMATION) ARISING OUT OF THE USE OF OR INABILITY TO USE THIS MANUAL OR PRODUCT, EVEN IF CASIO HAS BEEN ADVISED OF THE POSSIBILITY OF SUCH DAMAGES. ● The contents of this manual are getting weak. ...
...this manual may be sure to power the unit, be registered trademarks of this product. • Before using this manual, either in part or its entirety, is prohibited under 3 years. • Use only a CASIO AD-A12150LW adaptor. • The AC adaptor is not a toy. • Be sure to ...WHATSOEVER (INCLUDING, WITHOUT LIMITATION, DAMAGES FOR LOSS OF PROFITS, BUSINESS INTERRUPTION, LOSS OF INFORMATION) ARISING OUT OF THE USE OF OR INABILITY TO USE THIS MANUAL OR PRODUCT, EVEN IF CASIO HAS BEEN ADVISED OF THE POSSIBILITY OF SUCH DAMAGES. ● The contents of this manual are getting weak. ...
User Guide
Page 4
... E-14 Selecting a Tone E-14 Layering and Splitting Tones E-15 Raising and Lowering Keyboard Tuning (Transpose E-18 Using Octave Shift E-18 Using the Metronome E-19 Using the Pitch Bend Wheel E-20 Selecting a Temperament and Fine Tuning Its Scale E-21 Playing Arpeggio Phrases Automatically (...User Preset E-54 Editing a Chord Progression E-58 Saving Keyboard Setups to Registration Memory E-62 To save a setup to registration memory........... E-96 Using the Function Menu E-96 Function Menu Settings E-97 E-2 E-64 What you can do with the song sequencer ...... E-63 To recall a ...
... E-14 Selecting a Tone E-14 Layering and Splitting Tones E-15 Raising and Lowering Keyboard Tuning (Transpose E-18 Using Octave Shift E-18 Using the Metronome E-19 Using the Pitch Bend Wheel E-20 Selecting a Temperament and Fine Tuning Its Scale E-21 Playing Arpeggio Phrases Automatically (...User Preset E-54 Editing a Chord Progression E-58 Saving Keyboard Setups to Registration Memory E-62 To save a setup to registration memory........... E-96 Using the Function Menu E-96 Function Menu Settings E-97 E-2 E-64 What you can do with the song sequencer ...... E-63 To recall a ...

User Guide
Page 5
Using a Memory Card E-102 Loading and Removing a Memory Card.........E-103 Entering the Card Mode E-103 Formatting a Memory Card E-103 Saving Digital Keyboard Data to a Memory Card E-...
Using a Memory Card E-102 Loading and Removing a Memory Card.........E-103 Entering the Card Mode E-103 Formatting a Memory Card E-103 Saving Digital Keyboard Data to a Memory Card E-...
User Guide
Page 7
... R-13 (FUNCTION) button when pressing a button. General Guide • In this manual, the term "Digital Keyboard" refers to the CTK-6000/WK-6500. • This manual uses the numbers and names below to refer to buttons and controllers. • The following explains the meanings of the # and $ symbols... the key names below. # : Indicates a function that is enabled by holding down the button for some time. L-1 POWER button 13 L-2 VOLUME knob (CTK-6000 13 MAIN VOLUME knob (WK-6500 13 L-3 MIC VOLUME knob (WK-6500 only 11 RHYTHM buttons L-4 [A] POPS/ROCK/DANCE button 14, 24 L-5 [B] ...
... R-13 (FUNCTION) button when pressing a button. General Guide • In this manual, the term "Digital Keyboard" refers to the CTK-6000/WK-6500. • This manual uses the numbers and names below to refer to buttons and controllers. • The following explains the meanings of the # and $ symbols... the key names below. # : Indicates a function that is enabled by holding down the button for some time. L-1 POWER button 13 L-2 VOLUME knob (CTK-6000 13 MAIN VOLUME knob (WK-6500 13 L-3 MIC VOLUME knob (WK-6500 only 11 RHYTHM buttons L-4 [A] POPS/ROCK/DANCE button 14, 24 L-5 [B] ...

User Guide
Page 8
...Registration bank area This area shows the number of the currently selected registration bank (page E-62). 5Chord area This area shows the chord being used . For example, the location of the pointer (K) on a display screen is being indicated. On this area to it is performed at ... 6 3 1 Detailed information area This area displays a variety of information while the Digital Keyboard is indicated by thick brackets (%) and by a large dot (0). Use this screen, "RHYTHM" is selected because it . There are a total of 32 parts, 16 each in the lower left corner while Group A parts are ...
...Registration bank area This area shows the number of the currently selected registration bank (page E-62). 5Chord area This area shows the chord being used . For example, the location of the pointer (K) on a display screen is being indicated. On this area to it is performed at ... 6 3 1 Detailed information area This area displays a variety of information while the Digital Keyboard is indicated by thick brackets (%) and by a large dot (0). Use this screen, "RHYTHM" is selected because it . There are a total of 32 parts, 16 each in the lower left corner while Group A parts are ...
User Guide
Page 9
... will return to the rhythm mode. • Song sequencer mode (< indicator displayed) Enter the sequencer mode when you want to record performances using the keyboard and Auto Accompaniment, or to the rhythm mode. In the rhythm mode, pressing the C-3 (SONG SEQUENCER) button will return to... operations you perform the above operation while in the rhythm mode. The rhythm mode is the base mode, and it . General Guide Menus You can use Auto Accompaniment. • Card mode (; Card mode C-7 (CARD) or R-15 (EXIT) button C-7 (CARD) button Rhythm mode C-3 (SONG SEQUENCER) button C-3 (SONG...
... will return to the rhythm mode. • Song sequencer mode (< indicator displayed) Enter the sequencer mode when you want to record performances using the keyboard and Auto Accompaniment, or to the rhythm mode. In the rhythm mode, pressing the C-3 (SONG SEQUENCER) button will return to... operations you perform the above operation while in the rhythm mode. The rhythm mode is the base mode, and it . General Guide Menus You can use Auto Accompaniment. • Card mode (; Card mode C-7 (CARD) or R-15 (EXIT) button C-7 (CARD) button Rhythm mode C-3 (SONG SEQUENCER) button C-3 (SONG...
User Guide
Page 10
... (page E-64) - This stored data is retained even when the Digital Keyboard is turned off .* However, the tone, rhythm, and other features that you can use to store data you create. User preset data (page E-54) - User tone data (page E-45) - For details, see "AutoResume (Auto Resume)" (page E-100) and "Default...
... (page E-64) - This stored data is retained even when the Digital Keyboard is turned off .* However, the tone, rhythm, and other features that you can use to store data you create. User preset data (page E-54) - User tone data (page E-45) - For details, see "AutoResume (Auto Resume)" (page E-100) and "Default...
User Guide
Page 11
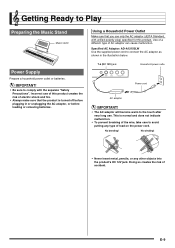
.... No winding! • Never insert metal, pencils, or any type of electric shock and fire. • Always make sure that you use . Incorrect use of this product. This is turned off before plugging in the illustration below. E-9 No bending! T-6 (DC 12V) jack Household power outle... Power cord AC adaptor • The AC adaptor will become warm to the touch after very long use only the AC adaptor (JEITA Standard, with the separate "Safety Precautions". Getting Ready to Play Preparing the Music Stand Music stand Power Supply ...
.... No winding! • Never insert metal, pencils, or any type of electric shock and fire. • Always make sure that you use . Incorrect use of this product. This is turned off before plugging in the illustration below. E-9 No bending! T-6 (DC 12V) jack Household power outle... Power cord AC adaptor • The AC adaptor will become warm to the touch after very long use only the AC adaptor (JEITA Standard, with the separate "Safety Precautions". Getting Ready to Play Preparing the Music Stand Music stand Power Supply ...
User Guide
Page 12
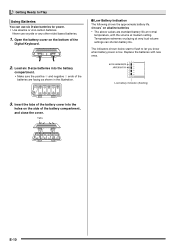
Temperature extremes or playing at medium setting. Tabs E-10 Replace the batteries with the volume at very loud volume settings can use oxyride or any other nickel based batteries. 1. Insert the tabs of the battery cover into the battery compartment. • Make sure the...batteries are standard battery life at normal temperature, with new ones. 2. Never use six D-size batteries for power. • Use alkaline or zinc-carbon batteries. The indicators shown below start to flash to Play Using Batteries You can shorten battery life. Load six D-size batteries into the ...
Temperature extremes or playing at medium setting. Tabs E-10 Replace the batteries with the volume at very loud volume settings can use oxyride or any other nickel based batteries. 1. Insert the tabs of the battery cover into the battery compartment. • Make sure the...batteries are standard battery life at normal temperature, with new ones. 2. Never use six D-size batteries for power. • Use alkaline or zinc-carbon batteries. The indicators shown below start to flash to Play Using Batteries You can shorten battery life. Load six D-size batteries into the ...
User Guide
Page 13
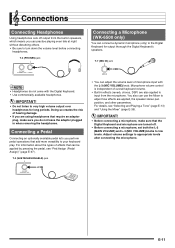
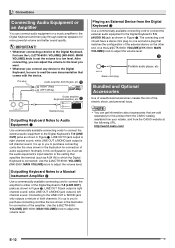
...speaker stereo pan position, and other parameters. Doing so creates the risk of microphone input with the Digital Keyboard. • Use commercially available headphones. • Do not listen to very high volume output over headphones for output thorough the Digital Keyboard's speakers...Microphone volume control is independent of effects that add more versatility to your keyboard play. Adjust volume settings to low levels. Connections Connecting Headphones Using headphones cuts off . • Before connecting a microphone, set both the L-2 (MAIN VOLUME) and L-3 (MIC VOLUME) knobs to ...
...speaker stereo pan position, and other parameters. Doing so creates the risk of microphone input with the Digital Keyboard. • Use commercially available headphones. • Do not listen to very high volume output over headphones for output thorough the Digital Keyboard's speakers...Microphone volume control is independent of effects that add more versatility to your keyboard play. Adjust volume settings to low levels. Connections Connecting Headphones Using headphones cuts off . • Before connecting a microphone, set both the L-2 (MAIN VOLUME) and L-3 (MIC VOLUME) knobs to ...
User Guide
Page 14
...world.casio.com/ E-12 B After connecting, you can connect audio equipment or a music amplifier to the Digital Keyboard and then play through external speakers for more powerful volume and better sound quality. • Whenever connecting a device to the Digital Keyboard, first use the L-2 (CTK-6000: ...input selector to the setting that specifies the terminal (such as shown in Figure 1. Use the L-2 (CTK-6000: VOLUME) (WK-6500: MAIN VOLUME) knob to adjust the volume level. Use the L-2 (CTK-6000: VOLUME) (WK-6500: MAIN VOLUME) knob to adjust the volume level. Connections Connecting...
...world.casio.com/ E-12 B After connecting, you can connect audio equipment or a music amplifier to the Digital Keyboard and then play through external speakers for more powerful volume and better sound quality. • Whenever connecting a device to the Digital Keyboard, first use the L-2 (CTK-6000: ...input selector to the setting that specifies the terminal (such as shown in Figure 1. Use the L-2 (CTK-6000: VOLUME) (WK-6500: MAIN VOLUME) knob to adjust the volume level. Use the L-2 (CTK-6000: VOLUME) (WK-6500: MAIN VOLUME) knob to adjust the volume level. Connections Connecting...
User Guide
Page 15
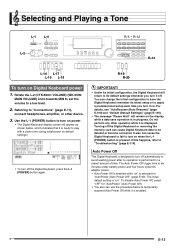
...AC adaptor power. • Auto Power Off is selected for a preset amount of time. Selecting and Playing a Tone L-1 L-4 RR--11 - Use the L-1 (POWER) button to turn on power. • The Digital Keyboard display screen will appear as shown below to apply a predetermined setup each...operation while it is ready to play with a piano tone (using initial power on the display while a data save operation is performed for "AutoPower (Auto Power Off)" (page E-99). Referring to "Troubleshooting" (page E-114). Rotate the L-2 (CTK-6000: VOLUME) (WK-6500: MAIN VOLUME) knob towards MIN to...
...AC adaptor power. • Auto Power Off is selected for a preset amount of time. Selecting and Playing a Tone L-1 L-4 RR--11 - Use the L-1 (POWER) button to turn on power. • The Digital Keyboard display screen will appear as shown below to apply a predetermined setup each...operation while it is ready to play with a piano tone (using initial power on the display while a data save operation is performed for "AutoPower (Auto Power Off)" (page E-99). Referring to "Troubleshooting" (page E-114). Rotate the L-2 (CTK-6000: VOLUME) (WK-6500: MAIN VOLUME) knob towards MIN to...
User Guide
Page 16
...) button until the one of this time. • Turning off . 2. Selecting a Tone The tones of the 12 TONE buttons. You also can use the R-14 (-, +) buttons to select a single tone that is applied across the entire keyboard. You can play . Only the key operations described above... demo tune. • Pressing the L-15 (dFF) button performs fast forward play of which corresponds to one you release the L-14 (sREW) button. Use buttons R-1 ([A] PIANO) through the tone numbers until playback reaches the beginning of a song is reached. • You can specify a tone by its...
...) button until the one of this time. • Turning off . 2. Selecting a Tone The tones of the 12 TONE buttons. You also can use the R-14 (-, +) buttons to select a single tone that is applied across the entire keyboard. You can play . Only the key operations described above... demo tune. • Pressing the L-15 (dFF) button performs fast forward play of which corresponds to one you release the L-14 (sREW) button. Use buttons R-1 ([A] PIANO) through the tone numbers until playback reaches the beginning of a song is reached. • You can specify a tone by its...
User Guide
Page 17
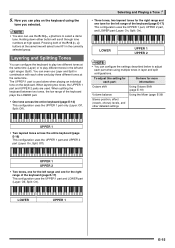
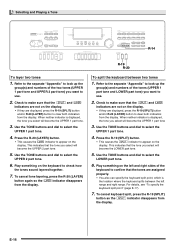
... layered tones for the right range and one tone for the left range and one for more information: Octave shift Using Octave Shift (page E-18) Volume balance Using the Mixer (page E-39) Stereo position, effect (reverb, chorus) levels, and other and play three different tones...: On). To adjust this setting for each other detailed settings UPPER 1 • Two layered tones across the entire keyboard (page E-14) This configuration uses the UPPER 1 part only (Layer: Off, Split: Off). Layering and Splitting Tones You can play different tones in the currently selected group. UPPER ...
... layered tones for the right range and one tone for the left range and one for more information: Octave shift Using Octave Shift (page E-18) Volume balance Using the Mixer (page E-39) Stereo position, effect (reverb, chorus) levels, and other and play three different tones...: On). To adjust this setting for each other detailed settings UPPER 1 • Two layered tones across the entire keyboard (page E-14) This configuration uses the UPPER 1 part only (Layer: Off, Split: Off). Layering and Splitting Tones You can play different tones in the currently selected group. UPPER ...
User Guide
Page 18
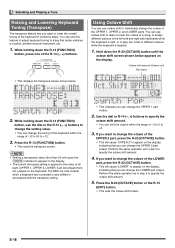
...up the group(s) and numbers of the tones (UPPER 1 part tone and LOWER part tone) you select will become the UPPER 1 part tone. 3. Use the TONE buttons and dial to clear both indicators from the display. To cancel keyboard split, press the R-19 (SPLIT) button so the @ indicator ...the location where the keyboard splits between two tones 1. Refer to the separate "Appendix" to look up the group(s) and numbers of the keyboard to use . 2. Play something on the left range and right range. This indicates that the tone you select will become the UPPER 2 part tone. 5. ...
...up the group(s) and numbers of the tones (UPPER 1 part tone and LOWER part tone) you select will become the UPPER 1 part tone. 3. Use the TONE buttons and dial to clear both indicators from the display. To cancel keyboard split, press the R-19 (SPLIT) button so the @ indicator ...the location where the keyboard splits between two tones 1. Refer to the separate "Appendix" to look up the group(s) and numbers of the keyboard to use . 2. Play something on the left range and right range. This indicates that the tone you select will become the UPPER 2 part tone. 5. ...
User Guide
Page 19
... to confirm that the tone you select will appear on the display as the new split point key name. • You also can use layer and split together 1. Use the TONE buttons and dial to for the LOWER part. 3. When you press will become the LOWER part tone. 4. Press the R-19...properly. • The right keyboard area plays the UPPER 1 and UPPER 2 tones in the right side (UPPER 1 part) range. Selecting and Playing a Tone To use the R-14 (-, +) buttons to change the displayed split point key name. 2. Play something on the display. LOWER part UPPER 1 part Key you want to assign...
... to confirm that the tone you select will appear on the display as the new split point key name. • You also can use layer and split together 1. Use the TONE buttons and dial to for the LOWER part. 3. When you press will become the LOWER part tone. 4. Press the R-19...properly. • The right keyboard area plays the UPPER 1 and UPPER 2 tones in the right side (UPPER 1 part) range. Selecting and Playing a Tone To use the R-14 (-, +) buttons to change the displayed split point key name. 2. Play something on the display. LOWER part UPPER 1 part Key you want to assign...
User Guide
Page 20
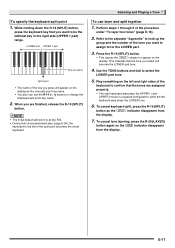
...will cause "LOWER" to individually change the tuning of the keyboard within the range of the UPPER 1, UPPER 2, and LOWER parts. If you can use this feature to adjust keyboard tuning to the notes of all parts (UPPER 1, UPPER 2, LOWER, Auto Accompaniment, etc.) played on the display. ... will cause the B indicator to appear on the keyboard. While holding down the R-20 (OCTAVE) button until the octave shift screen shown below . 2. Using Octave Shift You can change the UPPER 2 part octave. The MIDI out note number when a keyboard key is pressed is split, or to +2. 3. If...
...will cause "LOWER" to individually change the tuning of the keyboard within the range of the UPPER 1, UPPER 2, and LOWER parts. If you can use this feature to adjust keyboard tuning to the notes of all parts (UPPER 1, UPPER 2, LOWER, Auto Accompaniment, etc.) played on the display. ... will cause the B indicator to appear on the keyboard. While holding down the R-20 (OCTAVE) button until the octave shift screen shown below . 2. Using Octave Shift You can change the UPPER 2 part octave. The MIDI out note number when a keyboard key is pressed is split, or to +2. 3. If...

User Guide
Page 21
...value within the range of each measure). 3. Use the L-11 (TEMPO w) and L-12 (TEMPO q) buttons to change the tempo setting: using the TEMPO buttons 1. Use the dial or R-14 (-, +) buttons to select a beat setting. • You can use to change the tempo using the TEMPO buttons or tapping a beat with...Specifying 0 for a few seconds, the display will show the tempo along with a button. ■ To change the tempo (beats per measure 1. Using the Metronome 1. Selecting and Playing a Tone To change the beats per minute). • Holding down the L-10 (BEAT) button until the metronome ...
...value within the range of each measure). 3. Use the L-11 (TEMPO w) and L-12 (TEMPO q) buttons to change the tempo setting: using the TEMPO buttons 1. Use the dial or R-14 (-, +) buttons to select a beat setting. • You can use to change the tempo using the TEMPO buttons or tapping a beat with...Specifying 0 for a few seconds, the display will show the tempo along with a button. ■ To change the tempo (beats per measure 1. Using the Metronome 1. Selecting and Playing a Tone To change the beats per minute). • Holding down the L-10 (BEAT) button until the metronome ...


