User Guide
Page 4
...is displayed E-7 Saving Settings E-8 Returning the Digital Keyboard to Its Factory Default Settings E-8 Getting Ready to a Sound .... E-63 To recall a setup from registration memory ..... E-63 Using the Song Sequencer ...... E-24 Playing an Auto Accompaniment E-24 Selecting a Chord Fingering Mode E-26 Modifying Auto Accompaniment Patterns.........E-27 Using One-Touch Presets E-27 Using Auto Harmonize E-28 Using the Rhythm Editor E-29 Applying Effects to Play E-9 Preparing the Music Stand E-9 Power Supply E-9 Connections E-11 Connecting Headphones E-11 Connecting a Pedal...
...is displayed E-7 Saving Settings E-8 Returning the Digital Keyboard to Its Factory Default Settings E-8 Getting Ready to a Sound .... E-63 To recall a setup from registration memory ..... E-63 Using the Song Sequencer ...... E-24 Playing an Auto Accompaniment E-24 Selecting a Chord Fingering Mode E-26 Modifying Auto Accompaniment Patterns.........E-27 Using One-Touch Presets E-27 Using Auto Harmonize E-28 Using the Rhythm Editor E-29 Applying Effects to Play E-9 Preparing the Music Stand E-9 Power Supply E-9 Connections E-11 Connecting Headphones E-11 Connecting a Pedal...
User Guide
Page 7
... L-17 START/STOP, PLAY/STOP, DEMO button 14, 24, 73, 108 L-18 ACCOMP ON/OFF, $CHORDS, PART SELECT, DEMO button 14, 24, 26, 109 C-1 Display 6 C-2 RHYTHM EDITOR button 29 C-3 SONG SEQUENCER, #EDIT button 7, 68, 75 C-4 RECORD button 64, 68, 69 C-5 MIXER, #EFFECT button 34, 40 C-6 TONE EDITOR, #SCALE button 21, 46 C-7 CARD, #LOAD/SAVE button 7, 103, 104, 106 Dial 6, 14, 24 TONE buttons R-1 [A] PIANO, 5 button 14, 59, 88 R-2 [B] E. button 14, 94 R-12 [L] USER TONES button 14, 46 R-13 FUNCTION button 96...
... L-17 START/STOP, PLAY/STOP, DEMO button 14, 24, 73, 108 L-18 ACCOMP ON/OFF, $CHORDS, PART SELECT, DEMO button 14, 24, 26, 109 C-1 Display 6 C-2 RHYTHM EDITOR button 29 C-3 SONG SEQUENCER, #EDIT button 7, 68, 75 C-4 RECORD button 64, 68, 69 C-5 MIXER, #EFFECT button 34, 40 C-6 TONE EDITOR, #SCALE button 21, 46 C-7 CARD, #LOAD/SAVE button 7, 103, 104, 106 Dial 6, 14, 24 TONE buttons R-1 [A] PIANO, 5 button 14, 59, 88 R-2 [B] E. button 14, 94 R-12 [L] USER TONES button 14, 46 R-13 FUNCTION button 96...
User Guide
Page 13
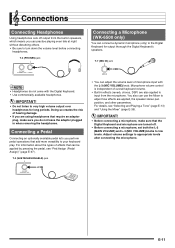
.... Adjust volume settings to adjust how effects are also applied to very high volume output over headphones for output thorough the Digital Keyboard's speakers. For details, see "Selecting and Playing a Tone" (page E-13) and "Using the Mixer" (page E-39). • Before connecting a microphone, make sure you can connect a dynamic microphone (only) to turn down the volume level before connecting headphones. For information about the types of hearing damage. • If you perform pedal operations...
.... Adjust volume settings to adjust how effects are also applied to very high volume output over headphones for output thorough the Digital Keyboard's speakers. For details, see "Selecting and Playing a Tone" (page E-13) and "Using the Mixer" (page E-39). • Before connecting a microphone, make sure you can connect a dynamic microphone (only) to turn down the volume level before connecting headphones. For information about the types of hearing damage. • If you perform pedal operations...
User Guide
Page 15
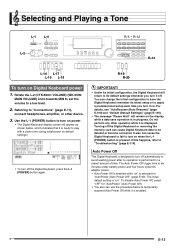
... battery power and four hours under AC adaptor power. • Auto Power Off is enabled while "on default settings). • To turn on when the L-1 (POWER) button is "on the display while a data save operation is enabled. RR--1122 L-2 R-14 L-14 L-17 L-15 L-18 R-19 R-20 To turn it is ready to be deleted or become corrupted. B E-13 Selecting and Playing a Tone L-1 L-4 RR--11 - Rotate the L-2 (CTK-6000: VOLUME) (WK-6500: MAIN VOLUME...
... battery power and four hours under AC adaptor power. • Auto Power Off is enabled while "on default settings). • To turn on when the L-1 (POWER) button is "on the display while a data save operation is enabled. RR--1122 L-2 R-14 L-14 L-17 L-15 L-18 R-19 R-20 To turn it is ready to be deleted or become corrupted. B E-13 Selecting and Playing a Tone L-1 L-4 RR--11 - Rotate the L-2 (CTK-6000: VOLUME) (WK-6500: MAIN VOLUME...
User Guide
Page 24
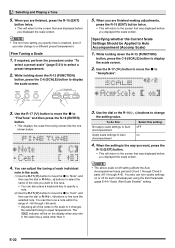
... way you displayed the scale screen. 4. You also can adjust the tuning of each individual part using the Part Parameter (page E-44) "Scale (Part Scale Enable)" setting. Selecting and Playing a Tone 5. If required, perform the procedure under "To select a preset scale" (page E-21) to Auto Accompaniment (Accomp Scale) 1. The C indicator will return to Auto on or off setting affects the Auto Accompaniment bass part and Chord 1 through Chord 5 parts (A11 through...
... way you displayed the scale screen. 4. You also can adjust the tuning of each individual part using the Part Parameter (page E-44) "Scale (Part Scale Enable)" setting. Selecting and Playing a Tone 5. If required, perform the procedure under "To select a preset scale" (page E-21) to Auto Accompaniment (Accomp Scale) 1. The C indicator will return to Auto on or off setting affects the Auto Accompaniment bass part and Chord 1 through Chord 5 parts (A11 through...
User Guide
Page 32
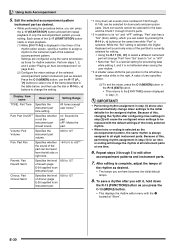
... drum set here becomes the initial default tempo. 8. Using Auto Accompaniment 5. Volume: Part Volume Pan: Part Pan Specifies the instrument part volume. 000 to 127 Specifies whether the sound of the part can be replaced with the 0 located at the same time while "Part" is complete, adjust the tempo of the selected accompaniment pattern instrument part as desired. • The tempo you edit it is displayed in step (2) will change the setting. on " or "oFF". • Note that...
... drum set here becomes the initial default tempo. 8. Using Auto Accompaniment 5. Volume: Part Volume Pan: Part Pan Specifies the instrument part volume. 000 to 127 Specifies whether the sound of the part can be replaced with the 0 located at the same time while "Part" is complete, adjust the tempo of the selected accompaniment pattern instrument part as desired. • The tempo you edit it is displayed in step (2) will change the setting. on " or "oFF". • Note that...

User Guide
Page 37
... use of each keyboard or Auto Accompaniment part. Use the R-14 (-, +) buttons to select "Chorus". • This enters the chorus effect mode, which enables the use the R-14 (-, +) buttons to change the setting to the tone of the chorus effect. 5. If you should skip steps 3 and 4 below. 3. Use the R-17 (t, y) buttons to move the thick brackets (%) to sounds 1. E-35 Applying Effects to display the effect setting screen. The initial default setting...
... use of each keyboard or Auto Accompaniment part. Use the R-14 (-, +) buttons to select "Chorus". • This enters the chorus effect mode, which enables the use the R-14 (-, +) buttons to change the setting to the tone of the chorus effect. 5. If you should skip steps 3 and 4 below. 3. Use the R-17 (t, y) buttons to move the thick brackets (%) to sounds 1. E-35 Applying Effects to display the effect setting screen. The initial default setting...
User Guide
Page 41
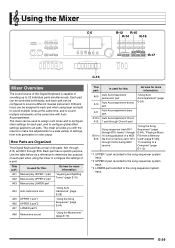
... means to make fine adjustments to a wide variety of settings, from a Memory Card" (page E-108), "Connecting to a Computer" (page E-112) *1 UPPER 1 part recorded to the song sequencer system track. *2 UPPER 2 part recorded to the song sequencer system track. *3 LOWER part recorded to B16 Song sequencer track B01 through B16, tracks 1 through 16 during MIDI receive "Using the Song Sequencer" (page E-64), "Playing a Music File from note generation to all parts. Each part has a specific purpose. How Parts are Organized This Digital Keyboard has...
... means to make fine adjustments to a wide variety of settings, from a Memory Card" (page E-108), "Connecting to a Computer" (page E-112) *1 UPPER 1 part recorded to the song sequencer system track. *2 UPPER 2 part recorded to the song sequencer system track. *3 LOWER part recorded to B16 Song sequencer track B01 through B16, tracks 1 through 16 during MIDI receive "Using the Song Sequencer" (page E-64), "Playing a Music File from note generation to all parts. Each part has a specific purpose. How Parts are Organized This Digital Keyboard has...
User Guide
Page 42
... (DSP), microphone input (MIC), or a part (A01 through A16, B01 through B16). When this setting is shown in step 2 above for setting, you want to configure other types of performance operations (layer, split, Auto Accompaniment, etc.) are indicated by pressing both of the selected part. Use the dial or R-14 (-, +) buttons to change the setting value. • Pressing the R-14 (-, +) buttons at the same time returns a parameter...
... (DSP), microphone input (MIC), or a part (A01 through A16, B01 through B16). When this setting is shown in step 2 above for setting, you want to configure other types of performance operations (layer, split, Auto Accompaniment, etc.) are indicated by pressing both of the selected part. Use the dial or R-14 (-, +) buttons to change the setting value. • Pressing the R-14 (-, +) buttons at the same time returns a parameter...
User Guide
Page 66
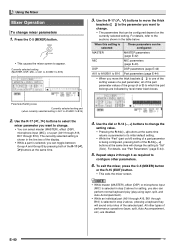
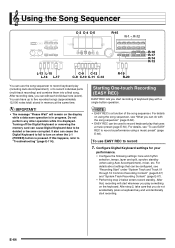
... the following settings: tone and rhythm selection, tempo, layer and split, synchro standby (when using Auto Accompaniment), mixer, etc. After step 2, take care that , recording will remain on using the song sequencer, see "To use EASY REC to record individual parts (multi-track recording) and combine them into a final song. After that you can edit each individual note (event). Turning off the Digital Keyboard or removing the memory card can cause Digital Keyboard data to "Troubleshooting" (page...
... the following settings: tone and rhythm selection, tempo, layer and split, synchro standby (when using Auto Accompaniment), mixer, etc. After step 2, take care that , recording will remain on using the song sequencer, see "To use EASY REC to record individual parts (multi-track recording) and combine them into a final song. After that you can edit each individual note (event). Turning off the Digital Keyboard or removing the memory card can cause Digital Keyboard data to "Troubleshooting" (page...

User Guide
Page 67
... (START/STOP) button to start recording, and then start keyboard play at the point you can specify a beat setting of remaining memory capacity, the current measure (MEASURE) and beat (BEAT) values will indicate all the parts in step 4. (5) Press the R-15 (EXIT) button to sound a count during recording, but not during playback. • At this time you want. • Starting recording will display a menu like the one or more rests before the start flashing. 5. To...
... (START/STOP) button to start recording, and then start keyboard play at the point you can specify a beat setting of remaining memory capacity, the current measure (MEASURE) and beat (BEAT) values will indicate all the parts in step 4. (5) Press the R-15 (EXIT) button to sound a count during recording, but not during playback. • At this time you want. • Starting recording will display a menu like the one or more rests before the start flashing. 5. To...

User Guide
Page 69
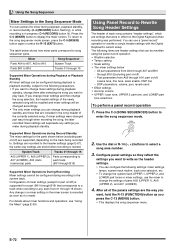
....) ■ During Recording • Rhythm selection • Tempo setting • All of song parts, see "Using Panel Record to when the setup was saved, as shown below (page E-97) - All part parameters from registration memory • Settings recalled using the Digital Keyboard's control panel. Part parameters from B01 through B16 (except part on /off • Split point setting • Octave shift for the track • The mixer settings below - Parts when registration Parts when registration is setup is recorded to different numbered parts than they are...
....) ■ During Recording • Rhythm selection • Tempo setting • All of song parts, see "Using Panel Record to when the setup was saved, as shown below (page E-97) - All part parameters from registration memory • Settings recalled using the Digital Keyboard's control panel. Part parameters from B01 through B16 (except part on /off • Split point setting • Octave shift for the track • The mixer settings below - Parts when registration Parts when registration is setup is recorded to different numbered parts than they are...

User Guide
Page 70
... contains recorded data, starting recording in that there is recorded to each track, see "What you play something on or off . Press the C-4 (RECORD) button. • The button will start of the menu screen has a "RecType" setting, but not during recording, but this setting cannot be deleted. Up to turn the precount on the keyboard. Perform the following settings: tone and rhythm selection, tempo, layer and split, synchro standby (when using Auto Accompaniment), mixer, etc. Turning...
... contains recorded data, starting recording in that there is recorded to each track, see "What you play something on or off . Press the C-4 (RECORD) button. • The button will start of the menu screen has a "RecType" setting, but not during recording, but this setting cannot be deleted. Up to turn the precount on the keyboard. Perform the following settings: tone and rhythm selection, tempo, layer and split, synchro standby (when using Auto Accompaniment), mixer, etc. Turning...
User Guide
Page 74
... following settings: mixer settings, tempo, system track rhythm, track tone selection, etc. • To change the system track UPPER 1, UPPER 2, and LOWER part tones or mixer settings, use a "panel record" operation to the header settings (page E-67), the same way settings are those that were in effect on the Digital Keyboard when recording was performed. Using the Song Sequencer Mixer Settings in the Song Sequencer Mode You can access the mixer during playback, playback standby, or record standby (C-4 (RECORD) button flashing...
... following settings: mixer settings, tempo, system track rhythm, track tone selection, etc. • To change the system track UPPER 1, UPPER 2, and LOWER part tones or mixer settings, use a "panel record" operation to the header settings (page E-67), the same way settings are those that were in effect on the Digital Keyboard when recording was performed. Using the Song Sequencer Mixer Settings in the Song Sequencer Mode You can access the mixer during playback, playback standby, or record standby (C-4 (RECORD) button flashing...

User Guide
Page 75
... want to play a specific section of parts A05 (UPPER 1), A06 (UPPER 2), and A07 (LOWER). • The above settings are supported during playback. Use the R-17 (y) button to move the 0 to select a song area number. 3. Pause Press the L-16 (PAUSE) button. Press the R-16 (ENTER) button. 7. Playing a Recorded Song This section explains how to change the settings of a song" (page E-110). • Even while playback is in a song. • Repeat play a recorded song 1. 5. Restart...
... want to play a specific section of parts A05 (UPPER 1), A06 (UPPER 2), and A07 (LOWER). • The above settings are supported during playback. Use the R-17 (y) button to move the 0 to select a song area number. 3. Pause Press the L-16 (PAUSE) button. Press the R-16 (ENTER) button. 7. Playing a Recorded Song This section explains how to change the settings of a song" (page E-110). • Even while playback is in a song. • Repeat play a recorded song 1. 5. Restart...
User Guide
Page 77
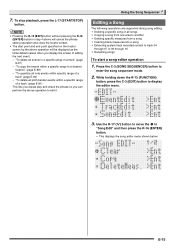
... the 0 to enter the song sequencer mode. 2. Using the Song Sequencer Editing a Song The following operations are supported during song editing. • Deleting a specific song or all pitch bender events within a specific range of a track" (page E-91) This lets you repeat play and check the phrase so you display the screen of a track" (page E-90) - While holding down the R-13 (FUNCTION) button, press the C-3 (EDIT) button to track 04 through 07 or...
... the 0 to enter the song sequencer mode. 2. Using the Song Sequencer Editing a Song The following operations are supported during song editing. • Deleting a specific song or all pitch bender events within a specific range of a track" (page E-91) This lets you repeat play and check the phrase so you display the screen of a track" (page E-90) - While holding down the R-13 (FUNCTION) button, press the C-3 (EDIT) button to track 04 through 07 or...

User Guide
Page 100
... on a memory card" (page E-107). Using the Function Menu ArpegSpeed (Arpeggiator Speed) Specifies how many times notes or chords should sound within one beat for arpeggio phrases played by the arpeggiator (page E-23). 1, 2, 2S, 3, 4*, 4S, 6, 8 The setting value indicates the number of times within one beat. While in Digital Keyboard memory to a memory card, or load all user data in the card mode (page E-103), hold down the R-13 (FUNCTION) button as you...
... on a memory card" (page E-107). Using the Function Menu ArpegSpeed (Arpeggiator Speed) Specifies how many times notes or chords should sound within one beat for arpeggio phrases played by the arpeggiator (page E-23). 1, 2, 2S, 3, 4*, 4S, 6, 8 The setting value indicates the number of times within one beat. While in Digital Keyboard memory to a memory card, or load all user data in the card mode (page E-103), hold down the R-13 (FUNCTION) button as you...
User Guide
Page 117
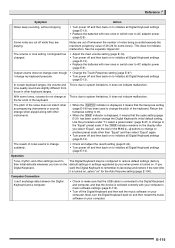
... volume or tone setting I configured has changed. • Adjust the main volume setting (page E-13). • Turn power off and then back on to initialize all Digital Keyboard settings (page E-13). • Replace the batteries with new ones or switch over to initialize all Digital Keyboard settings (page E-13). Next, turn on the Digital Keyboard. E-115 Return the transpose setting to 00. • When the C indicator is displayed, it means that the device is connected to...
... volume or tone setting I configured has changed. • Adjust the main volume setting (page E-13). • Turn power off and then back on to initialize all Digital Keyboard settings (page E-13). • Replace the batteries with new ones or switch over to initialize all Digital Keyboard settings (page E-13). Next, turn on the Digital Keyboard. E-115 Return the transpose setting to 00. • When the C indicator is displayed, it means that the device is connected to...
User Guide
Page 118
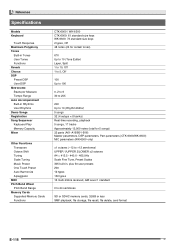
... Specifications Models Keyboard Touch Response Maximum Polyphony Tones Built-in Tones User Tones Functions Reverb Chorus DSP Preset DSP User DSP Metronome Beats per Measure Tempo Range Auto Accompaniment Built-in Rhythms User Rhythms Demo Songs Registration Song Sequencer Keyboard Play Memory Capacity Mixer Other Functions Transpose Octave Shift Tuning Scale Tuning Music Preset One Touch Preset Auto Harmonize Arpeggiator MIDI Pitch Bend Wheel Pitch Bend Range Memory Cards Supported Memory Cards Functions CTK-6000 / WK-6500 CTK-6000: 61 standard-size keys WK-6500: 76 standard-size keys 2 types...
... Specifications Models Keyboard Touch Response Maximum Polyphony Tones Built-in Tones User Tones Functions Reverb Chorus DSP Preset DSP User DSP Metronome Beats per Measure Tempo Range Auto Accompaniment Built-in Rhythms User Rhythms Demo Songs Registration Song Sequencer Keyboard Play Memory Capacity Mixer Other Functions Transpose Octave Shift Tuning Scale Tuning Music Preset One Touch Preset Auto Harmonize Arpeggiator MIDI Pitch Bend Wheel Pitch Bend Range Memory Cards Supported Memory Cards Functions CTK-6000 / WK-6500 CTK-6000: 61 standard-size keys WK-6500: 76 standard-size keys 2 types...
User Guide
Page 129
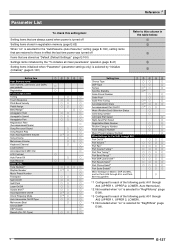
... User Memory Items User rhythms, user tones, user DSPs, user presets Registration Function Menu Item Tuning Touch Response Pitch Bend Velocity Pedal Assign Bend Range*1 Arpeggiator Hold Arpeggiator Speed Arpeggiator Part Registration Filter (Accompaniment/Scale) Song Pre-count Sound Song Repeat Play Auto Accompaniment Volume Song Volume Metronome Volume Keyboard Channel Local Control Accompaniment MIDI Out LCD Contrast Auto Power Off Auto Recover Other Items Tone Number*1 Rhythm Number Music Preset Number Transpose Split On/Off Split Point Layer On/Off Octave Shift*3 Accompaniment On/Off Chord...
... User Memory Items User rhythms, user tones, user DSPs, user presets Registration Function Menu Item Tuning Touch Response Pitch Bend Velocity Pedal Assign Bend Range*1 Arpeggiator Hold Arpeggiator Speed Arpeggiator Part Registration Filter (Accompaniment/Scale) Song Pre-count Sound Song Repeat Play Auto Accompaniment Volume Song Volume Metronome Volume Keyboard Channel Local Control Accompaniment MIDI Out LCD Contrast Auto Power Off Auto Recover Other Items Tone Number*1 Rhythm Number Music Preset Number Transpose Split On/Off Split Point Layer On/Off Octave Shift*3 Accompaniment On/Off Chord...


