
User Manual
Page 2
... Parts 6 Power Supply 7 Regulations 9 Trademarks 10 Chapter 2 Important Safety Instructions 11 Installation Location 11 Moving the Scanner 12 Handling 12 Disposal 13 When sending the scanner for repairs 13 Chapter 3 Installing the Software 14 System requirements 14 Setup Disc Contents 15 Software Installation 16 Chapter 4 Connecting the Scanner 20 Connecting the Scanner to the Computer 20 Turning the Power ON 21 Chapter 5 Placing Documents 23 Documents 23 Loading a document 25 Loading cards 27 Chapter 6 Scanning...
... Parts 6 Power Supply 7 Regulations 9 Trademarks 10 Chapter 2 Important Safety Instructions 11 Installation Location 11 Moving the Scanner 12 Handling 12 Disposal 13 When sending the scanner for repairs 13 Chapter 3 Installing the Software 14 System requirements 14 Setup Disc Contents 15 Software Installation 16 Chapter 4 Connecting the Scanner 20 Connecting the Scanner to the Computer 20 Turning the Power ON 21 Chapter 5 Placing Documents 23 Documents 23 Loading a document 25 Loading cards 27 Chapter 6 Scanning...
User Manual
Page 3
... to save a scanner driver setting 85 Chapter 10 Regular Maintenance 87 Cleaning the Scanner 87 Cleaning the Scanning Glass and the Rollers 88 Chapter 11 Detaching and attaching the separation pad 89 When to replace the separation pad 89 Detaching and attaching the separation pad 90 Chapter 12 Uninstalling the Software 91 Uninstallation 91 Chapter 13 Troubleshooting 92 Clearing a Paper Jam 92 Common Problems and Solutions 94 Software Troubleshooting 96 Useful...
... to save a scanner driver setting 85 Chapter 10 Regular Maintenance 87 Cleaning the Scanner 87 Cleaning the Scanning Glass and the Rollers 88 Chapter 11 Detaching and attaching the separation pad 89 When to replace the separation pad 89 Detaching and attaching the separation pad 90 Chapter 12 Uninstalling the Software 91 Uninstallation 91 Chapter 13 Troubleshooting 92 Clearing a Paper Jam 92 Common Problems and Solutions 94 Software Troubleshooting 96 Useful...

User Manual
Page 5
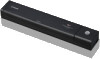
... size of the scanner with Feeder Up to 10 pages of the P-208II document scanner are used in this manual to explain procedures, restrictions, handling precautions, and instructions that should be loaded and then fed continuously, or one - or two-sided scan at a time. 4 Features of the Scanner The main features of a document can be started by turning ON the Auto Start switch on the rear panel. Connecting a computer to the scanner...
... size of the scanner with Feeder Up to 10 pages of the P-208II document scanner are used in this manual to explain procedures, restrictions, handling precautions, and instructions that should be loaded and then fed continuously, or one - or two-sided scan at a time. 4 Features of the Scanner The main features of a document can be started by turning ON the Auto Start switch on the rear panel. Connecting a computer to the scanner...

User Manual
Page 6
... and scanner driver to allow scanning under automatically determined conditions. Using the skip blank pages function enables you to scan without worrying about whether to scan one side or both the text and background are set automatically based on the bundled software you are not saved. Auto Color Detection The scanner detects whether the scanned document is in color, grayscale, or black and white, and saves the image accordingly. Full Auto Mode A Full Auto Mode...
... and scanner driver to allow scanning under automatically determined conditions. Using the skip blank pages function enables you to scan without worrying about whether to scan one side or both the text and background are set automatically based on the bundled software you are not saved. Auto Color Detection The scanner detects whether the scanned document is in color, grayscale, or black and white, and saves the image accordingly. Full Auto Mode A Full Auto Mode...
User Manual
Page 7
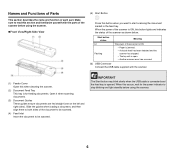
... to stop blinking and light steadily before using the scanner. 6 Make sure to read this section and familiarize yourself with the parts of the scanner is ON. • Paper is jammed. • A double feed has been detected and the scanner has stopped. • The top unit is open. • Another scanner error has occurred. (6) USB Connector Connect the USB cable supplied with the scanner. (1) Feeder Cover Open this when cleaning the scanner. (2) Document Feed Tray This tray is for the power indicator to start scanning the document...
... to stop blinking and light steadily before using the scanner. 6 Make sure to read this section and familiarize yourself with the parts of the scanner is ON. • Paper is jammed. • A double feed has been detected and the scanner has stopped. • The top unit is open. • Another scanner error has occurred. (6) USB Connector Connect the USB cable supplied with the scanner. (1) Feeder Cover Open this when cleaning the scanner. (2) Document Feed Tray This tray is for the power indicator to start scanning the document...
User Manual
Page 8
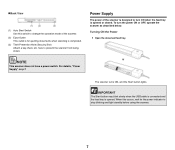
... Power 1 Open the document feed tray. The Start button may blink slowly when the USB cable is connected and the feed tray is opened . When this switch to change the operation mode of the scanner is designed to prevent the scanner from being stolen. here to turn the power ON or OFF, operate the scanner as described below. Power Supply The power of the scanner. (2) Eject Outlet This outlet is for the power indicator to stop blinking and light steadily before using the scanner...
... Power 1 Open the document feed tray. The Start button may blink slowly when the USB cable is connected and the feed tray is opened . When this switch to change the operation mode of the scanner is designed to prevent the scanner from being stolen. here to turn the power ON or OFF, operate the scanner as described below. Power Supply The power of the scanner. (2) Eject Outlet This outlet is for the power indicator to stop blinking and light steadily before using the scanner...

User Manual
Page 10
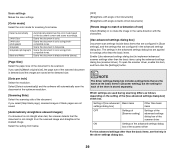
...: (1) this device may not cause interference, and (2) this machine meets the ENERGY STAR® Program guidelines for power management. If such changes or modifications should be required to the WEEE Directive (2002/96/EC) and your household waste disposal service. The standards and logos are office equipment, such as computers, monitors, printers, fax, machine, copiers, and scanners. L'exploitation est...
...: (1) this device may not cause interference, and (2) this machine meets the ENERGY STAR® Program guidelines for power management. If such changes or modifications should be required to the WEEE Directive (2002/96/EC) and your household waste disposal service. The standards and logos are office equipment, such as computers, monitors, printers, fax, machine, copiers, and scanners. L'exploitation est...

User Manual
Page 16
...-party software, user the scanner driver of your application software retailer. BizCard Business card management software from the supplied Setup Disc. CaptureOnTouch This is a dedicated scanning utility for this software must be downloaded via the Internet. Precautions for this product supports scanning with 32bit applications only. Even with 32-bit applications, not all ISIS or TWAIN-compatible applications. BizCard is the scanner driver for Use in 64-bit Operating Systems The scanner driver supplied with...
...-party software, user the scanner driver of your application software retailer. BizCard Business card management software from the supplied Setup Disc. CaptureOnTouch This is a dedicated scanning utility for this software must be downloaded via the Internet. Precautions for this product supports scanning with 32bit applications only. Even with 32-bit applications, not all ISIS or TWAIN-compatible applications. BizCard is the scanner driver for Use in 64-bit Operating Systems The scanner driver supplied with...

User Manual
Page 22
... scanner document feed tray switches on the position of the scanner has been opened to turn ON the power, the computer may not be able to start. When connecting a USB cable and opening the document feed tray, the start button stops flashing and remains lit, the scanner is ready for setting whether to turn on the scanner.) The scanner is recognized as a storage device. After the start button can connect the scanner to a computer. You can slowly flash. Depending on the power supply automatically...
... scanner document feed tray switches on the position of the scanner has been opened to turn ON the power, the computer may not be able to start. When connecting a USB cable and opening the document feed tray, the start button stops flashing and remains lit, the scanner is ready for setting whether to turn on the scanner.) The scanner is recognized as a storage device. After the start button can connect the scanner to a computer. You can slowly flash. Depending on the power supply automatically...

User Manual
Page 25
... cover the entire span of the feed rollers. ● Scanning documents before the ink is printed on thin paper, the image on the scanned image and transfer the dirt to subsequent documents. Always make sure that the ink on the type of embossment. 24 Always clean the internal parts of the scanner after scanning such documents. ● When scanning a two-sided document that is dry can cause problems with excessive paper dust...
... cover the entire span of the feed rollers. ● Scanning documents before the ink is printed on thin paper, the image on the scanned image and transfer the dirt to subsequent documents. Always make sure that the ink on the type of embossment. 24 Always clean the internal parts of the scanner after scanning such documents. ● When scanning a two-sided document that is dry can cause problems with excessive paper dust...
User Manual
Page 40
... the scanned document is detected and the images are not saved. [Automatically straightens skewed images] If a document is not straight when fed, the scanner detects that the document is stored separately. The settings in the advanced settings dialog box are configured in the driver settings dialog box. 39 Scans the document in color. If you select [Skip blank page], scanned images of blank pages are saved at the optimum resolution. [Scanning Side] Select the scanning side of the document. Scans the document in color using...
... the scanned document is detected and the images are not saved. [Automatically straightens skewed images] If a document is not straight when fed, the scanner detects that the document is stored separately. The settings in the advanced settings dialog box are configured in the driver settings dialog box. 39 Scans the document in color. If you select [Skip blank page], scanned images of blank pages are saved at the optimum resolution. [Scanning Side] Select the scanning side of the document. Scans the document in color using...

User Manual
Page 41
... list of the panel is specified, set the save location, edit the output panel and set the desired output. The file formats that can be selected as plugins. Edit [Output] panel The Edit output screen opens when you can change the select document icon displayed in the Output panel. Save to folder Saves the scanned image to a folder. The selected type of panel types. Create new [Output] panel Click the [New output] button...
... list of the panel is specified, set the save location, edit the output panel and set the desired output. The file formats that can be selected as plugins. Edit [Output] panel The Edit output screen opens when you can change the select document icon displayed in the Output panel. Save to folder Saves the scanned image to a folder. The selected type of panel types. Create new [Output] panel Click the [New output] button...
User Manual
Page 48
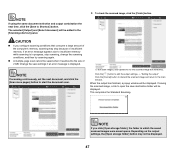
.... If saving the scanned image, a link to open the save settings if an error message is in which the saved scanned images were saved opens. If scanning continuously, set the next document, and click the [Scan more pages] button to the main window. If you configure scanning conditions that consume a large amount of the computer's memory, scanning may not be saved when it reaches the file size of insufficient memory. Change the save destination folder will be added to the [Scanning shortcut] panel...
.... If saving the scanned image, a link to open the save settings if an error message is in which the saved scanned images were saved opens. If scanning continuously, set the next document, and click the [Scan more pages] button to the main window. If you configure scanning conditions that consume a large amount of the computer's memory, scanning may not be saved when it reaches the file size of insufficient memory. Change the save destination folder will be added to the [Scanning shortcut] panel...

User Manual
Page 58
... save location folder. 57 By installing the plug-in an e-mail. To install plugins, enable the checkbox when installing CaptureOnTouch. Other output methods CaptureOnTouch supplies output methods other than [Save to use various services such as plugins. For how to folder] as printing the scanned image or attaching it in , you can use the plugins, see the plugin help. When this output method is specified, set the save locations...
... save location folder. 57 By installing the plug-in an e-mail. To install plugins, enable the checkbox when installing CaptureOnTouch. Other output methods CaptureOnTouch supplies output methods other than [Save to use various services such as plugins. For how to folder] as printing the scanned image or attaching it in , you can use the plugins, see the plugin help. When this output method is specified, set the save locations...
User Manual
Page 68
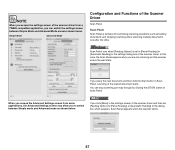
...] button of the Scanner Driver Scan Panel Scan Panel Scan Panel is set [Feeding Option] to switch between Simple Mode and Advanced Mode screens shown below . You can switch the settings screen between Simple mode and Advanced mode as feeding documents and stopping scanning when scanning multiple documents one after the other. When you access the Advanced Settings screen from a TWAIN compatible application, you click [More] in the settings screen of the scanner driver and then set to [Panel-Feeding] or [Automatic Feeding] in the settings dialog box of the placed document starts...
...] button of the Scanner Driver Scan Panel Scan Panel Scan Panel is set [Feeding Option] to switch between Simple Mode and Advanced Mode screens shown below . You can switch the settings screen between Simple mode and Advanced mode as feeding documents and stopping scanning when scanning multiple documents one after the other. When you access the Advanced Settings screen from a TWAIN compatible application, you click [More] in the settings screen of the scanner driver and then set to [Panel-Feeding] or [Automatic Feeding] in the settings dialog box of the placed document starts...

User Manual
Page 94
... saved before resuming the operation. 93 Make sure the document does not get caught in the scanner driver, the image of the interruption. 3 Remove the jammed document from the feed side or eject side. 4 Close the feeder cover. As the image of the document that you remove the jammed paper, check to verify the last scanned image before scanning is stopped. After you remove any remaining pieces. Carefully pull out the document without using excessive force. When a paper jam or other problem...
... saved before resuming the operation. 93 Make sure the document does not get caught in the scanner driver, the image of the interruption. 3 Remove the jammed document from the feed side or eject side. 4 Close the feeder cover. As the image of the document that you remove the jammed paper, check to verify the last scanned image before scanning is stopped. After you remove any remaining pieces. Carefully pull out the document without using excessive force. When a paper jam or other problem...

User Manual
Page 95
... [Select document] panel, or create a new [Select document] panel using [Select document] panel registered with all USB interfaces. 4 Confirm that the separation pad is attached securely. 6 Perfectly straight scanning may not support the scanner. Close the feed tray to turn OFF the scanner, and set to ON, you open the feed tray, the scanner turns ON automatically. 2 If the scanner is properly connected to the computer. 4 If many pages have been scanned since the last roller cleaning, clean the rollers and...
... [Select document] panel, or create a new [Select document] panel using [Select document] panel registered with all USB interfaces. 4 Confirm that the separation pad is attached securely. 6 Perfectly straight scanning may not support the scanner. Close the feed tray to turn OFF the scanner, and set to ON, you open the feed tray, the scanner turns ON automatically. 2 If the scanner is properly connected to the computer. 4 If many pages have been scanned since the last roller cleaning, clean the rollers and...
User Manual
Page 96
... all documents have been scanned because the scanner is specified for additional documents. Q9 Documents jam (or double-feed). Q10 Multiple pages of the following scanning conditions overlap. • [Color Mode] is selected as [Simplex] or [Duplex]. Although this does not indicate a malfunction. 95 If a sticky substance such as the [Page Size]. Q8 Pages are set to a single file. If an error message appears due to clean the area where the lines appear...
... all documents have been scanned because the scanner is specified for additional documents. Q9 Documents jam (or double-feed). Q10 Multiple pages of the following scanning conditions overlap. • [Color Mode] is selected as [Simplex] or [Duplex]. Although this does not indicate a malfunction. 95 If a sticky substance such as the [Page Size]. Q8 Pages are set to a single file. If an error message appears due to clean the area where the lines appear...

User Manual
Page 97
... free up memory space. 3 When insufficient hard disk space is not Hi-Speed USB 2.0 compliant, replace the cable with CaptureOnTouch. page) can edit the scan settings when the [Select document edit screen] opens. Useful tips Here are saved to the following locations, according to the computer. Can the save one file per page? When scanned images are the scan settings configured? CaptureOnTouch By clicking the Edit button ([ ]) in or Captiva Cloud cannot be used Install...
... free up memory space. 3 When insufficient hard disk space is not Hi-Speed USB 2.0 compliant, replace the cable with CaptureOnTouch. page) can edit the scan settings when the [Select document edit screen] opens. Useful tips Here are saved to the following locations, according to the computer. Can the save one file per page? When scanned images are the scan settings configured? CaptureOnTouch By clicking the Edit button ([ ]) in or Captiva Cloud cannot be used Install...
User Manual
Page 98
... document] panel or on the scanner driver setting screen, then scan. Click the [Detail Settings] button on p.27 How do I scan correctly without any loss of the scanner driver. You can set the file names of scanned images by selecting its checkbox when installing CaptureOnTouch. 97 Select the date format from the list box. How can I scan cards? Set [Page Size] to any settings other than [Match original size] (Windows) or [Detect automatically] (OS X) in the file name. Alternatively, set...
... document] panel or on the scanner driver setting screen, then scan. Click the [Detail Settings] button on p.27 How do I scan correctly without any loss of the scanner driver. You can set the file names of scanned images by selecting its checkbox when installing CaptureOnTouch. 97 Select the date format from the list box. How can I scan cards? Set [Page Size] to any settings other than [Match original size] (Windows) or [Detect automatically] (OS X) in the file name. Alternatively, set...


