Basic Guide
Page 8
... the Fixing Unit 85 Cleaning the Platen Glass and Feeder 86 Check and Replace Toner Cartridges 87 Checking the Toner Level 87 Conserving the Toner to Extend the Life of Toner Cartridges 88 Replacing the Toner Cartridge 88 Manage Using the Report and List Functions 91 Configure Settings Using the Remote... 100 Resolve an Error Code 101 Improve Output Quality 102 Resolve a Problem 104 FAQ 105 If a Power Failure Occurs 108 Recycling Used Cartridges 108 The Clean Earth Campaign 108 Important Safety Instructions 109 Legal Notices 111 Laser Safety 114 8 (→ p.106) You can see ...
... the Fixing Unit 85 Cleaning the Platen Glass and Feeder 86 Check and Replace Toner Cartridges 87 Checking the Toner Level 87 Conserving the Toner to Extend the Life of Toner Cartridges 88 Replacing the Toner Cartridge 88 Manage Using the Report and List Functions 91 Configure Settings Using the Remote... 100 Resolve an Error Code 101 Improve Output Quality 102 Resolve a Problem 104 FAQ 105 If a Power Failure Occurs 108 Recycling Used Cartridges 108 The Clean Earth Campaign 108 Important Safety Instructions 109 Legal Notices 111 Laser Safety 114 8 (→ p.106) You can see ...
Basic Guide
Page 12
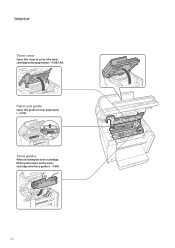
Paper exit guide Open this cover to clear paper jams (→P.96). Toner guides When inserting the toner cartridge, fit the protrusions on the toner cartridge into these guides (→P.88). 12 Interior Toner cover Open this guide to access the toner cartridge or clear paper jams (→P.88, P.96).
Paper exit guide Open this cover to clear paper jams (→P.96). Toner guides When inserting the toner cartridge, fit the protrusions on the toner cartridge into these guides (→P.88). 12 Interior Toner cover Open this guide to access the toner cartridge or clear paper jams (→P.88, P.96).
Basic Guide
Page 83
Clean the Machine 84 Cleaning the Exterior and Interior 84 Cleaning the Fixing Unit 85 Cleaning the Platen Glass and Feeder 86 Check and Replace Toner Cartridges 87 Checking the Toner Level 87 Conserving the Toner to clean the machine, replace the toner cartridge, and explains the report and list functions used for managing the machine. Maintenance and Management This chapter describes how to Extend the Life of Toner Cartridges 88 Replacing the Toner Cartridge 88 Manage Using the Report and List Functions 91 Configure Settings Using the Remote UI 92 83
Clean the Machine 84 Cleaning the Exterior and Interior 84 Cleaning the Fixing Unit 85 Cleaning the Platen Glass and Feeder 86 Check and Replace Toner Cartridges 87 Checking the Toner Level 87 Conserving the Toner to clean the machine, replace the toner cartridge, and explains the report and list functions used for managing the machine. Maintenance and Management This chapter describes how to Extend the Life of Toner Cartridges 88 Replacing the Toner Cartridge 88 Manage Using the Report and List Functions 91 Configure Settings Using the Remote UI 92 83

Basic Guide
Page 84
...the cables from the machine. 2 Remove any documents from the platen glass or feeder. 3 Lift the scanning platform, open the toner cover, and then remove the toner cartridge. 84 Clean the Machine Clean the exterior and interior of the machine and ventilation slots with a soft, well wrung-out cloth ...dampened with water or a mild detergent that has been diluted with water. 4 Wait for it to prevent toner powder and paper dust ...
...the cables from the machine. 2 Remove any documents from the platen glass or feeder. 3 Lift the scanning platform, open the toner cover, and then remove the toner cartridge. 84 Clean the Machine Clean the exterior and interior of the machine and ventilation slots with a soft, well wrung-out cloth ...dampened with water or a mild detergent that has been diluted with water. 4 Wait for it to prevent toner powder and paper dust ...
Basic Guide
Page 85
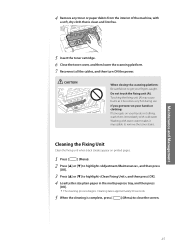
... it becomes very hot during use. Cleaning takes approximately 90 seconds. 5 When the cleaning is clean and lint-free. 5 Insert the toner cartridge. 6 Close the toner cover, and then lower the scanning platform. 7 Reconnect all the cables, and then turn ON the power. CAUTION ʢ"ʣ When... closing the scanning platform: Be careful not to remove the toner stains. If you get your hands or clothing, wash them immediately with cold water. Do not touch the fixing unit (A). Maintenance and Management ...
... it becomes very hot during use. Cleaning takes approximately 90 seconds. 5 When the cleaning is clean and lint-free. 5 Insert the toner cartridge. 6 Close the toner cover, and then lower the scanning platform. 7 Reconnect all the cables, and then turn ON the power. CAUTION ʢ"ʣ When... closing the scanning platform: Be careful not to remove the toner stains. If you get your hands or clothing, wash them immediately with cold water. Do not touch the fixing unit (A). Maintenance and Management ...

Basic Guide
Page 87
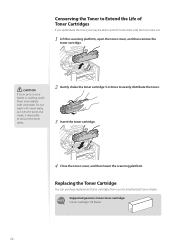
...the display and streaks may be stored in the memory without printing. Prepare toner cartridge. Density: +-0 Original Type: Text... When the message appears on printed pages. Checking the Toner Level 1 Press [ ] (Status Monitor/Cancel). 2 Press [▲] or...Check the toner level. • The toner level will be light or blurred. Check the toner level, and replace the toner cartridge if necessary. Gently shake the toner cartridge 5-6 times to close the screen. 87 Maintenance and Management Check and Replace Toner Cartridges Toner cartridges are ...
...the display and streaks may be stored in the memory without printing. Prepare toner cartridge. Density: +-0 Original Type: Text... When the message appears on printed pages. Checking the Toner Level 1 Press [ ] (Status Monitor/Cancel). 2 Press [▲] or...Check the toner level. • The toner level will be light or blurred. Check the toner level, and replace the toner cartridge if necessary. Gently shake the toner cartridge 5-6 times to close the screen. 87 Maintenance and Management Check and Replace Toner Cartridges Toner cartridges are ...
Basic Guide
Page 88
Do not wash with cold water. Supported genuine Canon toner cartridge: Canon Cartridge 128 Starter 88 Replacing the Toner Cartridge You can purchase replacement toner cartridges from your hands or clothing, wash them immediately with warm water, as it sets the toner and makes it impossible to remove the toner stains. 2 Gently shake the toner cartridge 5-6 times to print for some time until the...
Do not wash with cold water. Supported genuine Canon toner cartridge: Canon Cartridge 128 Starter 88 Replacing the Toner Cartridge You can purchase replacement toner cartridges from your hands or clothing, wash them immediately with warm water, as it sets the toner and makes it impossible to remove the toner stains. 2 Gently shake the toner cartridge 5-6 times to print for some time until the...
Basic Guide
Page 89
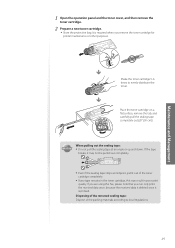
...; Do not pull the sealing tape at midpoint, pull it out of the packing materials according to evenly distribute the toner. Maintenance and Management Shake the toner cartridge 5-6 times to local regulations. 89 If the tape breaks, it is printed. If you are using the Fax,... please note that you remove the toner cartridge for printer maintenance or other purposes. 1 Open the operation panel and the toner cover, and then remove the toner cartridge. 2 Prepare a new toner cartridge. • Store the protective bag. It is required when you can ...
...; Do not pull the sealing tape at midpoint, pull it out of the packing materials according to evenly distribute the toner. Maintenance and Management Shake the toner cartridge 5-6 times to local regulations. 89 If the tape breaks, it is printed. If you are using the Fax,... please note that you remove the toner cartridge for printer maintenance or other purposes. 1 Open the operation panel and the toner cover, and then remove the toner cartridge. 2 Prepare a new toner cartridge. • Store the protective bag. It is required when you can ...
Basic Guide
Page 90
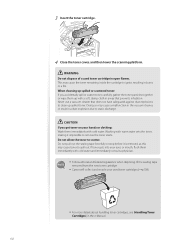
... or scattered toner: If you get toner on your used toner cartridge in a dust explosion due to scatter. Doing so may cause the toner remaining inside the cartridge to spill out. WARNING Do not dispose of the sealing tape removed from the new toner cartridge. • Canon will collect ...and recycle your hands or clothing: Wash them up spilled toner. This may cause a malfunction in...
... or scattered toner: If you get toner on your used toner cartridge in a dust explosion due to scatter. Doing so may cause the toner remaining inside the cartridge to spill out. WARNING Do not dispose of the sealing tape removed from the new toner cartridge. • Canon will collect ...and recycle your hands or clothing: Wash them up spilled toner. This may cause a malfunction in...
Basic Guide
Page 96
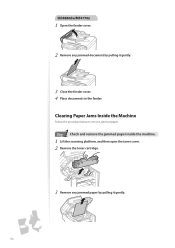
Clearing Paper Jams Inside the Machine Follow the procedure below to remove jammed paper. 1 Step Check and remove the jammed paper inside the machine. 1 Lift the scanning platform, and then open the toner cover. 2 Remove the toner cartridge. 3 Remove any jammed document by pulling it gently. 3 Close the feeder cover. 4 Place documents in the feeder. MF4880dw/MF4770n 1 Open the feeder cover. 2 Remove any jammed paper by pulling it gently. 96
Clearing Paper Jams Inside the Machine Follow the procedure below to remove jammed paper. 1 Step Check and remove the jammed paper inside the machine. 1 Lift the scanning platform, and then open the toner cover. 2 Remove the toner cartridge. 3 Remove any jammed document by pulling it gently. 3 Close the feeder cover. 4 Place documents in the feeder. MF4880dw/MF4770n 1 Open the feeder cover. 2 Remove any jammed paper by pulling it gently. 96
Basic Guide
Page 99
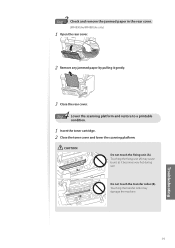
... the rear cover. 4 Step Lower the scanning platform and restore to a printable condition. 1 Insert the toner cartridge. 2 Close the toner cover and lower the scanning platform. 3 Step Check and remove the jammed paper in the rear cover. (MF4890dw/MF4880dw only) 1 Open the rear cover. 2 Remove any jammed paper by pulling it becomes very hot...
... the rear cover. 4 Step Lower the scanning platform and restore to a printable condition. 1 Insert the toner cartridge. 2 Close the toner cover and lower the scanning platform. 3 Step Check and remove the jammed paper in the rear cover. (MF4890dw/MF4880dw only) 1 Open the rear cover. 2 Remove any jammed paper by pulling it becomes very hot...
Basic Guide
Page 100
... section describes some time. For more details about other messages, see [Troubleshooting] [Onscreen Messages] in ... -> Text> order. Message Action • The toner cartridge needs to the size of messages related to the toner, memory, and paper. We recommend Canon genuine toner cartridges as the paper type displayed on the computer is evenly distributed inside the...
... section describes some time. For more details about other messages, see [Troubleshooting] [Onscreen Messages] in ... -> Text> order. Message Action • The toner cartridge needs to the size of messages related to the toner, memory, and paper. We recommend Canon genuine toner cartridges as the paper type displayed on the computer is evenly distributed inside the...
Basic Guide
Page 103
...[Finishing] [Advanced Settings] [Special Print Mode] [Special Settings 1] to another location. The bottom edge of spattering toner appear around the text or as patterns. Provide a margin around the data. Smudge marks of paper has smudge marks. Printed bar codes cannot be ...8594;p.22). • Print a test page with new paper. • If the machine is not in use for a long time after the toner cartridge has been replaced, change the settings from the operation panel. • When copying, change the settings from the operation panel. • When ...
...[Finishing] [Advanced Settings] [Special Print Mode] [Special Settings 1] to another location. The bottom edge of spattering toner appear around the text or as patterns. Provide a margin around the data. Smudge marks of paper has smudge marks. Printed bar codes cannot be ...8594;p.22). • Print a test page with new paper. • If the machine is not in use for a long time after the toner cartridge has been replaced, change the settings from the operation panel. • When copying, change the settings from the operation panel. • When ...

Basic Guide
Page 110
...Keep hands and clothing away from the outlet before cleaning. Doing so may result in serious personal injury. • Please contact an authorized Canon dealer if the machine makes an unusual noise, emits an unusual smell, or emits smoke or excessive heat. A location subject to contact with ... electrical parts inside the machine, this may cause short circuiting or fires. • Use a damp, well wrung-out cloth to disassemble the toner cartridge. If these areas to remove dust and grime. Consumables WARNING • Do not dispose of used for long periods of time, ensure that ...
...Keep hands and clothing away from the outlet before cleaning. Doing so may result in serious personal injury. • Please contact an authorized Canon dealer if the machine makes an unusual noise, emits an unusual smell, or emits smoke or excessive heat. A location subject to contact with ... electrical parts inside the machine, this may cause short circuiting or fires. • Use a damp, well wrung-out cloth to disassemble the toner cartridge. If these areas to remove dust and grime. Consumables WARNING • Do not dispose of used for long periods of time, ensure that ...

Starter Guide
Page 2
...application, send it as needed. • Please use to open a scanned image in the box. Supplied Toner Cartridge • The included "Canon Cartridge 128 Starter" can print an average yield of the replacement toner cartridge differs from the [Custom Installation] option. *1 See "Using the e-Manual" (P.31). *2 ...must be compatible with a LAN cable, USB cable, or a hub. Telephone Cable Starter Guide Sta Wireless LAN Setting Guide (MF4890dw/MF4880dw Only) Basic Operation Guide User Software CD-ROM Speed Dial Label Limited Warranty Notice Registration Card About the LAN and USB ...
...application, send it as needed. • Please use to open a scanned image in the box. Supplied Toner Cartridge • The included "Canon Cartridge 128 Starter" can print an average yield of the replacement toner cartridge differs from the [Custom Installation] option. *1 See "Using the e-Manual" (P.31). *2 ...must be compatible with a LAN cable, USB cable, or a hub. Telephone Cable Starter Guide Sta Wireless LAN Setting Guide (MF4890dw/MF4880dw Only) Basic Operation Guide User Software CD-ROM Speed Dial Label Limited Warranty Notice Registration Card About the LAN and USB ...
Starter Guide
Page 6
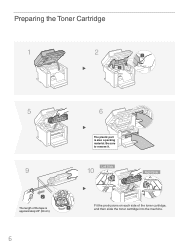
Be sure to remove it. Left Side 9 10 Protrusions Right Side Protrusions 2 The length of the toner cartridge, and then slide the toner cartridge into the machine. 6 Fit the protrusions on each side of the tape is also a packing material. Preparing the Toner Cartridge 1 2 1 2 5 6 The plastic part is 1 approximately 20" (50 cm).
Be sure to remove it. Left Side 9 10 Protrusions Right Side Protrusions 2 The length of the toner cartridge, and then slide the toner cartridge into the machine. 6 Fit the protrusions on each side of the tape is also a packing material. Preparing the Toner Cartridge 1 2 1 2 5 6 The plastic part is 1 approximately 20" (50 cm).
Starter Guide
Page 7
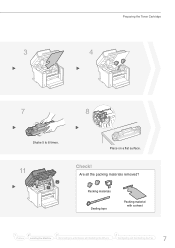
Preparing the Toner Cartridge 3 4 7 8 Shake 5 to a Computer and Installing the Drivers Configuring and Connecting the Fax 7 Check! Are all the packing materials removed? Packing materials Sealing tape Packing material with a sheet 1 2 3 4 Preface Installing the Machine Connecting to 6 times. 11 2 1 Place on a flat surface.
Preparing the Toner Cartridge 3 4 7 8 Shake 5 to a Computer and Installing the Drivers Configuring and Connecting the Fax 7 Check! Are all the packing materials removed? Packing materials Sealing tape Packing material with a sheet 1 2 3 4 Preface Installing the Machine Connecting to 6 times. 11 2 1 Place on a flat surface.
Starter Guide
Page 11
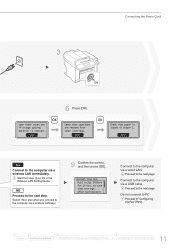
Start from toner cartridge. Select also when you connect to the next page. Next Check that tape/tabs are removed from step 3 on P.4 in Drawer 1. Current Time Set. battery ... Proceed to the computer via a wireless LAN later. 9 Confirm the screen, and then press [OK]. Must rechg. Connecting the Power Cord 3 ON Open toner cover;see if orange packing material is loaded in the Wireless LAN Setting Guide. Next 6 Press [OK]. Next Yes Connect to the next step. NO...
Start from toner cartridge. Select also when you connect to the next page. Next Check that tape/tabs are removed from step 3 on P.4 in Drawer 1. Current Time Set. battery ... Proceed to the computer via a wireless LAN later. 9 Confirm the screen, and then press [OK]. Must rechg. Connecting the Power Cord 3 ON Open toner cover;see if orange packing material is loaded in the Wireless LAN Setting Guide. Next 6 Press [OK]. Next Yes Connect to the next step. NO...


