
imageCLASS D550 Starter Guide
Page 1
Starter Guide 1 2 3 Read this product. After you finish reading this guide, store it in "Basic Operation Guide." The remarks for important safety instructions are described in a safe place for future reference. Please read this guide before operating this guide first. Read the guide also. A-1 Preface Next Page Installing the Machine P. 4 Connecting to a Computer and Installing the Drivers P. 12 Appendix P.
Starter Guide 1 2 3 Read this product. After you finish reading this guide, store it in "Basic Operation Guide." The remarks for important safety instructions are described in a safe place for future reference. Please read this guide before operating this guide first. Read the guide also. A-1 Preface Next Page Installing the Machine P. 4 Connecting to a Computer and Installing the Drivers P. 12 Appendix P.
imageCLASS D550 Starter Guide
Page 2
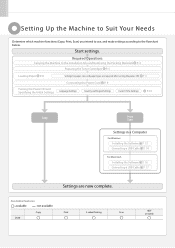
...Machine to Suit Your Needs Determine which machine functions (Copy, Print, Scan) you intend to use, and make settings according to the Installation Site and Removing the Packing Materials P. 4 Preparing the Toner Cartridges P. 5 Loading Paper P. 8 Settings for paper sizes and paper types...Settings Country and Region Settings Current Time Settings P. 10 Copy Print Scan Settings in a Computer For Windows Installing the Software P. 13 Connecting a USB Cable P. 14 For Macintosh Installing the Software P. 16 Connecting a USB Cable P. 17 Settings are required after turning the power ON. ...
...Machine to Suit Your Needs Determine which machine functions (Copy, Print, Scan) you intend to use, and make settings according to the Installation Site and Removing the Packing Materials P. 4 Preparing the Toner Cartridges P. 5 Loading Paper P. 8 Settings for paper sizes and paper types...Settings Country and Region Settings Current Time Settings P. 10 Copy Print Scan Settings in a Computer For Windows Installing the Software P. 13 Connecting a USB Cable P. 14 For Macintosh Installing the Software P. 16 Connecting a USB Cable P. 17 Settings are required after turning the power ON. ...

imageCLASS D550 Starter Guide
Page 3
... of toner cartridge yield for monochromatic electrophotographic printers and multi-function devices that all the supplied accessories are contained in the e-Manual. 1 Canon Cartridge 128 Starter Average yield*1: 1,000 sheets *1 The average yield is on the basis of "ISO/IEC 19752"* when printing A4 ...of the supplied toner cartridge. Confirm that contain printer components" issued by ISO (International Organization for Standardization). 1 Preface 2 Installing the Machine 3 Connecting the Machine To a Computer Appendix Checking the Supplied Accessories 1. If an item is already...
... of toner cartridge yield for monochromatic electrophotographic printers and multi-function devices that all the supplied accessories are contained in the e-Manual. 1 Canon Cartridge 128 Starter Average yield*1: 1,000 sheets *1 The average yield is on the basis of "ISO/IEC 19752"* when printing A4 ...of the supplied toner cartridge. Confirm that contain printer components" issued by ISO (International Organization for Standardization). 1 Preface 2 Installing the Machine 3 Connecting the Machine To a Computer Appendix Checking the Supplied Accessories 1. If an item is already...
imageCLASS D550 Starter Guide
Page 4
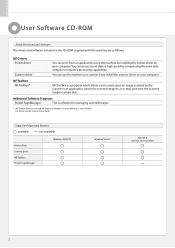
...Windows Vista/7 Mac OS X (version 10.4.9 or later) 2 You can use the machine as follows. PageManager This is a program which allows you install the scanner driver on your computer. MF Toolbox MF Toolbox* MF Toolbox is software for managing scanned images. * MF Toolbox for Macintosh and MF Toolbox...store the scanned image in the CD-ROM supplied with this machine are as a scanner if you to easily open an image scanned by installing the printer driver on your computer. User Software CD-ROM About the Drivers and Software The drivers and software included in a hard disk. ...
...Windows Vista/7 Mac OS X (version 10.4.9 or later) 2 You can use the machine as follows. PageManager This is a program which allows you install the scanner driver on your computer. MF Toolbox MF Toolbox* MF Toolbox is software for managing scanned images. * MF Toolbox for Macintosh and MF Toolbox...store the scanned image in the CD-ROM supplied with this machine are as a scanner if you to easily open an image scanned by installing the printer driver on your computer. User Software CD-ROM About the Drivers and Software The drivers and software included in a hard disk. ...
imageCLASS D550 Starter Guide
Page 5
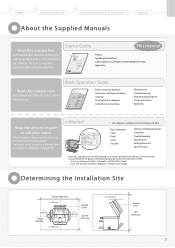
... machine. Be sure to read this manual before using the e-Manual, refer to suit your needs. Starter Guide This manual • Preface • Installing the Machine • Connecting to find the driver guides in the User Software CD-ROM. • Basic Operation • Copy • Print* ...ROM → [Manuals] → [GUIDE-UFR II-US.pdf ] • Scan: User Software CD-ROM → [Manuals] → [GUIDE-SCAN-US.pdf ] Determining the Installation Site 31 5/8" (804 mm) 4" (100 mm) 4" (100 mm) Paper cassette Feeder cover 4" (100 mm) 24 7/8" (631 mm) 4" (100 mm) 4" (100 mm)...
... machine. Be sure to read this manual before using the e-Manual, refer to suit your needs. Starter Guide This manual • Preface • Installing the Machine • Connecting to find the driver guides in the User Software CD-ROM. • Basic Operation • Copy • Print* ...ROM → [Manuals] → [GUIDE-UFR II-US.pdf ] • Scan: User Software CD-ROM → [Manuals] → [GUIDE-SCAN-US.pdf ] Determining the Installation Site 31 5/8" (804 mm) 4" (100 mm) 4" (100 mm) Paper cassette Feeder cover 4" (100 mm) 24 7/8" (631 mm) 4" (100 mm) 4" (100 mm)...
imageCLASS D550 Starter Guide
Page 6
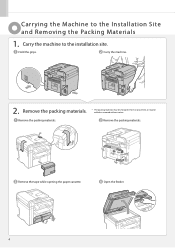
Carry the machine. 2. Remove the tape while opening the paper cassette. Carry the machine to the Installation Site and Removing the Packing Materials 1. Remove the packing materials. * The packing materials may be changed in form or placement, or may be added or removed without notice. Remove the packing materials. Remove the packing materials. Open the feeder. 4 Carrying the Machine to the installation site. Hold the grips.
Carry the machine. 2. Remove the tape while opening the paper cassette. Carry the machine to the Installation Site and Removing the Packing Materials 1. Remove the packing materials. * The packing materials may be changed in form or placement, or may be added or removed without notice. Remove the packing materials. Remove the packing materials. Open the feeder. 4 Carrying the Machine to the installation site. Hold the grips.
imageCLASS D550 Starter Guide
Page 7
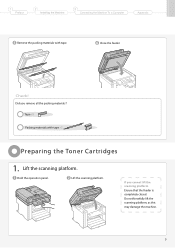
Close the feeder. Tape x8 Packing materials with tape. Lift the scanning platform. If you remove all the packing materials? 1 Preface 2 Installing the Machine 3 Connecting the Machine To a Computer Appendix Remove the packing materials with tape x3 Preparing the Toner Cartridges 1. Check! Lift the scanning platform. Hold the operation panel. Do not forcefully lift the scanning platform, as this may damage the machine. 5 Did you cannot lift the scanning platform Ensure that the feeder is completely closed.
Close the feeder. Tape x8 Packing materials with tape. Lift the scanning platform. If you remove all the packing materials? 1 Preface 2 Installing the Machine 3 Connecting the Machine To a Computer Appendix Remove the packing materials with tape x3 Preparing the Toner Cartridges 1. Check! Lift the scanning platform. Hold the operation panel. Do not forcefully lift the scanning platform, as this may damage the machine. 5 Did you cannot lift the scanning platform Ensure that the feeder is completely closed.

imageCLASS D550 Starter Guide
Page 9
... into the machine. Protrusion Protrusion Did you remove all the packing materials? Lower the scanning platform. 7 This part (a plastic part attached to remove it. 1 Preface 2 Installing the Machine 3 Connecting the Machine To a Computer Appendix Lift the tab. Insert the toner cartridge. Packing materials x2 Sealing tape x1 Packing material with a sheet...
... into the machine. Protrusion Protrusion Did you remove all the packing materials? Lower the scanning platform. 7 This part (a plastic part attached to remove it. 1 Preface 2 Installing the Machine 3 Connecting the Machine To a Computer Appendix Lift the tab. Insert the toner cartridge. Packing materials x2 Sealing tape x1 Packing material with a sheet...
imageCLASS D550 Starter Guide
Page 11
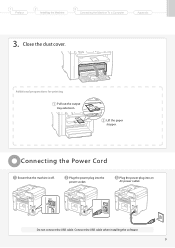
Connecting the Power Cord Ensure that the machine is off. Connect the USB cable when installing the software. 9 Lift the paper stopper. Plug the power plug into the power socket. OFF Do not connect the USB cable. Additional preparations for printing Pull out the output tray extension. Plug the power plug into an AC power outlet. Close the dust cover. 1 Preface 2 Installing the Machine 3 Connecting the Machine To a Computer Appendix 3.
Connecting the Power Cord Ensure that the machine is off. Connect the USB cable when installing the software. 9 Lift the paper stopper. Plug the power plug into the power socket. OFF Do not connect the USB cable. Additional preparations for printing Pull out the output tray extension. Plug the power plug into an AC power outlet. Close the dust cover. 1 Preface 2 Installing the Machine 3 Connecting the Machine To a Computer Appendix 3.
imageCLASS D550 Starter Guide
Page 13
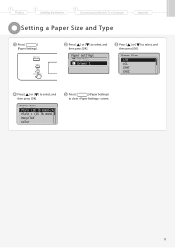
1 Preface 2 Installing the Machine 3 Connecting the Machine To a Computer Setting a Paper Size and Type Appendix Press [ ] (Paper Settings). Paper Settings MP Tray 1 Drawer 1 Press [ ] or [ ] to close screen. 11 Recycled Color Press [ ] (Paper Settings) to select, and then press [OK]. Paper Type Plain (16 lb Bond-24 Plain L (16 lb Bond... Paper Size LTR LGL STMT EXEC Press [ ] or [ ] to select, and then press [OK]. Press [ ] or [ ] to select, and then press [OK].
1 Preface 2 Installing the Machine 3 Connecting the Machine To a Computer Setting a Paper Size and Type Appendix Press [ ] (Paper Settings). Paper Settings MP Tray 1 Drawer 1 Press [ ] or [ ] to close screen. 11 Recycled Color Press [ ] (Paper Settings) to select, and then press [OK]. Paper Type Plain (16 lb Bond-24 Plain L (16 lb Bond... Paper Size LTR LGL STMT EXEC Press [ ] or [ ] to select, and then press [OK]. Press [ ] or [ ] to select, and then press [OK].
imageCLASS D550 Starter Guide
Page 14
...name is turned on when connecting the USB cable. 1. From the [Start] menu, select [Run]. 2. Enter "D:\Minst.exe" in this manual. Click. Install the MF Drivers and MF Toolbox. Press the [ENTER] key on as "D:" in [Start Search] or [Search programs and files] under the [Start] ...menu. 2. PageManager • e-Manual e-Manual "Installing the MF Drivers and MF Toolbox" If the top screen does not appear • Windows 2000, XP, and Server 2003 1. Click. 12 Connecting the Machine...
...name is turned on when connecting the USB cable. 1. From the [Start] menu, select [Run]. 2. Enter "D:\Minst.exe" in this manual. Click. Install the MF Drivers and MF Toolbox. Press the [ENTER] key on as "D:" in [Start Search] or [Search programs and files] under the [Start] ...menu. 2. PageManager • e-Manual e-Manual "Installing the MF Drivers and MF Toolbox" If the top screen does not appear • Windows 2000, XP, and Server 2003 1. Click. 12 Connecting the Machine...
imageCLASS D550 Starter Guide
Page 15
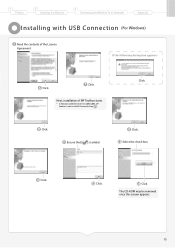
Proceed to Step . Click. If the following dialog box appears Click. Click. Ensure that [ ] is not installed. Click. Select the check box. (1) (2) Click. The CD-ROM may be removed once this screen appears. 13 Next, installation of the License Agreement. Click. Click. 1 Preface 2 Installing the Machine 3 Connecting the Machine To a Computer Appendix Installing with USB Connection (For Windows) Read the contents of MF Toolbox starts. * In Windows 2000 Server/Server 2003/2008, MF Toolbox is added. Click.
Proceed to Step . Click. If the following dialog box appears Click. Click. Ensure that [ ] is not installed. Click. Select the check box. (1) (2) Click. The CD-ROM may be removed once this screen appears. 13 Next, installation of the License Agreement. Click. Click. 1 Preface 2 Installing the Machine 3 Connecting the Machine To a Computer Appendix Installing with USB Connection (For Windows) Read the contents of MF Toolbox starts. * In Windows 2000 Server/Server 2003/2008, MF Toolbox is added. Click.
imageCLASS D550 Starter Guide
Page 16
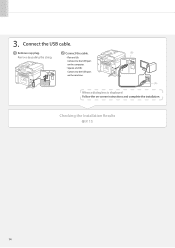
Connect the cable. • Flat end (A): Connect to the USB port on the computer. • Square end (B): Connect to the USB port on the machine. (B) (A) When a dialog box is displayed Follow the on-screen instructions and complete the installation. Remove by pulling the string. Remove cap plug. Checking the Installation Results P. 15 14 3. Connect the USB cable.
Connect the cable. • Flat end (A): Connect to the USB port on the computer. • Square end (B): Connect to the USB port on the machine. (B) (A) When a dialog box is displayed Follow the on-screen instructions and complete the installation. Remove by pulling the string. Remove cap plug. Checking the Installation Results P. 15 14 3. Connect the USB cable.
imageCLASS D550 Starter Guide
Page 17
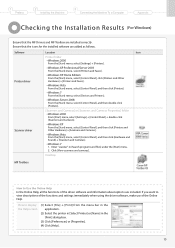
... to Use the Online Help In the Online Help, all the functions of the Online Help. Ensure that the MF Drivers and MF Toolbox are installed correctly. Desktop MF Toolbox How to display the Help screen (1) Select [File] → [Print] from the menu bar in the application. (2) Select... the printer in [Select Printer] or [Name] in [Search programs and files] under the [Start] menu. 2. 1 Preface 2 Installing the Machine 3 Connecting the Machine To a Computer Appendix Check ing the Installation Results (For Windows) Ensure that the icons for the...
... to Use the Online Help In the Online Help, all the functions of the Online Help. Ensure that the MF Drivers and MF Toolbox are installed correctly. Desktop MF Toolbox How to display the Help screen (1) Select [File] → [Print] from the menu bar in the application. (2) Select... the printer in [Select Printer] or [Name] in [Search programs and files] under the [Start] menu. 2. 1 Preface 2 Installing the Machine 3 Connecting the Machine To a Computer Appendix Check ing the Installation Results (For Windows) Ensure that the icons for the...
imageCLASS D550 Starter Guide
Page 18
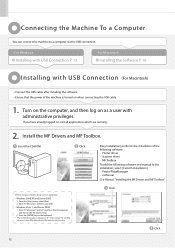
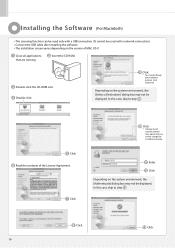
... system environment, the [Select a Destination] dialog box may not be displayed. Click. 16 Click. * [Change Install Location] button may not be displayed. Installing the Sof tware (For Macintosh) The scanning function can be used only with a USB connection. (... network connection.) Connect the USB cable after installing the software. The installation screen varies depending on the version of the License Agreement. Click. * You cannot change the installation location. Depending on the system environment, the [Authenticate] dialog...
... system environment, the [Select a Destination] dialog box may not be displayed. Click. 16 Click. * [Change Install Location] button may not be displayed. Installing the Sof tware (For Macintosh) The scanning function can be used only with a USB connection. (... network connection.) Connect the USB cable after installing the software. The installation screen varies depending on the version of the License Agreement. Click. * You cannot change the installation location. Depending on the system environment, the [Authenticate] dialog...
imageCLASS D550 Starter Guide
Page 19
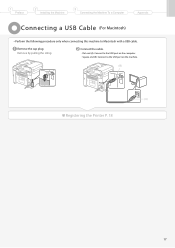
1 Preface 2 Installing the Machine 3 Connecting the Machine To a Computer Appendix Connec ting a USB Cable (For Macintosh) Perform the following procedure only when connecting this machine to the USB port on the computer. • Square end (B): Connect to Macintosh with a USB cable. Connect the cable. • Flat end (A): Connect to the USB port on the machine. (B) (A) Registering the Printer P. 18 17 Remove by pulling the string. Remove the cap plug.
1 Preface 2 Installing the Machine 3 Connecting the Machine To a Computer Appendix Connec ting a USB Cable (For Macintosh) Perform the following procedure only when connecting this machine to the USB port on the computer. • Square end (B): Connect to Macintosh with a USB cable. Connect the cable. • Flat end (A): Connect to the USB port on the machine. (B) (A) Registering the Printer P. 18 17 Remove by pulling the string. Remove the cap plug.
imageCLASS D550 Starter Guide
Page 20
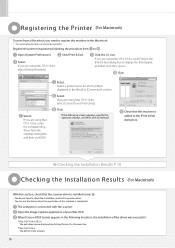
... (For Macintosh) With this section, check that this machine is added to check the installation results of your Mac OS X. When [Canon D500 Series] appears in the following locations, the installation of the driver was successful. •Mac OS X 10.4.x/10.5.x The pull-down menu displayed by clicking [Devices] in the menu bar...
... (For Macintosh) With this section, check that this machine is added to check the installation results of your Mac OS X. When [Canon D500 Series] appears in the following locations, the installation of the driver was successful. •Mac OS X 10.4.x/10.5.x The pull-down menu displayed by clicking [Devices] in the menu bar...
imageCLASS D550 Starter Guide
Page 21
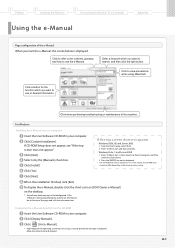
...-ROM Insert the User Software CD-ROM in your computer. A-1 Click a button for the function which you are using Macintosh. For Windows Installing the e-Manual on the operating system you want to search, and then click the right button. Select only the [Manuals] check box. ...Run]. 2. Click [Next]. Enter "D:\Minst.exe" in [Start Search] or [Search programs and files] under the [Start] menu. 2. Click [Display Manuals]. Click [Install]. Enter "D:\Minst.exe", and then click [OK]. • Windows Vista, 7, and Server 2008 1. If the e-Manual is displayed. Click [Custom...
...-ROM Insert the User Software CD-ROM in your computer. A-1 Click a button for the function which you are using Macintosh. For Windows Installing the e-Manual on the operating system you want to search, and then click the right button. Select only the [Manuals] check box. ...Run]. 2. Click [Next]. Enter "D:\Minst.exe" in [Start Search] or [Search programs and files] under the [Start] menu. 2. Click [Display Manuals]. Click [Install]. Enter "D:\Minst.exe", and then click [OK]. • Windows Vista, 7, and Server 2008 1. If the e-Manual is displayed. Click [Custom...
imageCLASS D550 Starter Guide
Page 22
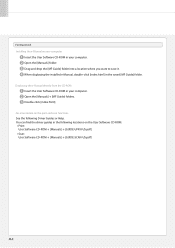
... on the print and scan functions See the following locations on your computer Insert the User Software CD-ROM in your computer. When displaying the installed e-Manual, double-click [index.html] in your computer. Double-click [index.html]. Drag and drop the [MF Guide] folder into a location ...to save it. You can find the driver guides in the following Driver Guides or Help. Open the [Manuals] → [MF Guide] folders. For Macintosh Installing the e-Manual on the User Software CD-ROM. Print: User Software CD-ROM → [Manuals] → [GUIDE-UFR II-US.pdf ...
... on the print and scan functions See the following locations on your computer Insert the User Software CD-ROM in your computer. When displaying the installed e-Manual, double-click [index.html] in your computer. Double-click [index.html]. Drag and drop the [MF Guide] folder into a location ...to save it. You can find the driver guides in the following Driver Guides or Help. Open the [Manuals] → [MF Guide] folders. For Macintosh Installing the e-Manual on the User Software CD-ROM. Print: User Software CD-ROM → [Manuals] → [GUIDE-UFR II-US.pdf ...
imageCLASS D550 Starter Guide
Page 23
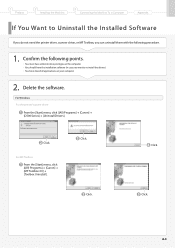
... with the following points. • You must have administrative privileges on the computer • You should have the installation software (in case you want to re-install the drivers) • You have closed all applications on your computer 2. Click. Click. For Windows For the ...printer/scanner driver From the [Start] menu, click [(All) Programs] → [Canon] → [D500 Series] → [Uninstall Drivers]. Click. For MF Toolbox ...
... with the following points. • You must have administrative privileges on the computer • You should have the installation software (in case you want to re-install the drivers) • You have closed all applications on your computer 2. Click. Click. For Windows For the ...printer/scanner driver From the [Start] menu, click [(All) Programs] → [Canon] → [D500 Series] → [Uninstall Drivers]. Click. For MF Toolbox ...


