imageCLASS D480 Starter Guide
Page 23
... is not supported on Windows Server 2003 and Windows Server 2008. Microsoft Windows Vista CPU: Intel Pentium 800 MHz or faster Memory: 512 MB or more Microsoft Windows Server 2008* CPU: Intel processor 1 GHz (×86 processor), 1.4 GHz (×64 processor) or faster...output data, thus realizing a significant increase in Windows Vista from any Windows application software, selects the Canon fax driver as the printer, and specifies its destination(s) and options. XPS Driver The Canon XPS Printer Driver enables you to easily import images scanned with a scanner into an image that ...
... is not supported on Windows Server 2003 and Windows Server 2008. Microsoft Windows Vista CPU: Intel Pentium 800 MHz or faster Memory: 512 MB or more Microsoft Windows Server 2008* CPU: Intel processor 1 GHz (×86 processor), 1.4 GHz (×64 processor) or faster...output data, thus realizing a significant increase in Windows Vista from any Windows application software, selects the Canon fax driver as the printer, and specifies its destination(s) and options. XPS Driver The Canon XPS Printer Driver enables you to easily import images scanned with a scanner into an image that ...

imageCLASS D480 Starter Guide
Page 34
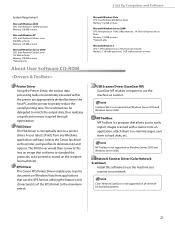
A display resolution of Flash Player earlier than Flash Player 8.0 is installed on the CD-ROM via your computer 32 The memory and CPU required to use the User Manual CD-ROM (e-Manual). Follow the instructions below to run each operating system are using Windows 2000 SP4.) &#...
A display resolution of Flash Player earlier than Flash Player 8.0 is installed on the CD-ROM via your computer 32 The memory and CPU required to use the User Manual CD-ROM (e-Manual). Follow the instructions below to run each operating system are using Windows 2000 SP4.) &#...

imageCLASS D460/D440/D420 Basic Operation Guide
Page 67
If you want to copy multiple documents using the platen glass, place a document and press [Start] once for each page. To cancel all settings will be canceled. The machine prints the remaining sets of "1 to 2-Sided Copying" (see p. 3-19), "2 to 2Sided Copying (D460 Only)" (see p. 3-20), or "2 to 1-Sided Copying (D460 Only)" (see p. 3-21). 4 Use - [numeric keys] to enter the desired copy quantity (1 to use and "2 on 1 Combination" (see p. 3-15) at the same time, select , then press [OK]. - When you want to keep the settings, set the collate mode as [SCAN], all ...
If you want to copy multiple documents using the platen glass, place a document and press [Start] once for each page. To cancel all settings will be canceled. The machine prints the remaining sets of "1 to 2-Sided Copying" (see p. 3-19), "2 to 2Sided Copying (D460 Only)" (see p. 3-20), or "2 to 1-Sided Copying (D460 Only)" (see p. 3-21). 4 Use - [numeric keys] to enter the desired copy quantity (1 to use and "2 on 1 Combination" (see p. 3-15) at the same time, select , then press [OK]. - When you want to keep the settings, set the collate mode as [SCAN], all ...

imageCLASS D460/D440/D420 Basic Operation Guide
Page 90
... - Note 4 Press [ ] or [ ] to select , then press [OK]. 0002 CANCEL If you do not need to cancel, then press [OK]. If you select in the memory of print jobs and cancel a job before the printing starts. Otherwise, press [Stop/Reset] to return to the standby mode. 3 Press [ ] or [ ] to select the...
... - Note 4 Press [ ] or [ ] to select , then press [OK]. 0002 CANCEL If you do not need to cancel, then press [OK]. If you select in the memory of print jobs and cancel a job before the printing starts. Otherwise, press [Stop/Reset] to return to the standby mode. 3 Press [ ] or [ ] to select the...
imageCLASS D460/D440/D420 Basic Operation Guide
Page 109
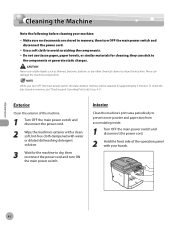
Make sure no documents are stored in memory will be retained for approximately 5 minutes. Use a soft cloth to prevent toner powder and paper dust from accumulating inside. 1 Turn OFF the main power switch ... to the components or generate static charges. When you turn OFF the main power switch, the data stored in memory, then turn ON the main power switch. To check the jobs stored in memory, see "Checking and Canceling Print Jobs," on p. 4-11. Interior Clean the machine's print area periodically to avoid scratching...
Make sure no documents are stored in memory will be retained for approximately 5 minutes. Use a soft cloth to prevent toner powder and paper dust from accumulating inside. 1 Turn OFF the main power switch ... to the components or generate static charges. When you turn OFF the main power switch, the data stored in memory, then turn ON the main power switch. To check the jobs stored in memory, see "Checking and Canceling Print Jobs," on p. 4-11. Interior Clean the machine's print area periodically to avoid scratching...

imageCLASS D460/D440/D420 Basic Operation Guide
Page 112
... LTR paper into the multi-purpose tray and start cleaning. - Cleaning the Machine Fuser Roller If black streaks appear with printing, the fuser roller in memory, this occur, clean the fuser roller in the multi-purpose tray. ■ For D460 Maintenance 8-5 Use standard paper as the cleaning paper. - Cleaning the roller...
... LTR paper into the multi-purpose tray and start cleaning. - Cleaning the Machine Fuser Roller If black streaks appear with printing, the fuser roller in memory, this occur, clean the fuser roller in the multi-purpose tray. ■ For D460 Maintenance 8-5 Use standard paper as the cleaning paper. - Cleaning the roller...
imageCLASS D460/D440/D420 Basic Operation Guide
Page 153
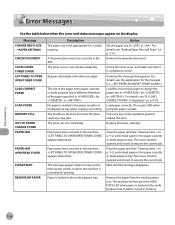
...Check the toner cover, and make sure that appears. Press any key on p. 2-14. Paper jams have occurred in memory. No paper is loaded in for or . The machine's memory becomes full when scanning copy jobs. For details, see "Setting Paper Size and Type," on the operation panel to resume ...CHANGE REG'D SIZE → PAPER SETTINGS CHECK DOCUMENT CLOSE COVER TONER COVER LIFT PANEL TO OPEN OPEN TONER COVER LOAD CORRECT PAPER LOAD PAPER MEMORY FULL OUT OF TONER CHANGE TONER PAPER JAM PAPER JAM OPEN REAR COVER PLEASE WAIT REMOVE MP PAPER Description The paper size is loaded in...
...Check the toner cover, and make sure that appears. Press any key on p. 2-14. Paper jams have occurred in memory. No paper is loaded in for or . The machine's memory becomes full when scanning copy jobs. For details, see "Setting Paper Size and Type," on the operation panel to resume ...CHANGE REG'D SIZE → PAPER SETTINGS CHECK DOCUMENT CLOSE COVER TONER COVER LIFT PANEL TO OPEN OPEN TONER COVER LOAD CORRECT PAPER LOAD PAPER MEMORY FULL OUT OF TONER CHANGE TONER PAPER JAM PAPER JAM OPEN REAR COVER PLEASE WAIT REMOVE MP PAPER Description The paper size is loaded in...
imageCLASS D480 Basic Operation Guide
Page 7
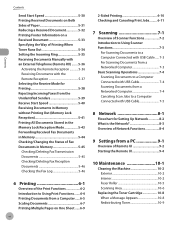
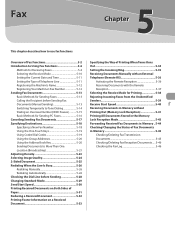
... Unidentified Senders 5-39 Receive Start Speed 5-40 Receiving Documents in Memory without Printing Out (Memory Lock Reception 5-41 Printing All Documents Stored in the Memory Lock Reception Mode 5-43 Forwarding Received Fax Documents in Memory 5-44 Checking/Changing the Status of Fax Documents in Memory 5-45 Checking/Deleting Fax Transmission Documents 5-45 Checking/Deleting Fax...
... Unidentified Senders 5-39 Receive Start Speed 5-40 Receiving Documents in Memory without Printing Out (Memory Lock Reception 5-41 Printing All Documents Stored in the Memory Lock Reception Mode 5-43 Forwarding Received Fax Documents in Memory 5-44 Checking/Changing the Status of Fax Documents in Memory 5-45 Checking/Deleting Fax Transmission Documents 5-45 Checking/Deleting Fax...
imageCLASS D480 Basic Operation Guide
Page 13
Power Supply - Safety Precautions Safety Precautions - If you can reach the outlet quickly. If you plug it in memory are backed up for about 5 minutes.) - Do not stack boxes or furniture around the machine, unplug the power cord immediately. Contact your doctor. ...During electrical storms, unplug the power cord from this product and consult your local authorized Canon dealer. - Keep the area free so you notice anything to rest on the power cord, and do not place the machine where the cord ...
Power Supply - Safety Precautions Safety Precautions - If you can reach the outlet quickly. If you plug it in memory are backed up for about 5 minutes.) - Do not stack boxes or furniture around the machine, unplug the power cord immediately. Contact your doctor. ...During electrical storms, unplug the power cord from this product and consult your local authorized Canon dealer. - Keep the area free so you notice anything to rest on the power cord, and do not place the machine where the cord ...
imageCLASS D480 Basic Operation Guide
Page 33
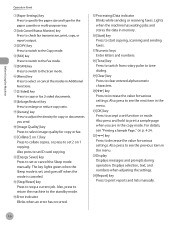
... Sleep mode is canceled. ⑬[Stop/Reset] key Press to stop a current job. Lights when the machine has waiting jobs and stores the data in memory. ⑯[Start] key Press to start copying, scanning and sending faxes. ⑰Numeric keys Enter letters and numbers. ⑱[Tone] key Press to switch from...
... Sleep mode is canceled. ⑬[Stop/Reset] key Press to stop a current job. Lights when the machine has waiting jobs and stores the data in memory. ⑯[Start] key Press to start copying, scanning and sending faxes. ⑰Numeric keys Enter letters and numbers. ⑱[Tone] key Press to switch from...
imageCLASS D480 Basic Operation Guide
Page 83
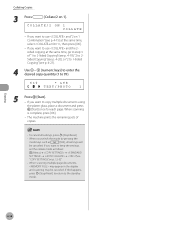
To cancel all settings will be canceled. If you want to use and "2 on 1 Combination" (see p. 4-21). 4 Use - [numeric keys] to enter the desired copy quantity (1 to the standby mode. Collating Copies 3 Press [Collate/2 on p. 12-5.)" - If you want to copy multiple documents using the platen glass, place a document and press [Start] once for each page. If this happens, press [Stop/Reset] to return to 99). 63% * LTR TEXT/PHOTO 1 5 Press [Start]. - Copying 4-14 When you want to keep the settings, set the collate mode as [FAX], all settings, press [...
To cancel all settings will be canceled. If you want to use and "2 on 1 Combination" (see p. 4-21). 4 Use - [numeric keys] to enter the desired copy quantity (1 to the standby mode. Collating Copies 3 Press [Collate/2 on p. 12-5.)" - If you want to copy multiple documents using the platen glass, place a document and press [Start] once for each page. If this happens, press [Stop/Reset] to return to 99). 63% * LTR TEXT/PHOTO 1 5 Press [Start]. - Copying 4-14 When you want to keep the settings, set the collate mode as [FAX], all settings, press [...
imageCLASS D480 Basic Operation Guide
Page 96
...Paper 5-31 Reducing a Received Document 5-32 Printing Footer Information on a Received Document 5-33 Specifying the Way of Fax Documents in Memory 5-45 Checking/Deleting Fax Transmission Documents 5-45 Checking/Deleting Fax Reception Documents...... 5-46 Checking the Fax Log 5-46 Overview of ...Senders 5-39 Receive Start Speed 5-40 Receiving Documents in Memory without Printing Out (Memory Lock Reception 5-41 Printing All Documents Stored in the Memory Lock Reception Mode 5-43 Forwarding Received Fax Documents in Memory...5-44 Checking/Changing the Status of Printing When Toner Runs...
...Paper 5-31 Reducing a Received Document 5-32 Printing Footer Information on a Received Document 5-33 Specifying the Way of Fax Documents in Memory 5-45 Checking/Deleting Fax Transmission Documents 5-45 Checking/Deleting Fax Reception Documents...... 5-46 Checking the Fax Log 5-46 Overview of ...Senders 5-39 Receive Start Speed 5-40 Receiving Documents in Memory without Printing Out (Memory Lock Reception 5-41 Printing All Documents Stored in the Memory Lock Reception Mode 5-43 Forwarding Received Fax Documents in Memory...5-44 Checking/Changing the Status of Printing When Toner Runs...

imageCLASS D480 Basic Operation Guide
Page 133
... SETTINGS 3 Press [ ] or [ ] to select , then press [OK]. RX SETTINGS 3 RX PRINT 5 Press [ ] or [ ] to select , then press [OK]. RX PRINT MEMORY RX - : Prints after all received pages in the memory before printing them out or prints each page as it is received. 6 Press [Stop/Reset] to return to the standby mode...
... SETTINGS 3 Press [ ] or [ ] to select , then press [OK]. RX SETTINGS 3 RX PRINT 5 Press [ ] or [ ] to select , then press [OK]. RX PRINT MEMORY RX - : Prints after all received pages in the memory before printing them out or prints each page as it is received. 6 Press [Stop/Reset] to return to the standby mode...
imageCLASS D480 Basic Operation Guide
Page 136
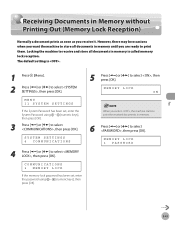
... set , enter the System Password using - [numeric keys], then press [OK]. 5 Press [ ] or [ ] to select , then press [OK]. MEMORY LOCK 1 PASSWORD Fax 5-41 MENU 11 SYSTEM SETTINGS If the System Password has been set , enter the password using - [numeric keys], then press [OK].... 3 Press [ ] or [ ] to select , then press [OK]. Receiving Documents in Memory without Printing Out (Memory Lock Reception) Receiving Documents in memory is . 1 Press [Menu]. 2 Press [ ] or [ ] to select , then press [OK]. The default setting is called...
... set , enter the System Password using - [numeric keys], then press [OK]. 5 Press [ ] or [ ] to select , then press [OK]. MEMORY LOCK 1 PASSWORD Fax 5-41 MENU 11 SYSTEM SETTINGS If the System Password has been set , enter the password using - [numeric keys], then press [OK].... 3 Press [ ] or [ ] to select , then press [OK]. Receiving Documents in Memory without Printing Out (Memory Lock Reception) Receiving Documents in memory is . 1 Press [Menu]. 2 Press [ ] or [ ] to select , then press [OK]. The default setting is called...

imageCLASS D480 Basic Operation Guide
Page 137
... seven digits), then press [OK]. MEM. RX END TIME 08:00 5-42 MEMORY LOCK 2 MEMORY RX TIME If you want to set the Memory Lock with a password, press [OK] without Printing Out (Memory Lock Reception) 7 If you want to change a password for memory lock, skip to step 12. 9 Press [ ] or [ ] to select , then ... you set a password, it will be necessary to enter the password whenever you do not want to set or change the Memory Lock mode settings, or cancel the Memory Lock mode. - MEMORY RX TIME ON 10 Use - [numeric keys] to enter the start time (in 24-hour format), then press [OK]. ...
... seven digits), then press [OK]. MEM. RX END TIME 08:00 5-42 MEMORY LOCK 2 MEMORY RX TIME If you want to set the Memory Lock with a password, press [OK] without Printing Out (Memory Lock Reception) 7 If you want to change a password for memory lock, skip to step 12. 9 Press [ ] or [ ] to select , then ... you set a password, it will be necessary to enter the password whenever you do not want to set or change the Memory Lock mode settings, or cancel the Memory Lock mode. - MEMORY RX TIME ON 10 Use - [numeric keys] to enter the start time (in 24-hour format), then press [OK]. ...
imageCLASS D480 Basic Operation Guide
Page 138
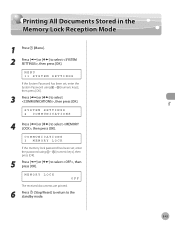
... set , enter the System Password using - [numeric keys], then press [OK]. 5 Press [ ] or [ ] to select , then press [OK]. MEMORY LOCK OFF The received documents are printed. 6 Press [Stop/Reset] to return to select , then press [OK]. MENU 11 SYSTEM SETTINGS If the System Password... the password using - [numeric keys], then press [OK]. 3 Press [ ] or [ ] to select , then press [OK]. Fax Printing All Documents Stored in the Memory Lock Reception Mode Printing All Documents Stored in the Memory Lock Reception Mode 1 Press [Menu]. 2 Press [ ] or [ ] to select , then press [OK].
... set , enter the System Password using - [numeric keys], then press [OK]. 5 Press [ ] or [ ] to select , then press [OK]. MEMORY LOCK OFF The received documents are printed. 6 Press [Stop/Reset] to return to select , then press [OK]. MENU 11 SYSTEM SETTINGS If the System Password... the password using - [numeric keys], then press [OK]. 3 Press [ ] or [ ] to select , then press [OK]. Fax Printing All Documents Stored in the Memory Lock Reception Mode Printing All Documents Stored in the Memory Lock Reception Mode 1 Press [Menu]. 2 Press [ ] or [ ] to select , then press [OK].
imageCLASS D480 Basic Operation Guide
Page 139
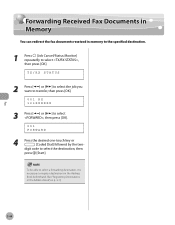
Fax Forwarding Received Fax Documents in Memory Forwarding Received Fax Documents in Memory You can redirect the fax documents received in memory to the specified destination. 1 Press [Job Cancel/Status Monitor] repeatedly to register destinations in the Address Book beforehand. (See "Registering Destinations in the Address Book," ...
Fax Forwarding Received Fax Documents in Memory Forwarding Received Fax Documents in Memory You can redirect the fax documents received in memory to the specified destination. 1 Press [Job Cancel/Status Monitor] repeatedly to register destinations in the Address Book beforehand. (See "Registering Destinations in the Address Book," ...

imageCLASS D480 Basic Operation Guide
Page 140
... Press [Stop/Reset] to return to the standby mode. CANCEL? < YES NO > If you do not want to delete, then press [OK]. 003 MEMORY TX TECO For , all recipients entered for a broadcasting job will be sent, then delete unwanted documents as necessary. 1 Press [Job Cancel/Status Monitor] repeatedly ...to select or , then press [OK]. Checking/Deleting Fax Transmission Documents You can check the detailed information of fax documents in Memory The Status Monitor screen enables you to view and change the status of fax documents currently being sent or waiting to be canceled. 4 ...
... Press [Stop/Reset] to return to the standby mode. CANCEL? < YES NO > If you do not want to delete, then press [OK]. 003 MEMORY TX TECO For , all recipients entered for a broadcasting job will be sent, then delete unwanted documents as necessary. 1 Press [Job Cancel/Status Monitor] repeatedly ...to select or , then press [OK]. Checking/Deleting Fax Transmission Documents You can check the detailed information of fax documents in Memory The Status Monitor screen enables you to view and change the status of fax documents currently being sent or waiting to be canceled. 4 ...

imageCLASS D480 Basic Operation Guide
Page 141
... Press [Stop/Reset] to return to select , then press [OK]. Fax 5-46 Checking the Fax Log You can delete the received documents in memory. For information on p. 5-44. You can forward the selected job to another destination by selecting . Checking/Changing the Status of Fax Documents in... Press [Job Cancel/Status Monitor] repeatedly to select , then press [OK]. TX/RX STATUS 2 Press [ ] or [ ] to scroll trough the job list. 001 MEMORY TX 031XXXXXXX If you do not want to the standby mode. Otherwise, press [Stop/Reset] to return to the standby mode. 3 Press [ ] or [ ] to ...
... Press [Stop/Reset] to return to select , then press [OK]. Fax 5-46 Checking the Fax Log You can delete the received documents in memory. For information on p. 5-44. You can forward the selected job to another destination by selecting . Checking/Changing the Status of Fax Documents in... Press [Job Cancel/Status Monitor] repeatedly to select , then press [OK]. TX/RX STATUS 2 Press [ ] or [ ] to scroll trough the job list. 001 MEMORY TX 031XXXXXXX If you do not want to the standby mode. Otherwise, press [Stop/Reset] to return to the standby mode. 3 Press [ ] or [ ] to ...
imageCLASS D480 Basic Operation Guide
Page 152
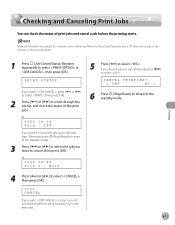
... want to select . Go to the next step. 5 Press [ ] to cancel, then press [OK]. Note 4 Press [ ] or [ ] to select . TXT If you select in the memory of the print job status. Checking and Canceling Print Jobs Checking and Canceling Print Jobs You can check the status of the print jobs.
... want to select . Go to the next step. 5 Press [ ] to cancel, then press [OK]. Note 4 Press [ ] or [ ] to select . TXT If you select in the memory of the print job status. Checking and Canceling Print Jobs Checking and Canceling Print Jobs You can check the status of the print jobs.


