Quick Start Guide
Page 4
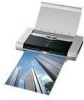
.... and other countries. • Microsoft® and Windows® are registered trademarks of such marks by Canon, Inc. Canon PIXMA iP90 Photo Printer Quick Start Guide Copyright This manual is under licence. • All other product and brand names are ...STAR guidelines for energy efficiency. Specifications are registered trademarks and PIXMA is made regarding non-Canon products was compiled from publicly available information. Trademarks • Canon, BCI and PhotoRecord are subject to your Canon PIXMA iP90 Photo Printer. and any use guide to change without the prior ...
.... and other countries. • Microsoft® and Windows® are registered trademarks of such marks by Canon, Inc. Canon PIXMA iP90 Photo Printer Quick Start Guide Copyright This manual is under licence. • All other product and brand names are ...STAR guidelines for energy efficiency. Specifications are registered trademarks and PIXMA is made regarding non-Canon products was compiled from publicly available information. Trademarks • Canon, BCI and PhotoRecord are subject to your Canon PIXMA iP90 Photo Printer. and any use guide to change without the prior ...
Quick Start Guide
Page 5
... with Windows 10 Printing with Macintosh 12 Canceling Printing 14 Printing Data through Infrared Communication 15 Advanced Printing Printing Photographs Directly from a PictBridge Compliant Device 23 Accessing Printer Driver 29 Adjusting Print Quality for Photographs 30 Using the Bundle Software 37 Printing Borderless Photographs 38 Printing Maintenance When Printing Becomes Faint or Colors...
... with Windows 10 Printing with Macintosh 12 Canceling Printing 14 Printing Data through Infrared Communication 15 Advanced Printing Printing Photographs Directly from a PictBridge Compliant Device 23 Accessing Printer Driver 29 Adjusting Print Quality for Photographs 30 Using the Bundle Software 37 Printing Borderless Photographs 38 Printing Maintenance When Printing Becomes Faint or Colors...
Quick Start Guide
Page 6
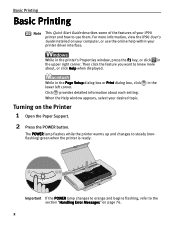
When the Help window appears, select your printer driver interface. Important If the POWER lamp changes to orange and begins flashing, refer to the section "Handling Error Messages" on the Printer 1 Open the Paper Support. 2 Press the POWER button. The POWER lamp flashes while the printer warms up and changes ...Print dialog box, click lower left corner. For more about each setting. While in the Turning on page 76. 2 While in the printer's Properties window, press the F1 key, or click in the upper right corner. Then click the feature you want to know more information, view ...
When the Help window appears, select your printer driver interface. Important If the POWER lamp changes to orange and begins flashing, refer to the section "Handling Error Messages" on the Printer 1 Open the Paper Support. 2 Press the POWER button. The POWER lamp flashes while the printer warms up and changes ...Print dialog box, click lower left corner. For more about each setting. While in the Turning on page 76. 2 While in the printer's Properties window, press the F1 key, or click in the upper right corner. Then click the feature you want to know more information, view ...
Quick Start Guide
Page 10
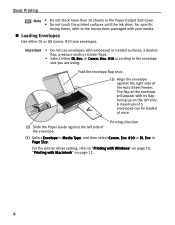
... sticker flaps. • Select either DL or US Comm. #10 size envelopes. Env. #10 according to "Printing with Windows" on page 10, "Printing with its flap facing up on page 12. 6 For the printer driver setting, refer to the envelope size you are using. or Comm. Fold the envelope flap shut. (1) Align...
... sticker flaps. • Select either DL or US Comm. #10 size envelopes. Env. #10 according to "Printing with Windows" on page 10, "Printing with its flap facing up on page 12. 6 For the printer driver setting, refer to the envelope size you are using. or Comm. Fold the envelope flap shut. (1) Align...
Quick Start Guide
Page 11
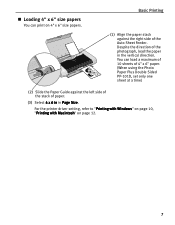
You can print on page 12. 7 Despite the direction of paper. (3) Select 4 x 6 in in the vertical direction. For the printer driver setting, refer to "Printing with Windows" on page 10, "Printing with Macintosh" on 4" x 6" size papers. Loading 4" x 6" size papers You can load a maximum of 10 sheets of 4" x 6" paper. (When using the Photo ...
You can print on page 12. 7 Despite the direction of paper. (3) Select 4 x 6 in in the vertical direction. For the printer driver setting, refer to "Printing with Windows" on page 10, "Printing with Macintosh" on 4" x 6" size papers. Loading 4" x 6" size papers You can load a maximum of 10 sheets of 4" x 6" paper. (When using the Photo ...
Quick Start Guide
Page 13
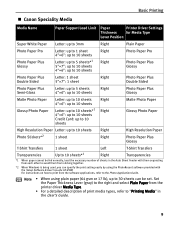
Basic Printing Canon Speciality Media Media Name Paper Support Load Limit Paper Printer Driver Settings Thickness for Media Type Lever Position ...the Setup Software & User's Guide CD-ROM. For instructions on how to print from sticking together. *2 When Windows is being used, you can be fed normally, load the necessary number of print media types, refer to "Printing...User's Guide. 9 Set the Paper Thickness Lever (gray) to the right and select Plain Paper from the printer driver Media Type. • For a detailed description of sheets in the Auto Sheet Feeder with them separating...
Basic Printing Canon Speciality Media Media Name Paper Support Load Limit Paper Printer Driver Settings Thickness for Media Type Lever Position ...the Setup Software & User's Guide CD-ROM. For instructions on how to print from sticking together. *2 When Windows is being used, you can be fed normally, load the necessary number of print media types, refer to "Printing...User's Guide. 9 Set the Paper Thickness Lever (gray) to the right and select Plain Paper from the printer driver Media Type. • For a detailed description of sheets in the Auto Sheet Feeder with them separating...
Quick Start Guide
Page 14
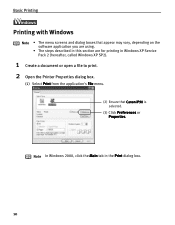
Note In Windows 2000, click the Main tab in Windows XP Service Pack 2 (hereafter, called Windows XP SP2). 1 Create a document or open a file to print. 2 Open the Printer Properties dialog box. (1) Select Print from the application's File menu. (2) Ensure that appear may vary, depending on the software application you are using. • The steps described in this section are for printing in the Print dialog box. 10 Basic Printing l Printing with Windows Note • The menu screens and dialog boxes that Canon iP90 is selected. (3) Click Preferences or Properties.
Note In Windows 2000, click the Main tab in Windows XP Service Pack 2 (hereafter, called Windows XP SP2). 1 Create a document or open a file to print. 2 Open the Printer Properties dialog box. (1) Select Print from the application's File menu. (2) Ensure that appear may vary, depending on the software application you are using. • The steps described in this section are for printing in the Print dialog box. 10 Basic Printing l Printing with Windows Note • The menu screens and dialog boxes that Canon iP90 is selected. (3) Click Preferences or Properties.
Quick Start Guide
Page 15
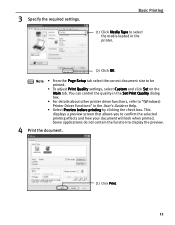
... settings, select Custom and click Set on the Main tab. Note • From the Page Setup tab select the correct document size to "(Windows) Printer Driver Functions" in the printer. (2) Click OK. This displays a preview screen that allows you to display the preview. 4 Print the document. (1) Click Print. 11 3 Specify the required settings...
... settings, select Custom and click Set on the Main tab. Note • From the Page Setup tab select the correct document size to "(Windows) Printer Driver Functions" in the printer. (2) Click OK. This displays a preview screen that allows you to display the preview. 4 Print the document. (1) Click Print. 11 3 Specify the required settings...
Quick Start Guide
Page 19
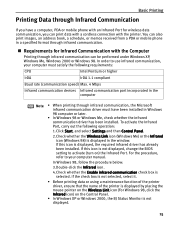
..., ensure that the name of the printer is displayed, the required infrared driver has already been installed. If this icon is displayed by placing the mouse pointer on the Wireless Link icon (For Windows 98, click the Infrared icon) on ) the Infrared Port. For the procedure, refer to activate... (turn on the Control Panel. • In Windows XP or Windows 2000, the BJ Status Monitor is not displayed. 15 Basic Printing Printing Data through Infrared Communication If you can print data with a cordless...
..., ensure that the name of the printer is displayed, the required infrared driver has already been installed. If this icon is displayed by placing the mouse pointer on the Wireless Link icon (For Windows 98, click the Infrared icon) on ) the Infrared Port. For the procedure, refer to activate... (turn on the Control Panel. • In Windows XP or Windows 2000, the BJ Status Monitor is not displayed. 15 Basic Printing Printing Data through Infrared Communication If you can print data with a cordless...
Quick Start Guide
Page 21
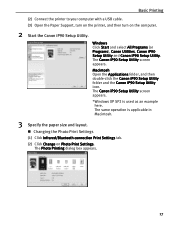
...Canon iP90 Setup Utility screen appears. *Windows XP SP2 is applicable in Macintosh. 3 Specify the paper size and layout. The same operation is used as an example here. The Photo Printing dialog box appears. 17 Basic Printing (2) Connect the printer to your computer with a USB cable. (3) Open the Paper Support, turn on the printer..., and then turn on Photo Print Settings. Macintosh Open the Applications folder, and then double-click the Canon iP90 Setup Utility folder and the Canon iP90 Setup Utility icon. Changing the Photo Print ...
...Canon iP90 Setup Utility screen appears. *Windows XP SP2 is applicable in Macintosh. 3 Specify the paper size and layout. The same operation is used as an example here. The Photo Printing dialog box appears. 17 Basic Printing (2) Connect the printer to your computer with a USB cable. (3) Open the Paper Support, turn on the printer..., and then turn on Photo Print Settings. Macintosh Open the Applications folder, and then double-click the Canon iP90 Setup Utility folder and the Canon iP90 Setup Utility icon. Changing the Photo Print ...
Quick Start Guide
Page 26
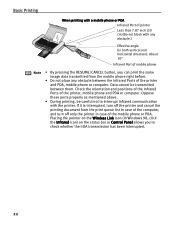
... been interrupted. 22 Basic Printing When printing with a mobile phone or PDA Infrared Port of printer Less than 7.87 inch (20 cm)(Do not block with the printer. Placing the pointer on the Wireless Link icon (In Windows 98, click the Infrared icon) on the status bar or Control Panel allows you can... print the same image data transmitted from the print queue list in case of the computer, and turn off only the printer in both vertical and horizontal direction): About...
... been interrupted. 22 Basic Printing When printing with a mobile phone or PDA Infrared Port of printer Less than 7.87 inch (20 cm)(Do not block with the printer. Placing the pointer on the Wireless Link icon (In Windows 98, click the Infrared icon) on the status bar or Control Panel allows you can... print the same image data transmitted from the print queue list in case of the computer, and turn off only the printer in both vertical and horizontal direction): About...
Quick Start Guide
Page 33
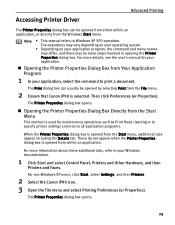
... more information about these additional tabs, refer to all application programs. When the Printer Properties dialog box is opened by selecting Print from the Windows Start menu. For non-Windows XP users, click Start, select Settings, and then Printers. 2 Select the Canon iP90 icon. 3 Open the File menu and select Printing Preferences (or Properties). For...
... more information about these additional tabs, refer to all application programs. When the Printer Properties dialog box is opened by selecting Print from the Windows Start menu. For non-Windows XP users, click Start, select Settings, and then Printers. 2 Select the Canon iP90 icon. 3 Open the File menu and select Printing Preferences (or Properties). For...
Quick Start Guide
Page 37
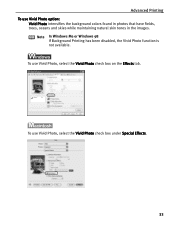
To use Vivid Photo, select the Vivid Photo check box on the Effects tab. Note In Windows Me or Windows 98 If Background Printing has been disabled, the Vivid Photo function is not available. To use Vivid Photo, select the Vivid Photo check box under Special Effects. 33 Advanced Printing To use Vivid Photo option: Vivid Photo intensifies the background colors found in photos that have fields, trees, oceans and skies while maintaining natural skin tones in the images.
To use Vivid Photo, select the Vivid Photo check box on the Effects tab. Note In Windows Me or Windows 98 If Background Printing has been disabled, the Vivid Photo function is not available. To use Vivid Photo, select the Vivid Photo check box under Special Effects. 33 Advanced Printing To use Vivid Photo option: Vivid Photo intensifies the background colors found in photos that have fields, trees, oceans and skies while maintaining natural skin tones in the images.
Quick Start Guide
Page 38
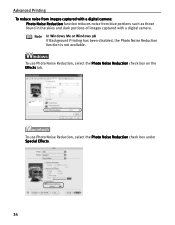
To use Photo Noise Reduction, select the Photo Noise Reduction check box under Special Effects. 34 To use Photo Noise Reduction, select the Photo Noise Reduction check box on the Effects tab. Note In Windows Me or Windows 98 If Background Printing has been disabled, the Photo Noise Reduction function is not available. Advanced Printing To reduce noise from images captured with a digital camera: Photo Noise Reduction function reduces noise from blue portions such as those found in the skies and dark portions of images captured with a digital camera.
To use Photo Noise Reduction, select the Photo Noise Reduction check box under Special Effects. 34 To use Photo Noise Reduction, select the Photo Noise Reduction check box on the Effects tab. Note In Windows Me or Windows 98 If Background Printing has been disabled, the Photo Noise Reduction function is not available. Advanced Printing To reduce noise from images captured with a digital camera: Photo Noise Reduction function reduces noise from blue portions such as those found in the skies and dark portions of images captured with a digital camera.
Quick Start Guide
Page 41
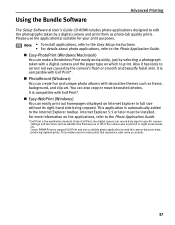
.... Easy-PhotoPrint (Windows/Macintosh) You can create fun and unique photo albums with a digital camera and the paper type on Internet Explorer in portrait or night scene mode, etc. Internet Explorer 5.5 or later must be installed. For more accurately. 37 Canon PIXMA Printers support Exif Print ... automatically added to read the camera data precisely, producing optimal prints. Easy-WebPrint (Windows) You can also copy or move decorated photos. This enables you to create prints that reproduce color more information on or off, if the camera was on the applications, refer to...
.... Easy-PhotoPrint (Windows/Macintosh) You can create fun and unique photo albums with a digital camera and the paper type on Internet Explorer in portrait or night scene mode, etc. Internet Explorer 5.5 or later must be installed. For more accurately. 37 Canon PIXMA Printers support Exif Print ... automatically added to read the camera data precisely, producing optimal prints. Easy-WebPrint (Windows) You can also copy or move decorated photos. This enables you to create prints that reproduce color more information on or off, if the camera was on the applications, refer to...
Quick Start Guide
Page 42
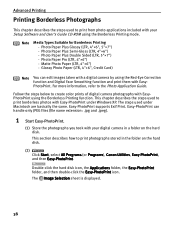
... in a folder on the hard disk. (2) Click Start, select All Programs (or Programs), Canon Utilities, Easy-PhotoPrint, and then Easy-PhotoPrint. This chapter describes the steps used under Windows XP. The Image Selection sheet is displayed. 38 Photo Paper Pro (LTR, 4"×6") - Follow... the steps below to print borderless photos with EasyPhotoPrint. The steps used to create color prints of digital camera photographs with ...
... in a folder on the hard disk. (2) Click Start, select All Programs (or Programs), Canon Utilities, Easy-PhotoPrint, and then Easy-PhotoPrint. This chapter describes the steps used under Windows XP. The Image Selection sheet is displayed. 38 Photo Paper Pro (LTR, 4"×6") - Follow... the steps below to print borderless photos with EasyPhotoPrint. The steps used to create color prints of digital camera photographs with ...
Quick Start Guide
Page 43
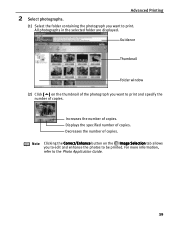
... the folder containing the photograph you want to be printed. For more information, refer to print and specify the number of copies. Guidance Thumbnail Folder window (2) Click [ ] on the Image Selection tab allows you to edit and enhance the photos to print. All photographs in the selected folder are displayed. Note...
... the folder containing the photograph you want to be printed. For more information, refer to print and specify the number of copies. Guidance Thumbnail Folder window (2) Click [ ] on the Image Selection tab allows you to edit and enhance the photos to print. All photographs in the selected folder are displayed. Note...
Quick Start Guide
Page 50
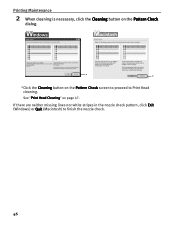
If there are neither missing lines nor white stripes in the nozzle check pattern, click Exit (Windows) or Quit (Macintosh) to Print Head cleaning. Printing Maintenance 2 When cleaning is necessary, click the Cleaning button on the Pattern Check dialog. * * *Click the Cleaning button on page 47. See "Print Head Cleaning" on the Pattern Check screen to proceed to finish the nozzle check. 46
If there are neither missing lines nor white stripes in the nozzle check pattern, click Exit (Windows) or Quit (Macintosh) to Print Head cleaning. Printing Maintenance 2 When cleaning is necessary, click the Cleaning button on the Pattern Check dialog. * * *Click the Cleaning button on page 47. See "Print Head Cleaning" on the Pattern Check screen to proceed to finish the nozzle check. 46
Quick Start Guide
Page 68
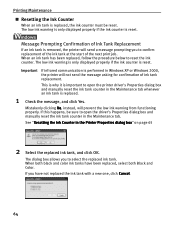
See "Resetting the Ink Counter in the Maintenance tab whenever an ink tank is removed, the printer will send a message prompting you have been replaced, select both Black and Color. Important If infrared communication is replaced, the ink counter must be sure to reset the ink counter.... you to select the replaced ink tank. Printing Maintenance Resetting the Ink Counter When an ink tank is performed in Windows XP or Windows 2000, the printer will not send the message asking for confirmation of ink tank replacement. Message Prompting Confirmation of Ink Tank Replacement If an...
See "Resetting the Ink Counter in the Maintenance tab whenever an ink tank is removed, the printer will send a message prompting you have been replaced, select both Black and Color. Important If infrared communication is replaced, the ink counter must be sure to reset the ink counter.... you to select the replaced ink tank. Printing Maintenance Resetting the Ink Counter When an ink tank is performed in Windows XP or Windows 2000, the printer will not send the message asking for confirmation of ink tank replacement. Message Prompting Confirmation of Ink Tank Replacement If an...

Quick Start Guide
Page 73
...Guide for additional information on topics not covered in this section. • "Cannot Install the Printer Driver" on page 70 • "Print Quality is Poor or Contains Errors" on page 72 • "Troubleshooting Printer Hardware" on page 74 • "Paper Does Not Feed Properly" on page 75 •... is not displayed. 69 The message may vary depending on page 82 When an Error Occurs When an error occurs in Windows XP or Windows 2000, a BJ Status Monitor screen is displayed automatically. Troubleshooting Troubleshooting Troubleshooting usually falls into one of the following categories.
...Guide for additional information on topics not covered in this section. • "Cannot Install the Printer Driver" on page 70 • "Print Quality is Poor or Contains Errors" on page 72 • "Troubleshooting Printer Hardware" on page 74 • "Paper Does Not Feed Properly" on page 75 •... is not displayed. 69 The message may vary depending on page 82 When an Error Occurs When an error occurs in Windows XP or Windows 2000, a BJ Status Monitor screen is displayed automatically. Troubleshooting Troubleshooting Troubleshooting usually falls into one of the following categories.


