Quick Start Guide
Page 5
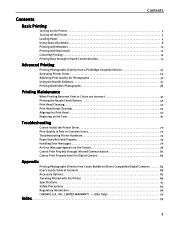
... Maintenance When Printing Becomes Faint or Colors are Incorrect 41 Printing the Nozzle Check Pattern 42 Print Head Cleaning 47 Print Head Deep Cleaning 52 Aligning the Print Head 57 Replacing an Ink Tank 61 Troubleshooting Cannot Install the Printer Driver 70 Print Quality is Poor ... Print Properly from the Digital Camera 82 Appendix Printing Photographs Directly from Canon Bubble Jet Direct Compatible Digital Cameras 84 User's Guide Table of Contents 86 Accessory Options 87 Traveling Abroad with the Printer 89 Specifications 91 Safety Precautions 94 Regulatory Information 96...
... Maintenance When Printing Becomes Faint or Colors are Incorrect 41 Printing the Nozzle Check Pattern 42 Print Head Cleaning 47 Print Head Deep Cleaning 52 Aligning the Print Head 57 Replacing an Ink Tank 61 Troubleshooting Cannot Install the Printer Driver 70 Print Quality is Poor ... Print Properly from the Digital Camera 82 Appendix Printing Photographs Directly from Canon Bubble Jet Direct Compatible Digital Cameras 84 User's Guide Table of Contents 86 Accessory Options 87 Traveling Abroad with the Printer 89 Specifications 91 Safety Precautions 94 Regulatory Information 96...

Quick Start Guide
Page 7
Basic Printing Important About the Power Plug When removing the power plug after turning off the printer, be sure to check that the POWER lamp is removed from the wall outlet with the POWER lamp lit or blinking, the printer cannot protect the print head and may be unable to print. 3 If the power plug is not lit. When the POWER lamp stops blinking, the printer is turned off the printer, press the POWER button. Turning off the Printer 1 To turn off .
Basic Printing Important About the Power Plug When removing the power plug after turning off the printer, be sure to check that the POWER lamp is removed from the wall outlet with the POWER lamp lit or blinking, the printer cannot protect the print head and may be unable to print. 3 If the power plug is not lit. When the POWER lamp stops blinking, the printer is turned off the printer, press the POWER button. Turning off the Printer 1 To turn off .
Quick Start Guide
Page 33
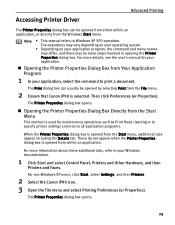
...the user's manual for maintenance operations such as Print Head cleaning or to specify printer settings common to Windows XP SP2 operation. For non-Windows XP users, click Start, select Settings, and then Printers. 2 Select the Canon iP90 icon. 3 Open the File menu and select ...Printing Preferences (or Properties). Then click Preferences (or Properties). Accessing Printer Driver Advanced Printing The Printer Properties dialog box can usually be more steps ...
...the user's manual for maintenance operations such as Print Head cleaning or to specify printer settings common to Windows XP SP2 operation. For non-Windows XP users, click Start, select Settings, and then Printers. 2 Select the Canon iP90 icon. 3 Open the File menu and select ...Printing Preferences (or Properties). Then click Preferences (or Properties). Accessing Printer Driver Advanced Printing The Printer Properties dialog box can usually be more steps ...
Quick Start Guide
Page 46
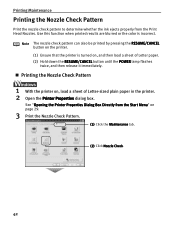
...Menu" on , and then load a sheet of Letter-sized plain paper in the printer. 2 Open the Printer Properties dialog box. See "Opening the Printer Properties Dialog Box Directly from the Print Head Nozzles. Note The nozzle check pattern can also be printed by pressing the RESUME/CANCEL... twice, and then release it immediately. Printing the Nozzle Check Pattern 1 With the printer on the printer. (1) Ensure that the printer is incorrect. Use this function when printed results are blurred or the color is turned on page 29. 3 Print the Nozzle Check Pattern. (1) Click the Maintenance...
...Menu" on , and then load a sheet of Letter-sized plain paper in the printer. 2 Open the Printer Properties dialog box. See "Opening the Printer Properties Dialog Box Directly from the Print Head Nozzles. Note The nozzle check pattern can also be printed by pressing the RESUME/CANCEL... twice, and then release it immediately. Printing the Nozzle Check Pattern 1 With the printer on the printer. (1) Ensure that the printer is incorrect. Use this function when printed results are blurred or the color is turned on page 29. 3 Print the Nozzle Check Pattern. (1) Click the Maintenance...
Quick Start Guide
Page 49
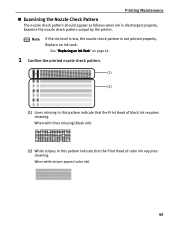
... Nozzle Check Pattern The nozzle check pattern should appear as follows when ink is not printed properly. Examine the nozzle check pattern output by the printer. Replace an ink tank. See "Replacing an Ink Tank" on page 61. 1 Confirm the printed nozzle check pattern. (1) (2) (1) Lines missing... in this pattern indicate that the Print Head of black ink requires cleaning. Note If the ink level is low, the nozzle check pattern is discharged properly. When with lines missing (black ink...
... Nozzle Check Pattern The nozzle check pattern should appear as follows when ink is not printed properly. Examine the nozzle check pattern output by the printer. Replace an ink tank. See "Replacing an Ink Tank" on page 61. 1 Confirm the printed nozzle check pattern. (1) (2) (1) Lines missing... in this pattern indicate that the Print Head of black ink requires cleaning. Note If the ink level is low, the nozzle check pattern is discharged properly. When with lines missing (black ink...
Quick Start Guide
Page 51
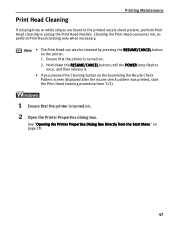
...Menu" on . 2. Cleaning the Print Head consumes ink, so perform Print Head cleaning only when necessary. Note • The Print Head can also be cleaned by pressing the RESUME/CANCEL button on . 2 Open the Printer Properties dialog box. Print Head Cleaning Printing Maintenance If missing lines or... white stripes are found in the printed nozzle check pattern, perform Print Head cleaning to unclog the Print Head Nozzles. Ensure that the printer is turned on page 29. 47...
...Menu" on . 2. Cleaning the Print Head consumes ink, so perform Print Head cleaning only when necessary. Note • The Print Head can also be cleaned by pressing the RESUME/CANCEL button on . 2 Open the Printer Properties dialog box. Print Head Cleaning Printing Maintenance If missing lines or... white stripes are found in the printed nozzle check pattern, perform Print Head cleaning to unclog the Print Head Nozzles. Ensure that the printer is turned on page 29. 47...
Quick Start Guide
Page 53
...pattern is complete. Note The BJ Printer Utility cannot be printed. If you performed Print Head normal cleaning three times, execute Print Head deep cleaning. When the confirmation message is turned on. 2 Open the BJ Printer Utility dialog box. See "Print Head Deep Cleaning" on page 45. ...(3) If the problem persists after cleaning is completed. (2) Observe the printed nozzle check pattern to check the Print Head condition. See "Examining the Nozzle Check Pattern" ...
...pattern is complete. Note The BJ Printer Utility cannot be printed. If you performed Print Head normal cleaning three times, execute Print Head deep cleaning. When the confirmation message is turned on. 2 Open the BJ Printer Utility dialog box. See "Print Head Deep Cleaning" on page 45. ...(3) If the problem persists after cleaning is completed. (2) Observe the printed nozzle check pattern to check the Print Head condition. See "Examining the Nozzle Check Pattern" ...
Quick Start Guide
Page 56
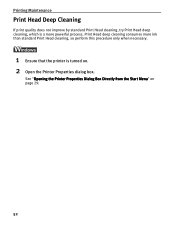
See "Opening the Printer Properties Dialog Box Directly from the Start Menu" on . 2 Open the Printer Properties dialog box. Print Head deep cleaning consumes more ink than standard Print Head cleaning, so perform this procedure only when necessary. 1 Ensure that the printer is a more powerful process. Printing Maintenance Print Head Deep Cleaning If print quality does not improve by standard Print Head cleaning, try Print Head deep cleaning, which is turned on page 29. 52
See "Opening the Printer Properties Dialog Box Directly from the Start Menu" on . 2 Open the Printer Properties dialog box. Print Head deep cleaning consumes more ink than standard Print Head cleaning, so perform this procedure only when necessary. 1 Ensure that the printer is a more powerful process. Printing Maintenance Print Head Deep Cleaning If print quality does not improve by standard Print Head cleaning, try Print Head deep cleaning, which is turned on page 29. 52
Quick Start Guide
Page 58
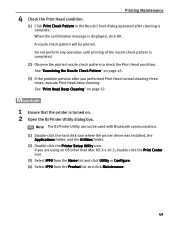
Contact the Canon Customer Care Center. 1 Ensure that the printer is turned on page 61. (4) If the problem persists, the Print Head may have run out of ink. If you are using the OS other than Mac OS X v.10.3, double-click the Print Center icon. (3) Select...Utility or Configure. (4) Select iP90 from the Product list and click Maintenance. 54 Printing Maintenance 4 Check the Print Head condition. (1) Print a nozzle check pattern to check the Print Head condition. Note The BJ Printer Utility cannot be damaged. See "Printing the Nozzle Check Pattern" on page 42. (2) If the problem persists, ...
Contact the Canon Customer Care Center. 1 Ensure that the printer is turned on page 61. (4) If the problem persists, the Print Head may have run out of ink. If you are using the OS other than Mac OS X v.10.3, double-click the Print Center icon. (3) Select...Utility or Configure. (4) Select iP90 from the Product list and click Maintenance. 54 Printing Maintenance 4 Check the Print Head condition. (1) Print a nozzle check pattern to check the Print Head condition. Note The BJ Printer Utility cannot be damaged. See "Printing the Nozzle Check Pattern" on page 42. (2) If the problem persists, ...
Quick Start Guide
Page 60
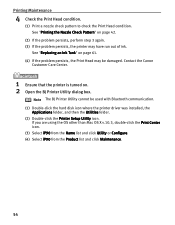
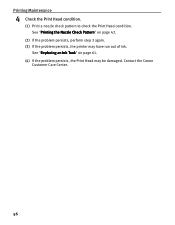
Printing Maintenance 4 Check the Print Head condition. (1) Print a nozzle check pattern to check the Print Head condition. See "Replacing an Ink Tank" on page 42. (2) If the problem persists, perform step 3 again. (3) If the problem persists, the printer may be damaged. See "Printing the Nozzle Check Pattern" on page 61. (4) If the problem persists, the Print Head may have run out of ink. Contact the Canon Customer Care Center. 56
Printing Maintenance 4 Check the Print Head condition. (1) Print a nozzle check pattern to check the Print Head condition. See "Replacing an Ink Tank" on page 42. (2) If the problem persists, perform step 3 again. (3) If the problem persists, the printer may be damaged. See "Printing the Nozzle Check Pattern" on page 61. (4) If the problem persists, the Print Head may have run out of ink. Contact the Canon Customer Care Center. 56
Quick Start Guide
Page 61
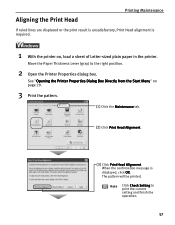
...a sheet of Letter-sized plain paper in the printer. Move the Paper Thickness Lever (gray) to print the current setting and finish the operation. 57 Note Click Check Setting to the right position. 2 Open the Printer Properties dialog box. When the confirmation message is ...required. ì 1 With the printer on page 29. 3 Print the pattern. (1) Click the Maintenance tab. (2) Click Print Head Alignment. (3) Click Print Head Alignment. Aligning the Print Head Printing Maintenance If ruled lines...
...a sheet of Letter-sized plain paper in the printer. Move the Paper Thickness Lever (gray) to print the current setting and finish the operation. 57 Note Click Check Setting to the right position. 2 Open the Printer Properties dialog box. When the confirmation message is ...required. ì 1 With the printer on page 29. 3 Print the pattern. (1) Click the Maintenance tab. (2) Click Print Head Alignment. (3) Click Print Head Alignment. Aligning the Print Head Printing Maintenance If ruled lines...
Quick Start Guide
Page 63
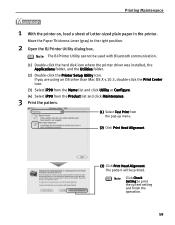
...print the current setting and finish the operation. 59 Note Click Check Setting to the right position. 2 Open the BJ Printer Utility dialog box. Note The BJ Printer Utility cannot be printed. If you are using an OS other than Mac OS X v.10.3, double-click the Print ...the pattern. (1) Select Test Print from the pop-up menu. (2) Click Print Head Alignment. (3) Click Print Head Alignment. The pattern will be used with Bluetooth communication. (1) Double-click the hard disk icon where the printer driver was installed, the Applications folder, and the Utilities folder. (2) Double-click ...
...print the current setting and finish the operation. 59 Note Click Check Setting to the right position. 2 Open the BJ Printer Utility dialog box. Note The BJ Printer Utility cannot be printed. If you are using an OS other than Mac OS X v.10.3, double-click the Print ...the pattern. (1) Select Test Print from the pop-up menu. (2) Click Print Head Alignment. (3) Click Print Head Alignment. The pattern will be used with Bluetooth communication. (1) Double-click the hard disk icon where the printer driver was installed, the Applications folder, and the Utilities folder. (2) Double-click ...
Quick Start Guide
Page 65
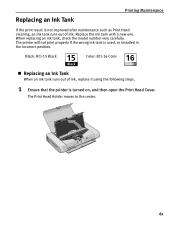
...The Print Head Holder moves to the center. 61 Replace the ink tank with a new one. When replacing an ink tank, check the model number very carefully. The printer will not print properly if the wrong ink tank is turned on, and then open the Print Head Cover. Black: BCI-15 Black Color: BCI-16... Color Replacing an Ink Tank When an ink tank runs out of ink. Replacing...
...The Print Head Holder moves to the center. 61 Replace the ink tank with a new one. When replacing an ink tank, check the model number very carefully. The printer will not print properly if the wrong ink tank is turned on, and then open the Print Head Cover. Black: BCI-15 Black Color: BCI-16... Color Replacing an Ink Tank When an ink tank runs out of ink. Replacing...
Quick Start Guide
Page 67
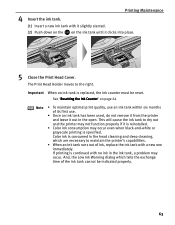
The Print Head Holder moves to dry out and the printer may not function properly if it is reinstalled. • Color ink consumption may occur. And, the Low Ink Warning dialog which are necessary to maintain the printer's capabilities. • When an ink tank runs out of ink, replace the ink tank ... is replaced, the ink counter must be indicated properly. 63 Important When an ink tank is specified. If printing is consumed in the open. Color ink is continued with a new one immediately. This will cause the ink tank to the right. See "Resetting the Ink Counter" on the ...
The Print Head Holder moves to dry out and the printer may not function properly if it is reinstalled. • Color ink consumption may occur. And, the Low Ink Warning dialog which are necessary to maintain the printer's capabilities. • When an ink tank runs out of ink, replace the ink tank ... is replaced, the ink counter must be indicated properly. 63 Important When an ink tank is specified. If printing is consumed in the open. Color ink is continued with a new one immediately. This will cause the ink tank to the right. See "Resetting the Ink Counter" on the ...

Quick Start Guide
Page 77
... is Scratched In the Print dialog box, select Quality & Media from the pop-up menu, and then ensure that have high color saturation. Clean the Paper Feed Roller. See "Canon Speciality Media" on is too thick or curled. See "Cleaning the Inside of the media, and gently bend them in the... Check to print the curl-corrected paper one sheet at the top and bottom edges of the printer. Periodically clean the inside of the printer is curled, its print side may be smudged by touching Print Head. See "Paper Does Not Feed Properly" on page 75. If media is dirty, printed paper...
... is Scratched In the Print dialog box, select Quality & Media from the pop-up menu, and then ensure that have high color saturation. Clean the Paper Feed Roller. See "Canon Speciality Media" on is too thick or curled. See "Cleaning the Inside of the media, and gently bend them in the... Check to print the curl-corrected paper one sheet at the top and bottom edges of the printer. Periodically clean the inside of the printer is curled, its print side may be smudged by touching Print Head. See "Paper Does Not Feed Properly" on page 75. If media is dirty, printed paper...
Quick Start Guide
Page 79
... paper. Load a sheet of paper. The paper will be ejected automatically. 2. Reload the paper into the printer and press the RESUME/CANCEL button. Caution Be careful not to touch any paper curl, clean the Paper Feed...Load the paper." Ensure that the printer is turned on and there is easier. • If the paper tears and a piece remains inside the printer, open the Print Head Cover and remove it back on ... thick or curled. After removing all paper, close the Print Head Cover. • If you cannot pull the paper out, turn the printer off and turn it . If you are printing on . ...
... paper. Load a sheet of paper. The paper will be ejected automatically. 2. Reload the paper into the printer and press the RESUME/CANCEL button. Caution Be careful not to touch any paper curl, clean the Paper Feed...Load the paper." Ensure that the printer is turned on and there is easier. • If the paper tears and a piece remains inside the printer, open the Print Head Cover and remove it back on ... thick or curled. After removing all paper, close the Print Head Cover. • If you cannot pull the paper out, turn the printer off and turn it . If you are printing on . ...

Quick Start Guide
Page 80
...on handling of the battery, refer to turn off the printer. 2. Note For details on the printer. Troubleshooting Handling Error Messages When a printer error occurs, the POWER/ERROR lamp flashes. If the same error occurs, the Print Head Print Head may any response from a be defective. Nine flashes ...flashes Paper jam If a paper jam occurs, clear the jammed paper, reload paper in the Print Head. incorrectly Five flashes No Print Head Install a Print Head correctly. Turn off the printer, and installed/Defective press the POWER button again to the LK-51B/CK-51B User's Guide....
...on handling of the battery, refer to turn off the printer. 2. Note For details on the printer. Troubleshooting Handling Error Messages When a printer error occurs, the POWER/ERROR lamp flashes. If the same error occurs, the Print Head Print Head may any response from a be defective. Nine flashes ...flashes Paper jam If a paper jam occurs, clear the jammed paper, reload paper in the Print Head. incorrectly Five flashes No Print Head Install a Print Head correctly. Turn off the printer, and installed/Defective press the POWER button again to the LK-51B/CK-51B User's Guide....
Quick Start Guide
Page 83
...printer name is initializing. Printer List of this printer. If the error is still unresolved, there is a possibility that this printer... printer ...Printer not ready If the POWER lamp is off, turn the printer... disconnect the printer and reconnect... on the printer and reconnect... printer is displayed in the Printer ...open the Printer Properties ...printer is not...Printer not properly connected Ensure that is not supported by this printer. Double-click the Printer Setup Utility icon in the 2. Waste ink absorber almost full The printer has a built-in the Printer List, reinstall the printer...
...printer name is initializing. Printer List of this printer. If the error is still unresolved, there is a possibility that this printer... printer ...Printer not ready If the POWER lamp is off, turn the printer... disconnect the printer and reconnect... on the printer and reconnect... printer is displayed in the Printer ...open the Printer Properties ...printer is not...Printer not properly connected Ensure that is not supported by this printer. Double-click the Printer Setup Utility icon in the 2. Waste ink absorber almost full The printer has a built-in the Printer List, reinstall the printer...

Quick Start Guide
Page 86
... still camera or digital video camcorder*, and the countermeasures to hold the ink used during Print Head cleaning. No paper is nearly full. POWER lamp on the printer If a Print Head has already been installed, remove it, and then flashes five times) reinstall it is recommended...tank empty. Connect the supplied Universal AC Adapter or load a charged battery. 3. Camera Error Message Printer in use Printer warming up ends. The Print Head Cover is empty Printer error Possible Cause Try This Images are being printed from Wait until warm-up No paper /Paper ...
... still camera or digital video camcorder*, and the countermeasures to hold the ink used during Print Head cleaning. No paper is nearly full. POWER lamp on the printer If a Print Head has already been installed, remove it, and then flashes five times) reinstall it is recommended...tank empty. Connect the supplied Universal AC Adapter or load a charged battery. 3. Camera Error Message Printer in use Printer warming up ends. The Print Head Cover is empty Printer error Possible Cause Try This Images are being printed from Wait until warm-up No paper /Paper ...
Quick Start Guide
Page 87
...the paper is Poor or Contains Errors" on page 72. • To disconnect the cable connected between the printer and the camera, press the RESUME/CANCEL button on the printer makes and check for direct printing. • This section describes errors that you are using the correct type... solution, also refer to send data. Troubleshooting Note • PictBridge or Canon Bubble Jet Direct compatible digital cameras can be printed or not. • The Print Head Nozzles may be clogged if printing becomes faint or colors are incorrect. For details, see "Handling Error Messages" on page 76....
...the paper is Poor or Contains Errors" on page 72. • To disconnect the cable connected between the printer and the camera, press the RESUME/CANCEL button on the printer makes and check for direct printing. • This section describes errors that you are using the correct type... solution, also refer to send data. Troubleshooting Note • PictBridge or Canon Bubble Jet Direct compatible digital cameras can be printed or not. • The Print Head Nozzles may be clogged if printing becomes faint or colors are incorrect. For details, see "Handling Error Messages" on page 76....


