Quick Start Guide
Page 2
...Number (located on the back of the printer): Model Number (located on your inquiries within 24 hours. 3. In addition, the latest driver downloads, answers to frequently asked questions, product information, and "where to your CD-ROM: Purchase Date: Canon U.S.A. Toll-Free Live Tech Support - ...(1-800-828-4040) This option provides live telephone technical support, free of the printer): Setup Software and User's Guide CD version number (USCD X.X) located on the...
...Number (located on the back of the printer): Model Number (located on your inquiries within 24 hours. 3. In addition, the latest driver downloads, answers to frequently asked questions, product information, and "where to your CD-ROM: Purchase Date: Canon U.S.A. Toll-Free Live Tech Support - ...(1-800-828-4040) This option provides live telephone technical support, free of the printer): Setup Software and User's Guide CD version number (USCD X.X) located on the...
Quick Start Guide
Page 4
Canon PIXMA iP90 Photo Printer Quick Start Guide Copyright This manual is copyrighted by Canon, Inc. As an ENERGY STAR partner, Canon U.S.A., Inc., has determined that this manual thoroughly in order that it will be , nor should they are ...Microsoft Corporation in this manual may not be , representation or warranties concerning the products described. and any use guide to your Canon PIXMA iP90 Photo Printer. Disclaimer Canon U.S.A., Inc. has reviewed this product meets the ENERGY STAR guidelines for energy efficiency. All statements, technical information and recommendations ...
Canon PIXMA iP90 Photo Printer Quick Start Guide Copyright This manual is copyrighted by Canon, Inc. As an ENERGY STAR partner, Canon U.S.A., Inc., has determined that this manual thoroughly in order that it will be , nor should they are ...Microsoft Corporation in this manual may not be , representation or warranties concerning the products described. and any use guide to your Canon PIXMA iP90 Photo Printer. Disclaimer Canon U.S.A., Inc. has reviewed this product meets the ENERGY STAR guidelines for energy efficiency. All statements, technical information and recommendations ...
Quick Start Guide
Page 5
... Quality for Photographs 30 Using the Bundle Software 37 Printing Borderless Photographs 38 Printing Maintenance When Printing Becomes Faint or Colors are Incorrect 41 Printing the Nozzle Check Pattern 42 Print Head Cleaning 47 Print Head Deep Cleaning 52 Aligning the Print... 81 Cannot Print Properly from the Digital Camera 82 Appendix Printing Photographs Directly from Canon Bubble Jet Direct Compatible Digital Cameras 84 User's Guide Table of Contents 86 Accessory Options 87 Traveling Abroad with the Printer 89 Specifications 91 Safety Precautions 94 Regulatory Information 96...
... Quality for Photographs 30 Using the Bundle Software 37 Printing Borderless Photographs 38 Printing Maintenance When Printing Becomes Faint or Colors are Incorrect 41 Printing the Nozzle Check Pattern 42 Print Head Cleaning 47 Print Head Deep Cleaning 52 Aligning the Print... 81 Cannot Print Properly from the Digital Camera 82 Appendix Printing Photographs Directly from Canon Bubble Jet Direct Compatible Digital Cameras 84 User's Guide Table of Contents 86 Accessory Options 87 Traveling Abroad with the Printer 89 Specifications 91 Safety Precautions 94 Regulatory Information 96...
Quick Start Guide
Page 6
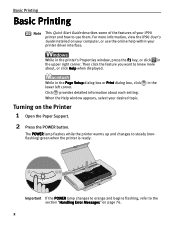
... interface. While in the upper right corner. When the Help window appears, select your computer, or use them. While in the printer's Properties window, press the F1 key, or click in the Page Setup dialog box or Print dialog box, click lower left corner. Click provides ... know more information, view the iP90 User's Guide installed on your desired topic. The POWER lamp flashes while the printer warms up and changes to the section "Handling Error Messages" on the Printer 1 Open the Paper Support. 2 Press the POWER button. in the Turning on page 76. 2 Important If the POWER ...
... interface. While in the upper right corner. When the Help window appears, select your computer, or use them. While in the printer's Properties window, press the F1 key, or click in the Page Setup dialog box or Print dialog box, click lower left corner. Click provides ... know more information, view the iP90 User's Guide installed on your desired topic. The POWER lamp flashes while the printer warms up and changes to the section "Handling Error Messages" on the Printer 1 Open the Paper Support. 2 Press the POWER button. in the Turning on page 76. 2 Important If the POWER ...

Quick Start Guide
Page 7
Basic Printing Important About the Power Plug When removing the power plug after turning off the printer, be unable to check that the POWER lamp is not lit. When the POWER lamp stops blinking, the printer is removed from the wall outlet with the POWER lamp lit or blinking, the printer cannot protect the print head and may be sure to print. 3 If the power plug is turned off the printer, press the POWER button. Turning off the Printer 1 To turn off .
Basic Printing Important About the Power Plug When removing the power plug after turning off the printer, be unable to check that the POWER lamp is not lit. When the POWER lamp stops blinking, the printer is removed from the wall outlet with the POWER lamp lit or blinking, the printer cannot protect the print head and may be sure to print. 3 If the power plug is turned off the printer, press the POWER button. Turning off the Printer 1 To turn off .
Quick Start Guide
Page 8
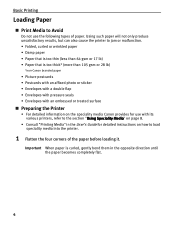
... sticker • Envelopes with a double flap • Envelopes with pressure seals • Envelopes with an embossed or treated surface Preparing the Printer • For detailed information on the speciality media Canon provides for detailed instructions on how to the section "Using Speciality Media" on page 8. • Consult "Printing Media" in the opposite...
... sticker • Envelopes with a double flap • Envelopes with pressure seals • Envelopes with an embossed or treated surface Preparing the Printer • For detailed information on the speciality media Canon provides for detailed instructions on how to the section "Using Speciality Media" on page 8. • Consult "Printing Media" in the opposite...
Quick Start Guide
Page 9
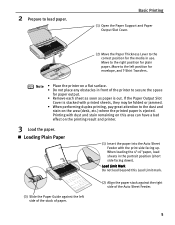
... a flat surface. • Do not place any obstacles in front of the printer to the left side of the stack of paper. (2) Align the paper stack against the left position for envelope, and T-Shirt Transfers. Loading Plain Paper (1) ....) where the printed paper is out. Move to secure the space for plain paper. Move to the dust and stain on the printing result and printer. 3 Load the paper. When loading the 4"×6"paper, load sheets in the portrait position (short side facing down). Printing with the print side facing up...
... a flat surface. • Do not place any obstacles in front of the printer to the left side of the stack of paper. (2) Align the paper stack against the left position for envelope, and T-Shirt Transfers. Loading Plain Paper (1) ....) where the printed paper is out. Move to secure the space for plain paper. Move to the dust and stain on the printing result and printer. 3 Load the paper. When loading the 4"×6"paper, load sheets in the portrait position (short side facing down). Printing with the print side facing up...
Quick Start Guide
Page 10
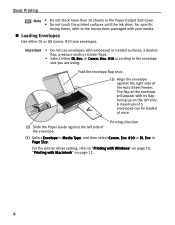
... appear with embossed or treated surfaces, a double flap, pressure seals or sticker flaps. • Select either DL or US Comm. #10 size envelopes. For the printer driver setting, refer to the envelope size you are using. Env. #10 or DL Env. Printing direction (3) Select Envelope in Media Type, and then select...
... appear with embossed or treated surfaces, a double flap, pressure seals or sticker flaps. • Select either DL or US Comm. #10 size envelopes. For the printer driver setting, refer to the envelope size you are using. Env. #10 or DL Env. Printing direction (3) Select Envelope in Media Type, and then select...
Quick Start Guide
Page 11
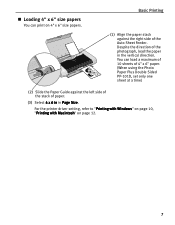
Despite the direction of the photograph, load the paper in Page Size. For the printer driver setting, refer to "Printing with Windows" on page 10, "Printing with Macintosh" on 4" x 6" size papers. Loading 4" x 6" size papers You can load a maximum of 10 ...
Despite the direction of the photograph, load the paper in Page Size. For the printer driver setting, refer to "Printing with Windows" on page 10, "Printing with Macintosh" on 4" x 6" size papers. Loading 4" x 6" size papers You can load a maximum of 10 ...
Quick Start Guide
Page 13
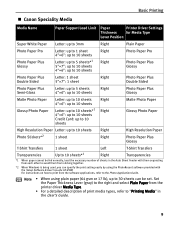
Basic Printing Canon Speciality Media Media Name Paper Support Load Limit Paper Printer Driver Settings Thickness for Media Type Lever Position Super White Paper Letter: up to 3mm Right Plain Paper Photo Paper Pro Photo Paper Plus Glossy ... Sheet Feeder with them separating from each other to avoid them from the software applications, refer to the right and select Plain Paper from the printer driver Media Type. • For a detailed description of sheets in the User's Guide. 9
Basic Printing Canon Speciality Media Media Name Paper Support Load Limit Paper Printer Driver Settings Thickness for Media Type Lever Position Super White Paper Letter: up to 3mm Right Plain Paper Photo Paper Pro Photo Paper Plus Glossy ... Sheet Feeder with them separating from each other to avoid them from the software applications, refer to the right and select Plain Paper from the printer driver Media Type. • For a detailed description of sheets in the User's Guide. 9
Quick Start Guide
Page 14
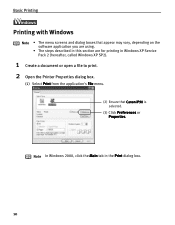
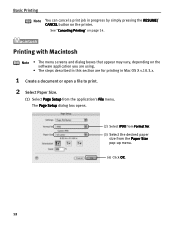
Basic Printing l Printing with Windows Note • The menu screens and dialog boxes that appear may vary, depending on the software application you are using. • The steps described in this section are for printing in the Print dialog box. 10 Note In Windows 2000, click the Main tab in Windows XP Service Pack 2 (hereafter, called Windows XP SP2). 1 Create a document or open a file to print. 2 Open the Printer Properties dialog box. (1) Select Print from the application's File menu. (2) Ensure that Canon iP90 is selected. (3) Click Preferences or Properties.
Basic Printing l Printing with Windows Note • The menu screens and dialog boxes that appear may vary, depending on the software application you are using. • The steps described in this section are for printing in the Print dialog box. 10 Note In Windows 2000, click the Main tab in Windows XP Service Pack 2 (hereafter, called Windows XP SP2). 1 Create a document or open a file to print. 2 Open the Printer Properties dialog box. (1) Select Print from the application's File menu. (2) Ensure that Canon iP90 is selected. (3) Click Preferences or Properties.
Quick Start Guide
Page 15
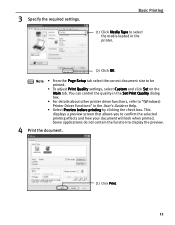
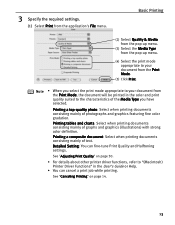
...; Select Preview before printing by clicking the check box. Note • From the Page Setup tab select the correct document size to "(Windows) Printer Driver Functions" in the printer. (2) Click OK. 3 Specify the required settings. You can control the quality in the Set Print Quality dialog box. • For details about other...
...; Select Preview before printing by clicking the check box. Note • From the Page Setup tab select the correct document size to "(Windows) Printer Driver Functions" in the printer. (2) Click OK. 3 Specify the required settings. You can control the quality in the Set Print Quality dialog box. • For details about other...
Quick Start Guide
Page 16
... open a file to print. 2 Select Paper Size. (1) Select Page Setup from the Paper Size pop-up menu. (4) Click OK. 12 See "Canceling Printing" on the printer. The Page Setup dialog box opens. (2) Select iP90 from Format for printing in progress by simply pressing the RESUME/ CANCEL button on page 14. Printing...
... open a file to print. 2 Select Paper Size. (1) Select Page Setup from the Paper Size pop-up menu. (4) Click OK. 12 See "Canceling Printing" on the printer. The Page Setup dialog box opens. (2) Select iP90 from Format for printing in progress by simply pressing the RESUME/ CANCEL button on page 14. Printing...
Quick Start Guide
Page 17
... mainly of graphs and graphics (illustrations) with strong color definition. See "Canceling Printing" on page 30. • For details about other printer driver functions, refer to "(Macintosh) Printer Driver Functions" in the color and print quality suited to the characteristics of photographs... and graphics featuring fine color gradation. Printing a top-quality photo: Select when printing...
... mainly of graphs and graphics (illustrations) with strong color definition. See "Canceling Printing" on page 30. • For details about other printer driver functions, refer to "(Macintosh) Printer Driver Functions" in the color and print quality suited to the characteristics of photographs... and graphics featuring fine color gradation. Printing a top-quality photo: Select when printing...
Quick Start Guide
Page 18
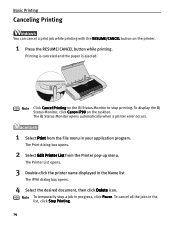
... To cancel all the jobs in progress, click Pause. Note To temporarily stop printing. The Printer List opens. 3 Double-click the printer name displayed in your application program. To display the BJ Status Monitor, click Canon iP90 on the BJ Status Monitor to stop a job in the list, click Stop Printing.... 14 The Print dialog box opens. 2 Select Edit Printer List from the File menu in the Name list The iP90 dialog box ...
... To cancel all the jobs in progress, click Pause. Note To temporarily stop printing. The Printer List opens. 3 Double-click the printer name displayed in your application program. To display the BJ Status Monitor, click Canon iP90 on the BJ Status Monitor to stop a job in the list, click Stop Printing.... 14 The Print dialog box opens. 2 Select Edit Printer List from the File menu in the Name list The iP90 dialog box ...
Quick Start Guide
Page 19
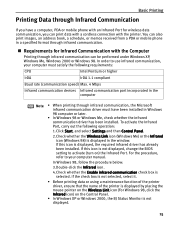
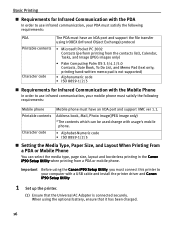
... Infrared Port. For the procedure, refer to your computer must have a computer, PDA or mobile phone with an Infrared Port for Infrared Communication with the printer. To activate the Infrared Port, carry out the following requirements: CPU Intel Pentium or higher IrDA IrDA 1.1 compliant Baud rate (communication speed) Max. 4 Mbps Infrared... 98) is displayed in the window. If the check box is not selected, select it. • Before printing data or using a maintenance function of the printer driver, ensure that the name of the...
... Infrared Port. For the procedure, refer to your computer must have a computer, PDA or mobile phone with an Infrared Port for Infrared Communication with the printer. To activate the Infrared Port, carry out the following requirements: CPU Intel Pentium or higher IrDA IrDA 1.1 compliant Baud rate (communication speed) Max. 4 Mbps Infrared... 98) is displayed in the window. If the check box is not selected, select it. • Before printing data or using a maintenance function of the printer driver, ensure that the name of the...
Quick Start Guide
Page 20
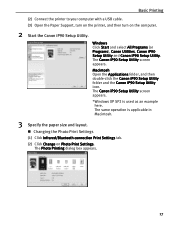
... Communication with the PDA In order to use infrared communication, your computer with a USB cable and install the printer driver and Canon iP90 Setup Utility. 1 Set up the printer. (1) Ensure that it has been charged. 16 Important Before using the optional battery, ensure that the Universal ...Printable contents Character code Mobile phone must have an IrDA port and support IrMC ver 1.1. When using the Canon iP90 Setup Utility, you must connect this printer to your mobile phone must satisfy the following requirements: PDA Printable contents Character code The PDA must have an...
... Communication with the PDA In order to use infrared communication, your computer with a USB cable and install the printer driver and Canon iP90 Setup Utility. 1 Set up the printer. (1) Ensure that it has been charged. 16 Important Before using the optional battery, ensure that the Universal ...Printable contents Character code Mobile phone must have an IrDA port and support IrMC ver 1.1. When using the Canon iP90 Setup Utility, you must connect this printer to your mobile phone must satisfy the following requirements: PDA Printable contents Character code The PDA must have an...
Quick Start Guide
Page 21
... Start the Canon iP90 Setup Utility. The Canon iP90 Setup Utility screen appears. Windows Click Start and select All Programs (or Programs), Canon Utilities, Canon iP90 Setup Utility and Canon iP90 Setup Utility. The same operation is used as an example here. Basic Printing (2) Connect the printer to your ...computer with a USB cable. (3) Open the Paper Support, turn on the printer, and then turn on ...
... Start the Canon iP90 Setup Utility. The Canon iP90 Setup Utility screen appears. Windows Click Start and select All Programs (or Programs), Canon Utilities, Canon iP90 Setup Utility and Canon iP90 Setup Utility. The same operation is used as an example here. Basic Printing (2) Connect the printer to your ...computer with a USB cable. (3) Open the Paper Support, turn on the printer, and then turn on ...
Quick Start Guide
Page 22
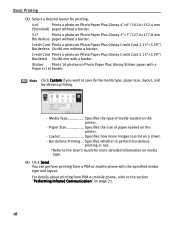
... a photo on Photo Paper Plus Glossy 4"×6"/101.6×152.4 mm (Standard) paper without a border. 5×7 Prints a photo on the printer. - Layout Specifies how many images to specify the media type, paper size, layout, and borderless printing. - Basic Printing (3) Select a desired ...layout for more detailed information on a sheet. - Media Type Specifies the type of paper loaded on the printer. - Borderless Printing... Sticker Prints 16 photos on Photo Paper Plus Glossy Credit Card 2.13"×3.39"/ Borderless 54×86 mm without...
... a photo on Photo Paper Plus Glossy 4"×6"/101.6×152.4 mm (Standard) paper without a border. 5×7 Prints a photo on the printer. - Layout Specifies how many images to specify the media type, paper size, layout, and borderless printing. - Basic Printing (3) Select a desired ...layout for more detailed information on a sheet. - Media Type Specifies the type of paper loaded on the printer. - Borderless Printing... Sticker Prints 16 photos on Photo Paper Plus Glossy Credit Card 2.13"×3.39"/ Borderless 54×86 mm without...
Quick Start Guide
Page 24
.... • It automatically sets the margin according to the image size. • Depending on the size of an image, it may take a while for this printer to start to print after starting the infrared transfer. 20
.... • It automatically sets the margin according to the image size. • Depending on the size of an image, it may take a while for this printer to start to print after starting the infrared transfer. 20


