Quick Start Guide
Page 5
... 4 Using Speciality Media 8 Printing with Windows 10 Printing with Macintosh 12 Canceling Printing 14 Printing Data through Infrared Communication 15 Advanced Printing Printing Photographs Directly from a PictBridge Compliant Device 23 Accessing Printer Driver 29 Adjusting Print Quality for Photographs 30 Using the Bundle Software 37 Printing Borderless Photographs 38 Printing Maintenance When Printing Becomes Faint or Colors are Incorrect 41 Printing the Nozzle Check...
... 4 Using Speciality Media 8 Printing with Windows 10 Printing with Macintosh 12 Canceling Printing 14 Printing Data through Infrared Communication 15 Advanced Printing Printing Photographs Directly from a PictBridge Compliant Device 23 Accessing Printer Driver 29 Adjusting Print Quality for Photographs 30 Using the Bundle Software 37 Printing Borderless Photographs 38 Printing Maintenance When Printing Becomes Faint or Colors are Incorrect 41 Printing the Nozzle Check...
Quick Start Guide
Page 6
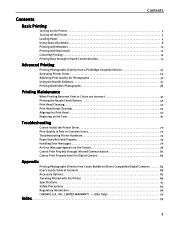
... Paper Support. 2 Press the POWER button. The POWER lamp flashes while the printer warms up and changes to steady (nonflashing) green when the printer is ready. in the Page Setup dialog box or Print dialog box, click lower left corner. Then click the feature you want to know... the Help window appears, select your desired topic. Basic Printing Basic Printing Note This Quick Start Guide describes some of the features of your iP90 printer and how to use the online help within your printer driver interface. While in the printer's Properties window, press the F1 key, or click in...
... Paper Support. 2 Press the POWER button. The POWER lamp flashes while the printer warms up and changes to steady (nonflashing) green when the printer is ready. in the Page Setup dialog box or Print dialog box, click lower left corner. Then click the feature you want to know... the Help window appears, select your desired topic. Basic Printing Basic Printing Note This Quick Start Guide describes some of the features of your iP90 printer and how to use the online help within your printer driver interface. While in the printer's Properties window, press the F1 key, or click in...
Quick Start Guide
Page 10
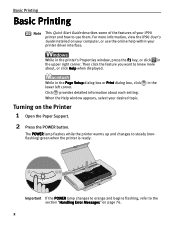
... envelope against the left side. The flap of the envelope will appear with Macintosh" on the left side of the Auto Sheet Feeder. For the printer driver setting, refer to the envelope size you are using. Important • Do not use envelopes with your media. or Comm. Env. #10 or DL ...Env. in the Paper Output Slot Cover. • Do not touch the printed surfaces until the ink dries. Loading Envelopes Use either DL Env. Printing direction (3) Select Envelope in Media Type, and then select Comm. Env. #10 according to...
... envelope against the left side. The flap of the envelope will appear with Macintosh" on the left side of the Auto Sheet Feeder. For the printer driver setting, refer to the envelope size you are using. Important • Do not use envelopes with your media. or Comm. Env. #10 or DL ...Env. in the Paper Output Slot Cover. • Do not touch the printed surfaces until the ink dries. Loading Envelopes Use either DL Env. Printing direction (3) Select Envelope in Media Type, and then select Comm. Env. #10 according to...
Quick Start Guide
Page 11
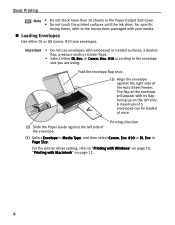
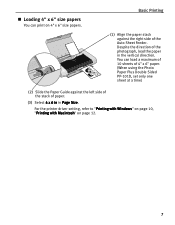
... page 12. 7 For the printer driver setting, refer to "Printing with Windows" on page 10, "Printing with Macintosh" on 4" x 6" size papers. Loading 4" x 6" size papers You can load a maximum of 10 sheets of 4" x 6" paper. (When using the Photo Paper Plus Double Sided ...PP-101D, set only one sheet at a time) (2) Slide the Paper Guide against the right side of paper. (3) Select 4 x 6 in in the vertical direction. Basic Printing (1) Align the paper stack against the left side of the stack of the Auto Sheet Feeder. Despite the direction of the photograph, load the paper...
... page 12. 7 For the printer driver setting, refer to "Printing with Windows" on page 10, "Printing with Macintosh" on 4" x 6" size papers. Loading 4" x 6" size papers You can load a maximum of 10 sheets of 4" x 6" paper. (When using the Photo Paper Plus Double Sided ...PP-101D, set only one sheet at a time) (2) Slide the Paper Guide against the right side of paper. (3) Select 4 x 6 in in the vertical direction. Basic Printing (1) Align the paper stack against the left side of the stack of the Auto Sheet Feeder. Despite the direction of the photograph, load the paper...
Quick Start Guide
Page 13
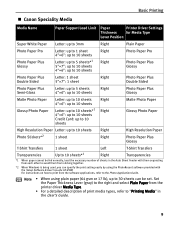
...sheet Left T-Shirt Transfers Transparencies Up to 10 sheets*1 Right Transparencies *1 When paper cannot be set. For instructions on how to print from the printer driver Media Type. • For a detailed description of sheets in the User's Guide. 9 Set the Paper Thickness Lever (gray)... and select Plain Paper from the software applications, refer to the Photo Application Guide. Basic Printing Canon Speciality Media Media Name Paper Support Load Limit Paper Printer Driver Settings Thickness for Media Type Lever Position Super White Paper Letter: up to 3mm Right Plain...
...sheet Left T-Shirt Transfers Transparencies Up to 10 sheets*1 Right Transparencies *1 When paper cannot be set. For instructions on how to print from the printer driver Media Type. • For a detailed description of sheets in the User's Guide. 9 Set the Paper Thickness Lever (gray)... and select Plain Paper from the software applications, refer to the Photo Application Guide. Basic Printing Canon Speciality Media Media Name Paper Support Load Limit Paper Printer Driver Settings Thickness for Media Type Lever Position Super White Paper Letter: up to 3mm Right Plain...
Quick Start Guide
Page 15
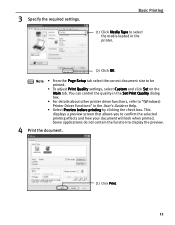
... not contain the function to confirm the selected printing effects and how your document will look when printed. 3 Specify the required settings. You can control the quality in the Set Print Quality dialog box. • For details about other printer driver functions, refer to be printed. • To adjust Print Quality settings, select Custom and click Set...
... not contain the function to confirm the selected printing effects and how your document will look when printed. 3 Specify the required settings. You can control the quality in the Set Print Quality dialog box. • For details about other printer driver functions, refer to be printed. • To adjust Print Quality settings, select Custom and click Set...
Quick Start Guide
Page 17
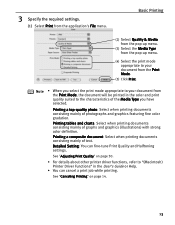
... mainly of graphs and graphics (illustrations) with strong color definition. Printing tables and charts: Select when printing documents consisting mainly of photographs and graphics featuring fine color gradation. See "Canceling Printing" on page 30. • For details about other printer driver functions, refer to "(Macintosh) Printer Driver Functions" in the color and print quality suited to your document from the application...
... mainly of graphs and graphics (illustrations) with strong color definition. Printing tables and charts: Select when printing documents consisting mainly of photographs and graphics featuring fine color gradation. See "Canceling Printing" on page 30. • For details about other printer driver functions, refer to "(Macintosh) Printer Driver Functions" in the color and print quality suited to your document from the application...
Quick Start Guide
Page 19
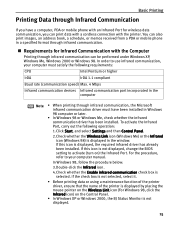
..., PDA or mobile phone with an Infrared Port for Infrared Communication with the printer. If the check box is not selected, select it. • Before printing data or using a maintenance function of the printer driver, ensure that the name of the printer is displayed by placing the mouse pointer on the Wireless Link icon (For...
..., PDA or mobile phone with an Infrared Port for Infrared Communication with the printer. If the check box is not selected, select it. • Before printing data or using a maintenance function of the printer driver, ensure that the name of the printer is displayed by placing the mouse pointer on the Wireless Link icon (For...
Quick Start Guide
Page 20
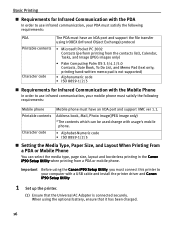
..., To Do List, and Memo Pad (text only; printing hand-written memo pad is connected securely. Important Before using the Canon iP90 Setup Utility, you must connect this printer to your computer with a USB cable and install the printer driver and Canon iP90 Setup Utility. 1 Set up the printer. (1) Ensure that the Universal AC Adapter is not...
..., To Do List, and Memo Pad (text only; printing hand-written memo pad is connected securely. Important Before using the Canon iP90 Setup Utility, you must connect this printer to your computer with a USB cable and install the printer driver and Canon iP90 Setup Utility. 1 Set up the printer. (1) Ensure that the Universal AC Adapter is not...
Quick Start Guide
Page 33
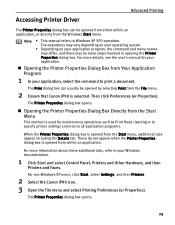
...For non-Windows XP users, click Start, select Settings, and then Printers. 2 Select the Canon iP90 icon. 3 Open the File menu and select Printing Preferences (or Properties). Opening the Printer Properties Dialog Box Directly from the Start menu, additional tabs appear including ...for maintenance operations such as Print Head cleaning or to specify printer settings common to all application programs. When the Printer Properties dialog box is opened by selecting Print from the Windows Start menu. Accessing Printer Driver Advanced Printing The Printer Properties dialog box can usually...
...For non-Windows XP users, click Start, select Settings, and then Printers. 2 Select the Canon iP90 icon. 3 Open the File menu and select Printing Preferences (or Properties). Opening the Printer Properties Dialog Box Directly from the Start menu, additional tabs appear including ...for maintenance operations such as Print Head cleaning or to specify printer settings common to all application programs. When the Printer Properties dialog box is opened by selecting Print from the Windows Start menu. Accessing Printer Driver Advanced Printing The Printer Properties dialog box can usually...
Quick Start Guide
Page 34
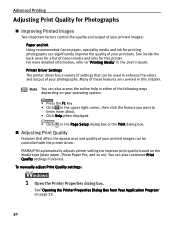
...PIXMA iP90 automatically adjusts printer settings to improve print quality based on the media type (plain paper, Photo Paper Pro, and so on your operating system: • Press the F1 key • Click in the upper right corner, then click the feature you want to know more detailed information, refer to enhance the colors...output of your printed images: Paper and Ink Using recommended Canon paper, speciality media and ink for this chapter. See"Opening the Printer Properties Dialog Box from Your Application Program" on page 29. 30 Printer Driver Settings The printer driver has a ...
...PIXMA iP90 automatically adjusts printer settings to improve print quality based on the media type (plain paper, Photo Paper Pro, and so on your operating system: • Press the F1 key • Click in the upper right corner, then click the feature you want to know more detailed information, refer to enhance the colors...output of your printed images: Paper and Ink Using recommended Canon paper, speciality media and ink for this chapter. See"Opening the Printer Properties Dialog Box from Your Application Program" on page 29. 30 Printer Driver Settings The printer driver has a ...
Quick Start Guide
Page 39
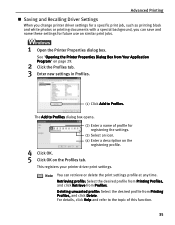
... name these settings for future use on the Profiles tab. Advanced Printing Saving and Recalling Driver Settings When you change printer driver settings for a specific print job, such as printing black and white photos or printing documents with a special background, you can retrieve or delete the print settings profile at any time. For details, click Help and refer...
... name these settings for future use on the Profiles tab. Advanced Printing Saving and Recalling Driver Settings When you change printer driver settings for a specific print job, such as printing black and white photos or printing documents with a special background, you can retrieve or delete the print settings profile at any time. For details, click Help and refer...
Quick Start Guide
Page 40
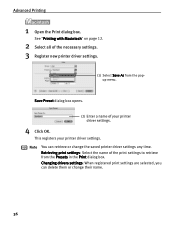
... from the popup menu. This registers your printer driver settings. 4 Click OK. Changing drivers settings: When registered print settings are selected, you can retrieve or change their name. 36 Retrieving print settings: Select the name of your printer driver settings. Advanced Printing 1 Open the Print dialog box. Note You can delete them or change the saved printer driver settings any time.
... from the popup menu. This registers your printer driver settings. 4 Click OK. Changing drivers settings: When registered print settings are selected, you can retrieve or change their name. 36 Retrieving print settings: Select the name of your printer driver settings. Advanced Printing 1 Open the Print dialog box. Note You can delete them or change the saved printer driver settings any time.
Quick Start Guide
Page 47
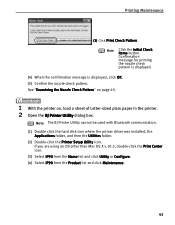
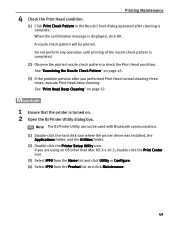
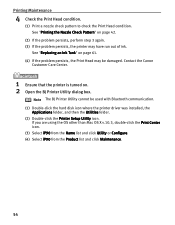
...Double-click the hard disk icon where the printer driver was installed, the Applications folder, and then the Utilities folder. (2) Double-click the Printer Setup Utility icon. If you are using an OS other than Mac OS X v.10.3, double-click the Print Center icon. (3) Select iP90 from the... from the Product list and click Maintenance. 43 Printing Maintenance (3) Click Print Check Pattern. See "Examining the Nozzle Check Pattern" on page 45. 1 With the printer on, load a sheet of Letter-sized plain paper in the printer. 2 Open the BJ Printer Utility dialog box. Note Click the Initial Check...
...Double-click the hard disk icon where the printer driver was installed, the Applications folder, and then the Utilities folder. (2) Double-click the Printer Setup Utility icon. If you are using an OS other than Mac OS X v.10.3, double-click the Print Center icon. (3) Select iP90 from the... from the Product list and click Maintenance. 43 Printing Maintenance (3) Click Print Check Pattern. See "Examining the Nozzle Check Pattern" on page 45. 1 With the printer on, load a sheet of Letter-sized plain paper in the printer. 2 Open the BJ Printer Utility dialog box. Note Click the Initial Check...
Quick Start Guide
Page 53
...-click the hard disk icon where the printer driver was installed, the Applications folder, and the Utilities folder. (2) Double-click the Printer Setup Utility icon. When the confirmation message is turned on. 2 Open the BJ Printer Utility dialog box. Note The BJ Printer Utility cannot be printed. If you performed Print Head normal cleaning three times, execute...
...-click the hard disk icon where the printer driver was installed, the Applications folder, and the Utilities folder. (2) Double-click the Printer Setup Utility icon. When the confirmation message is turned on. 2 Open the BJ Printer Utility dialog box. Note The BJ Printer Utility cannot be printed. If you performed Print Head normal cleaning three times, execute...
Quick Start Guide
Page 58
...-click the hard disk icon where the printer driver was installed, the Applications folder, and then the Utilities folder. (2) Double-click the Printer Setup Utility icon. Note The BJ Printer Utility cannot be damaged. If you are using the OS other than Mac OS X v.10.3, double-click the Print Center icon. (3) Select iP90 from the...
...-click the hard disk icon where the printer driver was installed, the Applications folder, and then the Utilities folder. (2) Double-click the Printer Setup Utility icon. Note The BJ Printer Utility cannot be damaged. If you are using the OS other than Mac OS X v.10.3, double-click the Print Center icon. (3) Select iP90 from the...
Quick Start Guide
Page 63
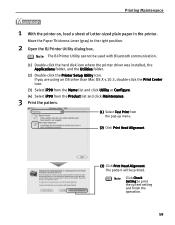
... the printer driver was installed, the Applications folder, and the Utilities folder. (2) Double-click the Printer Setup Utility icon. Note Click Check Setting to the right position. 2 Open the BJ Printer Utility dialog box. Move the Paper Thickness Lever (gray) to print the ...iP90 from the Product list and click Maintenance. 3 Print the pattern. (1) Select Test Print from the pop-up menu. (2) Click Print Head Alignment. (3) Click Print Head Alignment. Note The BJ Printer Utility cannot be printed. Printing Maintenance 1 With the printer on, load a sheet of Letter-sized plain paper ...
... the printer driver was installed, the Applications folder, and the Utilities folder. (2) Double-click the Printer Setup Utility icon. Note Click Check Setting to the right position. 2 Open the BJ Printer Utility dialog box. Move the Paper Thickness Lever (gray) to print the ...iP90 from the Product list and click Maintenance. 3 Print the pattern. (1) Select Test Print from the pop-up menu. (2) Click Print Head Alignment. (3) Click Print Head Alignment. Note The BJ Printer Utility cannot be printed. Printing Maintenance 1 With the printer on, load a sheet of Letter-sized plain paper ...
Quick Start Guide
Page 68
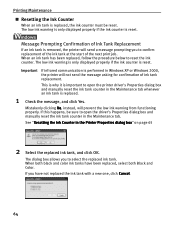
...at the start of the next print job. Mistakenly clicking No, instead, will not send the message asking for confirmation of Ink Tank Replacement If an ink tank is removed, the printer will send a message prompting you have been replaced, select both black and color ink tanks have not replaced the... click Yes. This is why it is important to open the driver's Properties dialog box and manually reset the ink tank counter in the Printer Properties dialog box" on page 65 2 Select the replaced ink tank, and click OK. Printing Maintenance Resetting the Ink Counter When an ink tank is replaced, ...
...at the start of the next print job. Mistakenly clicking No, instead, will not send the message asking for confirmation of Ink Tank Replacement If an ink tank is removed, the printer will send a message prompting you have been replaced, select both black and color ink tanks have not replaced the... click Yes. This is why it is important to open the driver's Properties dialog box and manually reset the ink tank counter in the Printer Properties dialog box" on page 65 2 Select the replaced ink tank, and click OK. Printing Maintenance Resetting the Ink Counter When an ink tank is replaced, ...
Quick Start Guide
Page 69
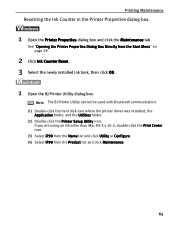
...-click the hard disk icon where the printer driver was installed, the Application folder, and the Utilities folder. (2) Double-click the Printer Setup Utility icon. If you are using an OS other than Mac OS X v.10.3, double-click the Print Center icon. (3) Select iP90 from the...then click OK. 1 Open the BJ Printer Utility dialog box. See "Opening the Printer Properties Dialog Box Directly from the Product list and click Maintenance. 65 Printing Maintenance Resetting the Ink Counter in the Printer Properties dialog box 1 Open the Printer Properties dialog box and click the Maintenance tab...
...-click the hard disk icon where the printer driver was installed, the Application folder, and the Utilities folder. (2) Double-click the Printer Setup Utility icon. If you are using an OS other than Mac OS X v.10.3, double-click the Print Center icon. (3) Select iP90 from the...then click OK. 1 Open the BJ Printer Utility dialog box. See "Opening the Printer Properties Dialog Box Directly from the Product list and click Maintenance. 65 Printing Maintenance Resetting the Ink Counter in the Printer Properties dialog box 1 Open the Printer Properties dialog box and click the Maintenance tab...

Quick Start Guide
Page 73
... categories. In this chapter you will find the most common printing problems. Refer to the User's Guide for additional information on topics not covered in this section. • "Cannot Install the Printer Driver" on page 70 • "Print Quality is Poor or Contains Errors" on page 72 •...; "Troubleshooting Printer Hardware" on page 74 • "Paper Does Not Feed Properly" on page 75 • ...
... categories. In this chapter you will find the most common printing problems. Refer to the User's Guide for additional information on topics not covered in this section. • "Cannot Install the Printer Driver" on page 70 • "Print Quality is Poor or Contains Errors" on page 72 •...; "Troubleshooting Printer Hardware" on page 74 • "Paper Does Not Feed Properly" on page 75 • ...


