
Quick Start Guide
Page 7
If the power plug is removed from the wall outlet with the POWER lamp lit or blinking, the printer cannot protect its print heads and may be sure to print. 3 When the POWER lamp stops blinking, the printer is not lit. Turning off the Printer 1 To turn off . Basic Printing About the Power Plug When removing the power plug after turing off the printer, be unable to check that the POWER lamp is turned off the printer, press the POWER button.
If the power plug is removed from the wall outlet with the POWER lamp lit or blinking, the printer cannot protect its print heads and may be sure to print. 3 When the POWER lamp stops blinking, the printer is not lit. Turning off the Printer 1 To turn off . Basic Printing About the Power Plug When removing the power plug after turing off the printer, be unable to check that the POWER lamp is turned off the printer, press the POWER button.

Quick Start Guide
Page 35
...appear despite sufficient ink levels, see "When Printing Becomes Faint or Colors are necessary to install the ink thanks in the open. Color ink is specified. When you start printing after replacing the ink tank, the printer executes Print Head Cleaning automatically. Color ink consumption may not operate properly if it ... Photo Magenta, Magenta, Yellow. Printing Maintenance Printing Maintenance Replacing an Ink Tank Replace ink tank(s) if they are out of its first use an ink tank within six months of ink. Once an ink tank has been used, do not remove it out in the correct order...
...appear despite sufficient ink levels, see "When Printing Becomes Faint or Colors are necessary to install the ink thanks in the open. Color ink is specified. When you start printing after replacing the ink tank, the printer executes Print Head Cleaning automatically. Color ink consumption may not operate properly if it ... Photo Magenta, Magenta, Yellow. Printing Maintenance Printing Maintenance Replacing an Ink Tank Replace ink tank(s) if they are out of its first use an ink tank within six months of ink. Once an ink tank has been used, do not remove it out in the correct order...
Quick Start Guide
Page 40
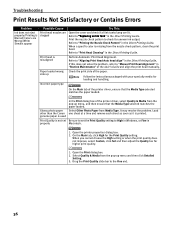
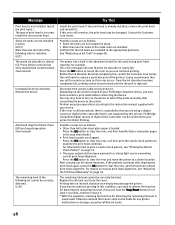
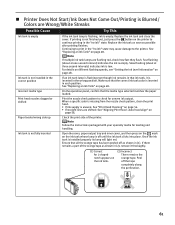
...It may resolve the problem. Open the printer properties dialog box. 2. Load one sheet at a time and remove each sheet as soon as it is misaligned Perform Automatic Print Head Alignment. When a specific color is not set Be sure to set the Print Quality setting to "Replacing an Ink Tank... nozzle check pattern, clean the print head. Paper loaded wrong side up Check the print side of the User's Guide and align the print head manually. Glossy photo paper other than the Canon genuine paper is Blurred/Colors are Wrong/White Streaks appear Print head nozzles are clogged Open the cover...
...It may resolve the problem. Open the printer properties dialog box. 2. Load one sheet at a time and remove each sheet as soon as it is misaligned Perform Automatic Print Head Alignment. When a specific color is not set Be sure to set the Print Quality setting to "Replacing an Ink Tank... nozzle check pattern, clean the print head. Paper loaded wrong side up Check the print side of the User's Guide and align the print head manually. Glossy photo paper other than the Canon genuine paper is Blurred/Colors are Wrong/White Streaks appear Print head nozzles are clogged Open the cover...

Quick Start Guide
Page 53
Choosing a location Power supply Do not install the printer in the country where you purchased the printer. Never remove the plug by pulling on a Print Head after printing. Do not place metal objects (paper clips, staples, etc.) or containers of flammable solvents (alcohol, thinners, etc.) on a thick rug or carpet. If a child ingests ...
Choosing a location Power supply Do not install the printer in the country where you purchased the printer. Never remove the plug by pulling on a Print Head after printing. Do not place metal objects (paper clips, staples, etc.) or containers of flammable solvents (alcohol, thinners, etc.) on a thick rug or carpet. If a child ingests ...

Easy Setup Instructions
Page 1
... the print head. 1 Unpack the Printer 2 Prepare the Printer Start Here Easy Setup Instructions 3 Install the Print Head 4 Install the Ink Tanks Series Photo Printer 5 Align the Print Head 1 Carefully remove all items from its lamp lights red. PIXMA iP6700D Photo Printer Documentation and Software Kit 1 Before turning on the printer, open it. CAUTION: Be sure to the color guide on print quality. The printer will perform a print head...
... the print head. 1 Unpack the Printer 2 Prepare the Printer Start Here Easy Setup Instructions 3 Install the Print Head 4 Install the Ink Tanks Series Photo Printer 5 Align the Print Head 1 Carefully remove all items from its lamp lights red. PIXMA iP6700D Photo Printer Documentation and Software Kit 1 Before turning on the printer, open it. CAUTION: Be sure to the color guide on print quality. The printer will perform a print head...
Direct Printing Guide
Page 51
..., the message is opened more than ten minutes, the print head holder moves to cancel printing. If you continue printing with the ink tanks installed. • Press the Stop/Reset button to the right side. The print head holder moves to Replace Ink Tank If an ink tank needs replacing, the Alarm lamp lights. ... not finished, you will need to press the OK button with an empty ink tank, it may damage the printer. *Printing does not resume if any of the ink tanks are removed. Confirm the message displayed on . 2 Put your fingers in the notches in either side of ink, replace them using ...
..., the message is opened more than ten minutes, the print head holder moves to cancel printing. If you continue printing with the ink tanks installed. • Press the Stop/Reset button to the right side. The print head holder moves to Replace Ink Tank If an ink tank needs replacing, the Alarm lamp lights. ... not finished, you will need to press the OK button with an empty ink tank, it may damage the printer. *Printing does not resume if any of the ink tanks are removed. Confirm the message displayed on . 2 Put your fingers in the notches in either side of ink, replace them using ...
Direct Printing Guide
Page 52
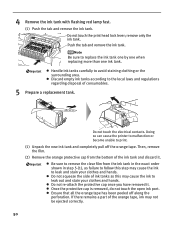
Do not touch the print head lock lever; Push the tab and remove the ink tank. Then, remove the film. (2) Remove the orange protective cap from the ink tank in the exact ...one when replacing more than one ink tank. Do not re-attach the protective cap once you have removed it . Do not squeeze the side of the orange tape, ink may cause the ink to follow ...ejected correctly. 50 Doing so can cause the printer to malfunction or become unable to remove the clear film from the bottom of consumables. 5. remove only the ink tank. Be sure to print. (1) Unpack the new ink tank and completely...
Do not touch the print head lock lever; Push the tab and remove the ink tank. Then, remove the film. (2) Remove the orange protective cap from the ink tank in the exact ...one when replacing more than one ink tank. Do not re-attach the protective cap once you have removed it . Do not squeeze the side of the orange tape, ink may cause the ink to follow ...ejected correctly. 50 Doing so can cause the printer to malfunction or become unable to remove the clear film from the bottom of consumables. 5. remove only the ink tank. Be sure to print. (1) Unpack the new ink tank and completely...

Direct Printing Guide
Page 53
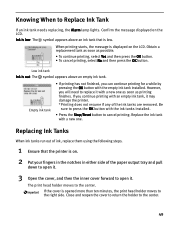
...print head holder moves to dry out and the printer may occur even when black-and-white or grayscale printing is not installed properly. Once an ink tank has been used unless all the ink tanks are installed in the open . The printer cannot be used , do not remove it from the printer...Insert the ink tank in the correct order directed on the mark until the print head cleaning finishes. 51 The Alarm lamp still lights after replacing the ink tank, the printer executes print head cleaning automatically. Color ink consumption may not operate properly when it out in the order directed ...
...print head holder moves to dry out and the printer may occur even when black-and-white or grayscale printing is not installed properly. Once an ink tank has been used unless all the ink tanks are installed in the open . The printer cannot be used , do not remove it from the printer...Insert the ink tank in the correct order directed on the mark until the print head cleaning finishes. 51 The Alarm lamp still lights after replacing the ink tank, the printer executes print head cleaning automatically. Color ink consumption may not operate properly when it out in the order directed ...
Direct Printing Guide
Page 60
... are as follows: • Some ink tanks are not installed in this printer. Possible causes are using a digital camera or digital video camcorder that the ink absorber is already installed, remove the print head and reinstall it . Replace the ink tank and close the cover. Press ...your device. Press [OK] to clear the error, and then perform manual print head alignment. Install the print head./ The type of the following color is not installed. Once the ink absorber becomes completely full, printing cannot be correctly detected. After carrying out the above measures, if the problem...
... are as follows: • Some ink tanks are not installed in this printer. Possible causes are using a digital camera or digital video camcorder that the ink absorber is already installed, remove the print head and reinstall it . Replace the ink tank and close the cover. Press ...your device. Press [OK] to clear the error, and then perform manual print head alignment. Install the print head./ The type of the following color is not installed. Once the ink absorber becomes completely full, printing cannot be correctly detected. After carrying out the above measures, if the problem...
Direct Printing Guide
Page 63
...been peeled off the tape completely along the perforation. 61 Check the print side of the orange tape as shown in the wrong position. If there remains a part of the printer. If printing is inserted in (2), remove it is not finished yet, just press the OK button on the... (1) Correct An L shaped notch appears on the printer to continue printing in the "no ink" state may cause damage to the printer. When a specific color is missing from the nozzle check pattern, clean the print head. • If ink supply is uneven: See "Print Head Cleaning" on the ink tank whose lamp is low...
...been peeled off the tape completely along the perforation. 61 Check the print side of the orange tape as shown in the wrong position. If there remains a part of the printer. If printing is inserted in (2), remove it is not finished yet, just press the OK button on the... (1) Correct An L shaped notch appears on the printer to continue printing in the "no ink" state may cause damage to the printer. When a specific color is missing from the nozzle check pattern, clean the print head. • If ink supply is uneven: See "Print Head Cleaning" on the ink tank whose lamp is low...

Direct Printing Guide
Page 70
... resume printing. If the printer is replaced, you cannot clear the error on your camera. Remove the jammed paper, load new paper, and press the OK button on page 57. Contact the Customer Care Center. You can continue printing for example. If the print head has already been installed, remove the print head and reinstall it . However, because printing is...
... resume printing. If the printer is replaced, you cannot clear the error on your camera. Remove the jammed paper, load new paper, and press the OK button on page 57. Contact the Customer Care Center. You can continue printing for example. If the print head has already been installed, remove the print head and reinstall it . However, because printing is...
Direct Printing Guide
Page 72
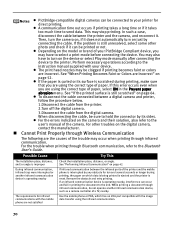
...connected between the printer and the camera, and reconnect it does not automatically turn on which has an IrDA port compatible with your device. Cannot Print Properly through Wireless Communication The following are incorrect. Remove the obstacle and retry printing. While printing a document through...digital camera and printer, follow the procedure below. 1.Disconnect the cable from the printer. 2.Turn off the digital camera. 3.Disconnect the cable from the digital camera. If the problem is reset. The print head nozzles may be clogged if printing becomes faint or colors are the ...
...connected between the printer and the camera, and reconnect it does not automatically turn on which has an IrDA port compatible with your device. Cannot Print Properly through Wireless Communication The following are incorrect. Remove the obstacle and retry printing. While printing a document through...digital camera and printer, follow the procedure below. 1.Disconnect the cable from the printer. 2.Turn off the digital camera. 3.Disconnect the cable from the digital camera. If the problem is reset. The print head nozzles may be clogged if printing becomes faint or colors are the ...


