
Quick Start Guide
Page 7
Turning off the Printer 1 To turn off . Basic Printing About the Power Plug When removing the power plug after turing off the printer, be unable to check that the POWER lamp is turned off the printer, press the POWER button. When the POWER lamp stops blinking, the printer is not lit. If the power plug is removed from the wall outlet with the POWER lamp lit or blinking, the printer cannot protect its print heads and may be sure to print. 3
Turning off the Printer 1 To turn off . Basic Printing About the Power Plug When removing the power plug after turing off the printer, be unable to check that the POWER lamp is turned off the printer, press the POWER button. When the POWER lamp stops blinking, the printer is not lit. If the power plug is removed from the wall outlet with the POWER lamp lit or blinking, the printer cannot protect its print heads and may be sure to print. 3

Quick Start Guide
Page 35
... if it out in the correct order. Color ink is specified. For details, refer to dry out and the printer may occur even when black-and-white or grayscale printing is consumed in the Direct Printing Guide. When you start printing after replacing the ink tank, the printer executes Print Head Cleaning automatically. When replacing them, check the...
... if it out in the correct order. Color ink is specified. For details, refer to dry out and the printer may occur even when black-and-white or grayscale printing is consumed in the Direct Printing Guide. When you start printing after replacing the ink tank, the printer executes Print Head Cleaning automatically. When replacing them, check the...

Quick Start Guide
Page 36
...is inserted in the Direct Printing Guide. Make sure that the correct ink tank color is peeled off the ink tank. Refer to "Aligning Print Head-Auto head align" in the Direct Printing Guide. Contact the Customer Care...Printing Maintenance When Printing Becomes Faint or Colors are Incorrect When printing becomes faint or colors are incorrect, even if ink remains in each position. Make sure that all the ink tank lamps are lit. Increase the Print Quality setting in the printer driver settings. Before printing the nozzle check pattern or cleaning the Print Head...
...is inserted in the Direct Printing Guide. Make sure that the correct ink tank color is peeled off the ink tank. Refer to "Aligning Print Head-Auto head align" in the Direct Printing Guide. Contact the Customer Care...Printing Maintenance When Printing Becomes Faint or Colors are Incorrect When printing becomes faint or colors are incorrect, even if ink remains in each position. Make sure that all the ink tank lamps are lit. Increase the Print Quality setting in the printer driver settings. Before printing the nozzle check pattern or cleaning the Print Head...
Quick Start Guide
Page 40
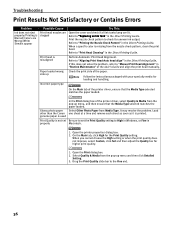
...Canon genuine paper is missing from the pop-up menu, and then ensure that the Media Type selected matches the paper loaded. Select Other Photo Paper from the pop-up Check the print side of the printer driver, select Quality & Media from the nozzle check pattern, clean the print head... the print head manually. Select Quality & Media from Media Type. Print head is printed. It may resolve the problem. Follow the instructions packaged with your specialty media for higher print quality. 1. Print Quality is Blurred/Colors are Wrong/White Streaks appear Print head nozzles are...
...Canon genuine paper is missing from the pop-up menu, and then ensure that the Media Type selected matches the paper loaded. Select Other Photo Paper from the pop-up Check the print side of the printer driver, select Quality & Media from the nozzle check pattern, clean the print head... the print head manually. Select Quality & Media from Media Type. Print head is printed. It may resolve the problem. Follow the instructions packaged with your specialty media for higher print quality. 1. Print Quality is Blurred/Colors are Wrong/White Streaks appear Print head nozzles are...

Quick Start Guide
Page 41
...When you are printing on page 4. Printed Surface is Scratched/Back of the Direct Printing Guide. Ensure that the paper you are using Borderless Printing. Refer to "Aligning Print Head-Auto head align" in deep color that the Media Type selected matches the paper loaded. Refer to "Back of the printer driver, select ... tab, click High for higher print quality. Check to print photos or pictures in the Direct Printing Guide. Paper feed roller is dirty, printed paper may occur at the top and bottom edges of the printer. Use photo paper such as Canon's Photo Paper Pro to see if...
...When you are printing on page 4. Printed Surface is Scratched/Back of the Direct Printing Guide. Ensure that the paper you are using Borderless Printing. Refer to "Aligning Print Head-Auto head align" in deep color that the Media Type selected matches the paper loaded. Refer to "Back of the printer driver, select ... tab, click High for higher print quality. Check to print photos or pictures in the Direct Printing Guide. Paper feed roller is dirty, printed paper may occur at the top and bottom edges of the printer. Use photo paper such as Canon's Photo Paper Pro to see if...

Quick Start Guide
Page 42
...mm/0.08 to 0.2 inches*2. Select Custom Settings from Custom Settings in the Canon IJ Printer Utility dialog box (Macintosh), the setting is also applied under direct printing with a non-printing regular paper to paper curl as follows. 1. Click OK when the ...print the curl-corrected paper one sheet at a time. *1 *2 38 Open the Canon IJ Printer Utility dialog box. 2. Check the printing paper if paper is curled 1. It is complete, and then click Send. 1. Clear the Prevent paper abrasion check box once printing is recommended to widen the clearance between the Print Head...
...mm/0.08 to 0.2 inches*2. Select Custom Settings from Custom Settings in the Canon IJ Printer Utility dialog box (Macintosh), the setting is also applied under direct printing with a non-printing regular paper to paper curl as follows. 1. Click OK when the ...print the curl-corrected paper one sheet at a time. *1 *2 38 Open the Canon IJ Printer Utility dialog box. 2. Check the printing paper if paper is curled 1. It is complete, and then click Send. 1. Clear the Prevent paper abrasion check box once printing is recommended to widen the clearance between the Print Head...
Quick Start Guide
Page 47
... LCD" in the Direct Printing Guide. Select Print and Fax Preferences from the Printer pop-up menu, do the following to confirm the printer settings: 1. If iP6700D is not displayed in the screen displayed in step 2, click Add(+) to hold the ink used during print head cleaning, for a while.... Disconnect the camera cable, and reconnect it directly to the computer and try printing again. Perform necessary ...
... LCD" in the Direct Printing Guide. Select Print and Fax Preferences from the Printer pop-up menu, do the following to confirm the printer settings: 1. If iP6700D is not displayed in the screen displayed in step 2, click Add(+) to hold the ink used during print head cleaning, for a while.... Disconnect the camera cable, and reconnect it directly to the computer and try printing again. Perform necessary ...
Quick Start Guide
Page 49
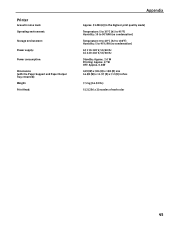
Printer Acoustic noise level: Operating environment: Storage environment: Power supply: Power consumption: Dimensions (with the Paper Support and Paper Output Tray retracted): Weight: Print Head: Appendix Approx. 35 dB (A) (in the highest print quality mode) Temperature: 5 to 35°C (41 to 95°F) Humidity: 10 to 90%RH (no ... to 104°F) Humidity: 5 to 95% RH (no condensation) AC 110-120 V, 50/60 Hz AC 220-240 V, 50/60 Hz Standby: Approx. 2.0 W Printing: Approx. 17 W OFF: Approx. 0.8 W 429 (W) x 304 (D) x 183 (H) mm 16.89 (W) x 11.97 (D) x 7.2 (H) inches 7.5 kg (16.50 lb.) 512 (...
Printer Acoustic noise level: Operating environment: Storage environment: Power supply: Power consumption: Dimensions (with the Paper Support and Paper Output Tray retracted): Weight: Print Head: Appendix Approx. 35 dB (A) (in the highest print quality mode) Temperature: 5 to 35°C (41 to 95°F) Humidity: 10 to 90%RH (no ... to 104°F) Humidity: 5 to 95% RH (no condensation) AC 110-120 V, 50/60 Hz AC 220-240 V, 50/60 Hz Standby: Approx. 2.0 W Printing: Approx. 17 W OFF: Approx. 0.8 W 429 (W) x 304 (D) x 183 (H) mm 16.89 (W) x 11.97 (D) x 7.2 (H) inches 7.5 kg (16.50 lb.) 512 (...

Quick Start Guide
Page 53
... Working around the power outlet is unstable or subject to a heating source. Print heads and ink tanks For safety reasons store Print Heads and ink tanks out of the reach of fire or electric shocks, install the printer in direct sunlight, outdoors, or close to excessive vibration. Do not install ...slant, vertically or upside-down, as the ink may leak and damage the printer. Do not shake Print Heads or ink tanks. To avoid the risk of small children. Never remove the plug by pulling on a Print Head after printing. Do not place any ink, consult a doctor immediately. Do not transport or...
... Working around the power outlet is unstable or subject to a heating source. Print heads and ink tanks For safety reasons store Print Heads and ink tanks out of the reach of fire or electric shocks, install the printer in direct sunlight, outdoors, or close to excessive vibration. Do not install ...slant, vertically or upside-down, as the ink may leak and damage the printer. Do not shake Print Heads or ink tanks. To avoid the risk of small children. Never remove the plug by pulling on a Print Head after printing. Do not place any ink, consult a doctor immediately. Do not transport or...
Quick Start Guide
Page 57
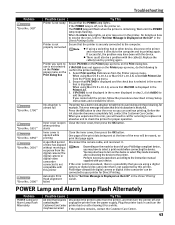
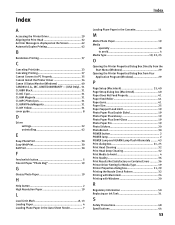
... Plus Semi-Gloss 19 Photo Paper Pro 19 Photo Stickers 20 PhotoRecord 30 POWER button 2 POWER lamp 2 POWER Lamp and ALARM Lamp Flash Alternately ......... 43 Print dialog box 21, 25 Print Head Cleaning 32 Print Head Deep Cleaning 32 Print Media to PC Properly 35 Cannot Install the Printer Driver 34 Canon IJ Status Monitor (Windows 40...
... Plus Semi-Gloss 19 Photo Paper Pro 19 Photo Stickers 20 PhotoRecord 30 POWER button 2 POWER lamp 2 POWER Lamp and ALARM Lamp Flash Alternately ......... 43 Print dialog box 21, 25 Print Head Cleaning 32 Print Head Deep Cleaning 32 Print Media to PC Properly 35 Cannot Install the Printer Driver 34 Canon IJ Status Monitor (Windows 40...

Easy Setup Instructions
Page 1
...the OK button to the left. Refer to the next step. Go to the color guide on the LCD" in the Direct Printing Guide. The pattern is aligned automatically. And the print head is printed. Press [OK] and repeat operation. You will need this to "An Error Message...print head alignment cannot be displayed is subject to the right. Refer to register your fingers in the notches in the Direct Printing Guide. •If you want to "An unintended language is left edge of blank paper into the auto sheet feeder, align the paper with Step 6 on the LCD. PIXMA iP6700D Photo Printer...
...the OK button to the left. Refer to the next step. Go to the color guide on the LCD" in the Direct Printing Guide. The pattern is aligned automatically. And the print head is printed. Press [OK] and repeat operation. You will need this to "An Error Message...print head alignment cannot be displayed is subject to the right. Refer to register your fingers in the notches in the Direct Printing Guide. •If you want to "An unintended language is left edge of blank paper into the auto sheet feeder, align the paper with Step 6 on the LCD. PIXMA iP6700D Photo Printer...
Direct Printing Guide
Page 4
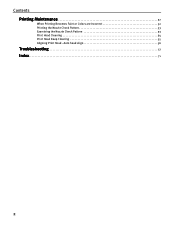
Auto head align 56 Troubleshooting 57 Index 71 2 Contents Printing Maintenance 52 When Printing Becomes Faint or Colors are Incorrect 52 Printing the Nozzle Check Pattern 53 Examining the Nozzle Check Pattern 53 Print Head Cleaning 54 Print Head Deep Cleaning 55 Aligning Print Head -
Auto head align 56 Troubleshooting 57 Index 71 2 Contents Printing Maintenance 52 When Printing Becomes Faint or Colors are Incorrect 52 Printing the Nozzle Check Pattern 53 Examining the Nozzle Check Pattern 53 Print Head Cleaning 54 Print Head Deep Cleaning 55 Aligning Print Head -

Direct Printing Guide
Page 8
... photo information on the margin of paper. Cleaning Cleans the print head when nozzles are clogged. See "Aligning Print Head - Head alignment print See "Aligning Print Head - Sticker print" on the Canon Photo Stickers. Color balance Prints nine color balance sample photos on page 31. Color balance" on the digital camera. DPOF print Prints photos according to ensure that ink is output correctly, or that the...
... photo information on the margin of paper. Cleaning Cleans the print head when nozzles are clogged. See "Aligning Print Head - Head alignment print See "Aligning Print Head - Sticker print" on the Canon Photo Stickers. Color balance Prints nine color balance sample photos on page 31. Color balance" on the digital camera. DPOF print Prints photos according to ensure that ink is output correctly, or that the...

Direct Printing Guide
Page 36
... or Image quality: High and then press the OK button. Slide show setting You can reset all settings, other than the display language and the print head position, to the initial state. (1) Use the buttons to select Reset setting and then press the OK button. (2) Use the buttons to select Yes and...
... or Image quality: High and then press the OK button. Slide show setting You can reset all settings, other than the display language and the print head position, to the initial state. (1) Use the buttons to select Reset setting and then press the OK button. (2) Use the buttons to select Yes and...
Direct Printing Guide
Page 51
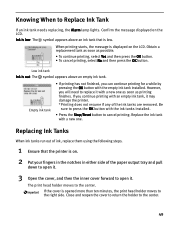
... button. If the cover is displayed on the LCD. When printing starts, the message is opened more than ten minutes, the print head holder moves to the right side. Replace the ink tank with an empty ink tank, it may damage the printer. *Printing does not resume if any of the ink tanks are removed... ink tank. Low ink tank Ink is out: The symbol appears above an ink tank that the printer is low. If you will need to open it with the empty ink tank installed. The print head holder moves to the center. 49 Be sure to press the OK button with the ink tanks...
... button. If the cover is displayed on the LCD. When printing starts, the message is opened more than ten minutes, the print head holder moves to the right side. Replace the ink tank with an empty ink tank, it may damage the printer. *Printing does not resume if any of the ink tanks are removed... ink tank. Low ink tank Ink is out: The symbol appears above an ink tank that the printer is low. If you will need to open it with the empty ink tank installed. The print head holder moves to the center. 49 Be sure to press the OK button with the ink tanks...
Direct Printing Guide
Page 52
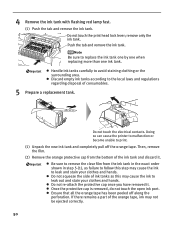
... laws and regulations regarding disposal of ink tanks as failure to follow this may cause the ink to print. (1) Unpack the new ink tank and completely pull off along the perforation. Do not touch the ... is removed, do not touch the open ink port. remove only the ink tank. Do not touch the print head lock lever; Push the tab and remove the ink tank. 4 Remove the ink tank with flashing red lamp... ink tank one by one when replacing more than one ink tank. Doing so can cause the printer to malfunction or become unable to leak and stain your clothes and hands. Ensure that all the ...
... laws and regulations regarding disposal of ink tanks as failure to follow this may cause the ink to print. (1) Unpack the new ink tank and completely pull off along the perforation. Do not touch the ... is removed, do not touch the open ink port. remove only the ink tank. Do not touch the print head lock lever; Push the tab and remove the ink tank. 4 Remove the ink tank with flashing red lamp... ink tank one by one when replacing more than one ink tank. Doing so can cause the printer to malfunction or become unable to leak and stain your clothes and hands. Ensure that all the ...

Direct Printing Guide
Page 53
... Ensure that the ink tanks are necessary to maintain the printer. 6 Install the ink tank. Ensure that the ink tank lamp lights red. Ensure that all the ink tanks are installed in the print head holder. (2) Press on the label. Color ink consumption may not operate properly when it out in the... order directed by the label. Color ink is open . The printer cannot be used , do not remove it from the printer and leave it is closed if ...
... Ensure that the ink tanks are necessary to maintain the printer. 6 Install the ink tank. Ensure that the ink tank lamp lights red. Ensure that all the ink tanks are installed in the print head holder. (2) Press on the label. Color ink consumption may not operate properly when it out in the... order directed by the label. Color ink is open . The printer cannot be used , do not remove it from the printer and leave it is closed if ...

Direct Printing Guide
Page 54
... remains in each position. Make sure that the correct ink tank color is inserted in the wrong position. Before printing the nozzle check pattern or cleaning the print head, check the following; If the ruled lines are shifted after performing print head cleaning twice Step3 "Print Head Deep Cleaning" on page 54 If the problem remains after running...
... remains in each position. Make sure that the correct ink tank color is inserted in the wrong position. Before printing the nozzle check pattern or cleaning the print head, check the following; If the ruled lines are shifted after performing print head cleaning twice Step3 "Print Head Deep Cleaning" on page 54 If the problem remains after running...
Direct Printing Guide
Page 55
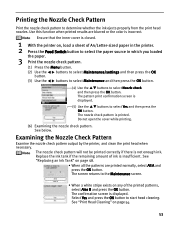
... exists on page 48. • When all the patterns are blurred or the color is incorrect. See below. Examining the Nozzle Check Pattern Examine the nozzle check pattern output by the printer, and clean the print head when necessary. The pattern print confirmation screen is not enough ink. The screen returns to select the paper...
... exists on page 48. • When all the patterns are blurred or the color is incorrect. See below. Examining the Nozzle Check Pattern Examine the nozzle check pattern output by the printer, and clean the print head when necessary. The pattern print confirmation screen is not enough ink. The screen returns to select the paper...

Direct Printing Guide
Page 56
.... (2) Use the button. If the print quality remains poor, repeat print head cleaning twice. This takes about 30-50 seconds. Print Head Cleaning Clean the print head if missing lines or white stripes appear in the ink absorber. Note that the print head nozzles are clean. Ensure that the inner cover is closed. 1 Ensure that the printer is not printed correctly.
.... (2) Use the button. If the print quality remains poor, repeat print head cleaning twice. This takes about 30-50 seconds. Print Head Cleaning Clean the print head if missing lines or white stripes appear in the ink absorber. Note that the print head nozzles are clean. Ensure that the inner cover is closed. 1 Ensure that the printer is not printed correctly.


