
iP4000 Quick Start Guide
Page 8
...Canon Specialty Media" on page 61. 4 To change the paper source, use with minimal space, you intend to install the printer in the User's Guide. • Continuous printing on a shelf with the printer driver. You can use just the Cassette for printing... location of the printer You can load paper in the Cassette allows you print. See "Aligning the Print Head" on page 14...print without removing and reloading paper. This is convenient if you require. Depending on the size of paper you use or during printer maintenance, you to print on the printer or printer driver. Basic Printing...
...Canon Specialty Media" on page 61. 4 To change the paper source, use with minimal space, you intend to install the printer in the User's Guide. • Continuous printing on a shelf with the printer driver. You can use just the Cassette for printing... location of the printer You can load paper in the Cassette allows you print. See "Aligning the Print Head" on page 14...print without removing and reloading paper. This is convenient if you require. Depending on the size of paper you use or during printer maintenance, you to print on the printer or printer driver. Basic Printing...

iP4000 Quick Start Guide
Page 49
z Discard empty ink tanks according to the center. 3 Remove the empty ink tank. The Print Head Holder moves to the local laws and regulations regarding disposal of the 2 Open the Top Cover, and pull down the Inner Cover forward to replace ... one when replacing more than one ink tank. 45 Push the tab and remove the ink tank. Printing Maintenance „ Replacing Ink Tanks When an ink tank runs out of ink, replace it using the following steps. 1 Ensure that the printer is on, and then push the upper center ( Front Cover to open...
z Discard empty ink tanks according to the center. 3 Remove the empty ink tank. The Print Head Holder moves to the local laws and regulations regarding disposal of the 2 Open the Top Cover, and pull down the Inner Cover forward to replace ... one when replacing more than one ink tank. 45 Push the tab and remove the ink tank. Printing Maintenance „ Replacing Ink Tanks When an ink tank runs out of ink, replace it using the following steps. 1 Ensure that the printer is on, and then push the upper center ( Front Cover to open...
iP4000 Quick Start Guide
Page 51
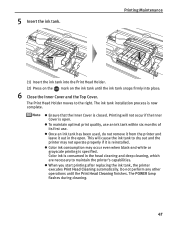
5 Insert the ink tank. z Once an ink tank has been used, do not remove it from the printer and leave it is reinstalled. z When you start printing after replacing the ink tank, the printer executes Print Head Cleaning automatically. The ink tank installation process is specified. z Color ink consumption may not operate properly if it out in...
5 Insert the ink tank. z Once an ink tank has been used, do not remove it from the printer and leave it is reinstalled. z When you start printing after replacing the ink tank, the printer executes Print Head Cleaning automatically. The ink tank installation process is specified. z Color ink consumption may not operate properly if it out in...
iP4000 Quick Start Guide
Page 71
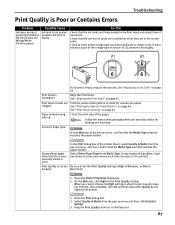
...the orange tape has been peeled off as shown in (2), remove it is printed. If there remains a part of the paper. See "Replacing an Ink Tank" on page 49. Print Head nozzles are firmly seated in the Print Head and reseat them if necessary. Load one sheet at a ... instructions packaged with your specialty media for higher print quality. 1. Print Quality is empty, replace the ink tank. Incorrect paper type On the Main tab of the printer driver, select Quality & Media from Media Type. Glossy photo paper other than the Canon specialty media is misaligned Align the Print Head.
...the orange tape has been peeled off as shown in (2), remove it is printed. If there remains a part of the paper. See "Replacing an Ink Tank" on page 49. Print Head nozzles are firmly seated in the Print Head and reseat them if necessary. Load one sheet at a ... instructions packaged with your specialty media for higher print quality. 1. Print Quality is empty, replace the ink tank. Incorrect paper type On the Main tab of the printer driver, select Quality & Media from Media Type. Glossy photo paper other than the Canon specialty media is misaligned Align the Print Head.
iP4000 Quick Start Guide
Page 79
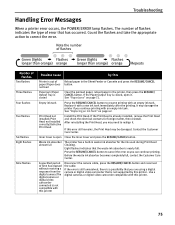
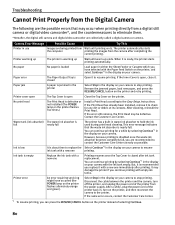
... camcorder that the waste ink absorber is already installed, remove the Print Head and check the electrical contacts for the ink used during Print Head Cleaning. Troubleshooting Handling Error Messages When a printer error occurs, the POWER/ERROR lamp flashes. Print Head not installed/Print Head not installed correctly/Defective Print Head Install the Print Head. A specified period of error that has occurred. If the...
... camcorder that the waste ink absorber is already installed, remove the Print Head and check the electrical contacts for the ink used during Print Head Cleaning. Troubleshooting Handling Error Messages When a printer error occurs, the POWER/ERROR lamp flashes. Print Head not installed/Print Head not installed correctly/Defective Print Head Install the Print Head. A specified period of error that has occurred. If the...
iP4000 Quick Start Guide
Page 84
... Top Cover on your camera to replace the Select Continue*1 in the display on the printer. If the Print Head has already been installed, remove it . If the error still remains, the Print Head may damage the printer if you can continue printing for any dirt or debris at its contacts. This error message indicates that may occur...
... Top Cover on your camera to replace the Select Continue*1 in the display on the printer. If the Print Head has already been installed, remove it . If the error still remains, the Print Head may damage the printer if you can continue printing for any dirt or debris at its contacts. This error message indicates that may occur...

iP4000 Quick Start Guide
Page 93
...tanks out of the reach of 10% to a heating source. Never touch the electrical contacts on the printer. If any object on a Print Head after printing. To avoid the risk of fire or electric shocks, install the printer in the country where you can easily unplug the power cord if necessary. Do not place any... V, 50/60 Hz AC 220-240 V, 50/60 Hz Working around the printer Never put your hands or fingers in a location that the area around the power outlet is unstable or subject to the wall. Never remove the plug by pulling on the cord. The metal parts may leak out and...
...tanks out of the reach of 10% to a heating source. Never touch the electrical contacts on the printer. If any object on a Print Head after printing. To avoid the risk of fire or electric shocks, install the printer in the country where you can easily unplug the power cord if necessary. Do not place any... V, 50/60 Hz AC 220-240 V, 50/60 Hz Working around the printer Never put your hands or fingers in a location that the area around the power outlet is unstable or subject to the wall. Never remove the plug by pulling on the cord. The metal parts may leak out and...

iP4000 Easy Setup Instructions
Page 1
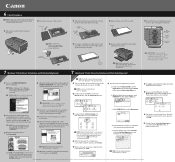
PIXMA iP4000 Series Photo Printer 1 Remove all items from its package. Protective cap IMPORTANT: Be sure the printer is ready. Top Cover Inner Cover Print Head Nozzles Electrical Contacts 3 Raise the print head lock lever. You will attempt to install the printer driver before proceeding. Parallel Cable 3 Remove the shipping tape from the Cyan Ink Tank (BCI-6C). 2 Twist off before continuing, or...
PIXMA iP4000 Series Photo Printer 1 Remove all items from its package. Protective cap IMPORTANT: Be sure the printer is ready. Top Cover Inner Cover Print Head Nozzles Electrical Contacts 3 Raise the print head lock lever. You will attempt to install the printer driver before proceeding. Parallel Cable 3 Remove the shipping tape from the Cyan Ink Tank (BCI-6C). 2 Twist off before continuing, or...
iP4000 Easy Setup Instructions
Page 2
...Print head alignment will take several minutes to complete. 5 When a message asking you . Select Custom Install in the Auto Sheet Feeder (top paper feeder). 7 Click Quit to exit the BJ Printer Utility. P-iP4000-ESI-0304 Printed... 6 Insert cassette completely into the printer until it clicks into place. Select PIXMA iP4000 and click Maintenance. Part no. ...Print head alignment will take several minutes to install the remaining software. Canon is loaded in the auto sheet feeder (top paper feeder). For additional information visit the electronic User's Guide. 2 Remove...
...Print head alignment will take several minutes to complete. 5 When a message asking you . Select Custom Install in the Auto Sheet Feeder (top paper feeder). 7 Click Quit to exit the BJ Printer Utility. P-iP4000-ESI-0304 Printed... 6 Insert cassette completely into the printer until it clicks into place. Select PIXMA iP4000 and click Maintenance. Part no. ...Print head alignment will take several minutes to install the remaining software. Canon is loaded in the auto sheet feeder (top paper feeder). For additional information visit the electronic User's Guide. 2 Remove...

Service Manual
Page 9
... digital video After removing the cable between the camera and the printer, camera does not support Camera Direct Printing. Pressing the Resume/Cancel button will exit the error without ink tank replacement, however, ink may run out during CD-R printing). CD-R tray guide open (during printing to paper). Set the paper in automatic print head alignment. [2500...
... digital video After removing the cable between the camera and the printer, camera does not support Camera Direct Printing. Pressing the Resume/Cancel button will exit the error without ink tank replacement, however, ink may run out during CD-R printing). CD-R tray guide open (during printing to paper). Set the paper in automatic print head alignment. [2500...

Service Manual
Page 11
... purge unit. Remove and re-install the print head, or replace the - ink tank, or - logic board ass'y*1. print head, or - Replace the - sheet feed unit, - print head*2, - purge unit, or - print head*2, or perform print head alignment. 1 - 6 Remarks When the print head temperature falls, ...Remove foreign material, or attach a removed part if any. Remove foreign material, or replace the - Remove foreign material, or replace the - Printing is opened . 2-4. A part of 3eBK, 6C, 6M, 6Y, or 6BK (at an angle. Color hue is not recognized. ink tank, or - Warnings Printer...
... purge unit. Remove and re-install the print head, or replace the - ink tank, or - logic board ass'y*1. print head, or - Replace the - sheet feed unit, - print head*2, - purge unit, or - print head*2, or perform print head alignment. 1 - 6 Remarks When the print head temperature falls, ...Remove foreign material, or attach a removed part if any. Remove foreign material, or replace the - Remove foreign material, or replace the - Printing is opened . 2-4. A part of 3eBK, 6C, 6M, 6Y, or 6BK (at an angle. Color hue is not recognized. ink tank, or - Warnings Printer...

Service Manual
Page 13
...the user mode. Service test print - Service test print (Confirm CD-R and automatic print head alignment sensor correction.) 1. ...remove the power cord, and allow for approx. 1 minute (for details of capacitor's accumulated charges), to prevent damages to the sliding portions. [See 3-3. Adjustment / Settings, (6) Service mode.] 2. See 3.3. Adjustment / Settings, (6) Service mode, for details. Adjustment / Settings, (1) Paper feed motor adjustment.] 1 - 8 Printing via parallel or USB connection - Service test print At replacement: 1. Perform the print head...
...the user mode. Service test print - Service test print (Confirm CD-R and automatic print head alignment sensor correction.) 1. ...remove the power cord, and allow for approx. 1 minute (for details of capacitor's accumulated charges), to prevent damages to the sliding portions. [See 3-3. Adjustment / Settings, (6) Service mode.] 2. See 3.3. Adjustment / Settings, (6) Service mode, for details. Adjustment / Settings, (1) Paper feed motor adjustment.] 1 - 8 Printing via parallel or USB connection - Service test print At replacement: 1. Perform the print head...

Service Manual
Page 14
... QC1-4833 - Confirm no grease is allowed. - off any grease thoroughly with ethanol. 1. Service test print *1: General notes: - Do not drop the ferrite core, which may be loosened only at replacement of the...removing a unit, after removing the power cord, allow the printer to sit for approx. 1 minute (for details.] - Do not touch the timing slit strip film and timing slit disk film. To the top 1 - 9 Perform the print head alignment in the user mode. - Service test print Print head... (DO NOT loosen them in other cases). Perform the print head alignment in -
... QC1-4833 - Confirm no grease is allowed. - off any grease thoroughly with ethanol. 1. Service test print *1: General notes: - Do not drop the ferrite core, which may be loosened only at replacement of the...removing a unit, after removing the power cord, allow the printer to sit for approx. 1 minute (for details.] - Do not touch the timing slit strip film and timing slit disk film. To the top 1 - 9 Perform the print head alignment in the user mode. - Service test print Print head... (DO NOT loosen them in other cases). Perform the print head alignment in -

Service Manual
Page 25
... to the polyester tape used when the packing was opened) to the print head (to protect the print head face from the printer and left alone by itself, ink (especially the pigment black ink) is removed from damage due to prevent the nozzles from drying). (2) Attach the ... during transportation. For this reason, keep the print head installed in the printer even during transportation. (2) Securely lock the carriage in Figures B and C below (to finish the mode, and confirm that the user will not easily be removed from the printer and transported alone, perform the following procedures: ...
... to the polyester tape used when the packing was opened) to the print head (to protect the print head face from the printer and left alone by itself, ink (especially the pigment black ink) is removed from damage due to prevent the nozzles from drying). (2) Attach the ... during transportation. For this reason, keep the print head installed in the printer even during transportation. (2) Securely lock the carriage in Figures B and C below (to finish the mode, and confirm that the user will not easily be removed from the printer and transported alone, perform the following procedures: ...

Service Manual
Page 28
..., magenta, yellow Condition On arrival of ink used (g) 0.45 (Black) 1.50 (Color) Est. Amount of the printer (All in sequence) Details First and second cleaning after printing on arrival: Performed when the access cover is performed). - Timer cleaning - 3*3 (Black/Color) If 120 to 336...to 720 hours have elapsed since the previous Black/Color cleaning till the start of the next printing. Timer cleaning - 6 (All in sequence) If 720 to bubbles, dust, or ink clogging, print head cleaning is removed and installed. 0.45 (Black) 1.50 (Color) At ink tank replacement (Black/Color) ...
..., magenta, yellow Condition On arrival of ink used (g) 0.45 (Black) 1.50 (Color) Est. Amount of the printer (All in sequence) Details First and second cleaning after printing on arrival: Performed when the access cover is performed). - Timer cleaning - 3*3 (Black/Color) If 120 to 336...to 720 hours have elapsed since the previous Black/Color cleaning till the start of the next printing. Timer cleaning - 6 (All in sequence) If 720 to bubbles, dust, or ink clogging, print head cleaning is removed and installed. 0.45 (Black) 1.50 (Color) At ink tank replacement (Black/Color) ...

Service Manual
Page 33
.... 35dB - PIXMA iP4000 Specifications Type Paper feeding method Resolution Desktop serial color bubble jet printer Auto sheet feed (ASF, cassette, automatic duplex printing, CD-R printing*1) 4,800 x 1,200dpi (Max.) Throughput Black (Fine Black) Color (Fine Color) Draft 25ppm 17ppm Standard 15ppm 11ppm Printing direction Print width Interface ASF stacking capacity Paper weight Detection functions Noise during printing (Highest print quality...
.... 35dB - PIXMA iP4000 Specifications Type Paper feeding method Resolution Desktop serial color bubble jet printer Auto sheet feed (ASF, cassette, automatic duplex printing, CD-R printing*1) 4,800 x 1,200dpi (Max.) Throughput Black (Fine Black) Color (Fine Color) Draft 25ppm 17ppm Standard 15ppm 11ppm Printing direction Print width Interface ASF stacking capacity Paper weight Detection functions Noise during printing (Highest print quality...


