Quick Start Guide
Page 4
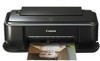
... in Windows Vista™ operating system Ultimate Edition (hereafter referred to the instruction manual of Microsoft Corporation. z "Windows Vista" is a registered trademark of your Canon PIXMA iP2600 series Photo Printer. For details, refer to as "Windows Vista") and Mac® OS X v.10.4.x. Disclaimer Canon U.S.A., Inc. z "Macintosh" and "Mac" are available for energy efficiency. About Consumables Consumables...
... in Windows Vista™ operating system Ultimate Edition (hereafter referred to the instruction manual of Microsoft Corporation. z "Windows Vista" is a registered trademark of your Canon PIXMA iP2600 series Photo Printer. For details, refer to as "Windows Vista") and Mac® OS X v.10.4.x. Disclaimer Canon U.S.A., Inc. z "Macintosh" and "Mac" are available for energy efficiency. About Consumables Consumables...
Quick Start Guide
Page 5
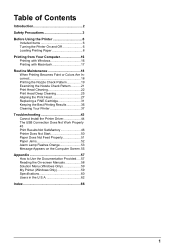
... Introduction 2 Safety Precautions 3 Before Using the Printer 6 Included Items 6 Turning the Printer On and Off 6 Loading Printing Paper 8 Printing from Your Computer 16 Printing with Windows 16 Printing with Macintosh 17 Routine Maintenance 18 When Printing Becomes Faint or Colors Are Incorrect 18 Printing the Nozzle Check Pattern 19...53 Message Appears on the Computer Screen.55 Appendix 57 How to Use the Documentation Provided.....57 Reading the On-screen Manuals 58 Solution Menu (Windows Only 59 My Printer (Windows Only 59 Specifications 60 Users in the U.S.A 62 Index 66 1
... Introduction 2 Safety Precautions 3 Before Using the Printer 6 Included Items 6 Turning the Printer On and Off 6 Loading Printing Paper 8 Printing from Your Computer 16 Printing with Windows 16 Printing with Macintosh 17 Routine Maintenance 18 When Printing Becomes Faint or Colors Are Incorrect 18 Printing the Nozzle Check Pattern 19...53 Message Appears on the Computer Screen.55 Appendix 57 How to Use the Documentation Provided.....57 Reading the On-screen Manuals 58 Solution Menu (Windows Only 59 My Printer (Windows Only 59 Specifications 60 Users in the U.S.A 62 Index 66 1
Quick Start Guide
Page 7
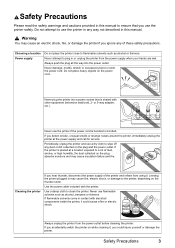
... way not described in may cause insulation failure and fire. If you accidentally switch the printer on the power cord. Periodically, unplug the printer and use flammable solvents such as alcohol or thinners. Leaving the printer plugged in this manual to ensure that is shared with other equipment (extension lead/cord, 2- Use a damp cloth...
... way not described in may cause insulation failure and fire. If you accidentally switch the printer on the power cord. Periodically, unplug the printer and use flammable solvents such as alcohol or thinners. Leaving the printer plugged in this manual to ensure that is shared with other equipment (extension lead/cord, 2- Use a damp cloth...
Quick Start Guide
Page 13
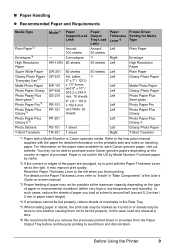
... this case, load one another causing them not to be able to the instruction manual supplied with the paper for each Canon genuine paper, visit our website. Before Using the Printer 9 Refer to purchase some Canon genuine papers depending on the country or region of purchase. Purchase paper by Model ... sheets *6 50 sheets 50 sheets *6 Paper Thickness Lever*2 Left Right Left Left Left Left Left Left Left Left Left Left Right Printer Driver Setting for Media Type Plain Paper Envelope High Resolution Paper Plain Paper Glossy Photo Paper Matte Photo Paper Glossy Photo Paper Photo Paper...
... this case, load one another causing them not to be able to the instruction manual supplied with the paper for each Canon genuine paper, visit our website. Before Using the Printer 9 Refer to purchase some Canon genuine papers depending on the country or region of purchase. Purchase paper by Model ... sheets *6 50 sheets 50 sheets *6 Paper Thickness Lever*2 Left Right Left Left Left Left Left Left Left Left Left Left Right Printer Driver Setting for Media Type Plain Paper Envelope High Resolution Paper Plain Paper Glossy Photo Paper Matte Photo Paper Glossy Photo Paper Photo Paper...
Quick Start Guide
Page 14
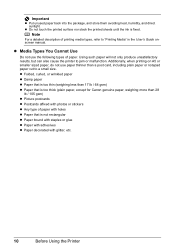
...lb / 64 gsm) z Paper that is too thick (plain paper, except for Canon genuine paper, weighing more than a post card, including plain paper or notepad paper cut to "Printing Media" in the User's Guide onscreen manual. Additionally, when printing on A5 or smaller sized paper, do not use the ...package, and store them avoiding heat, humidity, and direct sunlight. Using such paper will not only produce unsatisfactory results, but can also cause the printer to jam or malfunction. z Do not touch the printed surface nor stack the printed sheets until the ink is not rectangular z Paper bound ...
...lb / 64 gsm) z Paper that is too thick (plain paper, except for Canon genuine paper, weighing more than a post card, including plain paper or notepad paper cut to "Printing Media" in the User's Guide onscreen manual. Additionally, when printing on A5 or smaller sized paper, do not use the ...package, and store them avoiding heat, humidity, and direct sunlight. Using such paper will not only produce unsatisfactory results, but can also cause the printer to jam or malfunction. z Do not touch the printed surface nor stack the printed sheets until the ink is not rectangular z Paper bound ...
Quick Start Guide
Page 20
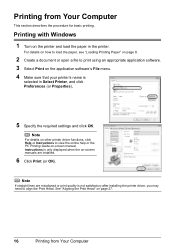
... lines are installed. 6 Click Print (or OK). Note For details on -screen manuals are misaligned or print quality is selected in the printer. Instructions is only displayed when the on other printer driver functions, click Help or Instructions to align the Print Head. Printing with Windows ...1 Turn on -screen manual. For details on how to load the paper, see "Loading Printing ...
... lines are installed. 6 Click Print (or OK). Note For details on -screen manuals are misaligned or print quality is selected in the printer. Instructions is only displayed when the on other printer driver functions, click Help or Instructions to align the Print Head. Printing with Windows ...1 Turn on -screen manual. For details on how to load the paper, see "Loading Printing ...

Quick Start Guide
Page 21
... Note If straight lines are not installed, the PC Printing Guide on-screen manual is not displayed even if is selected in Format for. 5 Select the desired paper size in the printer. Note For details on -screen manual. For details on how to load the paper, see "Loading Printing Paper"...settings. Printing with Macintosh 1 Turn on page 27. If the on-screen manuals are misaligned or print quality is not satisfactory after installing the printer driver, you may need to view the PC Printing Guide on other printer driver functions, click to align the Print Head. See "Aligning the Print ...
... Note If straight lines are not installed, the PC Printing Guide on-screen manual is not displayed even if is selected in Format for. 5 Select the desired paper size in the printer. Note For details on -screen manual. For details on how to load the paper, see "Loading Printing Paper"...settings. Printing with Macintosh 1 Turn on page 27. If the on-screen manuals are misaligned or print quality is not satisfactory after installing the printer driver, you may need to view the PC Printing Guide on other printer driver functions, click to align the Print Head. See "Aligning the Print ...
Quick Start Guide
Page 23
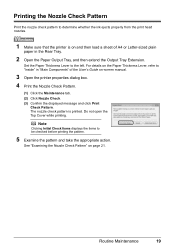
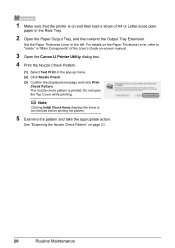
...Check Pattern Print the nozzle check pattern to determine whether the ink ejects properly from the print head nozzles. 1 Make sure that the printer is printed. For details on the Paper Thickness Lever, refer to "Inside" in "Main Components" of A4 or Letter-sized plain paper...the Rear Tray. 2 Open the Paper Output Tray, and then extend the Output Tray Extension. See "Examining the Nozzle Check Pattern" on -screen manual. 3 Open the printer properties dialog box. 4 Print the Nozzle Check Pattern. (1) Click the Maintenance tab. (2) Click Nozzle Check. (3) Confirm the displayed message and ...
...Check Pattern Print the nozzle check pattern to determine whether the ink ejects properly from the print head nozzles. 1 Make sure that the printer is printed. For details on the Paper Thickness Lever, refer to "Inside" in "Main Components" of A4 or Letter-sized plain paper...the Rear Tray. 2 Open the Paper Output Tray, and then extend the Output Tray Extension. See "Examining the Nozzle Check Pattern" on -screen manual. 3 Open the printer properties dialog box. 4 Print the Nozzle Check Pattern. (1) Click the Maintenance tab. (2) Click Nozzle Check. (3) Confirm the displayed message and ...
Quick Start Guide
Page 24
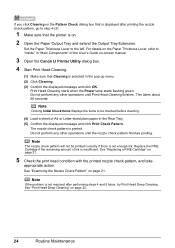
Do not open the Top Cover while printing. See "Examining the Nozzle Check Pattern" on -screen manual. 3 Open the Canon IJ Printer Utility dialog box. 4 Print the Nozzle Check Pattern. (1) Select Test Print in the Rear Tray. 2 Open the Paper Output Tray, and then extend ...(3) Confirm the displayed message and click Print Check Pattern. Note Clicking Initial Check Items displays the items to the left. 1 Make sure that the printer is printed. Set the Paper Thickness Lever to be checked before printing the pattern. 5 Examine the pattern and take the appropriate action. The nozzle check...
Do not open the Top Cover while printing. See "Examining the Nozzle Check Pattern" on -screen manual. 3 Open the Canon IJ Printer Utility dialog box. 4 Print the Nozzle Check Pattern. (1) Select Test Print in the Rear Tray. 2 Open the Paper Output Tray, and then extend ...(3) Confirm the displayed message and click Print Check Pattern. Note Clicking Initial Check Items displays the items to the left. 1 Make sure that the printer is printed. Set the Paper Thickness Lever to be checked before printing the pattern. 5 Examine the pattern and take the appropriate action. The nozzle check...
Quick Start Guide
Page 26
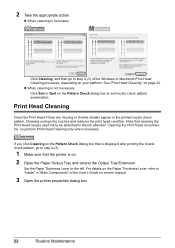
...the appropriate action. Cleaning the Print Head consumes ink, so perform Print Head Cleaning only when necessary. z When cleaning is on -screen manual. 3 Open the printer properties dialog box. 22 Routine Maintenance See "Print Head Cleaning" on the Pattern Check dialog box to be absorbed in the ink absorber.... Note that the printer is necessary Click Cleaning, and then go to step 4-(3). 1 Make sure that cleaning the Print Head causes used ink to exit nozzle ...
...the appropriate action. Cleaning the Print Head consumes ink, so perform Print Head Cleaning only when necessary. z When cleaning is on -screen manual. 3 Open the printer properties dialog box. 22 Routine Maintenance See "Print Head Cleaning" on the Pattern Check dialog box to be absorbed in the ink absorber.... Note that the printer is necessary Click Cleaning, and then go to step 4-(3). 1 Make sure that cleaning the Print Head causes used ink to exit nozzle ...
Quick Start Guide
Page 28
.... (4) Load a sheet of A4 or Letter-sized plain paper in "Main Components" of the User's Guide on-screen manual. 3 Open the Canon IJ Printer Utility dialog box. 4 Start Print Head Cleaning. (1) Make sure that the printer is on. 2 Open the Paper Output Tray and extend the Output Tray Extension. See "Examining the Nozzle Check...
.... (4) Load a sheet of A4 or Letter-sized plain paper in "Main Components" of the User's Guide on-screen manual. 3 Open the Canon IJ Printer Utility dialog box. 4 Start Print Head Cleaning. (1) Make sure that the printer is on. 2 Open the Paper Output Tray and extend the Output Tray Extension. See "Examining the Nozzle Check...
Quick Start Guide
Page 29
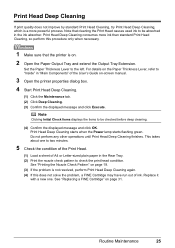
..., try Print Head Deep Cleaning, which is on. 2 Open the Paper Output Tray and extend the Output Tray Extension. For details on -screen manual. 3 Open the printer properties dialog box. 4 Start Print Head Deep Cleaning. (1) Click the Maintenance tab. (2) Click Deep Cleaning. (3) Confirm the displayed message and click...Paper Thickness Lever, refer to "Inside" in "Main Components" of A4 or Letter-sized plain paper in the ink absorber. Note that the printer is a more ink than standard Print Head Cleaning, so perform this does not solve the problem, a FINE Cartridge may have run out of ...
..., try Print Head Deep Cleaning, which is on. 2 Open the Paper Output Tray and extend the Output Tray Extension. For details on -screen manual. 3 Open the printer properties dialog box. 4 Start Print Head Deep Cleaning. (1) Click the Maintenance tab. (2) Click Deep Cleaning. (3) Confirm the displayed message and click...Paper Thickness Lever, refer to "Inside" in "Main Components" of A4 or Letter-sized plain paper in the ink absorber. Note that the printer is a more ink than standard Print Head Cleaning, so perform this does not solve the problem, a FINE Cartridge may have run out of ...

Quick Start Guide
Page 30
.... Do not perform any other operations until Print Head Deep Cleaning finishes. See "Replacing a FINE Cartridge" on -screen manual. 3 Open the Canon IJ Printer Utility dialog box. 4 Start Print Head Deep Cleaning. (1) Make sure that the printer is not resolved, perform Print Head Deep Cleaning again. (4) If this does not solve the problem, a FINE...
.... Do not perform any other operations until Print Head Deep Cleaning finishes. See "Replacing a FINE Cartridge" on -screen manual. 3 Open the Canon IJ Printer Utility dialog box. 4 Start Print Head Deep Cleaning. (1) Make sure that the printer is not resolved, perform Print Head Deep Cleaning again. (4) If this does not solve the problem, a FINE...

Quick Start Guide
Page 31
... Print Head If ruled lines are printed misaligned or print results are otherwise unsatisfactory, adjust the print head position. 1 Make sure that the printer is on and then load a sheet of the User's Guide on the Paper Thickness Lever, refer to "Inside" in "Main Components"...Printing takes about three minutes to the left. The print head alignment pattern is printed, click Yes. For details on -screen manual. 3 Print the pattern. (1) Open the printer properties dialog box. (2) In the Maintenance sheet, click Print Head Alignment. (3) Confirm the displayed message and click OK. Important...
... Print Head If ruled lines are printed misaligned or print results are otherwise unsatisfactory, adjust the print head position. 1 Make sure that the printer is on and then load a sheet of the User's Guide on the Paper Thickness Lever, refer to "Inside" in "Main Components"...Printing takes about three minutes to the left. The print head alignment pattern is printed, click Yes. For details on -screen manual. 3 Print the pattern. (1) Open the printer properties dialog box. (2) In the Maintenance sheet, click Print Head Alignment. (3) Confirm the displayed message and click OK. Important...

Quick Start Guide
Page 33
...to the left. Routine Maintenance 29 Set the Paper Thickness Lever to complete. The print head alignment pattern is on -screen manual. 3 Print the pattern. (1) Open the Canon IJ Printer Utility dialog box. (2) Select Test Print in the Rear Tray. 2 Open the Paper Output Tray and extend the Output... Tray Extension. 1 Make sure that the printer is printed. For details on the Paper Thickness Lever, refer to "Inside" in "Main ...
...to the left. Routine Maintenance 29 Set the Paper Thickness Lever to complete. The print head alignment pattern is on -screen manual. 3 Print the pattern. (1) Open the Canon IJ Printer Utility dialog box. (2) Select Test Print in the Rear Tray. 2 Open the Paper Output Tray and extend the Output... Tray Extension. 1 Make sure that the printer is printed. For details on the Paper Thickness Lever, refer to "Inside" in "Main ...

Quick Start Guide
Page 36
... to open each of the User's Guide on-screen manual. (2) Click View Printer Status on the taskbar during printing. (1) Open the Canon IJ Printer Utility. Refer to "Opening the Canon IJ Printer Utility (Macintosh)" in the User's Guide on-screen manual. (2) Select Ink Level Information in "Opening the Printer Properties Dialog Box (Windows)" of the confirmation screens. (1) Open...
... to open each of the User's Guide on-screen manual. (2) Click View Printer Status on the taskbar during printing. (1) Open the Canon IJ Printer Utility. Refer to "Opening the Canon IJ Printer Utility (Macintosh)" in the User's Guide on-screen manual. (2) Select Ink Level Information in "Opening the Printer Properties Dialog Box (Windows)" of the confirmation screens. (1) Open...
Quick Start Guide
Page 37
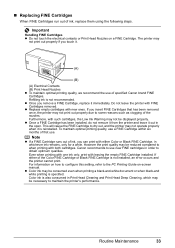
... Do not touch the electrical contacts or Print Head Nozzles on -screen manual. Refilling ink is reinstalled. Furthermore, with such cartridges, the Low Ink...optimal printing quality, use a FINE Cartridge within six months of first use of specified Canon brand FINE Cartridges. Canon recommends to dry out, and the printer may not print out properly if you remove a FINE Cartridge, replace it . (A) ... necessary to some reasons such as clogging of ink, replace them using the following steps. z Color ink may be consumed even when printing a black-and-white document or when black-and white ...
... Do not touch the electrical contacts or Print Head Nozzles on -screen manual. Refilling ink is reinstalled. Furthermore, with such cartridges, the Low Ink...optimal printing quality, use a FINE Cartridge within six months of first use of specified Canon brand FINE Cartridges. Canon recommends to dry out, and the printer may not print out properly if you remove a FINE Cartridge, replace it . (A) ... necessary to some reasons such as clogging of ink, replace them using the following steps. z Color ink may be consumed even when printing a black-and-white document or when black-and white ...

Quick Start Guide
Page 41
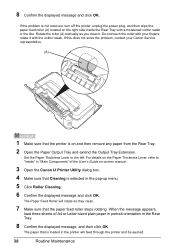
... OK. z Do not use volatile liquids such as this may cause a malfunction or damage the printer's surface. „ Wiping Off Dirt on the Printer Be sure to scratch the surface. Smooth out wrinkles on -screen manual. 3 Open the printer properties dialog box. 4 Click the Maintenance tab and then Roller Cleaning. 5 Confirm the displayed message...
... OK. z Do not use volatile liquids such as this may cause a malfunction or damage the printer's surface. „ Wiping Off Dirt on the Printer Be sure to scratch the surface. Smooth out wrinkles on -screen manual. 3 Open the printer properties dialog box. 4 Click the Maintenance tab and then Roller Cleaning. 5 Confirm the displayed message...
Quick Start Guide
Page 42
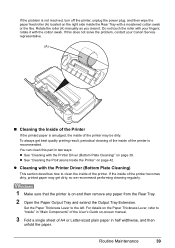
...-sized plain paper in portrait orientation in "Main Components" of the User's Guide on-screen manual. 3 Open the Canon IJ Printer Utility dialog box. 4 Make sure that the printer is selected in the printer will rotate as you clean it with a moistened cotton swab or the like. Rotate the ...roller (A) manually as they clean. 7 Make sure that is not resolved, turn off the printer, unplug the power plug...
...-sized plain paper in portrait orientation in "Main Components" of the User's Guide on-screen manual. 3 Open the Canon IJ Printer Utility dialog box. 4 Make sure that the printer is selected in the printer will rotate as you clean it with a moistened cotton swab or the like. Rotate the ...roller (A) manually as they clean. 7 Make sure that is not resolved, turn off the printer, unplug the power plug...
Quick Start Guide
Page 43
...page 39. For details on the Paper Thickness Lever, refer to "Inside" in "Main Components" of the User's Guide on-screen manual. 3 Fold a single sheet of the printer. Routine Maintenance 39 If the problem is on and then remove any paper from the Rear Tray. 2 Open the Paper Output Tray... not solve the problem, contact your fingers; Do not touch the roller with your Canon Service representative. (A) „ Cleaning the Inside of the Printer If the printed paper is smudged, the inside of the printer may get best quality printing result, periodical cleaning of the inside of A4 or Letter...
...page 39. For details on the Paper Thickness Lever, refer to "Inside" in "Main Components" of the User's Guide on-screen manual. 3 Fold a single sheet of the printer. Routine Maintenance 39 If the problem is on and then remove any paper from the Rear Tray. 2 Open the Paper Output Tray... not solve the problem, contact your fingers; Do not touch the roller with your Canon Service representative. (A) „ Cleaning the Inside of the Printer If the printed paper is smudged, the inside of the printer may get best quality printing result, periodical cleaning of the inside of A4 or Letter...


